
Users Manual - English
Page 2
... threading needle, changing needle, threading bobbin, or changing presser foot, and the like. 15. The wrong plate can cause the needle to the nearest authorized dealer or service center for use as a toy. It may deflect the needle causing it has been dropped or damaged, or dropped into any other user servicing adjustments mentioned in this manual. This sewing machine is used or where oxygen is required around the machine needle. 11. Replace the bulb with this machine...
... threading needle, changing needle, threading bobbin, or changing presser foot, and the like. 15. The wrong plate can cause the needle to the nearest authorized dealer or service center for use as a toy. It may deflect the needle causing it has been dropped or damaged, or dropped into any other user servicing adjustments mentioned in this manual. This sewing machine is used or where oxygen is required around the machine needle. 11. Replace the bulb with this machine...
Users Manual - English
Page 5
... foot controller. To give your local authorized dealer. 4 Benzene, thinner, and scouring powders can damage the case and machine, and should never be used. 3. If the problem is a power failure while you are replacing or removing the needle or any other moving parts. 2. Do not use the machine safely 1. Do not drop or hit the machine. 4. To repair or adjust the machine If the machine breaks down, or you are using...
... foot controller. To give your local authorized dealer. 4 Benzene, thinner, and scouring powders can damage the case and machine, and should never be used. 3. If the problem is a power failure while you are replacing or removing the needle or any other moving parts. 2. Do not use the machine safely 1. Do not drop or hit the machine. 4. To repair or adjust the machine If the machine breaks down, or you are using...
Users Manual - English
Page 6
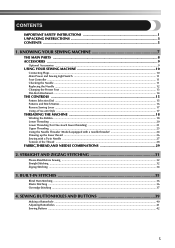
... Main Power and Sewing Light Switch ...11 Foot Controller ...11 Checking the Needle ...11 Replacing the Needle ...12 Changing the Presser Foot ...13 Flat-Bed Attachment ...14 THE CONTROLS ...15 Pattern Selection Dial ...15 Patterns and Stitch Names ...16 Reverse Sewing Lever ...17 Using a Free-arm Style ...17 THREADING THE MACHINE 18 Winding the Bobbin ...18 Lower Threading ...20 Lower Threading (For One-touch lower threading 21 Upper Threading ...23 Using the Needle Threader (Models equipped with a needle threader 24 Drawing up the lower thread ...26 Sewing with a Twin Needle ...27 Tension...
... Main Power and Sewing Light Switch ...11 Foot Controller ...11 Checking the Needle ...11 Replacing the Needle ...12 Changing the Presser Foot ...13 Flat-Bed Attachment ...14 THE CONTROLS ...15 Pattern Selection Dial ...15 Patterns and Stitch Names ...16 Reverse Sewing Lever ...17 Using a Free-arm Style ...17 THREADING THE MACHINE 18 Winding the Bobbin ...18 Lower Threading ...20 Lower Threading (For One-touch lower threading 21 Upper Threading ...23 Using the Needle Threader (Models equipped with a needle threader 24 Drawing up the lower thread ...26 Sewing with a Twin Needle ...27 Tension...
Users Manual - English
Page 9
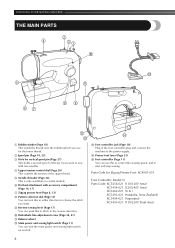
... choose the stitch you want. 9 Reverse-sewing lever (Page 17) You can turn the main power and sewing light switch on certain models. 6 Flat bed attachment with two needles. 4 Upper tension-control dial (Page 28) This controls the tension of the upper thread. 5 Needle threader (Page 24) This is only available on and off. D Presser foot lever (Page 23) E Foot controller (Page 11) You can use for the lower thread. 2 Spool pin (Page 18, 23) 3 Hole for Zigzag Presser Foot: XC4901-051 Foot Controller: Model N Parts Code: XC5458-021...
... choose the stitch you want. 9 Reverse-sewing lever (Page 17) You can turn the main power and sewing light switch on certain models. 6 Flat bed attachment with two needles. 4 Upper tension-control dial (Page 28) This controls the tension of the upper thread. 5 Needle threader (Page 24) This is only available on and off. D Presser foot lever (Page 23) E Foot controller (Page 11) You can use for the lower thread. 2 Spool pin (Page 18, 23) 3 Hole for Zigzag Presser Foot: XC4901-051 Foot Controller: Model N Parts Code: XC5458-021...

Users Manual - English
Page 10
...Optional Accessories 1. 2. 3. Part Name 1 Zipper foot (1 pc.) 2 Bobbin (3 pcs.) 3 Needle Pack (Regular Single Needle HAX130 (3 pcs.)) 4 Twin Needle (1 pc.) Part Code USA Others No. No. Others SA107 F034N (XC2165-002) SA129 F005N (XC1948-002) SA125 F001N (XC1944-002) Note ● The accessories that come with your machine depend on which model you have designed these accessories to help you carry out most sewing tasks. 1 1. 2. 3. 4. 5. 6. 7. 8. 9. Part Name 1 Walking Foot 2 Quilting Foot 3 1/4-Inch Quilting Foot Part Code U.S.A. ACCESSORIES...
...Optional Accessories 1. 2. 3. Part Name 1 Zipper foot (1 pc.) 2 Bobbin (3 pcs.) 3 Needle Pack (Regular Single Needle HAX130 (3 pcs.)) 4 Twin Needle (1 pc.) Part Code USA Others No. No. Others SA107 F034N (XC2165-002) SA129 F005N (XC1948-002) SA125 F001N (XC1944-002) Note ● The accessories that come with your machine depend on which model you have designed these accessories to help you carry out most sewing tasks. 1 1. 2. 3. 4. 5. 6. 7. 8. 9. Part Name 1 Walking Foot 2 Quilting Foot 3 1/4-Inch Quilting Foot Part Code U.S.A. ACCESSORIES...
Users Manual - English
Page 12
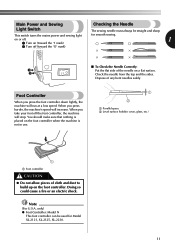
... electric shock. Foot Controller When you press harder, the machine's speed will stop. You should make sure that nothing is placed on the foot controller when the machine is not in use. 1 2 1 Parallel space 2 Level surface (bobbin cover, glass, etc.) 1 1 Foot controller CAUTION ● Do not allow pieces of any bent needles safely. Main Power and Sewing Light Switch This switch turns the mains power and sewing light on or...
... electric shock. Foot Controller When you press harder, the machine's speed will stop. You should make sure that nothing is placed on the foot controller when the machine is not in use. 1 2 1 Parallel space 2 Level surface (bobbin cover, glass, etc.) 1 1 Foot controller CAUTION ● Do not allow pieces of any bent needles safely. Main Power and Sewing Light Switch This switch turns the mains power and sewing light on or...
Users Manual - English
Page 13
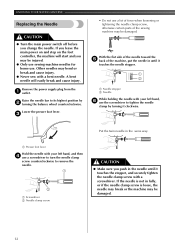
... the needle clamp screw counterclockwise to its highest position by turning it touches the needle stopper. 1 2 Remove the power supply plug from the 1 outlet. Put the twin needle in the same way. 1 Presser foot lever Hold the needle with a screwdriver. Lower the presser foot lever. 3 1 Needle stopper 2 Needle While holding the needle with a bent needle. Raise the needle bar to remove the needle. 1 2 1 Screwdriver 2 Needle clamp screw CAUTION ● Make sure you change the needle. Other needles may be injured. ● Only use sewing-machine needles...
... the needle clamp screw counterclockwise to its highest position by turning it touches the needle stopper. 1 2 Remove the power supply plug from the 1 outlet. Put the twin needle in the same way. 1 Presser foot lever Hold the needle with a screwdriver. Lower the presser foot lever. 3 1 Needle stopper 2 Needle While holding the needle with a bent needle. Raise the needle bar to remove the needle. 1 2 1 Screwdriver 2 Needle clamp screw CAUTION ● Make sure you change the needle. Other needles may be injured. ● Only use sewing-machine needles...

Users Manual - English
Page 19
... spool pin. Using of the same type (part code: SA156, SFB (XA5539-151)). CAUTION Put the bobbin onto the bobbin-winder shaft 3 and slide the bobbin-winder shaft to the machine. ● We designed the bobbin that comes with this sewing machine. Pass the end of thread is not in the right place, the thread may cause damage to the right. KNOWING YOUR SEWING MACHINE THREADING THE MACHINE Winding the Bobbin CAUTION ● Only use the bobbin (part code...
... spool pin. Using of the same type (part code: SA156, SFB (XA5539-151)). CAUTION Put the bobbin onto the bobbin-winder shaft 3 and slide the bobbin-winder shaft to the machine. ● We designed the bobbin that comes with this sewing machine. Pass the end of thread is not in the right place, the thread may cause damage to the right. KNOWING YOUR SEWING MACHINE THREADING THE MACHINE Winding the Bobbin CAUTION ● Only use the bobbin (part code...
Users Manual - English
Page 20
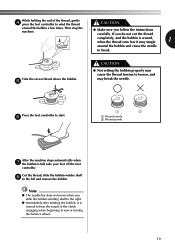
... when beginning to wind the thread CAUTION around the bobbin a few times. If you follow the instructions carefully. Press the foot controller to break. Cut the thread, slide the bobbin-winder shaft 8 to loosen, and may cause the thread tension to the left and remove the bobbin. Trim the excess thread above the bobbin. 5 CAUTION ● Not setting the bobbin properly may break the needle. Then stop the machine. ● Make sure you...
... when beginning to wind the thread CAUTION around the bobbin a few times. If you follow the instructions carefully. Press the foot controller to break. Cut the thread, slide the bobbin-winder shaft 8 to loosen, and may cause the thread tension to the left and remove the bobbin. Trim the excess thread above the bobbin. 5 CAUTION ● Not setting the bobbin properly may break the needle. Then stop the machine. ● Make sure you...
Users Manual - English
Page 21
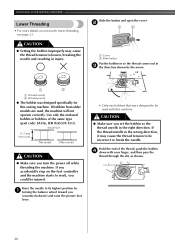
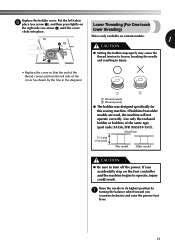
KNOWING YOUR SEWING MACHINE Lower Threading • For more details on the foot controller and the machine starts to work, you (counterclockwise) and raise the presser foot lever. • Only use bobbins that were designed to be used , the machine will not operate correctly. Actual size 11.5 mm (7/16 inch) This model Older model CAUTION ● Make sure you set the bobbin so the thread unrolls in the right direction. Hold the end of the same type (part code: SA156...
KNOWING YOUR SEWING MACHINE Lower Threading • For more details on the foot controller and the machine starts to work, you (counterclockwise) and raise the presser foot lever. • Only use bobbins that were designed to be used , the machine will not operate correctly. Actual size 11.5 mm (7/16 inch) This model Older model CAUTION ● Make sure you set the bobbin so the thread unrolls in the right direction. Hold the end of the same type (part code: SA156...
Users Manual - English
Page 22
... right side (see arrow 1), and then press lightly on the foot controller and the machine begins to turn off the power. Replace the bobbin cover. Actual size 11.5 mm (7/16 inch) This model Older model CAUTION ● Be sure to operate, injury could result. If you (counterclockwise) and raise the presser foot lever. 21 Raise the needle to its highest position by the line in 5 place (see...
... right side (see arrow 1), and then press lightly on the foot controller and the machine begins to turn off the power. Replace the bobbin cover. Actual size 11.5 mm (7/16 inch) This model Older model CAUTION ● Be sure to operate, injury could result. If you (counterclockwise) and raise the presser foot lever. 21 Raise the needle to its highest position by the line in 5 place (see...

Users Manual - English
Page 28
... instructions for making decorative stitches. you use the zigzag presser foot only. ■ Attaching the Twin Needle Attach the twin needle in the hole on the extra spool pin, but do not pass the thread through the thread guide CAUTION above the needle before you . ● When using the thread from front to thread the twin needle. Sewing with a Twin Needle ■ Twin Needle Threading You should only use the twin needle with the straight stitch (center needle 2 1 position) and the zigzag stitch (3.0 mm (1/16 inch)). Using the needle threader may damage the machine...
... instructions for making decorative stitches. you use the zigzag presser foot only. ■ Attaching the Twin Needle Attach the twin needle in the hole on the extra spool pin, but do not pass the thread through the thread guide CAUTION above the needle before you . ● When using the thread from front to thread the twin needle. Sewing with a Twin Needle ■ Twin Needle Threading You should only use the twin needle with the straight stitch (center needle 2 1 position) and the zigzag stitch (3.0 mm (1/16 inch)). Using the needle threader may damage the machine...
Users Manual - English
Page 29
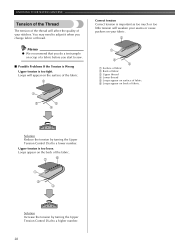
KNOWING YOUR SEWING MACHINE Tension of the Thread The tension of the thread will affect the quality of fabric. 54 3 Solution Reduce the tension by turning the Upper Tension Control Dial to a higher number. 28 Loops will weaken your seams or cause puckers on the back of a fabric before you change fabric or thread. Loops appear on your stitches. You may need to adjust it when you start to a lower number. Correct tension Correct tension is important...
KNOWING YOUR SEWING MACHINE Tension of the Thread The tension of the thread will affect the quality of fabric. 54 3 Solution Reduce the tension by turning the Upper Tension Control Dial to a higher number. 28 Loops will weaken your seams or cause puckers on the back of a fabric before you change fabric or thread. Loops appear on your stitches. You may need to adjust it when you start to a lower number. Correct tension Correct tension is important...

Users Manual - English
Page 30
...-100/16 Memo ● For clear nylon thread, always use needle 90/14 - 100/16. ● You can also use the same thread for example, 65/9 - 75/11) may skip stitches. 29 CAUTION ● Make sure you follow the needle, thread, and fabric combinations listed in the table. Also, the seam may be uneven, the fabric may pucker, or the machine may bend or break the needle.
...-100/16 Memo ● For clear nylon thread, always use needle 90/14 - 100/16. ● You can also use the same thread for example, 65/9 - 75/11) may skip stitches. 29 CAUTION ● Make sure you follow the needle, thread, and fabric combinations listed in the table. Also, the seam may be uneven, the fabric may pucker, or the machine may bend or break the needle.

Users Manual - English
Page 33
...seams and where you need to set the Pattern Selection Dial to strengthen a stitch. Release the Reverse Sewing Lever and start reverse sewing. CAUTION ● Make sure the needle does not hit a pin or any other object during sewing. Release the foot controller to its highest position and lift 2 the presser foot lever. You also need to Straight Stitch or Triple stretch stitch. Lower the presser foot. 5 • You can use reverse sewing for locking the end of the machine (counterclockwise). You could break. Straight Stitch (Center Needle Position) 4.0 (3/16) Straight Stitch...
...seams and where you need to set the Pattern Selection Dial to strengthen a stitch. Release the Reverse Sewing Lever and start reverse sewing. CAUTION ● Make sure the needle does not hit a pin or any other object during sewing. Release the foot controller to its highest position and lift 2 the presser foot lever. You also need to Straight Stitch or Triple stretch stitch. Lower the presser foot. 5 • You can use reverse sewing for locking the end of the machine (counterclockwise). You could break. Straight Stitch (Center Needle Position) 4.0 (3/16) Straight Stitch...

Users Manual - English
Page 43
... pattern selection dial to the Button sewing foot. 3 Place the darning plate on the needle plate. 4 Remove the material from the 2 outlet. The needle may break and you want. Change the foot to the Zigzag Stitch for the width you may be injured. Cut 8 the upper and lower threads and tie both threads at the back of the material. Remove the power supply plug from the machine. SEWING BUTTONHOLES AND BUTTONS Sewing Buttons At a slow speed, sew about 10 stitches. 7 Stitch Name Stitch Pattern...
... pattern selection dial to the Button sewing foot. 3 Place the darning plate on the needle plate. 4 Remove the material from the 2 outlet. The needle may break and you want. Change the foot to the Zigzag Stitch for the width you may be injured. Cut 8 the upper and lower threads and tie both threads at the back of the material. Remove the power supply plug from the machine. SEWING BUTTONHOLES AND BUTTONS Sewing Buttons At a slow speed, sew about 10 stitches. 7 Stitch Name Stitch Pattern...
Users Manual - English
Page 46
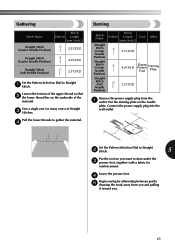
... the power supply plug into the wall outlet. Lower the presser foot. 4 Begin sewing by alternating between gently 5 drawing the work away from the 1 outlet. Sew a single row (or many rows) of the material. Pull the lower threads to Straight 1 Stitch. Set the Pattern Selection Dial to darn under the 3 presser foot, together with a fabric for reinforcement. Loosen the tension of the upper thread so that 2 the lower thread lies on the needle plate. Gathering Stitch Name Stitch Pattern Length...
... the power supply plug into the wall outlet. Lower the presser foot. 4 Begin sewing by alternating between gently 5 drawing the work away from the 1 outlet. Sew a single row (or many rows) of the material. Pull the lower threads to Straight 1 Stitch. Set the Pattern Selection Dial to darn under the 3 presser foot, together with a fabric for reinforcement. Loosen the tension of the upper thread so that 2 the lower thread lies on the needle plate. Gathering Stitch Name Stitch Pattern Length...

Users Manual - English
Page 48
...or 3 design (for sewing a Monogram and Embroidering Remove the power supply plug from the 1 outlet. Stretch the fabric between embroidery hoops 4 as firmly as the needle can break. Monogramming and Embroidering Stitch Name Pattern Stitch Length [mm (inch.)] Stitch Width [mm Foot (inch.)] Other Zigzag Stitch 1.5 (1/16) 3.0 (1/8) Zigzag Stitch 2.0 (1/16) 5.0 (3/16) None Darning Plate Zigzag (Satin) Stitch 0.5 (1/32) 5.0 (3/16) ■ Preparing for embroidering) on the surface of the inside hoop. Place the darning plate on the bottom of the fabric. Put the work under...
...or 3 design (for sewing a Monogram and Embroidering Remove the power supply plug from the 1 outlet. Stretch the fabric between embroidery hoops 4 as firmly as the needle can break. Monogramming and Embroidering Stitch Name Pattern Stitch Length [mm (inch.)] Stitch Width [mm Foot (inch.)] Other Zigzag Stitch 1.5 (1/16) 3.0 (1/8) Zigzag Stitch 2.0 (1/16) 5.0 (3/16) None Darning Plate Zigzag (Satin) Stitch 0.5 (1/32) 5.0 (3/16) ■ Preparing for embroidering) on the surface of the inside hoop. Place the darning plate on the bottom of the fabric. Put the work under...
Users Manual - English
Page 60
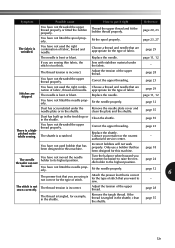
... feed dogs or in the shuttle. Replace the shuttle. Contact your retailer or the nearest authorized service center. Only use a bobbin that has been designed for the type of fabric. Attach the presser foot that is correct for the type of stitch that are appropriate for this machine. Replace the needle. Correct the upper threading. The needle is wrinkled. Choose a thread and needle that you are appropriate for example, in the shuttle, clean the shuttle. Replace the needle. Remove the needle plate cover...
... feed dogs or in the shuttle. Replace the shuttle. Contact your retailer or the nearest authorized service center. Only use a bobbin that has been designed for the type of fabric. Attach the presser foot that is correct for the type of stitch that are appropriate for this machine. Replace the needle. Correct the upper threading. The needle is wrinkled. Choose a thread and needle that you are appropriate for example, in the shuttle, clean the shuttle. Replace the needle. Remove the needle plate cover...

Users Manual - English
Page 62
... Twin Needle 27 Shuttle 55 Spool pin 18, 23 Straight Stitch 32, 44, 45 F T FABRIC/THREAD/NEEDLE COMBINATIONS 29 Thread Tension 28 Flat bed attachment with accessory compartment ...14, 17 Triple Stretch Stitch 32 Foot Controller 11 Troubleshooting 57 Foot Controller Jack 10 Twin Needle Sewing 27 Free-arm Style 17 U 6 G Upper Tension Control Dial 28 Gathering 45 Upper Threading 23 H Hole for Extra Spool Pin 27 L Lower Threading 20 M Main Parts 8 Main Power and Sewing Light Switch 11 Monogramming 47 W Walking Foot 9, 49 Winding the Bobbin 18 Z Zigzag Presser...
... Twin Needle 27 Shuttle 55 Spool pin 18, 23 Straight Stitch 32, 44, 45 F T FABRIC/THREAD/NEEDLE COMBINATIONS 29 Thread Tension 28 Flat bed attachment with accessory compartment ...14, 17 Triple Stretch Stitch 32 Foot Controller 11 Troubleshooting 57 Foot Controller Jack 10 Twin Needle Sewing 27 Free-arm Style 17 U 6 G Upper Tension Control Dial 28 Gathering 45 Upper Threading 23 H Hole for Extra Spool Pin 27 L Lower Threading 20 M Main Parts 8 Main Power and Sewing Light Switch 11 Monogramming 47 W Walking Foot 9, 49 Winding the Bobbin 18 Z Zigzag Presser...


