
Users Manual - English
Page 2
... never be taken, including the following: Read all moving parts. WARNING - Do not allow this machine to be supervised to the nearest authorized dealer or service center for use as contained in this manual. 3. Never operate this machine if it has a damaged cord or plug, if it is ... loose cloth. 5. Use only accessories recommended by pulling on the cord. Return the machine to ensure that they do not play with same type rated 15 watts. Special care is being administered. 8. This sewing machine is not working properly, if it has been dropped or damaged, or dropped into ...
... never be taken, including the following: Read all moving parts. WARNING - Do not allow this machine to be supervised to the nearest authorized dealer or service center for use as contained in this manual. 3. Never operate this machine if it has a damaged cord or plug, if it is ... loose cloth. 5. Use only accessories recommended by pulling on the cord. Return the machine to ensure that they do not play with same type rated 15 watts. Special care is being administered. 8. This sewing machine is not working properly, if it has been dropped or damaged, or dropped into ...
Users Manual - English
Page 5
...; when you are replacing or removing the needle or any other part; • if there is still there, please consult your machine a longer life 1. Make sure you watch the needle carefully while you are sewing. Do not touch the balance wheel, thread take-up lever, needle, or ...them correctly. To use or store the machine near a heater, iron, halogen lamp or other moving parts. 2. Benzene, thinner, and scouring powders can damage the case and machine, and should never be used. 3. PLEASE READ THESE INSTRUCTIONS BEFORE YOU USE THE MACHINE. To give your local authorized dealer. ...
...; when you are replacing or removing the needle or any other part; • if there is still there, please consult your machine a longer life 1. Make sure you watch the needle carefully while you are sewing. Do not touch the balance wheel, thread take-up lever, needle, or ...them correctly. To use or store the machine near a heater, iron, halogen lamp or other moving parts. 2. Benzene, thinner, and scouring powders can damage the case and machine, and should never be used. 3. PLEASE READ THESE INSTRUCTIONS BEFORE YOU USE THE MACHINE. To give your local authorized dealer. ...
Users Manual - English
Page 6
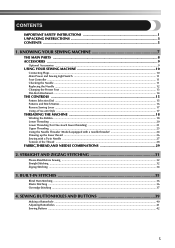
... Stitching ...34 3. BUILT-IN STITCHES 35 Blind Hem Stitching ...36 Elastic Stitching ...36 Overedge Stitching ...37 4. KNOWING YOUR SEWING MACHINE 7 THE MAIN PARTS ...8 ACCESSORIES ...9 Optional Accessories ...9 USING YOUR SEWING MACHINE 10 Connecting Plugs ...10 Main Power and Sewing Light Switch ...11 Foot Controller ...11 Checking the Needle ...11 Replacing the Needle ...12 Changing the Presser Foot...
... Stitching ...34 3. BUILT-IN STITCHES 35 Blind Hem Stitching ...36 Elastic Stitching ...36 Overedge Stitching ...37 4. KNOWING YOUR SEWING MACHINE 7 THE MAIN PARTS ...8 ACCESSORIES ...9 Optional Accessories ...9 USING YOUR SEWING MACHINE 10 Connecting Plugs ...10 Main Power and Sewing Light Switch ...11 Foot Controller ...11 Checking the Needle ...11 Replacing the Needle ...12 Changing the Presser Foot...
Users Manual - English
Page 9
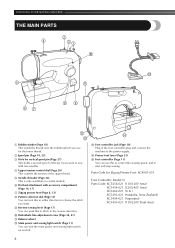
...-021 (Argentina) XC5495-021 (110/220V Dual Area) 8 Parts Code for vertical spool pin (Page 27) This holds a second spool of the upper thread. 5 Needle threader (Page 24) This is only available on and off. KNOWING YOUR SEWING MACHINE THE MAIN PARTS 2 4 31 0 E 5 A 67 89 B D ...C 1 Bobbin winder (Page 18) This winds the thread onto the bobbin,which you want to sew with accessory compartment (Page 14, 17) 7 Zigzag presser foot (Page ...
...-021 (Argentina) XC5495-021 (110/220V Dual Area) 8 Parts Code for vertical spool pin (Page 27) This holds a second spool of the upper thread. 5 Needle threader (Page 24) This is only available on and off. KNOWING YOUR SEWING MACHINE THE MAIN PARTS 2 4 31 0 E 5 A 67 89 B D ...C 1 Bobbin winder (Page 18) This winds the thread onto the bobbin,which you want to sew with accessory compartment (Page 14, 17) 7 Zigzag presser foot (Page ...

Users Manual - English
Page 10
...-002) SA125 F001N (XC1944-002) Note ● The accessories that come with your machine depend on which model you have designed these accessories to help you carry out most sewing tasks. 1 1. 2. 3. 4. 5. 6. 7. 8. 9. Part Name 1 Walking Foot 2 Quilting Foot 3 1/4-Inch Quilting Foot Part Code U.S.A. ACCESSORIES The following accessories are stored in the flat-bed attachment. We...
...-002) SA125 F001N (XC1944-002) Note ● The accessories that come with your machine depend on which model you have designed these accessories to help you carry out most sewing tasks. 1 1. 2. 3. 4. 5. 6. 7. 8. 9. Part Name 1 Walking Foot 2 Quilting Foot 3 1/4-Inch Quilting Foot Part Code U.S.A. ACCESSORIES The following accessories are stored in the flat-bed attachment. We...
Users Manual - English
Page 13
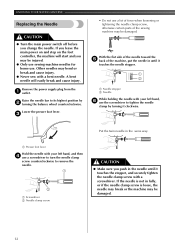
... the Needle CAUTION ● Turn the main power switch off before you may be injured. ● Only use sewing-machine needles for home use the screwdriver to tighten the needle clamp by 2 turning the balance wheel counterclockwise. Put the twin needle in the same way. ... parts of the machine, put the needle in the needle until it touches the needle stopper. 1 2 Remove the power supply plug from the 1 outlet. Lower the presser foot lever. 3 1 Needle stopper 2 Needle While holding the needle with a bent needle. With the flat side of the needle toward the 5 back of the sewing machine...
... the Needle CAUTION ● Turn the main power switch off before you may be injured. ● Only use sewing-machine needles for home use the screwdriver to tighten the needle clamp by 2 turning the balance wheel counterclockwise. Put the twin needle in the same way. ... parts of the machine, put the needle in the needle until it touches the needle stopper. 1 2 Remove the power supply plug from the 1 outlet. Lower the presser foot lever. 3 1 Needle stopper 2 Needle While holding the needle with a bent needle. With the flat side of the needle toward the 5 back of the sewing machine...

Users Manual - English
Page 19
Only use the bobbin that comes with this machine. KNOWING YOUR SEWING MACHINE THREADING THE MACHINE Winding the Bobbin CAUTION ● Only use the bobbin (part code: SA156, SFB (XA5539-151)) that comes with this machine or bobbins of the same type (part code: SA156, SFB (XA5539-151)). Actual size 11.5 mm (7/16... CAUTION Put the bobbin onto the bobbin-winder shaft 3 and slide the bobbin-winder shaft to the machine. ● We designed the bobbin that has been designed for this sewing machine. Turn the bobbin clockwise, by hand, until the spring on the spool pin. Using of any ...
Only use the bobbin that comes with this machine. KNOWING YOUR SEWING MACHINE THREADING THE MACHINE Winding the Bobbin CAUTION ● Only use the bobbin (part code: SA156, SFB (XA5539-151)) that comes with this machine or bobbins of the same type (part code: SA156, SFB (XA5539-151)). Actual size 11.5 mm (7/16... CAUTION Put the bobbin onto the bobbin-winder shaft 3 and slide the bobbin-winder shaft to the machine. ● We designed the bobbin that has been designed for this sewing machine. Turn the bobbin clockwise, by hand, until the spring on the spool pin. Using of any ...
Users Manual - English
Page 21
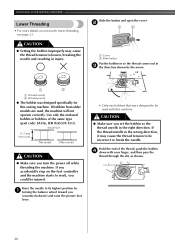
... evenly 2 Wound poorly ● The bobbin was designed specifically for this machine. KNOWING YOUR SEWING MACHINE Lower Threading • For more details on the foot controller and the machine starts to work, you could be injured. Hold the end of the same type (part code: SA156, SFB (XA5539-151)). Slide the button and open the...
... evenly 2 Wound poorly ● The bobbin was designed specifically for this machine. KNOWING YOUR SEWING MACHINE Lower Threading • For more details on the foot controller and the machine starts to work, you could be injured. Hold the end of the same type (part code: SA156, SFB (XA5539-151)). Slide the button and open the...
Users Manual - English
Page 22
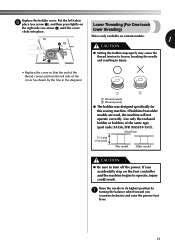
...line in the diagram). 1 2 1 Wound evenly 2 Wound poorly ● The bobbin was designed specifically for this sewing machine. Actual size 11.5 mm (7/16 inch) This model Older model CAUTION ● Be sure to operate, injury ...Replace the cover so that the end of the thread comes out from older models are used, the machine will not operate correctly. If you (counterclockwise) and raise the presser foot lever. 21 Use only ...toward you accidentally step on the foot controller and the machine begins to turn off the power. Replace the bobbin cover. Put the left side of the same...
...line in the diagram). 1 2 1 Wound evenly 2 Wound poorly ● The bobbin was designed specifically for this sewing machine. Actual size 11.5 mm (7/16 inch) This model Older model CAUTION ● Be sure to operate, injury ...Replace the cover so that the end of the thread comes out from older models are used, the machine will not operate correctly. If you (counterclockwise) and raise the presser foot lever. 21 Use only ...toward you accidentally step on the foot controller and the machine begins to turn off the power. Replace the bobbin cover. Put the left side of the same...

Users Manual - English
Page 28
...using the thread from front to thread the twin needle. Do not use the twin needle with any other stitch. ● Do not sew with this machine (part code: X57521-001). The flat side of the needle should face toward you pass it through the thread guide CAUTION above the needle before... Needle 2 Thread the right needle in the same way as a single needle (see page 16) you can sew Threading the Left Needle with bent needles. Using the needle threader may damage the machine. 27 See page 23 for more details. 1 needles works well with a Needle Threader ● You can ...
...using the thread from front to thread the twin needle. Do not use the twin needle with any other stitch. ● Do not sew with this machine (part code: X57521-001). The flat side of the needle should face toward you pass it through the thread guide CAUTION above the needle before... Needle 2 Thread the right needle in the same way as a single needle (see page 16) you can sew Threading the Left Needle with bent needles. Using the needle threader may damage the machine. 27 See page 23 for more details. 1 needles works well with a Needle Threader ● You can ...

Users Manual - English
Page 33
...under the presser foot and 4 position the needle 1 cm (3/8 inch) from moving parts. ● Do not stretch or pull the fabric during sewing. Lower the presser foot. 5 • You can use reverse sewing for locking the end of the machine (counterclockwise). CAUTION ● Make sure the needle does not hit a pin or.... If you use the wrong presser, the needle may hit the presser foot and bend or break and you are using the machine. Release the Reverse Sewing Lever and start reverse sewing. Pull the upper thread though the toes of the fabric. Release the foot controller to stop...
...under the presser foot and 4 position the needle 1 cm (3/8 inch) from moving parts. ● Do not stretch or pull the fabric during sewing. Lower the presser foot. 5 • You can use reverse sewing for locking the end of the machine (counterclockwise). CAUTION ● Make sure the needle does not hit a pin or.... If you use the wrong presser, the needle may hit the presser foot and bend or break and you are using the machine. Release the Reverse Sewing Lever and start reverse sewing. Pull the upper thread though the toes of the fabric. Release the foot controller to stop...

Users Manual - English
Page 50
...bar holder 3 Needle clamp 49 Do not use the walking foot for sewing materials such as vinyl cloth, synthetic leather, and thin leather. etc. Switch the machine off. 1 Raise the needle and the presser foot. 2 1 Forked part of the connecting 4 lever to the needle clamp, and fit the ...walking foot to feed when sewing. The walking foot prevents these materials from 2 crumpling, slipping ...
...bar holder 3 Needle clamp 49 Do not use the walking foot for sewing materials such as vinyl cloth, synthetic leather, and thin leather. etc. Switch the machine off. 1 Raise the needle and the presser foot. 2 1 Forked part of the connecting 4 lever to the needle clamp, and fit the ...walking foot to feed when sewing. The walking foot prevents these materials from 2 crumpling, slipping ...

Users Manual - English
Page 51
... needle and the presser foot. 2 Loosen the presser-foot screw to remove the 3 presser-foot holder. 2 Note ● When sewing with the walking foot, sew at medium to tighten the screw securely. USING ATTACHMENTS AND APPLICATIONS Lower the presser foot lever and then tighten 5 the presser foot screw...9679; Use a screwdriver to low speeds. 13 1 Use a screwdriver 2 Presser-foot holder 3 Presser-foot screw Attach the quilting foot, making sure that part 4 A shown in the diagram is useful for darning and freemotion machine quilting. A 1 2 1 Presser-foot screw 2 Needle clamp screw 50
... needle and the presser foot. 2 Loosen the presser-foot screw to remove the 3 presser-foot holder. 2 Note ● When sewing with the walking foot, sew at medium to tighten the screw securely. USING ATTACHMENTS AND APPLICATIONS Lower the presser foot lever and then tighten 5 the presser foot screw...9679; Use a screwdriver to low speeds. 13 1 Use a screwdriver 2 Presser-foot holder 3 Presser-foot screw Attach the quilting foot, making sure that part 4 A shown in the diagram is useful for darning and freemotion machine quilting. A 1 2 1 Presser-foot screw 2 Needle clamp screw 50

Users Manual - English
Page 62
... Elastic Overlock Stitch 37 Elastic Stitch 36 Embroidering 47 Q Quilting Foot 9, 50 R Repacking the Machine 60 Reverse Sewing Lever 17 S Sewing Buttons 42 Sewing Light Bulb Replacement 54 Sewing Light Switch 11 Sewing with a Twin Needle 27 Shuttle 55 Spool pin 18, 23 Straight Stitch 32, 44, 45 ...G Upper Tension Control Dial 28 Gathering 45 Upper Threading 23 H Hole for Extra Spool Pin 27 L Lower Threading 20 M Main Parts 8 Main Power and Sewing Light Switch 11 Monogramming 47 W Walking Foot 9, 49 Winding the Bobbin 18 Z Zigzag Presser Foot 8, 13 Zigzag Stitch 34, ...
... Elastic Overlock Stitch 37 Elastic Stitch 36 Embroidering 47 Q Quilting Foot 9, 50 R Repacking the Machine 60 Reverse Sewing Lever 17 S Sewing Buttons 42 Sewing Light Bulb Replacement 54 Sewing Light Switch 11 Sewing with a Twin Needle 27 Shuttle 55 Spool pin 18, 23 Straight Stitch 32, 44, 45 ...G Upper Tension Control Dial 28 Gathering 45 Upper Threading 23 H Hole for Extra Spool Pin 27 L Lower Threading 20 M Main Parts 8 Main Power and Sewing Light Switch 11 Monogramming 47 W Walking Foot 9, 49 Winding the Bobbin 18 Z Zigzag Presser Foot 8, 13 Zigzag Stitch 34, ...


