
Users Manual - English
Page 2
...not play with this machine. Use this machine only for household use the proper needle plate. Keep ventilation openings of the machine and foot control free from all instructions before using. Young children should be used as threading needle, changing needle, threading bobbin, or changing presser... foot, and the like. 15. Replace the bulb with any object into water. Close attention is necessary when the machine is used or ...
...not play with this machine. Use this machine only for household use the proper needle plate. Keep ventilation openings of the machine and foot control free from all instructions before using. Young children should be used as threading needle, changing needle, threading bobbin, or changing presser... foot, and the like. 15. Replace the bulb with any object into water. Close attention is necessary when the machine is used or ...
Users Manual - English
Page 5
... the cord: • when you have stopped using the machine; • if you are checking or cleaning the machine. 3. Do not store anything on the foot controller. To repair or adjust the machine If the machine breaks down, or you are replacing or removing the needle or any other part; •...
... the cord: • when you have stopped using the machine; • if you are checking or cleaning the machine. 3. Do not store anything on the foot controller. To repair or adjust the machine If the machine breaks down, or you are replacing or removing the needle or any other part; •...
Users Manual - English
Page 6
... ...8 ACCESSORIES ...9 Optional Accessories ...9 USING YOUR SEWING MACHINE 10 Connecting Plugs ...10 Main Power and Sewing Light Switch ...11 Foot Controller ...11 Checking the Needle ...11 Replacing the Needle ...12 Changing the Presser Foot ...13 Flat-Bed Attachment ...14 THE CONTROLS ...15 Pattern Selection Dial ...15 Patterns and Stitch Names ...16 Reverse Sewing...
... ...8 ACCESSORIES ...9 Optional Accessories ...9 USING YOUR SEWING MACHINE 10 Connecting Plugs ...10 Main Power and Sewing Light Switch ...11 Foot Controller ...11 Checking the Needle ...11 Replacing the Needle ...12 Changing the Presser Foot ...13 Flat-Bed Attachment ...14 THE CONTROLS ...15 Pattern Selection Dial ...15 Patterns and Stitch Names ...16 Reverse Sewing...

Users Manual - English
Page 7
5. USING ATTACHMENTS AND APPLICATIONS 43 Zipper Insertion ...44 Gathering ...45 Darning ...45 Appliqués ...46 Monogramming and Embroidering ...47 OPTIONAL ACCESSORIES 49 Using the Walking Foot ...49 Using the Quilting Foot ...50 Using the 1/4-Inch Quilting Foot ...51 6. APPENDIX ...53 MAINTENANCE ...54 Changing the Light Bulb ...54 Cleaning ...55 Troubleshooting ...57 Repacking the Machine ...60 INDEX ...61 6
5. USING ATTACHMENTS AND APPLICATIONS 43 Zipper Insertion ...44 Gathering ...45 Darning ...45 Appliqués ...46 Monogramming and Embroidering ...47 OPTIONAL ACCESSORIES 49 Using the Walking Foot ...49 Using the Quilting Foot ...50 Using the 1/4-Inch Quilting Foot ...51 6. APPENDIX ...53 MAINTENANCE ...54 Changing the Light Bulb ...54 Cleaning ...55 Troubleshooting ...57 Repacking the Machine ...60 INDEX ...61 6
Users Manual - English
Page 9
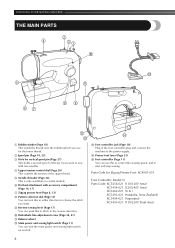
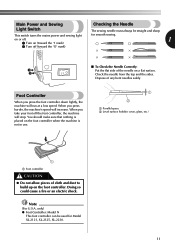
... A 67 89 B D C 1 Bobbin winder (Page 18) This winds the thread onto the bobbin,which you use this to the power supply. D Presser foot lever (Page 23) E Foot controller (Page 11) You can push this to control the sewing speed, and to start and stop sewing. Parts Code for vertical spool pin...want . 9 Reverse-sewing lever (Page 17) You can use for the lower thread. 2 Spool pin (Page 18, 23) 3 Hole for Zigzag Presser Foot: XC4901-051 Foot Controller: Model N Parts Code: XC5458-021 (110/120V Area) XC5454-021 (220/240V Area) XC5462-021 (U.K.) XC5493-021 (Australia, New Zealand) XC5494...
... A 67 89 B D C 1 Bobbin winder (Page 18) This winds the thread onto the bobbin,which you use this to the power supply. D Presser foot lever (Page 23) E Foot controller (Page 11) You can push this to control the sewing speed, and to start and stop sewing. Parts Code for vertical spool pin...want . 9 Reverse-sewing lever (Page 17) You can use for the lower thread. 2 Spool pin (Page 18, 23) 3 Hole for Zigzag Presser Foot: XC4901-051 Foot Controller: Model N Parts Code: XC5458-021 (110/120V Area) XC5454-021 (220/240V Area) XC5462-021 (U.K.) XC5493-021 (Australia, New Zealand) XC5494...

Users Manual - English
Page 10
...sewing tasks. 1 1. 2. 3. 4. 5. 6. 7. 8. 9. ACCESSORIES The following accessories are stored in the flat-bed attachment. Part Name 1 Zipper foot (1 pc.) 2 Bobbin (3 pcs.) 3 Needle Pack (Regular Single Needle HAX130 (3 pcs.)) 4 Twin Needle (1 pc.) Part Code USA Others No. Part ...Name X59370-051 5 Buttonhole Foot (1 pc.) SA156 SFB (XA5539-151) 6 7 Button Sewing Foot (1 pc.) Extra Spool Pin (1 pc.) 129583-001 8 Screwdriver (1 pc.) X57521-001 9 Darning Plate (1pc.) Part...
...sewing tasks. 1 1. 2. 3. 4. 5. 6. 7. 8. 9. ACCESSORIES The following accessories are stored in the flat-bed attachment. Part Name 1 Zipper foot (1 pc.) 2 Bobbin (3 pcs.) 3 Needle Pack (Regular Single Needle HAX130 (3 pcs.)) 4 Twin Needle (1 pc.) Part Code USA Others No. Part ...Name X59370-051 5 Buttonhole Foot (1 pc.) SA156 SFB (XA5539-151) 6 7 Button Sewing Foot (1 pc.) Extra Spool Pin (1 pc.) 129583-001 8 Screwdriver (1 pc.) X57521-001 9 Darning Plate (1pc.) Part...
Users Manual - English
Page 12
... can be straight and sharp for Model XL-2121, XL-2125, XL-2230. . 11 When you press the foot controller down lightly, the machine will run at a low speed. Dispose of cloth and dust to build up on the foot controller. Note (For U.S.A. Foot Controller When you press harder, the machine's speed will stop. You should make...
... can be straight and sharp for Model XL-2121, XL-2125, XL-2230. . 11 When you press the foot controller down lightly, the machine will run at a low speed. Dispose of cloth and dust to build up on the foot controller. Note (For U.S.A. Foot Controller When you press harder, the machine's speed will stop. You should make...
Users Manual - English
Page 13
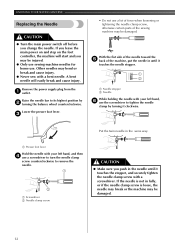
.... Other needles may be damaged. 12 A bent needle will start and you change the needle. If the needle is not in the same way. 1 Presser foot lever Hold the needle with a bent needle. Put the twin needle in fully, or if the needle clamp screw is loose, the needle may break... before you may be injured. ● Only use sewing-machine needles for home use. If you leave the main power on and step on the foot controller, the machine will easily break and cause injury. • Do not use a lot of force when loosening or tightening the needle clamp screw, otherwise...
.... Other needles may be damaged. 12 A bent needle will start and you change the needle. If the needle is not in the same way. 1 Presser foot lever Hold the needle with a bent needle. Put the twin needle in fully, or if the needle clamp screw is loose, the needle may break... before you may be injured. ● Only use sewing-machine needles for home use. If you leave the main power on and step on the foot controller, the machine will easily break and cause injury. • Do not use a lot of force when loosening or tightening the needle clamp screw, otherwise...

Users Manual - English
Page 14
... the shank. You will start and you may be injured. ● Always use the correct presser foot for the stitch pattern you use the wrong presser foot, the needle may strike the presser foot and bend or break, and may cause injury. ● Only use presser feet that the bar on ...should snap in line with the correct orientation, the needle may strike the presser foot, which may cause an accident or injury. Release the foot by 1 turning the balance wheel toward you (counterclockwise) and raise the presser foot lever. Using other any presser feet may bend or break the needle and cause...
... the shank. You will start and you may be injured. ● Always use the correct presser foot for the stitch pattern you use the wrong presser foot, the needle may strike the presser foot and bend or break, and may cause injury. ● Only use presser feet that the bar on ...should snap in line with the correct orientation, the needle may strike the presser foot, which may cause an accident or injury. Release the foot by 1 turning the balance wheel toward you (counterclockwise) and raise the presser foot lever. Using other any presser feet may bend or break the needle and cause...

Users Manual - English
Page 16
... (counterclockwise) to choose a pattern, turn the pattern selection dial in the highest position. Note ● When you turn the pattern selection dial, the needle, presser foot or fabric may be damaged. ■ 11 stitches 1 1 1 Pattern selection dial 2 Chosen pattern number 2 3 4 5 6 7 8 9 10 11 ■ 8 stitches 1 2345678 15 If the needle is in...
... (counterclockwise) to choose a pattern, turn the pattern selection dial in the highest position. Note ● When you turn the pattern selection dial, the needle, presser foot or fabric may be damaged. ■ 11 stitches 1 1 1 Pattern selection dial 2 Chosen pattern number 2 3 4 5 6 7 8 9 10 11 ■ 8 stitches 1 2345678 15 If the needle is in...
Users Manual - English
Page 18
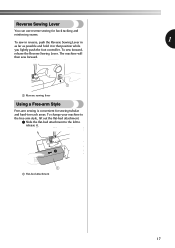
... Lever. Reverse Sewing Lever You can use reverse sewing for sewing tubular and hard-to release it in that position while you lightly push the foot controller. The machine will then sew forward. 1 1 Reverse sewing lever Using a Free-arm Style Free-arm sewing is convenient for back tacking and reinforcing seams...
... Lever. Reverse Sewing Lever You can use reverse sewing for sewing tubular and hard-to release it in that position while you lightly push the foot controller. The machine will then sew forward. 1 1 Reverse sewing lever Using a Free-arm Style Free-arm sewing is convenient for back tacking and reinforcing seams...
Users Manual - English
Page 20
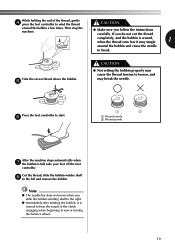
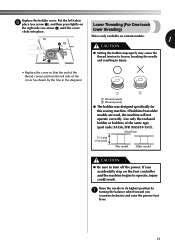
Press the foot controller to loosen, and may break the needle. Trim the excess thread above the bobbin. 5 CAUTION ● Not setting the bobbin ... sure you do not cut the thread completely, and the bobbin is normal to hear the sound of the thread, gently 4 press the foot controller to the left and remove the bobbin. Cut the thread, slide the bobbin-winder shaft 8 to wind the thread CAUTION around the bobbin... thread tension to start. 6 1 2 1 Wound evenly 2 Wound poorly After the machine stops automatically when 7 the bobbin is full, take your foot off the foot controller.
Press the foot controller to loosen, and may break the needle. Trim the excess thread above the bobbin. 5 CAUTION ● Not setting the bobbin ... sure you do not cut the thread completely, and the bobbin is normal to hear the sound of the thread, gently 4 press the foot controller to the left and remove the bobbin. Cut the thread, slide the bobbin-winder shaft 8 to wind the thread CAUTION around the bobbin... thread tension to start. 6 1 2 1 Wound evenly 2 Wound poorly After the machine stops automatically when 7 the bobbin is full, take your foot off the foot controller.
Users Manual - English
Page 21
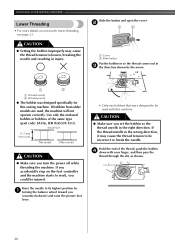
... you set the bobbin so the thread unrolls in 3 the direction shown by 1 turning the balance wheel toward you (counterclockwise) and raise the presser foot lever. • Only use bobbins that were designed to be incorrect or break the needle. CAUTION ● Make sure you turn the power off.... If you accidentally step on one-touch lower threading, see page 21. KNOWING YOUR SEWING MACHINE Lower Threading • For more details on the foot controller and the machine starts to work, you could be injured. Use only the enclosed bobbin or bobbins of the thread, push the bobbin 4...
... you set the bobbin so the thread unrolls in 3 the direction shown by 1 turning the balance wheel toward you (counterclockwise) and raise the presser foot lever. • Only use bobbins that were designed to be incorrect or break the needle. CAUTION ● Make sure you turn the power off.... If you accidentally step on one-touch lower threading, see page 21. KNOWING YOUR SEWING MACHINE Lower Threading • For more details on the foot controller and the machine starts to work, you could be injured. Use only the enclosed bobbin or bobbins of the thread, push the bobbin 4...
Users Manual - English
Page 22
...)). Use only the enclosed bobbin or bobbins of the cover (as shown by 1 turning the balance wheel toward you accidentally step on the foot controller and the machine begins to loosen, breaking the needle 1 and resulting in injury. • Replace the cover so that the end ... 2 CAUTION ● Setting the bobbin improperly may cause the thread tension to operate, injury could result. If you (counterclockwise) and raise the presser foot lever. 21 Lower Threading (For One-touch lower threading) This is only available on the right side (see arrow 2) until the cover clicks into ...
...)). Use only the enclosed bobbin or bobbins of the cover (as shown by 1 turning the balance wheel toward you accidentally step on the foot controller and the machine begins to loosen, breaking the needle 1 and resulting in injury. • Replace the cover so that the end ... 2 CAUTION ● Setting the bobbin improperly may cause the thread tension to operate, injury could result. If you (counterclockwise) and raise the presser foot lever. 21 Lower Threading (For One-touch lower threading) This is only available on the right side (see arrow 2) until the cover clicks into ...
Users Manual - English
Page 24
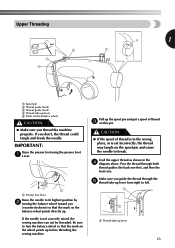
... mark on this pin. Make sure you thread the machine properly. Pass the thread through the 5 thread take-up . IMPORTANT: Raise the presser foot using the presser Foot 1 Lever. 1 1 Presser foot lever Raise the needle to left. 1 1 1 Thread take -up lever 5 Mark on the balance wheel points directly up lever from right to...
... mark on this pin. Make sure you thread the machine properly. Pass the thread through the 5 thread take-up . IMPORTANT: Raise the presser foot using the presser Foot 1 Lever. 1 1 Presser foot lever Raise the needle to left. 1 1 1 Thread take -up lever 5 Mark on the balance wheel points directly up lever from right to...
Users Manual - English
Page 25
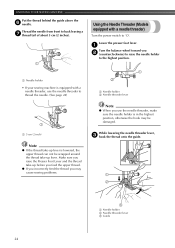
..., 3 hook the thread onto the guide. 1 2 3 1 Needle holder 2 Needle threader lever 3 Guide 24 Lower the presser foot lever. 1 Turn the balance wheel toward you use the needle threader to 'O'. Make sure you raise the Presser Foot Lever and the thread take -up lever is equipped with a needle threader) Turn the power switch...
..., 3 hook the thread onto the guide. 1 2 3 1 Needle holder 2 Needle threader lever 3 Guide 24 Lower the presser foot lever. 1 Turn the balance wheel toward you use the needle threader to 'O'. Make sure you raise the Presser Foot Lever and the thread take -up lever is equipped with a needle threader) Turn the power switch...
Users Manual - English
Page 27
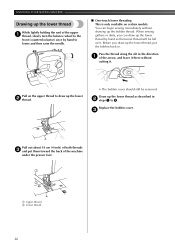
... be left over. When sewing gathers or darts, you draw up the lower thread, put them toward the back of the machine under the presser foot. 1 2 1 Upper thread 2 Lower thread 26 Pass the thread along the slit in . KNOWING YOUR SEWING MACHINE Drawing up the lower thread While lightly holding the...
... be left over. When sewing gathers or darts, you draw up the lower thread, put them toward the back of the machine under the presser foot. 1 2 1 Upper thread 2 Lower thread 26 Pass the thread along the slit in . KNOWING YOUR SEWING MACHINE Drawing up the lower thread While lightly holding the...

Users Manual - English
Page 28
... pin. Note Models that inch)). (see page 16) you can sew Threading the Left Needle with a Needle Threader ● You can use the zigzag presser foot only. ■ Attaching the Twin Needle Attach the twin needle in the same way that are equipped with this machine (part code: X57521-001).
... pin. Note Models that inch)). (see page 16) you can sew Threading the Left Needle with a Needle Threader ● You can use the zigzag presser foot only. ■ Attaching the Twin Needle Attach the twin needle in the same way that are equipped with this machine (part code: X57521-001).

Users Manual - English
Page 33
...inch.)] Straight Stitch (Center Needle Position) 2.5 (3/32) To back tack, push down the Reverse Sewing 6 Lever as far as possible, and then press the foot controller to choose the 1 stitch number you may be injured. 32 Straight Stitch (Center Needle Position) 4.0 (3/16) Straight Stitch (Left Needle Position) 2.5 ... If you do , you want. If you do , the needle may be damaged and you turn the balance wheel by pressing the foot controller. Release the Reverse Sewing Lever and start reverse sewing. Raise the needle to stop sewing. CAUTION ● Make sure the needle ...
...inch.)] Straight Stitch (Center Needle Position) 2.5 (3/32) To back tack, push down the Reverse Sewing 6 Lever as far as possible, and then press the foot controller to choose the 1 stitch number you may be injured. 32 Straight Stitch (Center Needle Position) 4.0 (3/16) Straight Stitch (Left Needle Position) 2.5 ... If you do , you want. If you do , the needle may be damaged and you turn the balance wheel by pressing the foot controller. Release the Reverse Sewing Lever and start reverse sewing. Raise the needle to stop sewing. CAUTION ● Make sure the needle ...

Users Manual - English
Page 34
...new direction. ■ Finishing Sewing You can use stitching to lock the threads at the point where you need to strengthen a stitch. Raise the presser foot and turn the fabric to 2 line up lever is also in its new direction using the needle as a turning point for the fabric. ■ ...fabric. 1 Thread cutter To prepare the machine for the next seam, 4 pull about 10 cm (4 inch) of thread through the toes of the presser foot toward the back of the machine. ■ Top Stitching and Stretch Materials You can use straight stitch for sewing stretch fabrics. 33 ■ Changing Sewing...
...new direction. ■ Finishing Sewing You can use stitching to lock the threads at the point where you need to strengthen a stitch. Raise the presser foot and turn the fabric to 2 line up lever is also in its new direction using the needle as a turning point for the fabric. ■ ...fabric. 1 Thread cutter To prepare the machine for the next seam, 4 pull about 10 cm (4 inch) of thread through the toes of the presser foot toward the back of the machine. ■ Top Stitching and Stretch Materials You can use straight stitch for sewing stretch fabrics. 33 ■ Changing Sewing...


