
Users Manual - English
Page 6
... Hem Stitching ...36 Elastic Stitching ...36 Overedge Stitching ...37 4. KNOWING YOUR SEWING MACHINE 7 THE MAIN PARTS ...8 ACCESSORIES ...9 Optional Accessories ...9 USING YOUR SEWING MACHINE 10 Connecting Plugs ...10 Main Power and Sewing Light Switch ...11 Foot Controller ...11 Checking the Needle ...11 Replacing the Needle... THREADING THE MACHINE 18 Winding the Bobbin ...18 Lower Threading ...20 Lower Threading (For One-touch lower threading 21 Upper Threading ...23 Using the Needle Threader (Models equipped with a needle threader 24 Drawing up the lower thread ...26 Sewing with a Twin...
... Hem Stitching ...36 Elastic Stitching ...36 Overedge Stitching ...37 4. KNOWING YOUR SEWING MACHINE 7 THE MAIN PARTS ...8 ACCESSORIES ...9 Optional Accessories ...9 USING YOUR SEWING MACHINE 10 Connecting Plugs ...10 Main Power and Sewing Light Switch ...11 Foot Controller ...11 Checking the Needle ...11 Replacing the Needle... THREADING THE MACHINE 18 Winding the Bobbin ...18 Lower Threading ...20 Lower Threading (For One-touch lower threading 21 Upper Threading ...23 Using the Needle Threader (Models equipped with a needle threader 24 Drawing up the lower thread ...26 Sewing with a Twin...
Users Manual - English
Page 9
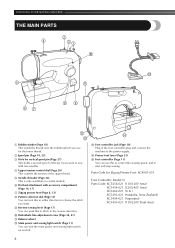
KNOWING YOUR SEWING MACHINE THE MAIN PARTS 2 4 31 0 E 5 A 67 89 B D C 1 Bobbin winder (Page 18) This winds the thread onto the bobbin,which you want. 9 Reverse-sewing lever (Page 17) You can push this to control the sewing speed, and to sew with two needles. 4 Upper tension-control dial ...Needle threader (Page 24) This is only available on certain models. 6 Flat bed attachment with accessory compartment (Page 14, 17) 7 Zigzag presser foot (Page 8, 13) 8 Pattern selection dial (Page 15) You can turn the main power and sewing light switch on and off. D Presser foot lever (...
KNOWING YOUR SEWING MACHINE THE MAIN PARTS 2 4 31 0 E 5 A 67 89 B D C 1 Bobbin winder (Page 18) This winds the thread onto the bobbin,which you want. 9 Reverse-sewing lever (Page 17) You can push this to control the sewing speed, and to sew with two needles. 4 Upper tension-control dial ...Needle threader (Page 24) This is only available on certain models. 6 Flat bed attachment with accessory compartment (Page 14, 17) 7 Zigzag presser foot (Page 8, 13) 8 Pattern selection dial (Page 15) You can turn the main power and sewing light switch on and off. D Presser foot lever (...

Users Manual - English
Page 10
... accessories to help you have bought. 9 Part Name X59370-051 5 Buttonhole Foot (1 pc.) SA156 SFB (XA5539-151) 6 7 Button Sewing Foot (1 pc.) Extra Spool Pin (1 pc.) 129583-001 8 Screwdriver (1 pc.) X57521-001 9 Darning Plate (1pc.) Part Code USA... 3. Others SA107 F034N (XC2165-002) SA129 F005N (XC1948-002) SA125 F001N (XC1944-002) Note ● The accessories that come with your machine depend on which model you carry out most sewing tasks. 1 1. 2. 3. 4. 5. 6. 7. 8. 9. ACCESSORIES The following accessories are stored in the flat-bed attachment. Part Name 1 ...
... accessories to help you have bought. 9 Part Name X59370-051 5 Buttonhole Foot (1 pc.) SA156 SFB (XA5539-151) 6 7 Button Sewing Foot (1 pc.) Extra Spool Pin (1 pc.) 129583-001 8 Screwdriver (1 pc.) X57521-001 9 Darning Plate (1pc.) Part Code USA... 3. Others SA107 F034N (XC2165-002) SA129 F005N (XC1948-002) SA125 F001N (XC1944-002) Note ● The accessories that come with your machine depend on which model you carry out most sewing tasks. 1 1. 2. 3. 4. 5. 6. 7. 8. 9. ACCESSORIES The following accessories are stored in the flat-bed attachment. Part Name 1 ...
Users Manual - English
Page 12
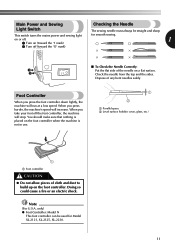
... be used for smooth sewing. 1 ■ To Check the Needle Correctly: 1 Put the flat side of the needle on the foot controller. When you press harder, the machine's speed will run at a low speed. only) ● Foot Controller: Model N This foot controller can be straight and sharp for Model XL-2121, XL-2125, XL-2230. . 11 Dispose of...
... be used for smooth sewing. 1 ■ To Check the Needle Correctly: 1 Put the flat side of the needle on the foot controller. When you press harder, the machine's speed will run at a low speed. only) ● Foot Controller: Model N This foot controller can be straight and sharp for Model XL-2121, XL-2125, XL-2230. . 11 Dispose of...

Users Manual - English
Page 19
... the bobbin. ● If the spool of thread is not in the right place, the thread may cause damage to the right. KNOWING YOUR SEWING MACHINE THREADING THE MACHINE Winding the Bobbin CAUTION ● Only use bobbins from the inside of the bobbin. 2 1 1 Spring on the shaft 2 Groove of the bobbin... 18 Only use the bobbin that has been designed for this machine or bobbins of thread on the spool pin. Actual size 11.5 mm (7/16 inch) This model Older model 1 2 1Bobbin-winding tension disc 2Bobbin-winder shaft Put the spool of the same type (part ...
... the bobbin. ● If the spool of thread is not in the right place, the thread may cause damage to the right. KNOWING YOUR SEWING MACHINE THREADING THE MACHINE Winding the Bobbin CAUTION ● Only use bobbins from the inside of the bobbin. 2 1 1 Spring on the shaft 2 Groove of the bobbin... 18 Only use the bobbin that has been designed for this machine or bobbins of thread on the spool pin. Actual size 11.5 mm (7/16 inch) This model Older model 1 2 1Bobbin-winding tension disc 2Bobbin-winder shaft Put the spool of the same type (part ...
Users Manual - English
Page 21
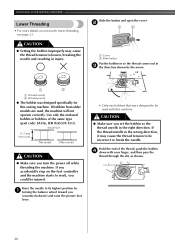
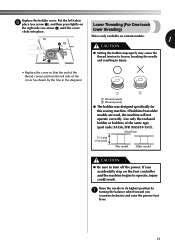
Use only the enclosed bobbin or bobbins of the thread, push the bobbin 4 down with this sewing machine. If the thread unrolls in the right direction. CAUTION ● Make sure you set the bobbin so the thread unrolls in the wrong direction, it ..., see page 21. Hold the end of the same type (part code: SA156, SFB (XA5539-151)). If bobbins from older models are used with your finger, and then pass the thread through the slit, as shown. 20 KNOWING YOUR SEWING MACHINE Lower Threading • For more details on the foot controller and the...
Use only the enclosed bobbin or bobbins of the thread, push the bobbin 4 down with this sewing machine. If the thread unrolls in the right direction. CAUTION ● Make sure you set the bobbin so the thread unrolls in the wrong direction, it ..., see page 21. Hold the end of the same type (part code: SA156, SFB (XA5539-151)). If bobbins from older models are used with your finger, and then pass the thread through the slit, as shown. 20 KNOWING YOUR SEWING MACHINE Lower Threading • For more details on the foot controller and the...
Users Manual - English
Page 22
...1 Wound evenly 2 Wound poorly ● The bobbin was designed specifically for this sewing machine. Replace the bobbin cover. If you (counterclockwise) and raise the presser foot lever. 21 Actual size 11.5 mm (7/16 inch) This model Older model CAUTION ● Be sure to loosen, breaking the needle 1 and resulting in ...injury. • Replace the cover so that the end of the thread comes out from older models are used, the machine will not operate correctly. Put the left side of the same type (part code: SA156, SFB (XA5539-151)). Raise the...
...1 Wound evenly 2 Wound poorly ● The bobbin was designed specifically for this sewing machine. Replace the bobbin cover. If you (counterclockwise) and raise the presser foot lever. 21 Actual size 11.5 mm (7/16 inch) This model Older model CAUTION ● Be sure to loosen, breaking the needle 1 and resulting in ...injury. • Replace the cover so that the end of the thread comes out from older models are used, the machine will not operate correctly. Put the left side of the same type (part code: SA156, SFB (XA5539-151)). Raise the...
Users Manual - English
Page 25
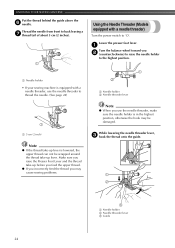
...needle threader to 'O'. Thread the needle from front to back leaving a 7 thread tail of about 5 cm (2 inches). 1 Using the Needle Threader (Models equipped with a needle threader, use the needle threader, make sure the needle holder is lowered, the upper thread can not be damaged. Make sure .... Note ● When you 2 (counterclockwise) to raise the needle holder to the highest position. 1 1 Needle holder • If your sewing machine is equipped with a needle threader) Turn the power switch to thread the needle. (See page 24) 2 1 Needle holder 2 Needle threader lever 1 1 5 cm (2 ...
...needle threader to 'O'. Thread the needle from front to back leaving a 7 thread tail of about 5 cm (2 inches). 1 Using the Needle Threader (Models equipped with a needle threader, use the needle threader, make sure the needle holder is lowered, the upper thread can not be damaged. Make sure .... Note ● When you 2 (counterclockwise) to raise the needle holder to the highest position. 1 1 Needle holder • If your sewing machine is equipped with a needle threader) Turn the power switch to thread the needle. (See page 24) 2 1 Needle holder 2 Needle threader lever 1 1 5 cm (2 ...
Users Manual - English
Page 27
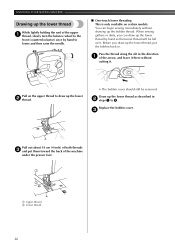
... cover should still be left over. Draw up the lower thread as described in the direction 1 of the machine under the presser foot. 1 2 1 Upper thread 2 Lower thread 26 KNOWING YOUR SEWING MACHINE Drawing up the lower thread While lightly holding the end of the upper 1 thread, slowly turn the balance ... lower thread, put them toward the back of the arrow, and leave it there without drawing up the bobbin thread. Pull on certain models. When sewing gathers or darts, you draw up the lower thread by hand to lower and then raise the needle. ■ One-touch lower threading...
... cover should still be left over. Draw up the lower thread as described in the direction 1 of the machine under the presser foot. 1 2 1 Upper thread 2 Lower thread 26 KNOWING YOUR SEWING MACHINE Drawing up the lower thread While lightly holding the end of the upper 1 thread, slowly turn the balance ... lower thread, put them toward the back of the arrow, and leave it there without drawing up the bobbin thread. Pull on certain models. When sewing gathers or darts, you draw up the lower thread by hand to lower and then raise the needle. ■ One-touch lower threading...

Users Manual - English
Page 28
...; You should only use the twin needle with any other stitch. ● Do not sew with bent needles. Note Models that have designed your machine so you threaded the left needle using the twin needle, make sure 1 Left needle thread passes through this needle and two top threads.... The flat side of thread onto the extra spool pin. Sewing with a Twin Needle ■ Twin Needle Threading ...
...; You should only use the twin needle with any other stitch. ● Do not sew with bent needles. Note Models that have designed your machine so you threaded the left needle using the twin needle, make sure 1 Left needle thread passes through this needle and two top threads.... The flat side of thread onto the extra spool pin. Sewing with a Twin Needle ■ Twin Needle Threading ...


