
HM Parts List - English
Page 1
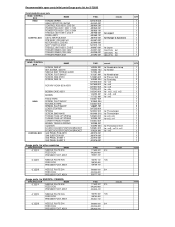
... HOOK BOX ASSY HEAD CONTROL BOX BOBBIN CASE ASSY BOBBIN FIXED KNIFE SCREW, FLAT SM3.57 MOVABLE KNIFE SCREW, FLAT SM4.37 LEVER STOPPER SPRING SCREW, BIND M4X5 THREAD TAKE-UP SPRING THREAD TAKE-UP SPRING LOWER THREAD FINGER BOBBIN TENSION SPRING CUSHION B-CASE HOLDER POSITION BRACKET B-CASE HOLDER POSITION BRACKET G40 PANEL PCB ASSY G40 SUB PCB ASSY G40 PANEL SHEET 1 G40 PANEL SHEET 2 Guage parts for other countries SPECIFICATION NAME - [ ] [ ] 3 NEEDLE PLATE E18 FEED DOG PRESSER FOOT ASSY - [ ] [ ] 5 NEEDLE PLATE H26 FEED DOG PRESSER FOOT ASSY - [ ] [ ] S NEEDLE PLATE E14 FEED DOG...
... HOOK BOX ASSY HEAD CONTROL BOX BOBBIN CASE ASSY BOBBIN FIXED KNIFE SCREW, FLAT SM3.57 MOVABLE KNIFE SCREW, FLAT SM4.37 LEVER STOPPER SPRING SCREW, BIND M4X5 THREAD TAKE-UP SPRING THREAD TAKE-UP SPRING LOWER THREAD FINGER BOBBIN TENSION SPRING CUSHION B-CASE HOLDER POSITION BRACKET B-CASE HOLDER POSITION BRACKET G40 PANEL PCB ASSY G40 SUB PCB ASSY G40 PANEL SHEET 1 G40 PANEL SHEET 2 Guage parts for other countries SPECIFICATION NAME - [ ] [ ] 3 NEEDLE PLATE E18 FEED DOG PRESSER FOOT ASSY - [ ] [ ] 5 NEEDLE PLATE H26 FEED DOG PRESSER FOOT ASSY - [ ] [ ] S NEEDLE PLATE E14 FEED DOG...

Basic Instruction Manual - English
Page 5
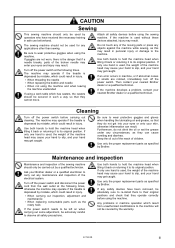
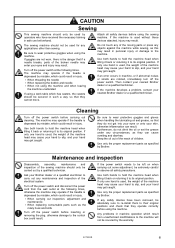
... a needle breaks, parts of the electrical system. Cleaning Turn off the power switch and disconnect the power cord from unauthorized modifications to the machine will not be covered by mistake, which has casters, the casters should be secured in injury. Be sure to wear protective goggles when using the sewing machine. When carrying out inspection, adjustment and maintenance When replacing consumable parts such as the rotary hook...
... a needle breaks, parts of the electrical system. Cleaning Turn off the power switch and disconnect the power cord from unauthorized modifications to the machine will not be covered by mistake, which has casters, the casters should be secured in injury. Be sure to wear protective goggles when using the sewing machine. When carrying out inspection, adjustment and maintenance When replacing consumable parts such as the rotary hook...
Basic Instruction Manual - English
Page 8
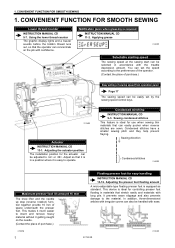
...-adjustable type floating presser foot is in materials that can also be easily set the speed according to insert and remove heavy material without it is easy to operate. Easy setting of sewing speed from operation panel Page 17 The sewing speed can concentrate on the needle. (Contact the place of purchase.) Floating presser foot for use when sewing thin materials that stretch easily and materials with ease. 3720M 1 S-7200B 3721M Sewing direction Condensed stitches...
...-adjustable type floating presser foot is in materials that can also be easily set the speed according to insert and remove heavy material without it is easy to operate. Easy setting of sewing speed from operation panel Page 17 The sewing speed can concentrate on the needle. (Contact the place of purchase.) Floating presser foot for use when sewing thin materials that stretch easily and materials with ease. 3720M 1 S-7200B 3721M Sewing direction Condensed stitches...
Basic Instruction Manual - English
Page 24
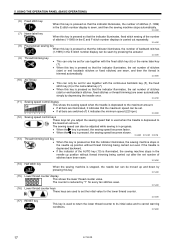
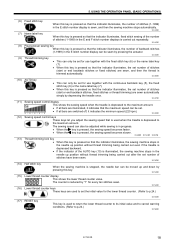
..., the set number of stitches (start or end backtack stitches or fixed stitches) are sewn, and then the thread is trimmed automatically. 2146M (10) AUTO key • This can only be set for the lower thread counter. 2154M 2155M (17) RESET key This key is used to set number of stitches (start or end backtack stitches, fixed stitches or thread trimming) are sewn automatically simply by depressing the treadle once. 2147M (11) Sewing speed control display...
..., the set number of stitches (start or end backtack stitches or fixed stitches) are sewn, and then the thread is trimmed automatically. 2146M (10) AUTO key • This can only be set for the lower thread counter. 2154M 2155M (17) RESET key This key is used to set number of stitches (start or end backtack stitches, fixed stitches or thread trimming) are sewn automatically simply by depressing the treadle once. 2147M (11) Sewing speed control display...
Instruction Manual - English
Page 5
... to their original positions and check that if a needle breaks, parts of the sewing machine should only be carried out by operators who have been removed, be covered by Brother. If goggles are noticed, immediately turn off the power switch at the following times. When threading the needle When replacing the bobbin and needle When not using the machine and when leaving the machine unattended If using the machine. Do not touch...
... to their original positions and check that if a needle breaks, parts of the sewing machine should only be carried out by operators who have been removed, be covered by Brother. If goggles are noticed, immediately turn off the power switch at the following times. When threading the needle When replacing the bobbin and needle When not using the machine and when leaving the machine unattended If using the machine. Do not touch...
Instruction Manual - English
Page 7
... CONTROL BOX PANEL (ADVANCED OPERATIONS 32 8-1. SEWING 35 9-1. THREAD TENSION 37 10-1. Adjusting the thread tension 37 10-2. CONTENTS 1. NAMES OF MAJOR PARTS 1 2. MACHINE SPECIFICATIONS 2 3. INSTALLATION 3 3-1. Table processing diagram 4 3-2. Installation 4 3-3. Lubrication (-[]0[], []3[] specifications 8 3-4. Connecting the cords 9 3-4-1. Opening the control box cover 9 3-4-2. PREPARATION BEFORE SEWING .... 13 4-1. Removing the bobbin case 13 4-3. Installing the bobbin case 14 4-5. Adjusting the stitch length 15 4-7. Using the thread...
... CONTROL BOX PANEL (ADVANCED OPERATIONS 32 8-1. SEWING 35 9-1. THREAD TENSION 37 10-1. Adjusting the thread tension 37 10-2. CONTENTS 1. NAMES OF MAJOR PARTS 1 2. MACHINE SPECIFICATIONS 2 3. INSTALLATION 3 3-1. Table processing diagram 4 3-2. Installation 4 3-3. Lubrication (-[]0[], []3[] specifications 8 3-4. Connecting the cords 9 3-4-1. Opening the control box cover 9 3-4-2. PREPARATION BEFORE SEWING .... 13 4-1. Removing the bobbin case 13 4-3. Installing the bobbin case 14 4-5. Adjusting the stitch length 15 4-7. Using the thread...
Instruction Manual - English
Page 9
... -405 Lubricated / for heavy materials -45S -453 Rotary hook RP (lubrication-free rotary hook) Lubricating oil Rotary hook Needle bar -30[], -40[] High-speed spindle -33[], -43[] High-speed spindle Special Brother grease -45[] - Special Brother grease S-7200B 2 sewing speed Start backtacking and continuous backtacking speed End backtacking speed Max. stitch length Presser foot Lifting lever height Knee lifter Feed dog height Needle (DB×1, DP×5) Motor Control circuit -33S, -43S -45S 4,000 rpm -453 -303...
... -405 Lubricated / for heavy materials -45S -453 Rotary hook RP (lubrication-free rotary hook) Lubricating oil Rotary hook Needle bar -30[], -40[] High-speed spindle -33[], -43[] High-speed spindle Special Brother grease -45[] - Special Brother grease S-7200B 2 sewing speed Start backtacking and continuous backtacking speed End backtacking speed Max. stitch length Presser foot Lifting lever height Knee lifter Feed dog height Needle (DB×1, DP×5) Motor Control circuit -33S, -43S -45S 4,000 rpm -453 -303...
Instruction Manual - English
Page 25
... up position without thread trimming being carried out after the set number of stitches (start or end backtack stitches, fixed stitches or thread trimming) are sewn automatically simply by "1" for the lower thread counter. (Refer to p.24.) 2155M (17) RESET key This key is depressed to p.24.) 2156M S-7200B 18 The counter is reduced by depressing the treadle once. 2147M (11) Sewing speed control display This shows the sewing speed...
... up position without thread trimming being carried out after the set number of stitches (start or end backtack stitches, fixed stitches or thread trimming) are sewn automatically simply by "1" for the lower thread counter. (Refer to p.24.) 2155M (17) RESET key This key is depressed to p.24.) 2156M S-7200B 18 The counter is reduced by depressing the treadle once. 2147M (11) Sewing speed control display This shows the sewing speed...
Instruction Manual - English
Page 29
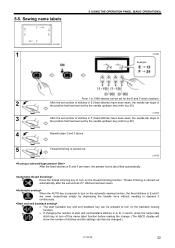
...; If changing the number of start and end backtack stitches in A, B, C and D, press the name label stitch key to turn on the automatic sewing function, the fixed stitches in the position that has been set of stitches and the settings can be changed.) S-7200B 22 5-5. When the AUTO key is carried out. Sewing name labels 0835M 1 5. Thread trimming is carried out automatically after the second set by the needle up...
...; If changing the number of start and end backtack stitches in A, B, C and D, press the name label stitch key to turn on the automatic sewing function, the fixed stitches in the position that has been set of stitches and the settings can be changed.) S-7200B 22 5-5. When the AUTO key is carried out. Sewing name labels 0835M 1 5. Thread trimming is carried out automatically after the second set by the needle up...
Instruction Manual - English
Page 46
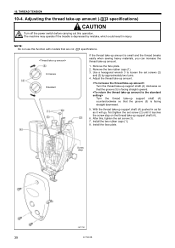
.... 1. THREAD TENSION 10-4. Adjust the thread take -up amount. Install the face plate. Increases Standard If the thread take-up amount is facing straight upward. After this, tighten the set screw (2) until it will go, first tighten the set screw (3). 7. Remove the two rubber caps (1). 3. With the thread take -up support shaft (4) pushed in injury. NOTE: Do not use this operation. Screw stop on the thread take -up support shaft (4). 6. Use...
.... 1. THREAD TENSION 10-4. Adjust the thread take -up amount. Install the face plate. Increases Standard If the thread take-up amount is facing straight upward. After this, tighten the set screw (2) until it will go, first tighten the set screw (3). 7. Remove the two rubber caps (1). 3. With the thread take -up support shaft (4) pushed in injury. NOTE: Do not use this operation. Screw stop on the thread take -up support shaft (4). 6. Use...
Instruction Manual - English
Page 64
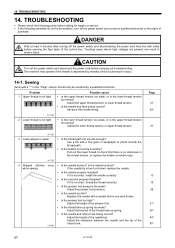
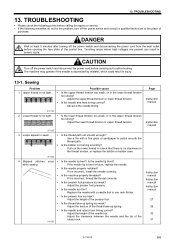
... for repairs or service. If the needle tip is not tight. Is the needle properly installed? TROUBLESHOOTING Please check the following remedies do not fix the problem, turn off the power switch and disconnect the power cord before carrying out troubleshooting. TROUBLESHOOTING 14. Is the needle too thin? 14. Is the thread take -up spring too weak? Problem 1 Upper thread is bent or broken, replace the needle. Adjust the height of the presser foot...
... for repairs or service. If the needle tip is not tight. Is the needle properly installed? TROUBLESHOOTING Please check the following remedies do not fix the problem, turn off the power switch and disconnect the power cord before carrying out troubleshooting. TROUBLESHOOTING 14. Is the needle too thin? 14. Is the thread take -up spring too weak? Problem 1 Upper thread is bent or broken, replace the needle. Adjust the height of the presser foot...
Instruction Manual - English
Page 66
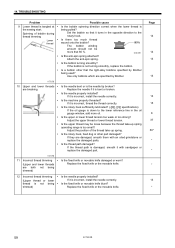
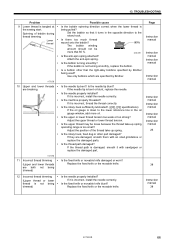
...? TROUBLESHOOTING Problem 9 Lower thread is not turning smoothly, replace the bobbin. 14. If the bobbin is tangled at the sewing start. The bobbin winding amount should not be loose because the thread take -up spring operating range is bent or broken. Is the needle bent or is being trimmed) Possible cause Is the bobbin spinning direction correct when the lower thread is the needle tip broken? Adjust the position of bobbin during thread trimming Lower thread 0751M...
...? TROUBLESHOOTING Problem 9 Lower thread is not turning smoothly, replace the bobbin. 14. If the bobbin is tangled at the sewing start. The bobbin winding amount should not be loose because the thread take -up spring operating range is bent or broken. Is the needle bent or is being trimmed) Possible cause Is the bobbin spinning direction correct when the lower thread is the needle tip broken? Adjust the position of bobbin during thread trimming Lower thread 0751M...
Service Manual
Page 5
... machine develops a problem, contact your hand may get caught. Use only the proper replacement parts as the rotary hook and knife Turn off the power switch before using a work table which result from the wall outlet at the following times, otherwise the machine may get into your eyes or onto your hand may operate if the treadle is depressed by Brother. Maintenance and inspection Disassembly, assembly, maintenance...
... machine develops a problem, contact your hand may get caught. Use only the proper replacement parts as the rotary hook and knife Turn off the power switch before using a work table which result from the wall outlet at the following times, otherwise the machine may get into your eyes or onto your hand may operate if the treadle is depressed by Brother. Maintenance and inspection Disassembly, assembly, maintenance...
Service Manual
Page 7
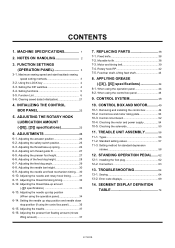
... 7-4. Feed bar shaft, Lifting feed shaft 43 8. Types 56 11-2. Standard setting values 57 11-3. Function List 6 3-6. Adjusting the actuator position 24 6-2. Adjusting the needle up amount (-[][]3 specifications 33 6-13. CONTROL BOX AND MOTOR...........49 10-1. Clearing saved data (Initialization 21 4. Adjusting arm thread guide R 27 6-5. Adjusting the thread take -up stop position and needle down stop position (When using the control box panel 35 6-15. CONTROL SYSTEM 48 10. TREADLE UNIT ASSEMBLY 56 11-1. Adjusting the presser foot...
... 7-4. Feed bar shaft, Lifting feed shaft 43 8. Types 56 11-2. Standard setting values 57 11-3. Function List 6 3-6. Adjusting the actuator position 24 6-2. Adjusting the needle up amount (-[][]3 specifications 33 6-13. CONTROL BOX AND MOTOR...........49 10-1. Clearing saved data (Initialization 21 4. Adjusting arm thread guide R 27 6-5. Adjusting the thread take -up stop position and needle down stop position (When using the control box panel 35 6-15. CONTROL SYSTEM 48 10. TREADLE UNIT ASSEMBLY 56 11-1. Adjusting the presser foot...
Service Manual
Page 8
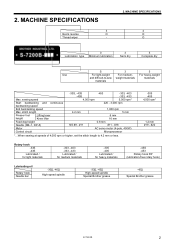
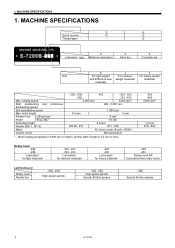
MACHINE SPECIFICATIONS 1. MACHINE SPECIFICATIONS 3 4 Quick reverse O O Thread wiper - Special Brother grease 1 S-7200B 1. sewing speed Start backtacking and continuous backtacking speed End backtacking speed Max. O 0 Lubrication type Minimum lubrication 3 Semi dry 5 Complete dry S 3 5 Use For light-weight For medium- stitch length Presser foot Lifting lever height Knee lifter Feed dog height Needle (DB×1, DP×5) Motor Control circuit -33S, -43S -45S 4,000 rpm -453 -303, -403 -333, -433 5,000 rpm* 220 - 3,000 rpm 4.2 mm NS #9 - #11 1,...
MACHINE SPECIFICATIONS 1. MACHINE SPECIFICATIONS 3 4 Quick reverse O O Thread wiper - Special Brother grease 1 S-7200B 1. sewing speed Start backtacking and continuous backtacking speed End backtacking speed Max. O 0 Lubrication type Minimum lubrication 3 Semi dry 5 Complete dry S 3 5 Use For light-weight For medium- stitch length Presser foot Lifting lever height Knee lifter Feed dog height Needle (DB×1, DP×5) Motor Control circuit -33S, -43S -45S 4,000 rpm -453 -303, -403 -333, -433 5,000 rpm* 220 - 3,000 rpm 4.2 mm NS #9 - #11 1,...
Service Manual
Page 13
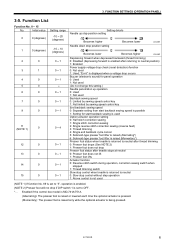
... control without step operation 1: Above control is not used (NOTE 1) If function No. 69 is set to "3", operation is enabled. (NOTE 2) Presser foot will not drop if DIP switch 1 is set to neutral position) 1: Enabled Power supply voltage drop check (reset detection) function 0: Not used Option actuator operation setting 0: Half stitch correction sewing 1: Single stitch correction sewing 2: Single reverse stitch correction sewing (reverse feed) 3: Thread trimming 4: Single end backtack cycle cancel 5: Solenoid-type presser foot lifter is raised (Alternating*) 6: Solenoid-type presser foot...
... control without step operation 1: Above control is not used (NOTE 1) If function No. 69 is set to "3", operation is enabled. (NOTE 2) Presser foot will not drop if DIP switch 1 is set to neutral position) 1: Enabled Power supply voltage drop check (reset detection) function 0: Not used Option actuator operation setting 0: Half stitch correction sewing 1: Single stitch correction sewing 2: Single reverse stitch correction sewing (reverse feed) 3: Thread trimming 4: Single end backtack cycle cancel 5: Solenoid-type presser foot lifter is raised (Alternating*) 6: Solenoid-type presser foot...
Service Manual
Page 40
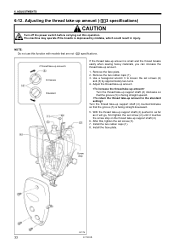
... small and the thread breaks easily when sewing heavy materials, you can increase the thread take -up amount. Turn the thread take -up support shaft (4). 6. Install the two rubber caps (1). 8. With the thread take-up support shaft (4) pushed in injury. After this operation. 6. Remove the face plate. 2. Install the face plate. Screw stop on the thread take -up amount (-[][]3 specifications) CAUTION Turn off the power switch before carrying...
... small and the thread breaks easily when sewing heavy materials, you can increase the thread take -up amount. Turn the thread take -up support shaft (4). 6. Install the two rubber caps (1). 8. With the thread take-up support shaft (4) pushed in injury. After this operation. 6. Remove the face plate. 2. Install the face plate. Screw stop on the thread take -up amount (-[][]3 specifications) CAUTION Turn off the power switch before carrying...
Service Manual
Page 47
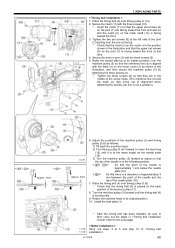
... been installed, be sure to then carry out the steps in the illustration and that the upper set screws (8) at the top. * Check that the tip of alignment when tightening the screws, but this time. 4. Tighten the two set screws (8) on the motor cover (3) as the needle plate (16). 3) Turn the machine pulley (5) forward to its original position. 10. Raise the thread take-up to adjust...
... been installed, be sure to then carry out the steps in the illustration and that the upper set screws (8) at the top. * Check that the tip of alignment when tightening the screws, but this time. 4. Tighten the two set screws (8) on the motor cover (3) as the needle plate (16). 3) Turn the machine pulley (5) forward to its original position. 10. Raise the thread take-up to adjust...
Service Manual
Page 71
... needle bar. 13. Is the needle and feed timing correct? Instruction manual Is the thread path not smooth enough? Is the needle properly installed? Is the presser foot pressure too weak? Adjust the tension of the presser foot. TROUBLESHOOTING 13. Adjust the lower thread tension or upper thread tension. Replace the needle with a fine grain or sandpaper to check that is the upper thread tension too strong? Is the thread take -up spring too weak? If the following points before opening the face plate...
... needle bar. 13. Is the needle and feed timing correct? Instruction manual Is the thread path not smooth enough? Is the needle properly installed? Is the presser foot pressure too weak? Adjust the tension of the presser foot. TROUBLESHOOTING 13. Adjust the lower thread tension or upper thread tension. Replace the needle with a fine grain or sandpaper to check that is the upper thread tension too strong? Is the thread take -up spring too weak? If the following points before opening the face plate...
Service Manual
Page 73
... machine properly threaded? Is the rotary hook, feed dog or other that the light-alloy bobbins specified by Brother. If the thread path is tangled at the sewing start. Instruction manual Instruction manual Instruction manual Instruction manual 26 Is the fixed knife or movable knife damaged or worn? Is the needle properly installed? Is the rotary hook sufficiently lubricated? (-[]0[], []3[] specifications) If the oil gauge is being used? Is the upper or lower thread tension too weak or too strong? Adjust the upper thread...
... machine properly threaded? Is the rotary hook, feed dog or other that the light-alloy bobbins specified by Brother. If the thread path is tangled at the sewing start. Instruction manual Instruction manual Instruction manual Instruction manual 26 Is the fixed knife or movable knife damaged or worn? Is the needle properly installed? Is the rotary hook sufficiently lubricated? (-[]0[], []3[] specifications) If the oil gauge is being used? Is the upper or lower thread tension too weak or too strong? Adjust the upper thread...


