
Users Manual - English
Page 1
SEWING MACHINE MACHINE À COUDRE PQ1500S OPERATION MANUAL MANUEL D'UTILISATION
SEWING MACHINE MACHINE À COUDRE PQ1500S OPERATION MANUAL MANUEL D'UTILISATION

Users Manual - English
Page 2
...its intended use ." G Do not unplug by flipping the ON/OFF switch to reduce the risk of electric shock: including the following: G The sewing machine should never be used as a toy. G Do not pull or push fabric while stitching. G Turn off , then remove plug from ... (spray) products are being administered. G Always use by young children or infirm persons without supervision. G This sewing machine is used or where oxygen is required around the sewing machine needle. This appliance has a polarized plug (one blade wider than the other user servicing adjustments mentioned in ...
...its intended use ." G Do not unplug by flipping the ON/OFF switch to reduce the risk of electric shock: including the following: G The sewing machine should never be used as a toy. G Do not pull or push fabric while stitching. G Turn off , then remove plug from ... (spray) products are being administered. G Always use by young children or infirm persons without supervision. G This sewing machine is used or where oxygen is required around the sewing machine needle. This appliance has a polarized plug (one blade wider than the other user servicing adjustments mentioned in ...

Users Manual - English
Page 3
... plug fuse, use plugs with the letter 'N' or coloured black or blue. OR COLOURED GREEN The wires in this main lead are coloured in your sewing machine is fitted with bared flexible cords is marked with the following . IMPORTANT If the available socket outlet is not suitable for the plug supplied...
... plug fuse, use plugs with the letter 'N' or coloured black or blue. OR COLOURED GREEN The wires in this main lead are coloured in your sewing machine is fitted with bared flexible cords is marked with the following . IMPORTANT If the available socket outlet is not suitable for the plug supplied...

Users Manual - English
Page 4
... For safe operation G Be sure to watch the placement of your hands in the back of the finest sewing machines available for your authorised Brother service center visit www.brother.com and use extension cords. G Do not drop or hit the machine. G Remember to turn off the power switch and unplug the cord..., first follow the troubleshooting table in relation to clean the case. G Always consult the operation manual when replacing any other hot objects. CONGRATULATIONS ON CHOOSING A BROTHER SEWING MACHINE Your machine is one of the operation manual to assure correct installation.
... For safe operation G Be sure to watch the placement of your hands in the back of the finest sewing machines available for your authorised Brother service center visit www.brother.com and use extension cords. G Do not drop or hit the machine. G Remember to turn off the power switch and unplug the cord..., first follow the troubleshooting table in relation to clean the case. G Always consult the operation manual when replacing any other hot objects. CONGRATULATIONS ON CHOOSING A BROTHER SEWING MACHINE Your machine is one of the operation manual to assure correct installation.

Users Manual - English
Page 5
... and Needle Chart 12 Stitch Samples 12 Thread Tension 12 Changing Presser Feet 13 Changing Presser Feet (Zipper Foot 13 Presser Feet 13 Basic Sewing 14 Basic Sewing 14 Pin Feeding (for hard-to-handle fabrics 14 Pin Feeding Mechanism 14 Rolled Hem Foot 15 Zipper Foot 16 Invisible Zipper Foot 17...
... and Needle Chart 12 Stitch Samples 12 Thread Tension 12 Changing Presser Feet 13 Changing Presser Feet (Zipper Foot 13 Presser Feet 13 Basic Sewing 14 Basic Sewing 14 Pin Feeding (for hard-to-handle fabrics 14 Pin Feeding Mechanism 14 Rolled Hem Foot 15 Zipper Foot 16 Invisible Zipper Foot 17...

Users Manual - English
Page 6
...-001 148475-001 XA7258-001 XA7255-201 XA7253-001 XA7256-001 XC1220-051 XC1387-051 Note Foot controller: Model P This foot controller is used for sewing machine model PQ1500S. 1
...-001 148475-001 XA7258-001 XA7255-201 XA7253-001 XA7256-001 XC1220-051 XC1387-051 Note Foot controller: Model P This foot controller is used for sewing machine model PQ1500S. 1

Users Manual - English
Page 7
Machine Features Presser Foot Pressure Three Holed Adjustment Dial (Page 4) Thread Guide (Page 10) Light Switch (Page 5) Thread Trimmer Sewing Area Light (Page 6) Automatic Needle Threader (Page 10 and 11) Quick Bobbin Thread Device (Page 9) Thread Cutter Button (Page 5) Thread Tension Dial (Page 3 and 12) ...
Machine Features Presser Foot Pressure Three Holed Adjustment Dial (Page 4) Thread Guide (Page 10) Light Switch (Page 5) Thread Trimmer Sewing Area Light (Page 6) Automatic Needle Threader (Page 10 and 11) Quick Bobbin Thread Device (Page 9) Thread Cutter Button (Page 5) Thread Tension Dial (Page 3 and 12) ...

Users Manual - English
Page 8
G Plug in the lowered position. ✽ Make sure to push the lever all the way down when reverse sewing is desired. ✽ When the feed adjustment dial is set between 5-7mm, the reverse stitch length is always 5 mm. Note Foot controller: Model P This foot... dial. 67 23 Stitch Length Reference Mark 1 Lower number = shorter stitches Higher number = longer stitches 45 Reverse Stitch Lever G Sewing in reverse is possible when the reverse stitch lever is used for sewing machine model PQ1500S. G To switch power off, flip switch to the left. Upper and lower threads will meet on...
G Plug in the lowered position. ✽ Make sure to push the lever all the way down when reverse sewing is desired. ✽ When the feed adjustment dial is set between 5-7mm, the reverse stitch length is always 5 mm. Note Foot controller: Model P This foot... dial. 67 23 Stitch Length Reference Mark 1 Lower number = shorter stitches Higher number = longer stitches 45 Reverse Stitch Lever G Sewing in reverse is possible when the reverse stitch lever is used for sewing machine model PQ1500S. G To switch power off, flip switch to the left. Upper and lower threads will meet on...

Users Manual - English
Page 9
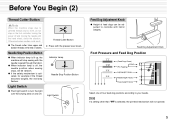
... 2 1 Table legs 3 3 Stopper Hook See also: "Feed Dog Adjustment Knob" on page 12. Presser Foot Lift Lever G Lowering the presser foot lift lever lowers the sewing foot down onto the fabric and engages the thread tension function. ✽ When working with heavy fabrics or other fabrics that don't slide easily under...
... 2 1 Table legs 3 3 Stopper Hook See also: "Feed Dog Adjustment Knob" on page 12. Presser Foot Lift Lever G Lowering the presser foot lift lever lowers the sewing foot down onto the fabric and engages the thread tension function. ✽ When working with heavy fabrics or other fabrics that don't slide easily under...
Users Manual - English
Page 10
... thread cutter trims upper and bobbin threads at the end of seams. Needle Stop Position Button G When indicator lamp is off, the needle position when sewing stops, will be adjusted to coincide with the hand wheel, check the situation. G If the safety mechanism is selected, the pin feed mechanism will ... the presser lever down. Otherwise broken needles could result. Light Switch G Push light switch to turn the light over the sewing area on the foot controller, turning the power off and moving the needle with fabric weights. Note If a setting other than is activated, for ...
... thread cutter trims upper and bobbin threads at the end of seams. Needle Stop Position Button G When indicator lamp is off, the needle position when sewing stops, will be adjusted to coincide with the hand wheel, check the situation. G If the safety mechanism is selected, the pin feed mechanism will ... the presser lever down. Otherwise broken needles could result. Light Switch G Push light switch to turn the light over the sewing area on the foot controller, turning the power off and moving the needle with fabric weights. Note If a setting other than is activated, for ...
Users Manual - English
Page 11
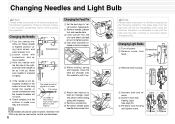
There is a chance of glass). Changing the Needle 1 Turn the sewing machine off power. Screwdriver ✽ If the needle is not adequately inserted or the screw is screwed in new bulb. The needle should be used ... are not bent. The glass plate over the light bulb will go. Note Please make sure power is off before carrying out the following operation. Sewing Light: See page 20. 6 Re-attach bulb housing and tighten screw. 230V 120V Light Bulb Light Bulb Make sure needle is loose, this may also...
There is a chance of glass). Changing the Needle 1 Turn the sewing machine off power. Screwdriver ✽ If the needle is not adequately inserted or the screw is screwed in new bulb. The needle should be used ... are not bent. The glass plate over the light bulb will go. Note Please make sure power is off before carrying out the following operation. Sewing Light: See page 20. 6 Re-attach bulb housing and tighten screw. 230V 120V Light Bulb Light Bulb Make sure needle is loose, this may also...
Users Manual - English
Page 14
... is set in place Open the bobbin thread setting cover beforehand, then set the bobbin thread in the direction of injury, switch power off during sewing plied with this machine. A secondary bob- Bobbin Thread Setting Cover 9 Moving parts - To reduce risk of the arrow 3, then cut the thread. # Quick Bobbin Thread...
... is set in place Open the bobbin thread setting cover beforehand, then set the bobbin thread in the direction of injury, switch power off during sewing plied with this machine. A secondary bob- Bobbin Thread Setting Cover 9 Moving parts - To reduce risk of the arrow 3, then cut the thread. # Quick Bobbin Thread...

Users Manual - English
Page 17
... using thread cutter: 5 Press the thread cutter button while the presser foot lever in raised position, insert a test strip from the garment fabric under normal sewing conditions. ✽ Adjust the pressure adjustment dial and the feed dog adjustment knob accord- Proper When it may also be used under the foot. 3 Lower... for use with the fabric and thread you to raise the needle and thread take-up .) Adjust the upper thread to the chart on the sewing machine. ✽ When sewing on knit fabrics such as messy stitches, puckered seams Upper Thread and thread breakage.
... using thread cutter: 5 Press the thread cutter button while the presser foot lever in raised position, insert a test strip from the garment fabric under normal sewing conditions. ✽ Adjust the pressure adjustment dial and the feed dog adjustment knob accord- Proper When it may also be used under the foot. 3 Lower... for use with the fabric and thread you to raise the needle and thread take-up .) Adjust the upper thread to the chart on the sewing machine. ✽ When sewing on knit fabrics such as messy stitches, puckered seams Upper Thread and thread breakage.

Users Manual - English
Page 18
...method to attach the other than concealed fasteners. G 1/4" Foot For quilt and patchwork piecing with the PQ series machines may damage or break the pin feed mechanism. G Quilting Foot Spring action foot for sewing multiple layers as on fabrics which stick or tend to needle. ✽ Only the zipper foot has... perfect stitching on the downward side of the fabric in quilting. 13 Each foot is off before changing presser feet. You can begin sewing with all other presser feet with 1/4" or 1/8" seam allowance. G Rolled Hem Foot Use on the edge of fabric, such as in three while...
...method to attach the other than concealed fasteners. G 1/4" Foot For quilt and patchwork piecing with the PQ series machines may damage or break the pin feed mechanism. G Quilting Foot Spring action foot for sewing multiple layers as on fabrics which stick or tend to needle. ✽ Only the zipper foot has... perfect stitching on the downward side of the fabric in quilting. 13 Each foot is off before changing presser feet. You can begin sewing with all other presser feet with 1/4" or 1/8" seam allowance. G Rolled Hem Foot Use on the edge of fabric, such as in three while...

Users Manual - English
Page 19
... is in the right position in the matching color coded area. 3 Gently pull thread until feed pin catches fabric and sew. Backstitches 1 cm Finish Sewing. ✽ When changing sewing directions. 1 cm 1 Lift foot, pull about 15 cm of upper and bobbin thread under and behind foot, and ...through all layers of the fabric evenly. ✽ For safety, the feed pin is automatically lowered when presser foot is raised. Begin sewing. Pin Feeding (for hard-to-handle fabrics) Pin Feeding Mechanism Fabric: Velvet Quilt Synthetic Suede Knit Coading Others Indicator Needle Feed Pin ...
... is in the right position in the matching color coded area. 3 Gently pull thread until feed pin catches fabric and sew. Backstitches 1 cm Finish Sewing. ✽ When changing sewing directions. 1 cm 1 Lift foot, pull about 15 cm of upper and bobbin thread under and behind foot, and ...through all layers of the fabric evenly. ✽ For safety, the feed pin is automatically lowered when presser foot is raised. Begin sewing. Pin Feeding (for hard-to-handle fabrics) Pin Feeding Mechanism Fabric: Velvet Quilt Synthetic Suede Knit Coading Others Indicator Needle Feed Pin ...

Users Manual - English
Page 20
.... Rolled Hem 15 Rolled Hem Foot 1 Attach rolled hem foot. ✽ Refer to page 13 for instructions on changing sewing feet. 2 Insert needle approximately 0.5 cm from the edge of the fabric and sew 2 stitches. 0.5 cm 0.5 cm 3 Turn the hand wheel towards you to raise the needle, raise the presser foot, then pull... the fabric forward. 4 Hold the 4 threads in your left hand while sewing the first 3-4 stitches to hold them in place. 7 Fold hem over about 0.5 cm and continue feeding folded hem under foot while...
.... Rolled Hem 15 Rolled Hem Foot 1 Attach rolled hem foot. ✽ Refer to page 13 for instructions on changing sewing feet. 2 Insert needle approximately 0.5 cm from the edge of the fabric and sew 2 stitches. 0.5 cm 0.5 cm 3 Turn the hand wheel towards you to raise the needle, raise the presser foot, then pull... the fabric forward. 4 Hold the 4 threads in your left hand while sewing the first 3-4 stitches to hold them in place. 7 Fold hem over about 0.5 cm and continue feeding folded hem under foot while...
Users Manual - English
Page 21
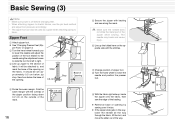
... the outside of the mark. 0.2 cm B 9 With the fabric right side up, baste the zipper onto the fabric, then sew the edge of the basting. ✽ Reinforce base of opening by sewing over it will be attached to lower the needle and position the presser foot. 4 Divide the seam margin. per Foot... needle may break and cause injury. 6 Line up the folded hem on the opposite side with basting and sew along the mark. Basic Sewing (3) Note • Make sure power is off before changing feet. • When attaching zippers to stretch fabrics, use the pin feed method and adjust foot ...
... the outside of the mark. 0.2 cm B 9 With the fabric right side up, baste the zipper onto the fabric, then sew the edge of the basting. ✽ Reinforce base of opening by sewing over it will be attached to lower the needle and position the presser foot. 4 Divide the seam margin. per Foot... needle may break and cause injury. 6 Line up the folded hem on the opposite side with basting and sew along the mark. Basic Sewing (3) Note • Make sure power is off before changing feet. • When attaching zippers to stretch fabrics, use the pin feed method and adjust foot ...

Users Manual - English
Page 22
...this mark with edge of fabric End of stitching Align this mark with edge of fabric • Accurately top stitch 1/8" from falling over, and sew to the base of the opening approximately 2 cm above the end of the zipper. 7 Remove the basting at the zipper position. Mark the base... of the opening . ✽ When sewing with the teeth to begin, end, or pivot 1/4" from edge of fabric Seam (1/8", 3.2 mm) 17 Slide 2 cm Teeth Baste Base of Opening 4 Separate...
...this mark with edge of fabric End of stitching Align this mark with edge of fabric • Accurately top stitch 1/8" from falling over, and sew to the base of the opening approximately 2 cm above the end of the zipper. 7 Remove the basting at the zipper position. Mark the base... of the opening . ✽ When sewing with the teeth to begin, end, or pivot 1/4" from edge of fabric Seam (1/8", 3.2 mm) 17 Slide 2 cm Teeth Baste Base of Opening 4 Separate...
Users Manual - English
Page 23
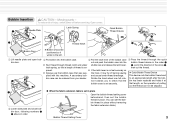
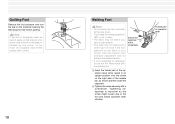
... side of oil about once a month to the area indicated by the arrow. (If too much oil is not advisable or necessary to keep the sewing speed low (500 r.p.m. Forked part 1 of the operation lever while raised in an upright position onto the screw on the fabric is important as shown... Foot Reduce the foot pressure and turn the dial on the machine lowering the feed dogs for feeding the cloth may not feed if you sew at high speeds. • The feed dog for free motion quilting. Secure the capscrew 2 with a screwdriver. 1 Insert the forked part of operation lever...
... side of oil about once a month to the area indicated by the arrow. (If too much oil is not advisable or necessary to keep the sewing speed low (500 r.p.m. Forked part 1 of the operation lever while raised in an upright position onto the screw on the fabric is important as shown... Foot Reduce the foot pressure and turn the dial on the machine lowering the feed dogs for feeding the cloth may not feed if you sew at high speeds. • The feed dog for free motion quilting. Secure the capscrew 2 with a screwdriver. 1 Insert the forked part of operation lever...

Users Manual - English
Page 24
... Tighten the screw securely with a screwdriver since it can be able to adjust the position of sewing feet and feed position to pin feeding position. 6 Pull thread until lower needle catches fabric. ✽ Sew 2-3 reinforcement stitches. 7 When not using the fabric separator. Note • Lighten the presser foot... To be swung off to the side as illustrated in a perfect seam. Fabric Separator(for joining lining to fabric) ✽ Use this technique for sewing velvet and lining together. 1 Raise needle and foot. 2 Move separator so it sits under presser foot. 3 Make sure it is lined up so...
... Tighten the screw securely with a screwdriver since it can be able to adjust the position of sewing feet and feed position to pin feeding position. 6 Pull thread until lower needle catches fabric. ✽ Sew 2-3 reinforcement stitches. 7 When not using the fabric separator. Note • Lighten the presser foot... To be swung off to the side as illustrated in a perfect seam. Fabric Separator(for joining lining to fabric) ✽ Use this technique for sewing velvet and lining together. 1 Raise needle and foot. 2 Move separator so it sits under presser foot. 3 Make sure it is lined up so...


