
Users Manual - English
Page 5
...Attaching stabilizer material 18 Embroidering different types of fabric 18 Setting the fabric in the embroidery frame 20 Fitting the embroidery frame to the machine 22 Removing the embroidery frame ...... 22 THREAD TENSION ADJUSTMENT....... 23 ADJUSTING THE LCD SCREEN CONTRAST 24 If the...a single color pattern when "MULTI COLOR" is displayed... 49 Embroidering characters that extend beyond one frame 50 EMBROIDERY APPLICATIONS 51 Combining a frame pattern with a design 51 Embroidering appliques (using a frame pattern 52 Embroidering onto small pieces of fabric or onto corners ........ 53...
...Attaching stabilizer material 18 Embroidering different types of fabric 18 Setting the fabric in the embroidery frame 20 Fitting the embroidery frame to the machine 22 Removing the embroidery frame ...... 22 THREAD TENSION ADJUSTMENT....... 23 ADJUSTING THE LCD SCREEN CONTRAST 24 If the...a single color pattern when "MULTI COLOR" is displayed... 49 Embroidering characters that extend beyond one frame 50 EMBROIDERY APPLICATIONS 51 Combining a frame pattern with a design 51 Embroidering appliques (using a frame pattern 52 Embroidering onto small pieces of fabric or onto corners ........ 53...
Users Manual - English
Page 8
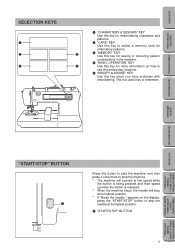
... is a useful key to stop at its highest position. * If "Raise the needle." CONTENTS MACHINE KNOWLEDGE SELECTION KEYS 1 2 4 1 "CHARACTERS & DESIGNS" KEY Use this key for embroidering characters and patterns. 2 "CARD" KEY Use this key to select a memory card for embroidery patterns. 3 3 "MEMORY" KEY Use this key for saving or retrieving pattern combinations in...
... is a useful key to stop at its highest position. * If "Raise the needle." CONTENTS MACHINE KNOWLEDGE SELECTION KEYS 1 2 4 1 "CHARACTERS & DESIGNS" KEY Use this key for embroidering characters and patterns. 2 "CARD" KEY Use this key to select a memory card for embroidery patterns. 3 3 "MEMORY" KEY Use this key for saving or retrieving pattern combinations in...
Users Manual - English
Page 9
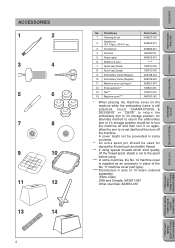
...-001 ***** 130013-003 130012-003 XA3728-001 X58739-003 X59351-001 130920-051 127610-000 XA0181-051 * When placing the machine cover on the machine while the embroidery frame is supplied as an accessory in place of 10 when ordered separately. (Parts Code) USA and Canada: XA3811-051 ... position. A cover might not be provieded in sets of the No. 11 machine cover (soft type). ***** Distributed in some countries, the No. 14 machine cover is still attached, touch "CHARACTERS & DESIGNS" or "CARD" to return the embroidery arm to it on again, allow the arm to the spool before using special...
...-001 ***** 130013-003 130012-003 XA3728-001 X58739-003 X59351-001 130920-051 127610-000 XA0181-051 * When placing the machine cover on the machine while the embroidery frame is supplied as an accessory in place of 10 when ordered separately. (Parts Code) USA and Canada: XA3811-051 ... position. A cover might not be provieded in sets of the No. 11 machine cover (soft type). ***** Distributed in some countries, the No. 14 machine cover is still attached, touch "CHARACTERS & DESIGNS" or "CARD" to return the embroidery arm to it on again, allow the arm to the spool before using special...
Users Manual - English
Page 10
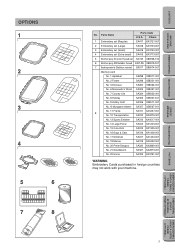
Parts Name Parts Code U.S.A. Others 1 Embroidery set (Regular) SA417 XA3727-001 2 Embroidery set (Large) SA418 XA3733-001 3 Embroidery set (Small) SA416 XA3730-001 4 Embroidery set (Extra-small) SA415 XA3713-001 5 Brother poly 40 color thread set SA740 X80928-100 6 Brother poly #90 bobbin thread EBT-PE... 19 Marine SA319 XA2452-001 No. 20 Petite Designs SA320 XA2869-001 No. 21 Needlework SA321 XA2873-001 No. 25 Horse SA325 XA3791-001 WARNING Embroidery Cards purchased in foreign countries may not work with your machine. 7 EMBROIDERING USING A LARGE FRAME (OPTIONAL) ...
Parts Name Parts Code U.S.A. Others 1 Embroidery set (Regular) SA417 XA3727-001 2 Embroidery set (Large) SA418 XA3733-001 3 Embroidery set (Small) SA416 XA3730-001 4 Embroidery set (Extra-small) SA415 XA3713-001 5 Brother poly 40 color thread set SA740 X80928-100 6 Brother poly #90 bobbin thread EBT-PE... 19 Marine SA319 XA2452-001 No. 20 Petite Designs SA320 XA2869-001 No. 21 Needlework SA321 XA2873-001 No. 25 Horse SA325 XA3791-001 WARNING Embroidery Cards purchased in foreign countries may not work with your machine. 7 EMBROIDERING USING A LARGE FRAME (OPTIONAL) ...
Users Manual - English
Page 12
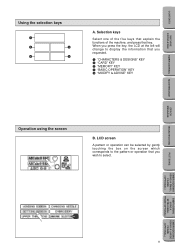
... EMBROIDERING MAINTENANCE Using the selection keys A. Selection keys Select one of the five keys that explain the functions of the machine, and press that you requested. 1 "CHARACTERS & DESIGNS" KEY 2 "CARD" KEY 3 "MEMORY" KEY 4 "BASIC OPERATION" KEY 5 "MODIFY & ADVISE" KEY Operation using the screen B. LCD screen A pattern or operation can be selected by...
... EMBROIDERING MAINTENANCE Using the selection keys A. Selection keys Select one of the five keys that explain the functions of the machine, and press that you requested. 1 "CHARACTERS & DESIGNS" KEY 2 "CARD" KEY 3 "MEMORY" KEY 4 "BASIC OPERATION" KEY 5 "MODIFY & ADVISE" KEY Operation using the screen B. LCD screen A pattern or operation can be selected by...
Users Manual - English
Page 24
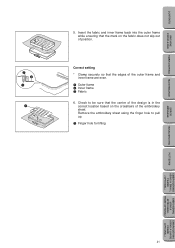
... using the finger hole to be sure that the mark on the crosshairs of the embroidery sheet. Check to pull up. 1 Finger hole for lifting 21 PATTERNS EMBROIDERING USING A SMALL FRAME (OPTIONAL) EMBROIDERING USING A EXTRA-SMALL FRAME (OPTIONAL) EMBROIDERING USING A LARGE ...FRAME (OPTIONAL) Insert the fabric and inner frame back into the outer frame while ensuring that the center of the design is in the correct location based on the fabric does not slip out of the outer frame and inner frame are even. 1 Outer frame 2 Inner...
... using the finger hole to be sure that the mark on the crosshairs of the embroidery sheet. Check to pull up. 1 Finger hole for lifting 21 PATTERNS EMBROIDERING USING A SMALL FRAME (OPTIONAL) EMBROIDERING USING A EXTRA-SMALL FRAME (OPTIONAL) EMBROIDERING USING A LARGE ...FRAME (OPTIONAL) Insert the fabric and inner frame back into the outer frame while ensuring that the center of the design is in the correct location based on the fabric does not slip out of the outer frame and inner frame are even. 1 Outer frame 2 Inner...

Users Manual - English
Page 27
... this key to make contrast less (lighter). 2 "Sharp" Touch this key to make the LCD lighter, touch the upper selection key (CHARACTERS & DESIGNS). 3. While touching the LCD (anywhere is hard to make contrast greater (darker). 3 Touch "END" to return to the screen which was previously being... displayed. 1 23 * If the contrast is turned on again. 2. CONTENTS MACHINE KNOWLEDGE ADJUSTING THE LCD SCREEN CONTRAST To adjust the brightness of the lower two selection keys (BASIC OPERATION, MODIFY & ADVISE). If the LCD ...
... this key to make contrast less (lighter). 2 "Sharp" Touch this key to make the LCD lighter, touch the upper selection key (CHARACTERS & DESIGNS). 3. While touching the LCD (anywhere is hard to make contrast greater (darker). 3 Touch "END" to return to the screen which was previously being... displayed. 1 23 * If the contrast is turned on again. 2. CONTENTS MACHINE KNOWLEDGE ADJUSTING THE LCD SCREEN CONTRAST To adjust the brightness of the lower two selection keys (BASIC OPERATION, MODIFY & ADVISE). If the LCD ...
Users Manual - English
Page 31
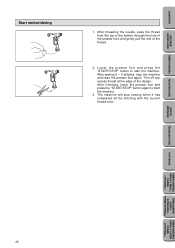
... hole of the presser foot, and gently pull the end of the design. After trimming, lower the presser foot and press the "START/STOP" button again to start the machine. 3. The machine will stop the machine and raise the presser foot again. Lower the presser foot and press the... "START/STOP" button to start the machine. Trim off any excess thread at the edge of the thread. 2. CONTENTS MACHINE KNOWLEDGE EMBROIDERING MAINTENANCE Start embroidering 1. After sewing 5 - 6 stitches, stop sewing when it has completed all...
... hole of the presser foot, and gently pull the end of the design. After trimming, lower the presser foot and press the "START/STOP" button again to start the machine. 3. The machine will stop the machine and raise the presser foot again. Lower the presser foot and press the... "START/STOP" button to start the machine. Trim off any excess thread at the edge of the thread. 2. CONTENTS MACHINE KNOWLEDGE EMBROIDERING MAINTENANCE Start embroidering 1. After sewing 5 - 6 stitches, stop sewing when it has completed all...

Users Manual - English
Page 33
... memory card inserted, the screen corresponding to the memory card will appear. CONTENTS MACHINE KNOWLEDGE EMBROIDERING MAINTENANCE HOW TO SELECT PATTERNS Selecting built-in embroidery patterns A Select the type of built-in embroidery patterns you wish to embroider. * If the power is turned on without ...a memory card inserted, the display shown at the left will appear. (Example: No.2 The Flower card) To select built-in patterns press the "CHARACTERS & DESIGNS" key. 1 1 "CHARACTERS & DESIGNS" key...
... memory card inserted, the screen corresponding to the memory card will appear. CONTENTS MACHINE KNOWLEDGE EMBROIDERING MAINTENANCE HOW TO SELECT PATTERNS Selecting built-in embroidery patterns A Select the type of built-in embroidery patterns you wish to embroider. * If the power is turned on without ...a memory card inserted, the display shown at the left will appear. (Example: No.2 The Flower card) To select built-in patterns press the "CHARACTERS & DESIGNS" key. 1 1 "CHARACTERS & DESIGNS" key...
Users Manual - English
Page 38
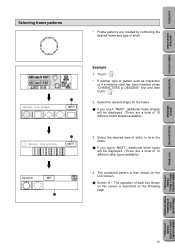
...will be displayed. (There are a total of pattern such as characters or if a memory card has been inserted, press "CHARACTERS & DESIGNS" first and then touch " ". 2. The combined pattern is described on the LCD screen. 3 Screen A - TROUBLESHOOTING PATTERNS EMBROIDERING ...USING A SMALL FRAME (OPTIONAL) EMBROIDERING USING A EXTRA-SMALL FRAME (OPTIONAL) EMBROIDERING USING A LARGE FRAME (OPTIONAL) 35 CONTENTS MACHINE KNOWLEDGE EMBROIDERING MAINTENANCE ERROR MESSAGE Selecting frame patterns * Frame patterns are a total of 10 different frame shapes available.) 3. The operation...
...will be displayed. (There are a total of pattern such as characters or if a memory card has been inserted, press "CHARACTERS & DESIGNS" first and then touch " ". 2. The combined pattern is described on the LCD screen. 3 Screen A - TROUBLESHOOTING PATTERNS EMBROIDERING ...USING A SMALL FRAME (OPTIONAL) EMBROIDERING USING A EXTRA-SMALL FRAME (OPTIONAL) EMBROIDERING USING A LARGE FRAME (OPTIONAL) 35 CONTENTS MACHINE KNOWLEDGE EMBROIDERING MAINTENANCE ERROR MESSAGE Selecting frame patterns * Frame patterns are a total of 10 different frame shapes available.) 3. The operation...

Users Manual - English
Page 44
For the next example press "CHARACTERS & DESIGNS", touch "ABC abc 0" to select desired font style and enter characters to form the word or monogram. 2. CONTENTS MACHINE KNOWLEDGE EMBROIDERING MAINTENANCE MEMORY Up to 5 different pattern combinations can be displayed on the screen. Press "MEMORY". 1 "MEMORY" key 3. Press "MEMORY", touch "NEXT" and "MEMORY 2" ...
For the next example press "CHARACTERS & DESIGNS", touch "ABC abc 0" to select desired font style and enter characters to form the word or monogram. 2. CONTENTS MACHINE KNOWLEDGE EMBROIDERING MAINTENANCE MEMORY Up to 5 different pattern combinations can be displayed on the screen. Press "MEMORY". 1 "MEMORY" key 3. Press "MEMORY", touch "NEXT" and "MEMORY 2" ...
Users Manual - English
Page 46
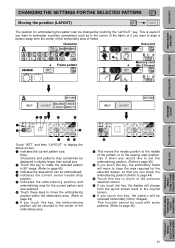
... screen. Note: Characters and patterns may sometimes be returned to the center of the pattern or to the sewing start position. CONTENTS MACHINE KNOWLEDGE CHANGING THE SETTINGS FOR THE SELECTED PATTERN Moving the position (LAYOUT) The position for embroidering the pattern can be used with some... the current center needle drop position. 5 Indicates the embroidering position and embroidering area for the selected design, so that you want to align a pattern away form the center of the embroidery area of the fabric or if you touch this key to return to display the above screen. ...
... screen. Note: Characters and patterns may sometimes be returned to the center of the pattern or to the sewing start position. CONTENTS MACHINE KNOWLEDGE CHANGING THE SETTINGS FOR THE SELECTED PATTERN Moving the position (LAYOUT) The position for embroidering the pattern can be used with some... the current center needle drop position. 5 Indicates the embroidering position and embroidering area for the selected design, so that you want to align a pattern away form the center of the embroidery area of the fabric or if you touch this key to return to display the above screen. ...
Users Manual - English
Page 54
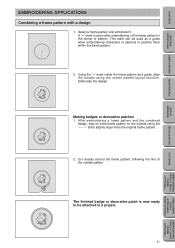
Select a frame pattern and embroider it. Embroider the design. After embroidering a frame pattern and the combined design, sew an extra frame pattern on the outside pattern. Cut cleanly around the frame pattern, following the line of pattern... frame pattern. 2. This mark can be attached to position them within the frame pattern. 2. CONTENTS MACHINE KNOWLEDGE EMBROIDERING MAINTENANCE ERROR MESSAGE TROUBLESHOOTING EMBROIDERING APPLICATIONS Combining a frame pattern with a design 1. Using the "+" mark inside the frame pattern as a guide when embroidering characters or patterns to ...
Select a frame pattern and embroider it. Embroider the design. After embroidering a frame pattern and the combined design, sew an extra frame pattern on the outside pattern. Cut cleanly around the frame pattern, following the line of pattern... frame pattern. 2. This mark can be attached to position them within the frame pattern. 2. CONTENTS MACHINE KNOWLEDGE EMBROIDERING MAINTENANCE ERROR MESSAGE TROUBLESHOOTING EMBROIDERING APPLICATIONS Combining a frame pattern with a design 1. Using the "+" mark inside the frame pattern as a guide when embroidering characters or patterns to ...

Users Manual - English
Page 63
... is displayed when the RETRIEVE key is touched and the design in the machine's memory is from must be inserted in order to retrieve the design. This message is inserted. The card that cannot be combined. Use the balance wheel to move the embroidery frame while the needle is in the down position when...
... is displayed when the RETRIEVE key is touched and the design in the machine's memory is from must be inserted in order to retrieve the design. This message is inserted. The card that cannot be combined. Use the balance wheel to move the embroidery frame while the needle is in the down position when...
Users Manual - English
Page 65
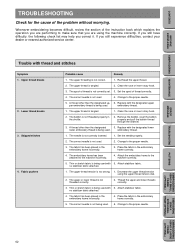
Upper thread breaks 2. Re-thread the upper thread. 2. A thread other than the designated 3. Change to the machine correctly. 5. Attach the embroidery frame to the proper needle. 3. Attach stabilizer fabric. no stabilizer fabric attached. 4. Decrease the upper thread tension using the machine correctly. Thin or stretch fabric is tangled. 1. If you correct it. Lower thread breaks...
Upper thread breaks 2. Re-thread the upper thread. 2. A thread other than the designated 3. Change to the machine correctly. 5. Attach the embroidery frame to the proper needle. 3. Attach stabilizer fabric. no stabilizer fabric attached. 4. Decrease the upper thread tension using the machine correctly. Thin or stretch fabric is tangled. 1. If you correct it. Lower thread breaks...

Users Manual - English
Page 66
...tension using the upper thread tension dial. 2. Threads other than the designated 4. Threads other than the designated 4. being used with the designated upper and upper and lower embroidery thread are lower embroidery threads. The needle is not cut during automatic thread cutting. 1. .... Cut and remove the tangled threads inside the rotary hook using scissors. Install the needle correctly. 2. CONTENTS MACHINE KNOWLEDGE EMBROIDERING MAINTENANCE ERROR MESSAGE TROUBLESHOOTING Symptom Probable cause Remedy 5. Remove the bobbin, reset the bobbin properly and ...
...tension using the upper thread tension dial. 2. Threads other than the designated 4. Threads other than the designated 4. being used with the designated upper and upper and lower embroidery thread are lower embroidery threads. The needle is not cut during automatic thread cutting. 1. .... Cut and remove the tangled threads inside the rotary hook using scissors. Install the needle correctly. 2. CONTENTS MACHINE KNOWLEDGE EMBROIDERING MAINTENANCE ERROR MESSAGE TROUBLESHOOTING Symptom Probable cause Remedy 5. Remove the bobbin, reset the bobbin properly and ...


