

Users Manual - English
Page 3
...manual to change without notice. Benzene, thinner, and scouring powders can damage the case and machine, and should contact your local authorized Brother dealer. FOR USERS IN AUSTRALIA AND NEW ZEALAND This embroidery machine is not intended to be used . • Always consult the ... and assistance may be replaced by authorized dealer. • In the event a malfunction occurs or adjustment is required, first follow the troubleshooting table in this product are subject to inspect and adjust the machine yourself. Use accessories recommended by the manufacturer as marked on plug. ...
...manual to change without notice. Benzene, thinner, and scouring powders can damage the case and machine, and should contact your local authorized Brother dealer. FOR USERS IN AUSTRALIA AND NEW ZEALAND This embroidery machine is not intended to be used . • Always consult the ... and assistance may be replaced by authorized dealer. • In the event a malfunction occurs or adjustment is required, first follow the troubleshooting table in this product are subject to inspect and adjust the machine yourself. Use accessories recommended by the manufacturer as marked on plug. ...
Users Manual - English
Page 5
... APPENDIX 69 Care and Maintenance ...70 Cleaning the machine surface ...70 Cleaning the race ...70 Attaching the Embroidery Foot 72 Attaching the embroidery Foot "Q" ...72 Troubleshooting ...74 Error messages ...78 Adjusting the LCD...81 Operation beep...81 Canceling the operation beep ...82 Index ...83 4
... APPENDIX 69 Care and Maintenance ...70 Cleaning the machine surface ...70 Cleaning the race ...70 Attaching the Embroidery Foot 72 Attaching the embroidery Foot "Q" ...72 Troubleshooting ...74 Error messages ...78 Adjusting the LCD...81 Operation beep...81 Canceling the operation beep ...82 Index ...83 4

Users Manual - English
Page 70
Care and Maintenance 70 Cleaning the machine surface 70 Cleaning the race 70 Attaching the Embroidery Foot 72 Attaching the embroidery Foot "Q 72 Troubleshooting ...74 Error messages 78 Adjusting the LCD 81 Operation beep 81 Canceling the operation beep 82 Index ...83 3 APPENDIX The various maintenance and troubleshooting procedures are described in this chapter.
Care and Maintenance 70 Cleaning the machine surface 70 Cleaning the race 70 Attaching the Embroidery Foot 72 Attaching the embroidery Foot "Q 72 Troubleshooting ...74 Error messages 78 Adjusting the LCD 81 Operation beep 81 Canceling the operation beep 82 Index ...83 3 APPENDIX The various maintenance and troubleshooting procedures are described in this chapter.
Users Manual - English
Page 75
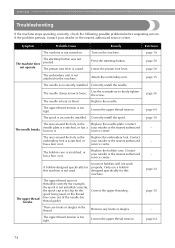
... for this machine. Incorrect bobbins will not work properly. page 64 74 The upper thread tension is too tight. Lower the presser foot lever. APPENDIX Troubleshooting If the machine stops operating correctly, check the following possible problems before requesting service. your retailer or the nearest authorized service center. Reference page 19...
... for this machine. Incorrect bobbins will not work properly. page 64 74 The upper thread tension is too tight. Lower the presser foot lever. APPENDIX Troubleshooting If the machine stops operating correctly, check the following possible problems before requesting service. your retailer or the nearest authorized service center. Reference page 19...

Users Manual - English
Page 76
... thread is not used . page 28 page 64 A bobbin designed specifically for this machine is incorrectly installed. Incorrect bobbins will not work properly. page 24 Troubleshooting 75
... thread is not used . page 28 page 64 A bobbin designed specifically for this machine is incorrectly installed. Incorrect bobbins will not work properly. page 24 Troubleshooting 75
Users Manual - English
Page 78
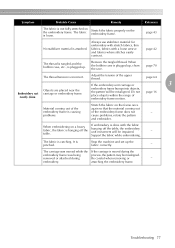
... hanging off the table, the embroidery unit movement will be misaligned. Support the fabric while embroidering. - attaching the embroidery frame. Be careful when removing or - Troubleshooting 77 When the bobbin case is plugged up the fabric correctly. - page 64 If the embroidery unit carriage or 3 Embroidery not neatly done. Stop the...
... hanging off the table, the embroidery unit movement will be misaligned. Support the fabric while embroidering. - attaching the embroidery frame. Be careful when removing or - Troubleshooting 77 When the bobbin case is plugged up the fabric correctly. - page 64 If the embroidery unit carriage or 3 Embroidery not neatly done. Stop the...

Users Manual - English
Page 80
... on the card was pressed when no pattern is being stored. The start/stop button was selected. A card that will not fit within the frame. Troubleshooting 79 Error Message Probable Cause This message is displayed when the embroidery unit is trying to set a number of characters that cannot be used with...
... on the card was pressed when no pattern is being stored. The start/stop button was selected. A card that will not fit within the frame. Troubleshooting 79 Error Message Probable Cause This message is displayed when the embroidery unit is trying to set a number of characters that cannot be used with...

Users Manual - English
Page 82
... beeps sound. ■ If the machine locks up, for example, because the thread is pressed you will hear one beep. machine automatically stops. Press c or . d Troubleshooting 81 a Each time a key is tangled The machine beeps for the cause of the error, and 3 correct it on again. Turn off the machine. Adjusting...
... beeps sound. ■ If the machine locks up, for example, because the thread is pressed you will hear one beep. machine automatically stops. Press c or . d Troubleshooting 81 a Each time a key is tangled The machine beeps for the cause of the error, and 3 correct it on again. Turn off the machine. Adjusting...

Users Manual - English
Page 85
APPENDIX R race 70 recalling a pattern 63 release button 17 resewing 65 S safety instructions 1 scissors 6 screwdriver 6 seam ripper 6 , settings key 11 22 spool cap 6 , spool net 6 25 spool of thread 30 spool pin 8 , stabilizer material 7 42 start/stop button 10 storing pattern 63 T thread cutter 8 thread cutter button 10 thread guide cover 8 thread guide disk 9 thread guide plate 8 thread take-up lever check window 8 thread tension adjustment 64 top cover 8 touch panel 11 troubleshooting 74 turning machine on/off 19 U upper threading 30 84
APPENDIX R race 70 recalling a pattern 63 release button 17 resewing 65 S safety instructions 1 scissors 6 screwdriver 6 seam ripper 6 , settings key 11 22 spool cap 6 , spool net 6 25 spool of thread 30 spool pin 8 , stabilizer material 7 42 start/stop button 10 storing pattern 63 T thread cutter 8 thread cutter button 10 thread guide cover 8 thread guide disk 9 thread guide plate 8 thread take-up lever check window 8 thread tension adjustment 64 top cover 8 touch panel 11 troubleshooting 74 turning machine on/off 19 U upper threading 30 84


