
Users Manual - English
Page 2
... or when making any object into water. Do not unplug by the manufacturer as described in this manual. 3. Do not use ." Switch the embroidery machine to break. 14. Always unplug before cleaning. 2. Never drop or insert any adjustments in the needle area, such as a toy. To unplug, ...grasp the plug, not the cord. 10. Always unplug the embroidery machine from outlet. 9. The embroidery machine should always be taken, including the following: "Read all moving parts. WARNING - The wrong plate can cause the needle to the ...
... or when making any object into water. Do not unplug by the manufacturer as described in this manual. 3. Do not use ." Switch the embroidery machine to break. 14. Always unplug before cleaning. 2. Never drop or insert any adjustments in the needle area, such as a toy. To unplug, ...grasp the plug, not the cord. 10. Always unplug the embroidery machine from outlet. 9. The embroidery machine should always be taken, including the following: "Read all moving parts. WARNING - The wrong plate can cause the needle to the ...
Users Manual - English
Page 3
... the mains supply. The wire which is fitted with the coloured markings identifying the terminals in the main lead of this equipment. If your embroidery machine is coloured blue must be fitted in a live socket outlet. With alternative plugs an approved fuse must be connected to BS 1362, i.e. BE SURE to...
... the mains supply. The wire which is fitted with the coloured markings identifying the terminals in the main lead of this equipment. If your embroidery machine is coloured blue must be fitted in a live socket outlet. With alternative plugs an approved fuse must be connected to BS 1362, i.e. BE SURE to...
Users Manual - English
Page 4
...storing your nearest authorized service center. ● Please note that you study this booklet. Benzene, thinner, and scouring powders can damage the case and machine, and should never be sure to turn off the power switch and unplug the cord when: ● Operation is complete ● Replacing or ...removing the needle or any assemblies; Do not drop or hit the machine. 4. Always consult the operation manual or use extension cords. 4. To fully enjoy all of the operation manual to clean the case. Remember to...
...storing your nearest authorized service center. ● Please note that you study this booklet. Benzene, thinner, and scouring powders can damage the case and machine, and should never be sure to turn off the power switch and unplug the cord when: ● Operation is complete ● Replacing or ...removing the needle or any assemblies; Do not drop or hit the machine. 4. Always consult the operation manual or use extension cords. 4. To fully enjoy all of the operation manual to clean the case. Remember to...
Users Manual - English
Page 5
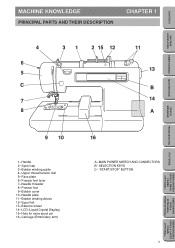
CONTENTS CHAPTER 1 MACHINE KNOWLEDGE 3 PRINCIPAL PARTS AND THEIR DESCRIPTION 3 MAIN POWER SWITCH AND CONNECTORS 4 SELECTION KEYS 5 "START/STOP" BUTTON 5 ACCESSORIES ... different types of fabric 18 Setting the fabric in the embroidery frame 20 Fitting the embroidery frame to the machine 22 Removing the embroidery frame ...... 22 THREAD TENSION ADJUSTMENT....... 23 ADJUSTING THE LCD SCREEN CONTRAST 24 If the...A EXTRA-SMALL FRAME (OPTIONAL) EMBROIDERING USING A SMALL FRAME (OPTIONAL) PATTERNS TROUBLESHOOTING ERROR MESSAGE EMBROIDERING MAINTENANCE MACHINE KNOWLEDGE CONTENTS
CONTENTS CHAPTER 1 MACHINE KNOWLEDGE 3 PRINCIPAL PARTS AND THEIR DESCRIPTION 3 MAIN POWER SWITCH AND CONNECTORS 4 SELECTION KEYS 5 "START/STOP" BUTTON 5 ACCESSORIES ... different types of fabric 18 Setting the fabric in the embroidery frame 20 Fitting the embroidery frame to the machine 22 Removing the embroidery frame ...... 22 THREAD TENSION ADJUSTMENT....... 23 ADJUSTING THE LCD SCREEN CONTRAST 24 If the...A EXTRA-SMALL FRAME (OPTIONAL) EMBROIDERING USING A SMALL FRAME (OPTIONAL) PATTERNS TROUBLESHOOTING ERROR MESSAGE EMBROIDERING MAINTENANCE MACHINE KNOWLEDGE CONTENTS
Users Manual - English
Page 6
...- LCD (Liquid Crystal Display) 15- Hole for extra spool pin 16- Presser foot 9- Bobbin cover 10- Needle plate 11- Bobbin winding device 12- CONTENTS MACHINE KNOWLEDGE EMBROIDERING MAINTENANCE MACHINE KNOWLEDGE PRINCIPAL PARTS AND THEIR DESCRIPTION CHAPTER 1 4 6 5 C 7 8 31 2 15 12 11 13 B 14 A ERROR MESSAGE TROUBLESHOOTING PATTERNS EMBROIDERING USING A SMALL FRAME (OPTIONAL) 9 10...
...- LCD (Liquid Crystal Display) 15- Hole for extra spool pin 16- Presser foot 9- Bobbin cover 10- Needle plate 11- Bobbin winding device 12- CONTENTS MACHINE KNOWLEDGE EMBROIDERING MAINTENANCE MACHINE KNOWLEDGE PRINCIPAL PARTS AND THEIR DESCRIPTION CHAPTER 1 4 6 5 C 7 8 31 2 15 12 11 13 B 14 A ERROR MESSAGE TROUBLESHOOTING PATTERNS EMBROIDERING USING A SMALL FRAME (OPTIONAL) 9 10...
Users Manual - English
Page 7
...plug does not fit fully in the outlet, contact a qualified electrician to fit in any way. When servicing the sewing machine, or when removing covers or changing lamps, the machine must be switched off and the plug removed from the socket-outlet. - only This appliance has a polarized plug (one ... the plug in a polarized outlet only one blade wider than the other). To reduce the risk of the machine must have the plug removed from the socket-outlet. - When leaving the embroidery machine unattended, the main switch of electric shock, this plug is intended to install the proper outlet.
...plug does not fit fully in the outlet, contact a qualified electrician to fit in any way. When servicing the sewing machine, or when removing covers or changing lamps, the machine must be switched off and the plug removed from the socket-outlet. - only This appliance has a polarized plug (one ... the plug in a polarized outlet only one blade wider than the other). To reduce the risk of the machine must have the plug removed from the socket-outlet. - When leaving the embroidery machine unattended, the main switch of electric shock, this plug is intended to install the proper outlet.
Users Manual - English
Page 8
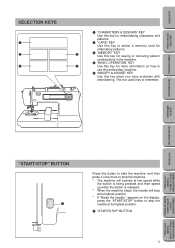
... Use this key to select a memory card for embroidery patterns. 3 3 "MEMORY" KEY Use this key for saving or retrieving pattern combinations in the machine. 4 "BASIC OPERATION" KEY 5 Use this key for more to remember. EMBROIDERING MAINTENANCE ERROR MESSAGE TROUBLESHOOTING PATTERNS EMBROIDERING USING A SMALL FRAME (OPTIONAL) EMBROIDERING... USING A EXTRA-SMALL FRAME (OPTIONAL) "START/STOP" BUTTON 1 Press this button to start the machine, and then press it once more information on the display, press the "START/STOP" button to use this embroidery...
... Use this key to select a memory card for embroidery patterns. 3 3 "MEMORY" KEY Use this key for saving or retrieving pattern combinations in the machine. 4 "BASIC OPERATION" KEY 5 Use this key for more to remember. EMBROIDERING MAINTENANCE ERROR MESSAGE TROUBLESHOOTING PATTERNS EMBROIDERING USING A SMALL FRAME (OPTIONAL) EMBROIDERING... USING A EXTRA-SMALL FRAME (OPTIONAL) "START/STOP" BUTTON 1 Press this button to start the machine, and then press it once more information on the display, press the "START/STOP" button to use this embroidery...
Users Manual - English
Page 9
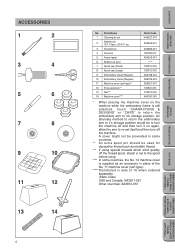
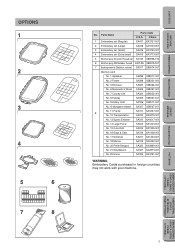
...return the embroidery arm to it's storage position would be used for decorative thread such as an accessory in place of the No. 11 machine cover (soft type). ***** Distributed in sets of 10 when ordered separately. (Parts Code) USA and Canada: XA3811-051 Other countries: ... 6 Bobbins (4 pcs) 7 Spool cap (Small) 8 Spool cap (Large) 9 Embroidery sheet (Regular) 10 Embroidery frame (Regular) 11 Machine cover (soft type)* 12 Extra spool pin** 13 Net*** 14 Machine cover**** Parts Code XA4527-001 X59535-001 X53666-001 184783-001 X54243-001 ***** 130013-003 130012-003 XA3728-001 X58739...
...return the embroidery arm to it's storage position would be used for decorative thread such as an accessory in place of the No. 11 machine cover (soft type). ***** Distributed in sets of 10 when ordered separately. (Parts Code) USA and Canada: XA3811-051 Other countries: ... 6 Bobbins (4 pcs) 7 Spool cap (Small) 8 Spool cap (Large) 9 Embroidery sheet (Regular) 10 Embroidery frame (Regular) 11 Machine cover (soft type)* 12 Extra spool pin** 13 Net*** 14 Machine cover**** Parts Code XA4527-001 X59535-001 X53666-001 184783-001 X54243-001 ***** 130013-003 130012-003 XA3728-001 X58739...
Users Manual - English
Page 10
...001 3 Embroidery set (Small) SA416 XA3730-001 4 Embroidery set (Extra-small) SA415 XA3713-001 5 Brother poly 40 color thread set SA740 X80928-100 6 Brother poly #90 bobbin thread EBT-PE X80919-001 7 Backing material (Stabilizer material) SA517 X80914-001 Memory card No. 1 Alphabet SA298 X58317-... XA2873-001 No. 25 Horse SA325 XA3791-001 WARNING Embroidery Cards purchased in foreign countries may not work with your machine. 7 EMBROIDERING USING A LARGE FRAME (OPTIONAL) EMBROIDERING USING A EXTRA-SMALL FRAME (OPTIONAL) EMBROIDERING USING A SMALL FRAME (OPTIONAL) ...
...001 3 Embroidery set (Small) SA416 XA3730-001 4 Embroidery set (Extra-small) SA415 XA3713-001 5 Brother poly 40 color thread set SA740 X80928-100 6 Brother poly #90 bobbin thread EBT-PE X80919-001 7 Backing material (Stabilizer material) SA517 X80914-001 Memory card No. 1 Alphabet SA298 X58317-... XA2873-001 No. 25 Horse SA325 XA3791-001 WARNING Embroidery Cards purchased in foreign countries may not work with your machine. 7 EMBROIDERING USING A LARGE FRAME (OPTIONAL) EMBROIDERING USING A EXTRA-SMALL FRAME (OPTIONAL) EMBROIDERING USING A SMALL FRAME (OPTIONAL) ...

Users Manual - English
Page 11
BA ERROR MESSAGE TROUBLESHOOTING PATTERNS EMBROIDERING USING A SMALL FRAME (OPTIONAL) EMBROIDERING USING A EXTRA-SMALL FRAME (OPTIONAL) EMBROIDERING USING A LARGE FRAME (OPTIONAL) 8 Touch "NEXT". 3. CONTENTS MACHINE KNOWLEDGE EMBROIDERING MAINTENANCE OPERATION (SELECTION KEYS) Most of the instructions are in the machine's memory. A B 1 1 "BASIC OPERATION" key 1. Touch "SWITCH FUNCTION". 4. Press "BASIC OPERATION". 2. Messages on the LCD screen guide you through each operation. Touch "SELECTION KEY".
BA ERROR MESSAGE TROUBLESHOOTING PATTERNS EMBROIDERING USING A SMALL FRAME (OPTIONAL) EMBROIDERING USING A EXTRA-SMALL FRAME (OPTIONAL) EMBROIDERING USING A LARGE FRAME (OPTIONAL) 8 Touch "NEXT". 3. CONTENTS MACHINE KNOWLEDGE EMBROIDERING MAINTENANCE OPERATION (SELECTION KEYS) Most of the instructions are in the machine's memory. A B 1 1 "BASIC OPERATION" key 1. Touch "SWITCH FUNCTION". 4. Press "BASIC OPERATION". 2. Messages on the LCD screen guide you through each operation. Touch "SELECTION KEY".
Users Manual - English
Page 12
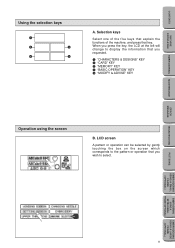
Selection keys Select one of the five keys that explain the functions of the machine, and press that you wish to select. ERROR MESSAGE TROUBLESHOOTING PATTERNS EMBROIDERING USING A SMALL FRAME (OPTIONAL) EMBROIDERING USING A EXTRA-SMALL FRAME (OPTIONAL) EMBROIDERING USING A LARGE ... or operation that key. When you requested. 1 "CHARACTERS & DESIGNS" KEY 2 "CARD" KEY 3 "MEMORY" KEY 4 "BASIC OPERATION" KEY 5 "MODIFY & ADVISE" KEY Operation using the screen B. CONTENTS MACHINE KNOWLEDGE EMBROIDERING MAINTENANCE Using the selection keys A.
Selection keys Select one of the five keys that explain the functions of the machine, and press that you wish to select. ERROR MESSAGE TROUBLESHOOTING PATTERNS EMBROIDERING USING A SMALL FRAME (OPTIONAL) EMBROIDERING USING A EXTRA-SMALL FRAME (OPTIONAL) EMBROIDERING USING A LARGE ... or operation that key. When you requested. 1 "CHARACTERS & DESIGNS" KEY 2 "CARD" KEY 3 "MEMORY" KEY 4 "BASIC OPERATION" KEY 5 "MODIFY & ADVISE" KEY Operation using the screen B. CONTENTS MACHINE KNOWLEDGE EMBROIDERING MAINTENANCE Using the selection keys A.

Users Manual - English
Page 13
Press "MODIFY & ADVISE". 2. Touch "WINDING BOBBIN". The operation procedure for winding a bobbin will be displayed. 1 "BASIC OPERATION" key Example: To find out how to wind a bobbin 1. Touch "FABRIC AND THREAD AND NEEDLE". 2 "MODIFY & ADVISE" key 10 PATTERNS EMBROIDERING USING A SMALL FRAME (OPTIONAL) EMBROIDERING USING A EXTRA-SMALL FRAME (OPTIONAL) EMBROIDERING USING A LARGE FRAME (OPTIONAL) CONTENTS MACHINE KNOWLEDGE EMBROIDERING MAINTENANCE ERROR MESSAGE TROUBLESHOOTING Example: To find out the combination of fabric, needle and thread 1. Press "BASIC OPERATION". 2.
Press "MODIFY & ADVISE". 2. Touch "WINDING BOBBIN". The operation procedure for winding a bobbin will be displayed. 1 "BASIC OPERATION" key Example: To find out how to wind a bobbin 1. Touch "FABRIC AND THREAD AND NEEDLE". 2 "MODIFY & ADVISE" key 10 PATTERNS EMBROIDERING USING A SMALL FRAME (OPTIONAL) EMBROIDERING USING A EXTRA-SMALL FRAME (OPTIONAL) EMBROIDERING USING A LARGE FRAME (OPTIONAL) CONTENTS MACHINE KNOWLEDGE EMBROIDERING MAINTENANCE ERROR MESSAGE TROUBLESHOOTING Example: To find out the combination of fabric, needle and thread 1. Press "BASIC OPERATION". 2.

Users Manual - English
Page 14
... display language, error messages will change the language setting to Spanish. 4. Touch "LANGUAGE SELECTION". 3. Touch "NEXT". 3. Touch the key which was previously being displayed. CONTENTS MACHINE KNOWLEDGE EMBROIDERING MAINTENANCE ERROR MESSAGE TROUBLESHOOTING HOW TO USE THE LANGUAGE SELECTION KEY You can move to the next screen by touching "NEXT". 1 "BASIC OPERATION...
... display language, error messages will change the language setting to Spanish. 4. Touch "LANGUAGE SELECTION". 3. Touch "NEXT". 3. Touch the key which was previously being displayed. CONTENTS MACHINE KNOWLEDGE EMBROIDERING MAINTENANCE ERROR MESSAGE TROUBLESHOOTING HOW TO USE THE LANGUAGE SELECTION KEY You can move to the next screen by touching "NEXT". 1 "BASIC OPERATION...

Users Manual - English
Page 15
This will cancel the Spanish language setting and return all screen displays and error messages to English 1. CONTENTS MACHINE KNOWLEDGE EMBROIDERING MAINTENANCE How to clear the language selection 1 Example: To change the display language from Spanish back to the English language. 1 "BASIC OPERATION" key ...
This will cancel the Spanish language setting and return all screen displays and error messages to English 1. CONTENTS MACHINE KNOWLEDGE EMBROIDERING MAINTENANCE How to clear the language selection 1 Example: To change the display language from Spanish back to the English language. 1 "BASIC OPERATION" key ...

Users Manual - English
Page 16
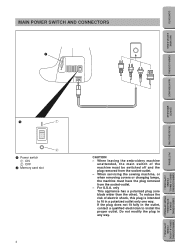
Connect the machine to hold the spool securely on the spool post. * The spool cap should be used to the power supply and turn on the spool before ... USING A LARGE FRAME (OPTIONAL) The spool cap closest to the thread spool size should come from the thread on the main power. 1 ON 2 OFF 2. CONTENTS MACHINE KNOWLEDGE EMBROIDERING MAINTENANCE BOBBIN WINDING AND INSTALLATION How to wind a bobbin and set the lower thread. 1 1 "BASIC OPERATION" key 3 2 6 7 4 5 1 ERROR MESSAGE TROUBLESHOOTING PATTERNS EMBROIDERING USING...
Connect the machine to hold the spool securely on the spool post. * The spool cap should be used to the power supply and turn on the spool before ... USING A LARGE FRAME (OPTIONAL) The spool cap closest to the thread spool size should come from the thread on the main power. 1 ON 2 OFF 2. CONTENTS MACHINE KNOWLEDGE EMBROIDERING MAINTENANCE BOBBIN WINDING AND INSTALLATION How to wind a bobbin and set the lower thread. 1 1 "BASIC OPERATION" key 3 2 6 7 4 5 1 ERROR MESSAGE TROUBLESHOOTING PATTERNS EMBROIDERING USING...
Users Manual - English
Page 17
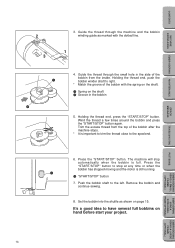
...FRAME (OPTIONAL) EMBROIDERING USING A LARGE FRAME (OPTIONAL) 14 Trim the excess thread from the top of the bobbin from the inside. The machine will stop at any time or when the bobbin has stopped moving and the motor is full. Remove the bobbin and continue sewing. 8. ...guide as shown on page 15. Press the "START/STOP" button to stop automatically when the bobbin is still running. 1 "START/STOP" button 7. CONTENTS MACHINE KNOWLEDGE EMBROIDERING MAINTENANCE ERROR MESSAGE 2 3 3. It's a good idea to the spoolend. 6. Wind the thread a few times around the bobbin and press ...
...FRAME (OPTIONAL) EMBROIDERING USING A LARGE FRAME (OPTIONAL) 14 Trim the excess thread from the top of the bobbin from the inside. The machine will stop at any time or when the bobbin has stopped moving and the motor is full. Remove the bobbin and continue sewing. 8. ...guide as shown on page 15. Press the "START/STOP" button to stop automatically when the bobbin is still running. 1 "START/STOP" button 7. CONTENTS MACHINE KNOWLEDGE EMBROIDERING MAINTENANCE ERROR MESSAGE 2 3 3. It's a good idea to the spoolend. 6. Wind the thread a few times around the bobbin and press ...

Users Manual - English
Page 18
CONTENTS MACHINE KNOWLEDGE Setting the bobbin 1 2 The bobbin cover is located in place and pressing down lightly on page 6) EMBROIDERING MAINTENANCE ERROR MESSAGE 3. Insert the bobbin into ...
CONTENTS MACHINE KNOWLEDGE Setting the bobbin 1 2 The bobbin cover is located in place and pressing down lightly on page 6) EMBROIDERING MAINTENANCE ERROR MESSAGE 3. Insert the bobbin into ...
Users Manual - English
Page 19
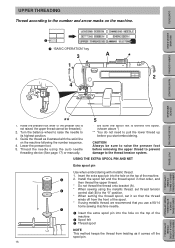
...thread, set thread tension control dial (B) to the "0" position. * When setting the thread spool, set it comes off from the front of the machine. 2. Install the spool felt and the thread spool in that order, and then thread the upper thread. * Do not thread the thread onto ...bracket (A). * When sewing using metallic thread, we recommend that you start embroidering. CONTENTS MACHINE KNOWLEDGE UPPER THREADING Thread according to the number and arrow marks on the machine following the number sequence. 4. Turn the balance wheel to raise the needle to raise the presser ...
...thread, set thread tension control dial (B) to the "0" position. * When setting the thread spool, set it comes off from the front of the machine. 2. Install the spool felt and the thread spool in that order, and then thread the upper thread. * Do not thread the thread onto ...bracket (A). * When sewing using metallic thread, we recommend that you start embroidering. CONTENTS MACHINE KNOWLEDGE UPPER THREADING Thread according to the number and arrow marks on the machine following the number sequence. 4. Turn the balance wheel to raise the needle to raise the presser ...

Users Manual - English
Page 20
... thread toward you and check that the hook has passed through the wire loop thread guide (number "6") and gently pull the thread towards you. 2. CONTENTS MACHINE KNOWLEDGE EMBROIDERING MAINTENANCE 1 4 2 3 4 Auto needle threading device 6 Net If using special threads which wind quickly off the thread spool, attach a net to the spool before...
... thread toward you and check that the hook has passed through the wire loop thread guide (number "6") and gently pull the thread towards you. 2. CONTENTS MACHINE KNOWLEDGE EMBROIDERING MAINTENANCE 1 4 2 3 4 Auto needle threading device 6 Net If using special threads which wind quickly off the thread spool, attach a net to the spool before...

Users Manual - English
Page 21
... It's a good idea to place a piece of the fabric. The stabilizer material should be embroidered. The goal of the stabilizer is already sufficiently stiff. CONTENTS MACHINE KNOWLEDGE EMBROIDERING MAINTENANCE ERROR MESSAGE TROUBLESHOOTING PREPARATION BEFORE EMBROIDERING Be sure to turn off the power before embroidering.
... It's a good idea to place a piece of the fabric. The stabilizer material should be embroidered. The goal of the stabilizer is already sufficiently stiff. CONTENTS MACHINE KNOWLEDGE EMBROIDERING MAINTENANCE ERROR MESSAGE TROUBLESHOOTING PREPARATION BEFORE EMBROIDERING Be sure to turn off the power before embroidering.

