
Users Manual - English
Page 2
... it has been dropped or damaged, or dropped into any air openings blocked. Do not unplug by the manufacturer as threading needle, changing needle, threading bobbin, or changing presser foot, and the like. 15. Keep fingers away from the accumulation of electric shock. 1. Do not allow this embroidery machine only for...
... it has been dropped or damaged, or dropped into any air openings blocked. Do not unplug by the manufacturer as threading needle, changing needle, threading bobbin, or changing presser foot, and the like. 15. Keep fingers away from the accumulation of electric shock. 1. Do not allow this embroidery machine only for...
Users Manual - English
Page 5
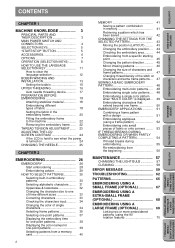
.../STOP" BUTTON 5 ACCESSORIES 6 OPTIONS 7 OPERATION (SELECTION KEYS) ........ 8 HOW TO USE THE LANGUAGE SELECTION KEY 11 How to clear the language selection 12 BOBBIN WINDING AND INSTALLATION 13 Setting the bobbin 15 UPPER THREADING 16 Auto needle threading device 17 PREPARATION BEFORE EMBROIDERING 18 Attaching stabilizer material 18 Embroidering different types of fabric...
.../STOP" BUTTON 5 ACCESSORIES 6 OPTIONS 7 OPERATION (SELECTION KEYS) ........ 8 HOW TO USE THE LANGUAGE SELECTION KEY 11 How to clear the language selection 12 BOBBIN WINDING AND INSTALLATION 13 Setting the bobbin 15 UPPER THREADING 16 Auto needle threading device 17 PREPARATION BEFORE EMBROIDERING 18 Attaching stabilizer material 18 Embroidering different types of fabric...

Users Manual - English
Page 6
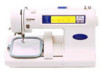
"START/STOP" BUTTON EMBROIDERING USING A EXTRA-SMALL FRAME (OPTIONAL) EMBROIDERING USING A LARGE FRAME (OPTIONAL) 3 Bobbin winding guide 4- Presser foot lever 7- Bobbin cover 10- Bobbin winding device 12- LCD (Liquid Crystal Display) 15- Handle 2- Needle threader 8- Presser foot 9- Spool cap 3- Upper thread tension dial 5- Hole for extra spool pin 16- ...
"START/STOP" BUTTON EMBROIDERING USING A EXTRA-SMALL FRAME (OPTIONAL) EMBROIDERING USING A LARGE FRAME (OPTIONAL) 3 Bobbin winding guide 4- Presser foot lever 7- Bobbin cover 10- Bobbin winding device 12- LCD (Liquid Crystal Display) 15- Handle 2- Needle threader 8- Presser foot 9- Spool cap 3- Upper thread tension dial 5- Hole for extra spool pin 16- ...

Users Manual - English
Page 9
Parts Name 1 Cleaning brush 2 Needle set 75/11 3pcs., 90/14 1 pc. 3 Screwdriver 4 Scissors 5 Seam ripper 6 Bobbins (4 pcs) 7 Spool cap (Small) 8 Spool cap (Large) 9 Embroidery sheet (Regular) 10 Embroidery frame (Regular) 11 Machine cover (soft type)* 12 Extra spool pin** 13 Net*** ...
Parts Name 1 Cleaning brush 2 Needle set 75/11 3pcs., 90/14 1 pc. 3 Screwdriver 4 Scissors 5 Seam ripper 6 Bobbins (4 pcs) 7 Spool cap (Small) 8 Spool cap (Large) 9 Embroidery sheet (Regular) 10 Embroidery frame (Regular) 11 Machine cover (soft type)* 12 Extra spool pin** 13 Net*** ...
Users Manual - English
Page 10
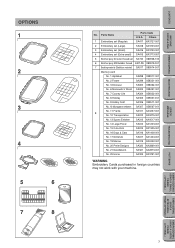
... 2 Embroidery set (Large) SA418 XA3733-001 3 Embroidery set (Small) SA416 XA3730-001 4 Embroidery set (Extra-small) SA415 XA3713-001 5 Brother poly 40 color thread set SA740 X80928-100 6 Brother poly #90 bobbin thread EBT-PE X80919-001 7 Backing material (Stabilizer material) SA517 X80914-001 Memory card No. 1 Alphabet SA298 X58317-001 No. 2 Flower SA299...
... 2 Embroidery set (Large) SA418 XA3733-001 3 Embroidery set (Small) SA416 XA3730-001 4 Embroidery set (Extra-small) SA415 XA3713-001 5 Brother poly 40 color thread set SA740 X80928-100 6 Brother poly #90 bobbin thread EBT-PE X80919-001 7 Backing material (Stabilizer material) SA517 X80914-001 Memory card No. 1 Alphabet SA298 X58317-001 No. 2 Flower SA299...

Users Manual - English
Page 13
Touch "WINDING BOBBIN". Press "MODIFY & ADVISE". 2. Touch "FABRIC AND THREAD AND NEEDLE". 2 "MODIFY & ADVISE" key 10 PATTERNS EMBROIDERING USING A SMALL FRAME (OPTIONAL) EMBROIDERING USING A EXTRA-SMALL FRAME (OPTIONAL) EMBROIDERING USING A LARGE FRAME (OPTIONAL) The operation procedure for winding a bobbin will be displayed. 1 "BASIC OPERATION" key Example: To find out how to wind a bobbin 1. Press "BASIC OPERATION". 2. CONTENTS MACHINE KNOWLEDGE EMBROIDERING MAINTENANCE ERROR MESSAGE TROUBLESHOOTING Example: To find out the combination of fabric, needle and thread 1.
Touch "WINDING BOBBIN". Press "MODIFY & ADVISE". 2. Touch "FABRIC AND THREAD AND NEEDLE". 2 "MODIFY & ADVISE" key 10 PATTERNS EMBROIDERING USING A SMALL FRAME (OPTIONAL) EMBROIDERING USING A EXTRA-SMALL FRAME (OPTIONAL) EMBROIDERING USING A LARGE FRAME (OPTIONAL) The operation procedure for winding a bobbin will be displayed. 1 "BASIC OPERATION" key Example: To find out how to wind a bobbin 1. Press "BASIC OPERATION". 2. CONTENTS MACHINE KNOWLEDGE EMBROIDERING MAINTENANCE ERROR MESSAGE TROUBLESHOOTING Example: To find out the combination of fabric, needle and thread 1.

Users Manual - English
Page 16
CONTENTS MACHINE KNOWLEDGE EMBROIDERING MAINTENANCE BOBBIN WINDING AND INSTALLATION How to hold the spool securely on the spool post. * The spool cap should come from the thread on the main power. 1 ... felt 13 EMBROIDERING USING A EXTRA-SMALL FRAME (OPTIONAL) EMBROIDERING USING A LARGE FRAME (OPTIONAL) Set the thread spool. The thread end should be used to wind a bobbin and set the lower thread. 1 1 "BASIC OPERATION" key 3 2 6 7 4 5 1 ERROR MESSAGE TROUBLESHOOTING PATTERNS EMBROIDERING USING A SMALL FRAME (OPTIONAL...
CONTENTS MACHINE KNOWLEDGE EMBROIDERING MAINTENANCE BOBBIN WINDING AND INSTALLATION How to hold the spool securely on the spool post. * The spool cap should come from the thread on the main power. 1 ... felt 13 EMBROIDERING USING A EXTRA-SMALL FRAME (OPTIONAL) EMBROIDERING USING A LARGE FRAME (OPTIONAL) Set the thread spool. The thread end should be used to wind a bobbin and set the lower thread. 1 1 "BASIC OPERATION" key 3 2 6 7 4 5 1 ERROR MESSAGE TROUBLESHOOTING PATTERNS EMBROIDERING USING A SMALL FRAME (OPTIONAL...

Users Manual - English
Page 17
...A EXTRA-SMALL FRAME (OPTIONAL) EMBROIDERING USING A LARGE FRAME (OPTIONAL) 14 Press the "START/STOP" button to have several full bobbins on hand before start your project. Set the bobbin into the shuttle as marked with the spring on the shaft. 1 Spring on page 15. It's a good idea to stop ...thread close to the left. Trim the excess thread from the inside. Push the bobbin shaft to the spoolend. 6. Guide the thread through the small hole in the bobbin 5. Wind the thread a few times around the bobbin and press the "START/STOP" button again. Guide the thread through the machine...
...A EXTRA-SMALL FRAME (OPTIONAL) EMBROIDERING USING A LARGE FRAME (OPTIONAL) 14 Press the "START/STOP" button to have several full bobbins on hand before start your project. Set the bobbin into the shuttle as marked with the spring on the shaft. 1 Spring on page 15. It's a good idea to stop ...thread close to the left. Trim the excess thread from the inside. Push the bobbin shaft to the spoolend. 6. Guide the thread through the small hole in the bobbin 5. Wind the thread a few times around the bobbin and press the "START/STOP" button again. Guide the thread through the machine...

Users Manual - English
Page 18
... the left end in place and pressing down lightly on page 6) EMBROIDERING MAINTENANCE ERROR MESSAGE 3. Close the bobbin cover by pushing the bobbin release button to pull up the lower (bobbin) thread, it is done automatically. TROUBLESHOOTING PATTERNS EMBROIDERING USING A SMALL FRAME (OPTIONAL) EMBROIDERING USING A EXTRA... the shuttle following the thread direction as shown on the right end to snap in the etching under the bobbin cover. * (Use a plastic bobbin as noted in place. * There is located in front of the needle plate. 1. Embroidery can begin without pulling...
... the left end in place and pressing down lightly on page 6) EMBROIDERING MAINTENANCE ERROR MESSAGE 3. Close the bobbin cover by pushing the bobbin release button to pull up the lower (bobbin) thread, it is done automatically. TROUBLESHOOTING PATTERNS EMBROIDERING USING A SMALL FRAME (OPTIONAL) EMBROIDERING USING A EXTRA... the shuttle following the thread direction as shown on the right end to snap in the etching under the bobbin cover. * (Use a plastic bobbin as noted in place. * There is located in front of the needle plate. 1. Embroidery can begin without pulling...

Users Manual - English
Page 29
Thread the upper thread following the solidline and numerical sequence marked on your machine. Thread the lower (bobbin) thread. (See page 15) 26 EMBROIDERING USING A LARGE FRAME (OPTIONAL) Be sure to attach the spool felt as shown in the illustration. 1 Spool felt (See page 16 - 17) 2. CONTENTS MACHINE KNOWLEDGE EMBROIDERING MAINTENANCE EMBROIDERING EMBROIDERY CHAPTER 2 1 1 "BASIC OPERATION" key 6 1 5 3 4 2 ERROR MESSAGE TROUBLESHOOTING PATTERNS EMBROIDERING USING A SMALL FRAME (OPTIONAL) EMBROIDERING USING A EXTRA-SMALL FRAME (OPTIONAL) 1.
Thread the upper thread following the solidline and numerical sequence marked on your machine. Thread the lower (bobbin) thread. (See page 15) 26 EMBROIDERING USING A LARGE FRAME (OPTIONAL) Be sure to attach the spool felt as shown in the illustration. 1 Spool felt (See page 16 - 17) 2. CONTENTS MACHINE KNOWLEDGE EMBROIDERING MAINTENANCE EMBROIDERING EMBROIDERY CHAPTER 2 1 1 "BASIC OPERATION" key 6 1 5 3 4 2 ERROR MESSAGE TROUBLESHOOTING PATTERNS EMBROIDERING USING A SMALL FRAME (OPTIONAL) EMBROIDERING USING A EXTRA-SMALL FRAME (OPTIONAL) 1.

Users Manual - English
Page 32
...) EMBROIDERING USING A LARGE FRAME (OPTIONAL) 29 CONTENTS MACHINE KNOWLEDGE Embroidering advice Thread Embroidery thread #50 Needle Home sewing machine needle 75/11 * The recommended lower (bobbin) thread is #60 - #90 synthetic thread. * For thin and stretch fabrics which are difficult to embroider, attach the fabric to non-woven stabilizer fabric before...
...) EMBROIDERING USING A LARGE FRAME (OPTIONAL) 29 CONTENTS MACHINE KNOWLEDGE Embroidering advice Thread Embroidery thread #50 Needle Home sewing machine needle 75/11 * The recommended lower (bobbin) thread is #60 - #90 synthetic thread. * For thin and stretch fabrics which are difficult to embroider, attach the fabric to non-woven stabilizer fabric before...

Users Manual - English
Page 58
... that color, and then touch "FORWARD" to move back a few stitches to slightly before the position where the thread broke or the bobbin ran out of the thread. * Cut the upper thread above the fabric in the frame and then remove the embroidery frame. Follow the... same procedure as for this happens do the following. 1. Touch "HELP". Replace the lower (bobbin) thread and then re-attach the embroidery frame. 2. CONTENTS MACHINE KNOWLEDGE EMBROIDERING MAINTENANCE ERROR MESSAGE If thread breaks during embroidering The machine stops ...
... that color, and then touch "FORWARD" to move back a few stitches to slightly before the position where the thread broke or the bobbin ran out of the thread. * Cut the upper thread above the fabric in the frame and then remove the embroidery frame. Follow the... same procedure as for this happens do the following. 1. Touch "HELP". Replace the lower (bobbin) thread and then re-attach the embroidery frame. 2. CONTENTS MACHINE KNOWLEDGE EMBROIDERING MAINTENANCE ERROR MESSAGE If thread breaks during embroidering The machine stops ...

Users Manual - English
Page 62
...EMBROIDERING USING A LARGE FRAME (OPTIONAL) This message is displayed when the "START/STOP" button is pressed while the presser foot lever is threaded or the bobbin runs out of the thread. This message is displayed when a pattern has not been selected and the "START/STOP" button is pressed or "SET"... message is displayed when "RETRIEVE" is touched and there is no upper thread is raised. Warning message displays This message is displayed when the bobbin winding shaft is at the right side and the "START/STOP" button is pressed. This message may be caused by a tangled thread or embroidering...
...EMBROIDERING USING A LARGE FRAME (OPTIONAL) This message is displayed when the "START/STOP" button is pressed while the presser foot lever is threaded or the bobbin runs out of the thread. This message is displayed when a pattern has not been selected and the "START/STOP" button is pressed or "SET"... message is displayed when "RETRIEVE" is touched and there is no upper thread is raised. Warning message displays This message is displayed when the bobbin winding shaft is at the right side and the "START/STOP" button is pressed. This message may be caused by a tangled thread or embroidering...

Users Manual - English
Page 64
... is displayed when the total number of characters or patterns combined exceeds a maximum 35. Touch "CANCEL" if you touch the "?????" This message is displayed during bobbin winding. key. This message is displayed after you touched the "?????" Audio alarms ● Proper operation will sound: One beep Improper (wrong) operation will sound: Two...
... is displayed when the total number of characters or patterns combined exceeds a maximum 35. Touch "CANCEL" if you touch the "?????" This message is displayed during bobbin winding. key. This message is displayed after you touched the "?????" Audio alarms ● Proper operation will sound: One beep Improper (wrong) operation will sound: Two...

Users Manual - English
Page 65
...dealer or nearest authorized service center. The upper thread is too strong. 1. Clean the race or inner rotary hook. 3. Attach stabilizer fabric. The bobbin is not being used . embroidery thread. 1. The upper thread tension is tangled. 2. no stabilizer fabric attached. 1. The correct needle is not.... 1. The spool of the instruction book which explains the operation you are performing to the proper needle. 3. Remove the bobbin, reset the bobbin properly and pull the bobbin thread through the channel. 3. A thread other than the designated 3.
...dealer or nearest authorized service center. The upper thread is too strong. 1. Clean the race or inner rotary hook. 3. Attach stabilizer fabric. The bobbin is not being used . embroidery thread. 1. The upper thread tension is tangled. 2. no stabilizer fabric attached. 1. The correct needle is not.... 1. The spool of the instruction book which explains the operation you are performing to the proper needle. 3. Remove the bobbin, reset the bobbin properly and pull the bobbin thread through the channel. 3. A thread other than the designated 3.

Users Manual - English
Page 66
The thread has been threaded incorrectly through the channel. 4. Remove the bobbin, reset the bobbin properly and pull the bobbin thread through the inner rotary hook. 3. embroidery thread. 6. The upper or lower thread is tangled. 5. The embroidery frame has been attached to the machine correctly. 3. ...
The thread has been threaded incorrectly through the channel. 4. Remove the bobbin, reset the bobbin properly and pull the bobbin thread through the inner rotary hook. 3. embroidery thread. 6. The upper or lower thread is tangled. 5. The embroidery frame has been attached to the machine correctly. 3. ...

Owner's Manual (Español) - Spanish
Page 2
... mechanical adjustment. 4. "SAVE THESE INSTRUCTIONS" "This embroidery machine is intended for household use bent needles. 13. Do not use as threading needle, changing needle, threading bobbin, or changing presser foot, and the like. 15. Always unplug before cleaning. 2. Use this embroidery machine if it has a damaged cord or plug, if it...
... mechanical adjustment. 4. "SAVE THESE INSTRUCTIONS" "This embroidery machine is intended for household use bent needles. 13. Do not use as threading needle, changing needle, threading bobbin, or changing presser foot, and the like. 15. Always unplug before cleaning. 2. Use this embroidery machine if it has a damaged cord or plug, if it...

Owner's Manual (Español) - Spanish
Page 5
.../STOP" BUTTON 5 ACCESSORIES 6 OPTIONS 7 OPERATION (SELECTION KEYS) ........ 8 HOW TO USE THE LANGUAGE SELECTION KEY 11 How to clear the language selection 12 BOBBIN WINDING AND INSTALLATION 13 Setting the bobbin 15 UPPER THREADING 16 Auto needle threading device 17 PREPARATION BEFORE EMBROIDERING 18 Attaching stabilizer material 18 Embroidering different types of fabric...
.../STOP" BUTTON 5 ACCESSORIES 6 OPTIONS 7 OPERATION (SELECTION KEYS) ........ 8 HOW TO USE THE LANGUAGE SELECTION KEY 11 How to clear the language selection 12 BOBBIN WINDING AND INSTALLATION 13 Setting the bobbin 15 UPPER THREADING 16 Auto needle threading device 17 PREPARATION BEFORE EMBROIDERING 18 Attaching stabilizer material 18 Embroidering different types of fabric...

Owner's Manual (Español) - Spanish
Page 6
... device 12- Balance wheel 14- Upper thread tension dial 5- Needle plate 11- MAIN POWER SWITCH AND CONNECTORS B- Spool cap 3- Bobbin cover 10- Spool felt 13- LCD (Liquid Crystal Display) 15- Carriage (Embroidery arm) 16 A- Presser foot lever 7- Presser foot 9- Hole for extra spool pin 16- ...
... device 12- Balance wheel 14- Upper thread tension dial 5- Needle plate 11- MAIN POWER SWITCH AND CONNECTORS B- Spool cap 3- Bobbin cover 10- Spool felt 13- LCD (Liquid Crystal Display) 15- Carriage (Embroidery arm) 16 A- Presser foot lever 7- Presser foot 9- Hole for extra spool pin 16- ...

Owner's Manual (Español) - Spanish
Page 9
... the machine off and then turn off the thread spool, attach a net to re-set 75/11 3pcs., 90/14 1 pc. 3 Screwdriver 4 Scissors 5 Seam ripper 6 Bobbins (4 pcs) 7 Spool cap (Small) 8 Spool cap (Large) 9 Embroidery sheet (Regular) 10 Embroidery frame (Regular) 11 Machine cover (soft type)* 12 Extra spool pin** 13 Net...
... the machine off and then turn off the thread spool, attach a net to re-set 75/11 3pcs., 90/14 1 pc. 3 Screwdriver 4 Scissors 5 Seam ripper 6 Bobbins (4 pcs) 7 Spool cap (Small) 8 Spool cap (Large) 9 Embroidery sheet (Regular) 10 Embroidery frame (Regular) 11 Machine cover (soft type)* 12 Extra spool pin** 13 Net...


