

Users Manual - English
Page 2
... type rated 2.4 watts. Do not pull or push fabric while stitching. "SAVE THESE INSTRUCTIONS" "This embroidery machine is required around the embroidery machine needle. 11. DANGER - Replace bulb with any other user servicing adjustments mentioned in the instruction manual. Keep ventilation...the symbol "O" position when making any air openings blocked. Always use as threading needle, changing needle, threading bobbin, or changing presser foot, and the like. 15. Switch the embroidery machine to the symbol "O" position which represents off, then remove plug from the ...
... type rated 2.4 watts. Do not pull or push fabric while stitching. "SAVE THESE INSTRUCTIONS" "This embroidery machine is required around the embroidery machine needle. 11. DANGER - Replace bulb with any other user servicing adjustments mentioned in the instruction manual. Keep ventilation...the symbol "O" position when making any air openings blocked. Always use as threading needle, changing needle, threading bobbin, or changing presser foot, and the like. 15. Switch the embroidery machine to the symbol "O" position which represents off, then remove plug from the ...
Users Manual - English
Page 4
... center. ● Please note that you study this booklet. needle, or other parts ● A power failure occurs during use ● Maintaining the machine ● Leaving the machine unattended. 3. Do not touch the balance wheel, thread take-up, needle, or other hot objects. 2. Do not store your eye...In the event a malfunction occurs or adjustment is required, first follow the troubleshooting table in the card slot while your machine turns on the needle while sewing. To fully enjoy all of the operation manual to change for improvement without notice. 1 Be sure to ...
... center. ● Please note that you study this booklet. needle, or other parts ● A power failure occurs during use ● Maintaining the machine ● Leaving the machine unattended. 3. Do not touch the balance wheel, thread take-up, needle, or other hot objects. 2. Do not store your eye...In the event a malfunction occurs or adjustment is required, first follow the troubleshooting table in the card slot while your machine turns on the needle while sewing. To fully enjoy all of the operation manual to change for improvement without notice. 1 Be sure to ...

Users Manual - English
Page 5
... the bobbin 15 UPPER THREADING 16 Auto needle threading device 17 PREPARATION BEFORE EMBROIDERING 18 Attaching stabilizer material 18 Embroidering different types of fabric 18 Setting the fabric in the embroidery frame 20 Fitting the embroidery frame to the machine 22 Removing the embroidery frame ...... 22... THREAD TENSION ADJUSTMENT....... 23 ADJUSTING THE LCD SCREEN CONTRAST 24 If the LCD is hard to see when the power is turned on 24 CHANGING THE NEEDLE 25 CHAPTER 2 EMBROIDERING 26 EMBROIDERY ...
... the bobbin 15 UPPER THREADING 16 Auto needle threading device 17 PREPARATION BEFORE EMBROIDERING 18 Attaching stabilizer material 18 Embroidering different types of fabric 18 Setting the fabric in the embroidery frame 20 Fitting the embroidery frame to the machine 22 Removing the embroidery frame ...... 22... THREAD TENSION ADJUSTMENT....... 23 ADJUSTING THE LCD SCREEN CONTRAST 24 If the LCD is hard to see when the power is turned on 24 CHANGING THE NEEDLE 25 CHAPTER 2 EMBROIDERING 26 EMBROIDERY ...
Users Manual - English
Page 6
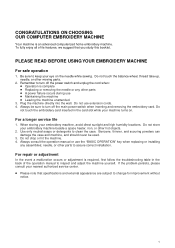
...BUTTON EMBROIDERING USING A EXTRA-SMALL FRAME (OPTIONAL) EMBROIDERING USING A LARGE FRAME (OPTIONAL) 3 Needle threader 8- MAIN POWER SWITCH AND CONNECTORS B- Needle plate 11- SELECTION KEYS C- Spool felt 13- LCD (Liquid Crystal Display) 15- Bobbin ...winding guide 4- Carriage (Embroidery arm) 16 A- Handle 2- Upper thread tension dial 5- CONTENTS MACHINE KNOWLEDGE EMBROIDERING MAINTENANCE MACHINE KNOWLEDGE PRINCIPAL PARTS AND THEIR...
...BUTTON EMBROIDERING USING A EXTRA-SMALL FRAME (OPTIONAL) EMBROIDERING USING A LARGE FRAME (OPTIONAL) 3 Needle threader 8- MAIN POWER SWITCH AND CONNECTORS B- Needle plate 11- SELECTION KEYS C- Spool felt 13- LCD (Liquid Crystal Display) 15- Bobbin ...winding guide 4- Carriage (Embroidery arm) 16 A- Handle 2- Upper thread tension dial 5- CONTENTS MACHINE KNOWLEDGE EMBROIDERING MAINTENANCE MACHINE KNOWLEDGE PRINCIPAL PARTS AND THEIR...
Users Manual - English
Page 8
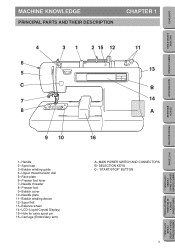
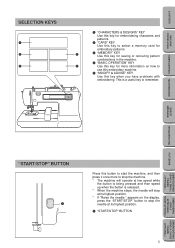
... Press this key when you have problems with embroidering. This is released. * When the machine stops, the needle will stop the needle at its highest position. 1 "START/STOP" BUTTON 5 EMBROIDERING USING A LARGE FRAME (OPTIONAL) CONTENTS MACHINE KNOWLEDGE SELECTION KEYS 1 2 4 1 "CHARACTERS & DESIGNS" KEY Use this key for ... 3 "MEMORY" KEY Use this key for saving or retrieving pattern combinations in the machine. 4 "BASIC OPERATION" KEY 5 Use this key for more to stop the machine. * The machine will operate at low speed while the button is being pressed and then speed up ...
... Press this key when you have problems with embroidering. This is released. * When the machine stops, the needle will stop the needle at its highest position. 1 "START/STOP" BUTTON 5 EMBROIDERING USING A LARGE FRAME (OPTIONAL) CONTENTS MACHINE KNOWLEDGE SELECTION KEYS 1 2 4 1 "CHARACTERS & DESIGNS" KEY Use this key for ... 3 "MEMORY" KEY Use this key for saving or retrieving pattern combinations in the machine. 4 "BASIC OPERATION" KEY 5 Use this key for more to stop the machine. * The machine will operate at low speed while the button is being pressed and then speed up ...

Users Manual - English
Page 9
... to it's storage position would be used for decorative thread such as metallic thread. *** If using special threads which wind quickly off the machine. Parts Name 1 Cleaning brush 2 Needle set itself and then turn it 's storage position. ACCESSORIES 1 2 3 4 5 6 7 8 9 10 11 12 13 14 6 No.... A cover might not be provieded in some countries. ** An extra spool pin should be to turn the machine off and then turn off the ...
... to it's storage position would be used for decorative thread such as metallic thread. *** If using special threads which wind quickly off the machine. Parts Name 1 Cleaning brush 2 Needle set itself and then turn it 's storage position. ACCESSORIES 1 2 3 4 5 6 7 8 9 10 11 12 13 14 6 No.... A cover might not be provieded in some countries. ** An extra spool pin should be to turn the machine off and then turn off the ...

Users Manual - English
Page 13
Touch "WINDING BOBBIN". Touch "FABRIC AND THREAD AND NEEDLE". 2 "MODIFY & ADVISE" key 10 PATTERNS EMBROIDERING USING A SMALL FRAME (OPTIONAL) EMBROIDERING USING A EXTRA-SMALL FRAME (OPTIONAL) EMBROIDERING USING A LARGE FRAME (OPTIONAL) The operation procedure for winding a bobbin will be displayed. 1 "BASIC OPERATION" key Example: To find out how to wind a bobbin 1. Press "MODIFY & ADVISE". 2. Press "BASIC OPERATION". 2. CONTENTS MACHINE KNOWLEDGE EMBROIDERING MAINTENANCE ERROR MESSAGE TROUBLESHOOTING Example: To find out the combination of fabric, needle and thread 1.
Touch "WINDING BOBBIN". Touch "FABRIC AND THREAD AND NEEDLE". 2 "MODIFY & ADVISE" key 10 PATTERNS EMBROIDERING USING A SMALL FRAME (OPTIONAL) EMBROIDERING USING A EXTRA-SMALL FRAME (OPTIONAL) EMBROIDERING USING A LARGE FRAME (OPTIONAL) The operation procedure for winding a bobbin will be displayed. 1 "BASIC OPERATION" key Example: To find out how to wind a bobbin 1. Press "MODIFY & ADVISE". 2. Press "BASIC OPERATION". 2. CONTENTS MACHINE KNOWLEDGE EMBROIDERING MAINTENANCE ERROR MESSAGE TROUBLESHOOTING Example: To find out the combination of fabric, needle and thread 1.
Users Manual - English
Page 18
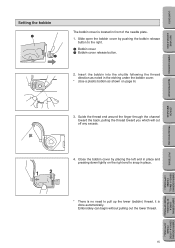
CONTENTS MACHINE KNOWLEDGE Setting the bobbin 1 2 The bobbin cover is located in the etching under the bobbin cover. * (Use a plastic bobbin as noted in front of the needle plate. 1. Slide open the bobbin cover by placing the left end in place and pressing down lightly on page 6) EMBROIDERING MAINTENANCE ERROR MESSAGE 3. Insert the...
CONTENTS MACHINE KNOWLEDGE Setting the bobbin 1 2 The bobbin cover is located in the etching under the bobbin cover. * (Use a plastic bobbin as noted in front of the needle plate. 1. Slide open the bobbin cover by placing the left end in place and pressing down lightly on page 6) EMBROIDERING MAINTENANCE ERROR MESSAGE 3. Insert the...
Users Manual - English
Page 19
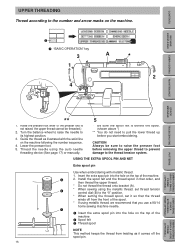
... be threaded.) 2. Insert the extra spool pin into the hole on the top of the machine 2 Spool felt 3 Thread spool NOTE This method keeps the thread from the front of the spool. * If using the auto needle threading device (See page 17) or manually. 5 * Be sure the spool felt is not raised..., the upper thread cannot be sure to raise the presser foot before you use a 90/14 home sewing machine needle. 1 Insert the extra spool pin into the hole on the top of the machine. 2. Install the spool felt and the thread spool in that order, and then thread the upper thread. * Do...
... be threaded.) 2. Insert the extra spool pin into the hole on the top of the machine 2 Spool felt 3 Thread spool NOTE This method keeps the thread from the front of the spool. * If using the auto needle threading device (See page 17) or manually. 5 * Be sure the spool felt is not raised..., the upper thread cannot be sure to raise the presser foot before you use a 90/14 home sewing machine needle. 1 Insert the extra spool pin into the hole on the top of the machine. 2. Install the spool felt and the thread spool in that order, and then thread the upper thread. * Do...

Users Manual - English
Page 20
...the wire loop thread guide (number "6") and gently pull the thread towards you. 2. Release the thread from the needle threader lever. 7. CONTENTS MACHINE KNOWLEDGE EMBROIDERING MAINTENANCE 1 4 2 3 4 Auto needle threading device 6 Net If using special threads which wind quickly off the thread spool, attach a net to the ...cannot be sure that it is lowered. 4. Lower the presser foot. 3. Guide the thread through the eye of the machine. 17 Check to be used while the needle is being held by the thread hook. 1 Hook 2 Metal guides 3 Thread correctly under the metal guides and the ...
...the wire loop thread guide (number "6") and gently pull the thread towards you. 2. Release the thread from the needle threader lever. 7. CONTENTS MACHINE KNOWLEDGE EMBROIDERING MAINTENANCE 1 4 2 3 4 Auto needle threading device 6 Net If using special threads which wind quickly off the thread spool, attach a net to the ...cannot be sure that it is lowered. 4. Lower the presser foot. 3. Guide the thread through the eye of the machine. 17 Check to be used while the needle is being held by the thread hook. 1 Hook 2 Metal guides 3 Thread correctly under the metal guides and the ...
Users Manual - English
Page 28
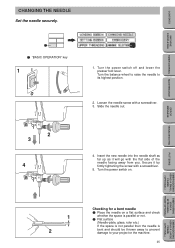
... FRAME (OPTIONAL) EMBROIDERING USING A EXTRA-SMALL FRAME (OPTIONAL) EMBROIDERING USING A LARGE FRAME (OPTIONAL) 1 2 Checking for a bent needle 1 Place the needle on . Turn the power switch off and lower the presser foot lever. CONTENTS MACHINE KNOWLEDGE EMBROIDERING MAINTENANCE CHANGING THE NEEDLE Set the needle securely. 1 1 "BASIC OPERATION" key 1 1. Secure it will go with a screwdriver. 5. Loosen the...
... FRAME (OPTIONAL) EMBROIDERING USING A EXTRA-SMALL FRAME (OPTIONAL) EMBROIDERING USING A LARGE FRAME (OPTIONAL) 1 2 Checking for a bent needle 1 Place the needle on . Turn the power switch off and lower the presser foot lever. CONTENTS MACHINE KNOWLEDGE EMBROIDERING MAINTENANCE CHANGING THE NEEDLE Set the needle securely. 1 1 "BASIC OPERATION" key 1 1. Secure it will go with a screwdriver. 5. Loosen the...
Users Manual - English
Page 31
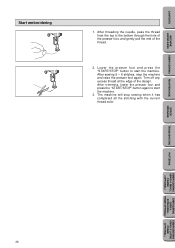
Trim off any excess thread at the edge of the thread. 2. After threading the needle, pass the thread from the top to start the machine. 3. After sewing 5 - 6 stitches, stop sewing when it has completed all the stitching with the current thread color. ERROR MESSAGE ... EMBROIDERING USING A SMALL FRAME (OPTIONAL) EMBROIDERING USING A EXTRA-SMALL FRAME (OPTIONAL) EMBROIDERING USING A LARGE FRAME (OPTIONAL) 28 The machine will stop the machine and raise the presser foot again. After trimming, lower the presser foot and press the "START/STOP" button again to start the...
Trim off any excess thread at the edge of the thread. 2. After threading the needle, pass the thread from the top to start the machine. 3. After sewing 5 - 6 stitches, stop sewing when it has completed all the stitching with the current thread color. ERROR MESSAGE ... EMBROIDERING USING A SMALL FRAME (OPTIONAL) EMBROIDERING USING A EXTRA-SMALL FRAME (OPTIONAL) EMBROIDERING USING A LARGE FRAME (OPTIONAL) 28 The machine will stop the machine and raise the presser foot again. After trimming, lower the presser foot and press the "START/STOP" button again to start the...
Users Manual - English
Page 32
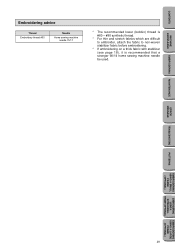
... Embroidering advice Thread Embroidery thread #50 Needle Home sewing machine needle 75/11 * The recommended lower (bobbin) thread is #60 - #90 synthetic thread. * For thin and stretch fabrics which are difficult to...woven stabilizer fabric before embroidering. * If embroidering on a thick fabric with stabilizer (see page 18), it is recommended that a stronger 90/14 home sewing machine needle be used. EMBROIDERING MAINTENANCE ERROR MESSAGE TROUBLESHOOTING PATTERNS EMBROIDERING USING A SMALL FRAME (OPTIONAL) EMBROIDERING USING A EXTRA-SMALL FRAME (OPTIONAL) EMBROIDERING USING A LARGE ...
... Embroidering advice Thread Embroidery thread #50 Needle Home sewing machine needle 75/11 * The recommended lower (bobbin) thread is #60 - #90 synthetic thread. * For thin and stretch fabrics which are difficult to...woven stabilizer fabric before embroidering. * If embroidering on a thick fabric with stabilizer (see page 18), it is recommended that a stronger 90/14 home sewing machine needle be used. EMBROIDERING MAINTENANCE ERROR MESSAGE TROUBLESHOOTING PATTERNS EMBROIDERING USING A SMALL FRAME (OPTIONAL) EMBROIDERING USING A EXTRA-SMALL FRAME (OPTIONAL) EMBROIDERING USING A LARGE ...
Users Manual - English
Page 46
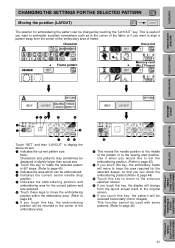
... cannot be reversed horizontally (mirror imaged). A If you touch this key to return to the previous selection screen. B 8 This moves the needle position to the middle of frame. B If you touch this key, the embroidering position will be changed by touching the "LAYOUT" key. ... position and embroidering area for the selected design, so that you can be returned to the center of the embroidery area. CONTENTS MACHINE KNOWLEDGE CHANGING THE SETTINGS FOR THE SELECTED PATTERN Moving the position (LAYOUT) The position for embroidering the pattern can check the embroidering ...
... cannot be reversed horizontally (mirror imaged). A If you touch this key to return to the previous selection screen. B 8 This moves the needle position to the middle of frame. B If you touch this key, the embroidering position will be changed by touching the "LAYOUT" key. ... position and embroidering area for the selected design, so that you can be returned to the center of the embroidery area. CONTENTS MACHINE KNOWLEDGE CHANGING THE SETTINGS FOR THE SELECTED PATTERN Moving the position (LAYOUT) The position for embroidering the pattern can check the embroidering ...
Users Manual - English
Page 47
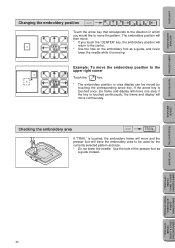
... If you would like to move the embroidery position to the upper right corner Touch the "????" if the key is moving. CONTENTS MACHINE KNOWLEDGE EMBROIDERING MAINTENANCE ERROR MESSAGE TROUBLESHOOTING Changing the embroidery position Touch the arrow key that corresponds to the direction in which you touch the ... will move and the presser foot will move continuously. Use the hole of the presser foot as a guide, and never lower the needle while it is touched continuously, the frame and display will trace the embroidery area to be moved by touching the corresponding arrow key. key...
... If you would like to move the embroidery position to the upper right corner Touch the "????" if the key is moving. CONTENTS MACHINE KNOWLEDGE EMBROIDERING MAINTENANCE ERROR MESSAGE TROUBLESHOOTING Changing the embroidery position Touch the arrow key that corresponds to the direction in which you touch the ... will move and the presser foot will move continuously. Use the hole of the presser foot as a guide, and never lower the needle while it is touched continuously, the frame and display will trace the embroidery area to be moved by touching the corresponding arrow key. key...
Users Manual - English
Page 48
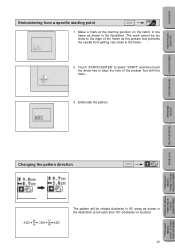
CONTENTS MACHINE KNOWLEDGE EMBROIDERING MAINTENANCE Embroidering from getting very close to the edge of the presser foot with the mark. ABC 3. Embroider the pattern. The mark cannot ... direction ABC ABC ABC ABC ABC The pattern will be too close to align the hole of the frame as the presser foot prevents the needle from a specific starting position on the fabric in the frame as shown in the illustration. Make a mark at left each time "90˚ clockwise" is...
CONTENTS MACHINE KNOWLEDGE EMBROIDERING MAINTENANCE Embroidering from getting very close to the edge of the presser foot with the mark. ABC 3. Embroider the pattern. The mark cannot ... direction ABC ABC ABC ABC ABC The pattern will be too close to align the hole of the frame as the presser foot prevents the needle from a specific starting position on the fabric in the frame as shown in the illustration. Make a mark at left each time "90˚ clockwise" is...
Users Manual - English
Page 53
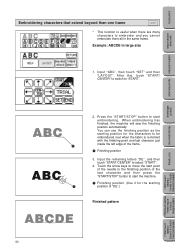
..."START/ CENTER" to switch to start the machine. 1 Finishing position (Use it for the characters to select "START". 4. Input "ABC", then touch "SET" and then "LAYOUT". Touch the arrow keys to move the start point of the needle to the finishing position of the frame. 1... Finishing position 3. CONTENTS MACHINE KNOWLEDGE EMBROIDERING MAINTENANCE ERROR MESSAGE TROUBLESHOOTING Embroidering characters that extend beyond than one frame * This function is ...
..."START/ CENTER" to switch to start the machine. 1 Finishing position (Use it for the characters to select "START". 4. Input "ABC", then touch "SET" and then "LAYOUT". Touch the arrow keys to move the start point of the needle to the finishing position of the frame. 1... Finishing position 3. CONTENTS MACHINE KNOWLEDGE EMBROIDERING MAINTENANCE ERROR MESSAGE TROUBLESHOOTING Embroidering characters that extend beyond than one frame * This function is ...
Users Manual - English
Page 54
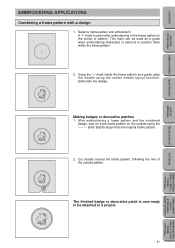
... pattern. The finished badge or decorative patch is sewn after embroidering of the frame pattern in the center of the outside using the center needle layout function. CONTENTS MACHINE KNOWLEDGE EMBROIDERING MAINTENANCE ERROR MESSAGE TROUBLESHOOTING EMBROIDERING APPLICATIONS Combining a frame pattern with a design 1. This mark can be attached to be used as a guide...
... pattern. The finished badge or decorative patch is sewn after embroidering of the frame pattern in the center of the outside using the center needle layout function. CONTENTS MACHINE KNOWLEDGE EMBROIDERING MAINTENANCE ERROR MESSAGE TROUBLESHOOTING EMBROIDERING APPLICATIONS Combining a frame pattern with a design 1. This mark can be attached to be used as a guide...
Users Manual - English
Page 61
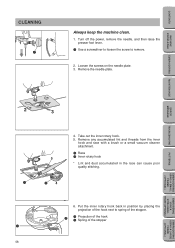
...in the race can cause poor quality stitching. O 6. CONTENTS MACHINE KNOWLEDGE CLEANING Always keep the machine clean. 1. EMBROIDERING MAINTENANCE ERROR MESSAGE TROUBLESHOOTING PATTERNS EMBROIDERING USING A SMALL FRAME (OPTIONAL) 2 58 3 5 4 4. Turn off the power, remove the needle, and then raise the presser foot lever. 1 Use a...to spring of the stopper. 1 Projection of the hook 2 Spring of the hook next to remove. 2. Loosen the screws on the needle plate. 3. Take out the inner rotary hook. 5. Remove any accumulated lint and threads from the inner hook and race with a ...
...in the race can cause poor quality stitching. O 6. CONTENTS MACHINE KNOWLEDGE CLEANING Always keep the machine clean. 1. EMBROIDERING MAINTENANCE ERROR MESSAGE TROUBLESHOOTING PATTERNS EMBROIDERING USING A SMALL FRAME (OPTIONAL) 2 58 3 5 4 4. Turn off the power, remove the needle, and then raise the presser foot lever. 1 Use a...to spring of the stopper. 1 Projection of the hook 2 Spring of the hook next to remove. 2. Loosen the screws on the needle plate. 3. Take out the inner rotary hook. 5. Remove any accumulated lint and threads from the inner hook and race with a ...
Users Manual - English
Page 62
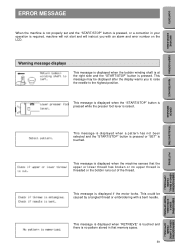
...EMBROIDERING USING A EXTRA-SMALL FRAME (OPTIONAL) EMBROIDERING USING A LARGE FRAME (OPTIONAL) This could be displayed after the display warns you with a bent needle. This message is displayed when "RETRIEVE" is touched and there is no upper thread is raised. Warning message displays This message is displayed when the... When the machine is not properly set and the "START/STOP" button is pressed, or a correction in that the upper or lower thread has broken or no pattern stored in your operation is required, machine will not start and will instruct you to raise the needle to the ...
...EMBROIDERING USING A EXTRA-SMALL FRAME (OPTIONAL) EMBROIDERING USING A LARGE FRAME (OPTIONAL) This could be displayed after the display warns you with a bent needle. This message is displayed when "RETRIEVE" is touched and there is no upper thread is raised. Warning message displays This message is displayed when the... When the machine is not properly set and the "START/STOP" button is pressed, or a correction in that the upper or lower thread has broken or no pattern stored in your operation is required, machine will not start and will instruct you to raise the needle to the ...


