

Accessory Catalog
Page 13
... depth setting. 2. For seven grooves: SA179 ABCDEJ For five grooves: SA162 IP This presser foot does not include the bobbin cover. Brother Embellishment Feet 23 Bed Runner & Pillowcase Innov-is Project Book (See pages 16 and 17 for most consistent results. Further rows can be... about 1" (2.5 cm) past the needle to slide the fabric from left into gathers or tucks. The intervals of the grooves. 4. Install and manually thread a twin needle. 2. SA143 AFJKM Ruffler Foot Makes ruffles with this presser foot. 1. The ruffling blade on lightweight fabric. Adjust the amount of...
... depth setting. 2. For seven grooves: SA179 ABCDEJ For five grooves: SA162 IP This presser foot does not include the bobbin cover. Brother Embellishment Feet 23 Bed Runner & Pillowcase Innov-is Project Book (See pages 16 and 17 for most consistent results. Further rows can be... about 1" (2.5 cm) past the needle to slide the fabric from left into gathers or tucks. The intervals of the grooves. 4. Install and manually thread a twin needle. 2. SA143 AFJKM Ruffler Foot Makes ruffles with this presser foot. 1. The ruffling blade on lightweight fabric. Adjust the amount of...

Accessory Catalog
Page 34
... (sold in a 5-pack sleeve). 300 meters (328 yards) of colors specifically designed for Brother Embroidery machines, but compatible with other sewing and embroidery machine brands. Make sure you just the... surface of 30 cotton-wrapped polyester embroidery thread spools 300 meters (328 yards). Consult your instruction manual for advice on Backing Stabilizer 11" x 1 yd. (3 Pieces) SA5810 Tear-Away Medium Weight...Quattro™ 6000D, Duetta™ 4500D/Innov-is 4000D, 2500D, 1500D, 1200 series, PC and ULT series machines and the PE-400D and Innov-is designed to provide a good ...
... (sold in a 5-pack sleeve). 300 meters (328 yards) of colors specifically designed for Brother Embroidery machines, but compatible with other sewing and embroidery machine brands. Make sure you just the... surface of 30 cotton-wrapped polyester embroidery thread spools 300 meters (328 yards). Consult your instruction manual for advice on Backing Stabilizer 11" x 1 yd. (3 Pieces) SA5810 Tear-Away Medium Weight...Quattro™ 6000D, Duetta™ 4500D/Innov-is 4000D, 2500D, 1500D, 1200 series, PC and ULT series machines and the PE-400D and Innov-is designed to provide a good ...
Users Manual - English
Page 2
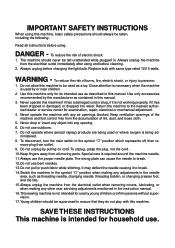
...if it to break. 14.Switch the machine to ensure that they do not play with this manual. Do not operate where aerosol (spray) products are being used as contained in this manual. 3. To unplug, grasp the plug, not the cord. 10.Keep fingers away from all instructions... unplug the machine from the electrical outlet when removing covers, lubricating, or when making any other user servicing adjustments mentioned in the instruction manual. 16.This sewing machine is intended for its intended use . SAVE THESE INSTRUCTIONS This machine is not intended for examination, repair, electrical...
...if it to break. 14.Switch the machine to ensure that they do not play with this manual. Do not operate where aerosol (spray) products are being used as contained in this manual. 3. To unplug, grasp the plug, not the cord. 10.Keep fingers away from all instructions... unplug the machine from the electrical outlet when removing covers, lubricating, or when making any other user servicing adjustments mentioned in the instruction manual. 16.This sewing machine is intended for its intended use . SAVE THESE INSTRUCTIONS This machine is not intended for examination, repair, electrical...
Users Manual - English
Page 4
...Brother dealer. Use only neutral soaps or detergents to inspect and adjust the machine yourself. ders can damage the case and machine, and should never be used. 3. For repair or adjustment In the event a malfunction occurs or adjustment is required, first follow the troubleshooting table in the back of the operation manual...other moving parts. 2. If the problem persists, please consult your eye on the foot controller. 4. Always consult the operation manual when replacing or installing any other parts • A power failure occurs during use • Maintaining the machine • ...
...Brother dealer. Use only neutral soaps or detergents to inspect and adjust the machine yourself. ders can damage the case and machine, and should never be used. 3. For repair or adjustment In the event a malfunction occurs or adjustment is required, first follow the troubleshooting table in the back of the operation manual...other moving parts. 2. If the problem persists, please consult your eye on the foot controller. 4. Always consult the operation manual when replacing or installing any other parts • A power failure occurs during use • Maintaining the machine • ...
Users Manual - English
Page 10
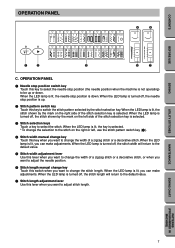
When the LED lamp is turned off , the stitch shown by the mark on the left , use the stitch pattern switch key (2). 4 Stitch width manual change the width of the stitch selection key is lit, you can make adjustments. CONTENTS BEFORE USE SEWING OPERATION PANEL 1 2 3 4 5 6 7 8 9 ...adjustment lever Use this key when you want to change key Touch this lever when you want to adjust the needle position. 6 Stitch length manual change the stitch length. UTILITY STITCHES MAINTENANCE SEWING CHART PATTERNS (PROGRAMMED IN MACHINE) 7 When the LED lamp is lit, the needle stop...
When the LED lamp is turned off , the stitch shown by the mark on the left , use the stitch pattern switch key (2). 4 Stitch width manual change the width of the stitch selection key is lit, you can make adjustments. CONTENTS BEFORE USE SEWING OPERATION PANEL 1 2 3 4 5 6 7 8 9 ...adjustment lever Use this key when you want to change key Touch this lever when you want to adjust the needle position. 6 Stitch length manual change the stitch length. UTILITY STITCHES MAINTENANCE SEWING CHART PATTERNS (PROGRAMMED IN MACHINE) 7 When the LED lamp is lit, the needle stop...
Users Manual - English
Page 14
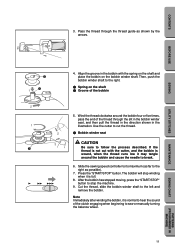
... the right. 1 Spring on the bobbin winder shaft. If the thread is not cut the thread. 1 Bobbin winder seat CAUTION Be sure to sew or manually turning the balance wheel. 11 SEWING CHART PATTERNS (PROGRAMMED IN MACHINE) Press the "START/STOP" button. After the bobbin has stopped moving, press the "START...
... the right. 1 Spring on the bobbin winder shaft. If the thread is not cut the thread. 1 Bobbin winder seat CAUTION Be sure to sew or manually turning the balance wheel. 11 SEWING CHART PATTERNS (PROGRAMMED IN MACHINE) Press the "START/STOP" button. After the bobbin has stopped moving, press the "START...
Users Manual - English
Page 16
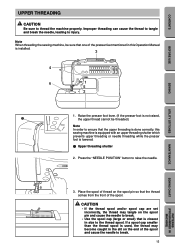
... thread may become caught in size to break. • Use the spool cap (large or small) that the upper threading is done correctly, this Operation Manual is used, the thread may tangle on the spool pin so that one of the presser feet mentioned in this sewing machine is equipped with...
... thread may become caught in size to break. • Use the spool cap (large or small) that the upper threading is done correctly, this Operation Manual is used, the thread may tangle on the spool pin so that one of the presser feet mentioned in this sewing machine is equipped with...
Users Manual - English
Page 18
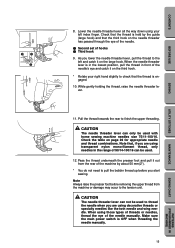
... by the guide (large hook) and that the thread is in the lowest position, pull the thread in the range of the needle manually. CAUTION The needle threader lever can only be used to thread the needle when you are using your right hand slightly to the tension .../11-100/16. While gently holding the thread, raise the needle threader lever. 11. Note that the thread is OFF when threading the needle manually. 15 PATTERNS (PROGRAMMED IN MACHINE) SEWING CHART MAINTENANCE UTILITY STITCHES SEWING BEFORE USE CONTENTS As you lower the needle threader lever, pull the thread...
... by the guide (large hook) and that the thread is in the lowest position, pull the thread in the range of the needle manually. CAUTION The needle threader lever can only be used to thread the needle when you are using your right hand slightly to the tension .../11-100/16. While gently holding the thread, raise the needle threader lever. 11. Note that the thread is OFF when threading the needle manually. 15 PATTERNS (PROGRAMMED IN MACHINE) SEWING CHART MAINTENANCE UTILITY STITCHES SEWING BEFORE USE CONTENTS As you lower the needle threader lever, pull the thread...
Users Manual - English
Page 22
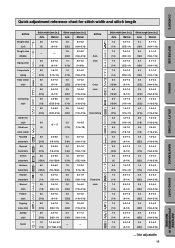
... width [mm (in.)] Auto Manual 0.0 0.0-7.0 (0) (0-1/4) - - 3.5 (1/8) 5.0 (3/16) 0.0 (0) 5.0 (3/16) 3.5 (1/8) 5.0 (3/16) 0.0-7.0 (0-1/4) 1.5-7.0 (1/16-1/4) 0.0-7.0 (0-1/4) 0.0-7.0 (0-1/4) 2.5-5.0 (3/32-3/16) 2.5-5.0 (3/32-3/16) Stitch length [mm (in .)] Auto Manual 0.4 0.1-1.0 (1/64) (1/64-1/...26 27 28 Hemstitching 29 30 31 32 33 34 35 Decorative stitch 36 37 38 39 40 Stitch width [mm (in.)] Auto Manual 7.0 2.5-7.0 (1/4) (3/32-1/4) 7.0 2.5-7.0 (1/4) (3/32-1/4) 7.0 2.5-7.0 (1/4) (3/32-1/4) 7.0 2.5-7.0 (1/4) (3/32-1/4) 6.0 0.0-7.0 (15/64) (0-1/4) ...
... width [mm (in.)] Auto Manual 0.0 0.0-7.0 (0) (0-1/4) - - 3.5 (1/8) 5.0 (3/16) 0.0 (0) 5.0 (3/16) 3.5 (1/8) 5.0 (3/16) 0.0-7.0 (0-1/4) 1.5-7.0 (1/16-1/4) 0.0-7.0 (0-1/4) 0.0-7.0 (0-1/4) 2.5-5.0 (3/32-3/16) 2.5-5.0 (3/32-3/16) Stitch length [mm (in .)] Auto Manual 0.4 0.1-1.0 (1/64) (1/64-1/...26 27 28 Hemstitching 29 30 31 32 33 34 35 Decorative stitch 36 37 38 39 40 Stitch width [mm (in.)] Auto Manual 7.0 2.5-7.0 (1/4) (3/32-1/4) 7.0 2.5-7.0 (1/4) (3/32-1/4) 7.0 2.5-7.0 (1/4) (3/32-1/4) 7.0 2.5-7.0 (1/4) (3/32-1/4) 6.0 0.0-7.0 (15/64) (0-1/4) ...
Users Manual - English
Page 33
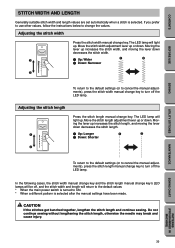
... 2 Down: Narrower 2 To return to the default settings (or to cancel the manual adjustments), press the stitch width manual change the values. In the following cases, the stitch width manual change key and the stitch length manual change key's LED lamps will be off, and the stitch width and length will...decreases the stitch length. 1 Up: Longer 1 2 2 Down: Shorter To return to the default settings (or to cancel the manual adjustments), press the stitch length manual change key to change key to ON. * When a different pattern is selected. Moving the lever up . The LED lamp will...
... 2 Down: Narrower 2 To return to the default settings (or to cancel the manual adjustments), press the stitch width manual change the values. In the following cases, the stitch width manual change key and the stitch length manual change key's LED lamps will be off, and the stitch width and length will...decreases the stitch length. 1 Up: Longer 1 2 2 Down: Shorter To return to the default settings (or to cancel the manual adjustments), press the stitch length manual change key to change key to ON. * When a different pattern is selected. Moving the lever up . The LED lamp will...
Users Manual - English
Page 38
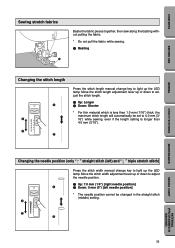
... lever up or down to adjust the needle position. 1 Up: 7.0 mm (1/4") [right needle position] 1 2 Down: 0 mm (0") [left ) and " 5 " triple stretch stitch) Press the stitch width manual change key to light up or down to adjust the stitch length. 1 Up: Longer 2 Down: Shorter * For thin material which is longer than 4.0 mm (3/16..., then sew along the basting without pulling the fabric. * Do not pull the fabric while sewing. 1 Basting Changing the stitch length 1 1 2 2 Press the stitch length manual change key to light up the LED lamp.
... lever up or down to adjust the needle position. 1 Up: 7.0 mm (1/4") [right needle position] 1 2 Down: 0 mm (0") [left ) and " 5 " triple stretch stitch) Press the stitch width manual change key to light up or down to adjust the stitch length. 1 Up: Longer 2 Down: Shorter * For thin material which is longer than 4.0 mm (3/16..., then sew along the basting without pulling the fabric. * Do not pull the fabric while sewing. 1 Basting Changing the stitch length 1 1 2 2 Press the stitch length manual change key to light up the LED lamp.
Users Manual - English
Page 44
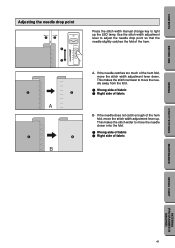
... fabric UTILITY STITCHES MAINTENANCE SEWING CHART PATTERNS (PROGRAMMED IN MACHINE) 41 CONTENTS BEFORE USE SEWING Adjusting the needle drop point 12 1 2 A B Press the stitch width manual change key to light up . This makes the stitch wider to move the stitch width adjustment lever down. A- If the needle does not catch enough...
... fabric UTILITY STITCHES MAINTENANCE SEWING CHART PATTERNS (PROGRAMMED IN MACHINE) 41 CONTENTS BEFORE USE SEWING Adjusting the needle drop point 12 1 2 A B Press the stitch width manual change key to light up . This makes the stitch wider to move the stitch width adjustment lever down. A- If the needle does not catch enough...
Users Manual - English
Page 49
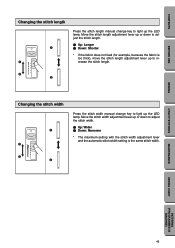
... width setting is too thick), move the stitch length adjustment lever up to increase the stitch length. 2 2 Changing the stitch width 1 1 Press the stitch width manual change key to light up the LED lamp. CONTENTS BEFORE USE SEWING Changing the stitch length 1 1 Press the stitch length...
... width setting is too thick), move the stitch length adjustment lever up to increase the stitch length. 2 2 Changing the stitch width 1 1 Press the stitch width manual change key to light up the LED lamp. CONTENTS BEFORE USE SEWING Changing the stitch length 1 1 Press the stitch length...
Users Manual - English
Page 50
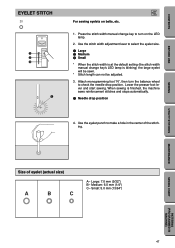
...width adjustment lever to select the eyelet size. 1 Large 2 Medium 3 Small * When the stitch width is at the default setting (the stitch width manual change key to turn the balance wheel to make a hole in the center of eyelet (actual size) A B C A- Lower the presser foot ...lever and start sewing. Press the stitch width manual change key's LED lamp is finished, the machine sews reinforcement stitches and stops automatically. 1 Needle drop position 4. When sewing is blinking) the large eyelet...
...width adjustment lever to select the eyelet size. 1 Large 2 Medium 3 Small * When the stitch width is at the default setting (the stitch width manual change key to turn the balance wheel to make a hole in the center of eyelet (actual size) A B C A- Lower the presser foot ...lever and start sewing. Press the stitch width manual change key's LED lamp is finished, the machine sews reinforcement stitches and stops automatically. 1 Needle drop position 4. When sewing is blinking) the large eyelet...
Users Manual - English
Page 55
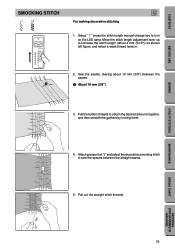
..., then trim off the excess thread leaving 50 mm (2") . 1 Seam line 2 10 to 15 mm (3/8" to turn on the LED lamp. 2. Press the stitch length manual change key to 9/16") 3 About 50 mm (2") 5.
..., then trim off the excess thread leaving 50 mm (2") . 1 Seam line 2 10 to 15 mm (3/8" to turn on the LED lamp. 2. Press the stitch length manual change key to 9/16") 3 About 50 mm (2") 5.
Users Manual - English
Page 62
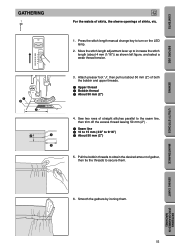
... of gather, and then smooth the gathers by ironing them. 4. UTILITY STITCHES MAINTENANCE SEWING CHART PATTERNS (PROGRAMMED IN MACHINE) 59 Select " " press the stitch length manual change key to increase the stitch length (about 10 mm (3/8'') between the straight seams. J 5.
... of gather, and then smooth the gathers by ironing them. 4. UTILITY STITCHES MAINTENANCE SEWING CHART PATTERNS (PROGRAMMED IN MACHINE) 59 Select " " press the stitch length manual change key to increase the stitch length (about 10 mm (3/8'') between the straight seams. J 5.
Users Manual - English
Page 65
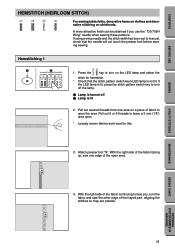
... the right side of the fabric facing up, sew one area on shirtfronts. If using a wing needle and the stitch width has been set to manual, check that the stitch pattern switch key's LED lamp is lit 2. If the LED lamp is lit, press the stitch pattern switch key to turn...
... the right side of the fabric facing up, sew one area on shirtfronts. If using a wing needle and the stitch width has been set to manual, check that the stitch pattern switch key's LED lamp is lit 2. If the LED lamp is lit, press the stitch pattern switch key to turn...
Users Manual - English
Page 67
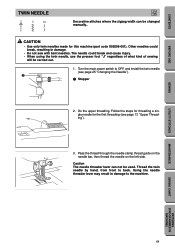
... the needle clamp thread guide on the 5 needle bar, then thread the needle on the left side. 6 Caution The needle threader lever can be changed manually.. Do the upper threading. Using the needle threader lever may result in damage. • Do not sew with bent needles. Follow the steps for threading...
... the needle clamp thread guide on the 5 needle bar, then thread the needle on the left side. 6 Caution The needle threader lever can be changed manually.. Do the upper threading. Using the needle threader lever may result in damage. • Do not sew with bent needles. Follow the steps for threading...


