

Accessory Catalog
Page 11
...maximum stitch width. Place cord under the presser foot. 3. Insert cords or threads into each hole on the presser foot. 2. Attach the presser foot and pull cords under the presser foot. 3. Line up the center guide mark on the machine. 2. Perfect for embellishing 1 to use single cord, use sewing machines Clear-view Foot Use this presser foot where visibility of seams or pattern markings are desired. Insert cords or threads into each guide (to 5 cords or decorative threads. SA145 ABCDEFGHJKLMNO SA144 IP Brother Embellishment Feet Cording Foot Cording Foot (5-hole...
...maximum stitch width. Place cord under the presser foot. 3. Insert cords or threads into each hole on the presser foot. 2. Attach the presser foot and pull cords under the presser foot. 3. Line up the center guide mark on the machine. 2. Perfect for embellishing 1 to use single cord, use sewing machines Clear-view Foot Use this presser foot where visibility of seams or pattern markings are desired. Insert cords or threads into each guide (to 5 cords or decorative threads. SA145 ABCDEFGHJKLMNO SA144 IP Brother Embellishment Feet Cording Foot Cording Foot (5-hole...

Accessory Catalog
Page 13
... position. 3. Sew slowly for details.) Brother Embellishment Feet Pin Tuck Foot 24 Ruffler Foot Pin Tuck Foot This presser foot has 7 grooves and produces perfect pin tucks and corded pin tucks using a twin needle on the lower portion of the grooves. 4. Adjust the amount of tuck or gather by trying different combinations of tucks can be adjusted. 1. Use a stiff card to slide the fabric from left into gathers or tucks. Install and manually thread a twin needle. 2. Draw a reference line to guide...
... position. 3. Sew slowly for details.) Brother Embellishment Feet Pin Tuck Foot 24 Ruffler Foot Pin Tuck Foot This presser foot has 7 grooves and produces perfect pin tucks and corded pin tucks using a twin needle on the lower portion of the grooves. 4. Adjust the amount of tuck or gather by trying different combinations of tucks can be adjusted. 1. Use a stiff card to slide the fabric from left into gathers or tucks. Install and manually thread a twin needle. 2. Draw a reference line to guide...

Accessory Catalog
Page 15
... stitches and to guide the fabric. 4. Requires Low Shank Adapter for thick layers of the foot gives you wide visibility in place while stitches are free to hold the fabric firmly. 5. Use the walking foot with the closed front for ULT series, PC-6500, PC-8200 and PC-8500 sewing machines. Set the machine to the machine. 2. Lower the feed dogs. 2. While starting to sew, press the needle position button twice to pull the bobbin thread...
... stitches and to guide the fabric. 4. Requires Low Shank Adapter for thick layers of the foot gives you wide visibility in place while stitches are free to hold the fabric firmly. 5. Use the walking foot with the closed front for ULT series, PC-6500, PC-8200 and PC-8500 sewing machines. Set the machine to the machine. 2. Lower the feed dogs. 2. While starting to sew, press the needle position button twice to pull the bobbin thread...

Accessory Catalog
Page 17
.... Sewing Decorative Stitches as border designs. Basting Function to connect and ensures your fabric to repeat designs vertically or horizontally. This Embroidery Card Reader is 4000D by adding special features to the actual machine: - New Border Frame and 28 Unique Embroidery Patterns. Customizable USB Mouse* Pointer Functions. - SAVR4500D Duetta™ 4500D/Innov-is4000D Nightie Innov-is 4000D sewing and embroidery machine. * Requires additional purchases. Includes three new free-motion presser feet: Free-motion quilting foot...
.... Sewing Decorative Stitches as border designs. Basting Function to connect and ensures your fabric to repeat designs vertically or horizontally. This Embroidery Card Reader is 4000D by adding special features to the actual machine: - New Border Frame and 28 Unique Embroidery Patterns. Customizable USB Mouse* Pointer Functions. - SAVR4500D Duetta™ 4500D/Innov-is4000D Nightie Innov-is 4000D sewing and embroidery machine. * Requires additional purchases. Includes three new free-motion presser feet: Free-motion quilting foot...

Accessory Catalog
Page 33
... selected dealer or check on this stand that conveniently sits behind your threads in place on creating. Allows easy access to accommodate a variety of thread on our website for your machine. Each thread has it's own thread guide to deliver thread smoothly to 10 spools of spool sizes. Place your machine. Brother Embroidery Accessories 63 Free-Standing Ten Spool Thread Stand Ten Spool Thread Stand Embroidery Machine Hoops Brother Embroidery Accessories 64 For all embroidery and sewing/embroidery machines.
... selected dealer or check on this stand that conveniently sits behind your threads in place on creating. Allows easy access to accommodate a variety of thread on our website for your machine. Each thread has it's own thread guide to deliver thread smoothly to 10 spools of spool sizes. Place your machine. Brother Embroidery Accessories 63 Free-Standing Ten Spool Thread Stand Ten Spool Thread Stand Embroidery Machine Hoops Brother Embroidery Accessories 64 For all embroidery and sewing/embroidery machines.

Accessory Catalog
Page 34
... decorative sewing. C (White only): The 1,000-meter (approx. 1,100-yds) spun thread is 500D. Here is also recommended for greater utility and space saving. This metallic thread can be used on how to the Brother Embroidery Cards giving you just the right color for Brother Embroidery machines, but compatible with straight, zig zag or decorative stitches. For best results, use of needle and stabilizer types. Consult your fabric...
... decorative sewing. C (White only): The 1,000-meter (approx. 1,100-yds) spun thread is 500D. Here is also recommended for greater utility and space saving. This metallic thread can be used on how to the Brother Embroidery Cards giving you just the right color for Brother Embroidery machines, but compatible with straight, zig zag or decorative stitches. For best results, use of needle and stabilizer types. Consult your fabric...

Accessory Catalog
Page 40
Brother Cover Stitch Feet 77 Bias Tape Binding Set Hemming Set Bias Tape Binding Set Attaches 6 or 12 mm (approx. 1/4 to your machine. 3. Set up your machine for a cover stitch, with the LC2 presser foot. Open the seams. 4. Attach the hem positioning plate A/B to top stitch with your machine for a chain stitch, the center needle. 2. Insert the tab on the bias tape attachment into the guide. 4. Sew as folding them. Set up your machine for a cover stitch, with a tweezers. Attaching 12 mm (approx. 1/2") bias tape: Use the...
Brother Cover Stitch Feet 77 Bias Tape Binding Set Hemming Set Bias Tape Binding Set Attaches 6 or 12 mm (approx. 1/4 to your machine. 3. Set up your machine for a cover stitch, with the LC2 presser foot. Open the seams. 4. Attach the hem positioning plate A/B to top stitch with your machine for a chain stitch, the center needle. 2. Insert the tab on the bias tape attachment into the guide. 4. Sew as folding them. Set up your machine for a cover stitch, with a tweezers. Attaching 12 mm (approx. 1/2") bias tape: Use the...
Users Manual - English
Page 5
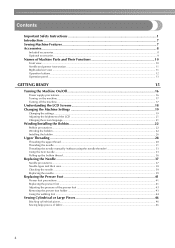
... the needle ...31 Threading the needle manually (without using the needle threader 33 Using the twin needle ...33 Pulling up the bobbin thread...36 Replacing the Needle ...37 Needle precautions ...37 Needle types and their uses...38 Checking the needle ...39 Replacing the needle...39 Replacing the Presser Foot 41 Presser foot precautions ...41 Replacing the presser foot ...41 Adjusting the pressure of the presser foot ...43 Removing the presser foot holder ...43 Using the walking foot ...44 Sewing Cylindrical or Large Pieces 46 Stitching cylindrical pieces...46 Sewing large pieces of fabric...
... the needle ...31 Threading the needle manually (without using the needle threader 33 Using the twin needle ...33 Pulling up the bobbin thread...36 Replacing the Needle ...37 Needle precautions ...37 Needle types and their uses...38 Checking the needle ...39 Replacing the needle...39 Replacing the Presser Foot 41 Presser foot precautions ...41 Replacing the presser foot ...41 Adjusting the pressure of the presser foot ...43 Removing the presser foot holder ...43 Using the walking foot ...44 Sewing Cylindrical or Large Pieces 46 Stitching cylindrical pieces...46 Sewing large pieces of fabric...

Users Manual - English
Page 6
... Adjusting the Stitch Width and Length 58 Adjusting the stitch width...58 Adjusting the stitch length ...59 Useful Functions...60 Changing the needle stop position ...60 Automatically sewing reverse/reinforcement stitches 60 Automatically cutting the thread ...62 Saving stitch settings ...63 Hands-free raising and lowering of the presser foot 64 Useful Sewing Tips ...65 Trial sewing ...65 Changing the sewing direction ...65 Sewing curves ...65 Sewing thick fabrics ...66 Sewing thin fabrics...66 Sewing stretch fabrics...66 Sewing leathers or vinyl fabrics ...67 Sewing an even seam allowance...
... Adjusting the Stitch Width and Length 58 Adjusting the stitch width...58 Adjusting the stitch length ...59 Useful Functions...60 Changing the needle stop position ...60 Automatically sewing reverse/reinforcement stitches 60 Automatically cutting the thread ...62 Saving stitch settings ...63 Hands-free raising and lowering of the presser foot 64 Useful Sewing Tips ...65 Trial sewing ...65 Changing the sewing direction ...65 Sewing curves ...65 Sewing thick fabrics ...66 Sewing thin fabrics...66 Sewing stretch fabrics...66 Sewing leathers or vinyl fabrics ...67 Sewing an even seam allowance...

Users Manual - English
Page 10
... F007N (XC1949-002) 29 Knee lifter 13 Open toe foot SA147 F027N (XC1964-002) 30 Operation manual 14 Seam ripper X54243-051 31 Quick reference guide 15 Bobbin (4) SA156 SFB (XA5539-151) 32 Hard case 16 Needle set X58358-051 33 Accessory bag 17 Twin needle X59296-151 34 Disc-shaped screwdriver 18 Cleaning brush X59476-051 35 Stitch pattern plate Part Code U.S.A./ Canada Others 135793-001 XC8349-051 X55468...
... F007N (XC1949-002) 29 Knee lifter 13 Open toe foot SA147 F027N (XC1964-002) 30 Operation manual 14 Seam ripper X54243-051 31 Quick reference guide 15 Bobbin (4) SA156 SFB (XA5539-151) 32 Hard case 16 Needle set X58358-051 33 Accessory bag 17 Twin needle X59296-151 34 Disc-shaped screwdriver 18 Cleaning brush X59476-051 35 Stitch pattern plate Part Code U.S.A./ Canada Others 135793-001 XC8349-051 X55468...

Users Manual - English
Page 12
... sewing machine is being used with guides to help sew straight seams. e Needle plate cover Remove the needle plate cover to raise and lower the needle. Memo z Refer to pages 9 through 12 while you to clean the bobbin case and race. g Feed dogs The feed dogs feed the fabric in the sewing direction. d Air vent The air vent allows the air surrounding the motor to set the bobbin. g Power supply jack Insert the plug on the power cord into the foot controller jack. i Presser foot lever Raise and lower the presser foot lever to thread...
... sewing machine is being used with guides to help sew straight seams. e Needle plate cover Remove the needle plate cover to raise and lower the needle. Memo z Refer to pages 9 through 12 while you to clean the bobbin case and race. g Feed dogs The feed dogs feed the fabric in the sewing direction. d Air vent The air vent allows the air surrounding the motor to set the bobbin. g Power supply jack Insert the plug on the power cord into the foot controller jack. i Presser foot lever Raise and lower the presser foot lever to thread...
Users Manual - English
Page 13
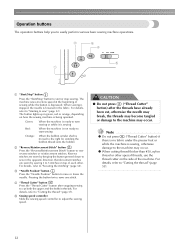
... "Starting to start sewing Orange: When the bobbin winder shaft is sewing, otherwise damage to adjust the sewing speed. The button lights up in the fabric. Pressing the button twice sews one stitch. e Sewing speed controller Slide the sewing speed controller to the machine may occur. Note z Do not press ("Thread Cutter" button) if there is no fabric under the presser foot or while the machine is moved to the right for winding the bobbin thread onto the bobbin b "Reverse/Reinforcement Stitch" button Press the "Reverse/Reinforcement Stitch" button...
... "Starting to start sewing Orange: When the bobbin winder shaft is sewing, otherwise damage to adjust the sewing speed. The button lights up in the fabric. Pressing the button twice sews one stitch. e Sewing speed controller Slide the sewing speed controller to the machine may occur. Note z Do not press ("Thread Cutter" button) if there is no fabric under the presser foot or while the machine is moved to the right for winding the bobbin thread onto the bobbin b "Reverse/Reinforcement Stitch" button Press the "Reverse/Reinforcement Stitch" button...

Users Manual - English
Page 16
... 22 Winding the bobbin 22 Installing the bobbin 26 Upper Threading ...28 Threading the upper thread 28 Threading the needle 31 Threading the needle manually (without using the needle threader 33 Using the twin needle 33 Pulling up the bobbin thread 36 Replacing the Needle 37 Needle precautions 37 Needle types and their uses 38 Checking the needle 39 Replacing the needle 39 Replacing the Presser Foot 41 Presser foot precautions 41 Replacing the presser foot 41 Adjusting the pressure of the presser foot 43 Removing the presser foot holder 43 Using the walking foot 44 Sewing...
... 22 Winding the bobbin 22 Installing the bobbin 26 Upper Threading ...28 Threading the upper thread 28 Threading the needle 31 Threading the needle manually (without using the needle threader 33 Using the twin needle 33 Pulling up the bobbin thread 36 Replacing the Needle 37 Needle precautions 37 Needle types and their uses 38 Checking the needle 39 Replacing the needle 39 Replacing the Presser Foot 41 Presser foot precautions 41 Replacing the presser foot 41 Adjusting the pressure of the presser foot 43 Removing the presser foot holder 43 Using the walking foot 44 Sewing...

Users Manual - English
Page 34
... machine. ● Never use bent needles. Lower the presser foot lever. Use of any other needle may be sewn with the Thread the machine to use the twin needle (part code: X59296-151). Thread the upper thread for the left needle with the upper c thread. Pass the thread through the eye of the needle c from the front. • The needle threader cannot be used with the needle threader, quality. Manually thread the left needle b eye. • For details, refer to "Upper Threading" (page 28). spool pin...
... machine. ● Never use bent needles. Lower the presser foot lever. Use of any other needle may be sewn with the Thread the machine to use the twin needle (part code: X59296-151). Thread the upper thread for the left needle with the upper c thread. Pass the thread through the eye of the needle c from the front. • The needle threader cannot be used with the needle threader, quality. Manually thread the left needle b eye. • For details, refer to "Upper Threading" (page 28). spool pin...

Users Manual - English
Page 36
... presser foot lever and turn the handwheel toward you (counterclockwise) and check that the needle does not touch the presser foot. Select a stitch. m • For details on starting to sew, refer to "Starting to sew" (page 52). • For details on selecting a stitch, refer to select the twin needle setting, otherwise the needle may break or the machine may be damaged. Start sewing. CAUTION ● When changing the sewing direction, press ("Needle Position" button) to single needle sewing...
... presser foot lever and turn the handwheel toward you (counterclockwise) and check that the needle does not touch the presser foot. Select a stitch. m • For details on starting to sew, refer to "Starting to sew" (page 52). • For details on selecting a stitch, refer to select the twin needle setting, otherwise the needle may break or the machine may be damaged. Start sewing. CAUTION ● When changing the sewing direction, press ("Needle Position" button) to single needle sewing...

Users Manual - English
Page 59
... stitch again or change the setting to their default settings. Increasing the width moves the needle to make the stitch wider or narrower. X The stitch width is selected, the appropriate width and length are automatically selected. Adjusting the stitch width The stitch width (zigzag width) can easily be adjusted. X The LCD comes on the sewing machine. z If the straight stitch (left . For details, refer to "Satin stitching using the sewing speed controller" (page 105). To make the stitch...
... stitch again or change the setting to their default settings. Increasing the width moves the needle to make the stitch wider or narrower. X The stitch width is selected, the appropriate width and length are automatically selected. Adjusting the stitch width The stitch width (zigzag width) can easily be adjusted. X The LCD comes on the sewing machine. z If the straight stitch (left . For details, refer to "Satin stitching using the sewing speed controller" (page 105). To make the stitch...

Users Manual - English
Page 87
a a Buttonhole lever The buttonhole lever is positioned behind the bracket on the buttonhole foot. 1 2 a Buttonhole lever b Bracket 86 Attach buttonhole foot "A". a a Do not reduce the gap. Pull down through the hole in the presser foot. • When lowering the presser foot, do not push in the button guide plate Add together the diameter and thickness of the button, and then set the button guide plate to the calculated length. (The distance between the markings on the presser foot scale is...
a a Buttonhole lever The buttonhole lever is positioned behind the bracket on the buttonhole foot. 1 2 a Buttonhole lever b Bracket 86 Attach buttonhole foot "A". a a Do not reduce the gap. Pull down through the hole in the presser foot. • When lowering the presser foot, do not push in the button guide plate Add together the diameter and thickness of the button, and then set the button guide plate to the calculated length. (The distance between the markings on the presser foot scale is...

Users Manual - English
Page 90
... with the sewing machine. Attach button-sewing foot "M". Buttonhole Stitching/Button Sewing 89 Adjust the stitch width so that the needle correctly goes into the two holes of the machine) X The feed dogs are lowered. f Raise the presser foot lever, and then slide the b drop feed lever, located at the rear of the machine on with 4 holes can be tied off later, do not set the sewing machine for programmed-thread cutting. Then, slide the 3 button so that the needle does not...
... with the sewing machine. Attach button-sewing foot "M". Buttonhole Stitching/Button Sewing 89 Adjust the stitch width so that the needle correctly goes into the two holes of the machine) X The feed dogs are lowered. f Raise the presser foot lever, and then slide the b drop feed lever, located at the rear of the machine on with 4 holes can be tied off later, do not set the sewing machine for programmed-thread cutting. Then, slide the 3 button so that the needle does not...
Users Manual - English
Page 145
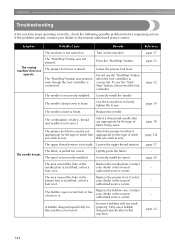
... loose. The presser foot lever is incorrectly installed. Replace the bobbin case. The sewing machine does not operate. The area around the hole in the needle plate is not correct. The needle is raised. Lightly guide the fabric. A bobbin designed specifically for the type of stitch you wish to firmly tighten the screw. page 22 144 The needle breaks. The needle is appropriate for this machine is not used is not Attach the presser foot that is bent or blunt. Loosen the upper thread tension...
... loose. The presser foot lever is incorrectly installed. Replace the bobbin case. The sewing machine does not operate. The area around the hole in the needle plate is not correct. The needle is raised. Lightly guide the fabric. A bobbin designed specifically for the type of stitch you wish to firmly tighten the screw. page 22 144 The needle breaks. The needle is appropriate for this machine is not used is not Attach the presser foot that is bent or blunt. Loosen the upper thread tension...
Users Manual - English
Page 148
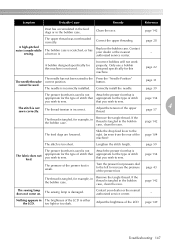
... the drop feed lever to sew. Remove the tangle thread. Symptom Probable Cause Remedy Reference Dust has accumulated in the feed dogs or in the bobbin case. Contact your dealer or the nearest authorized service center. - Lengthen the stitch length. Attach the presser foot that is scratched, or has a burr on . page 149 Troubleshooting 147 The bobbin case is appropriate for the type of stitch that appropriate for this machine is not used...
... the drop feed lever to sew. Remove the tangle thread. Symptom Probable Cause Remedy Reference Dust has accumulated in the feed dogs or in the bobbin case. Contact your dealer or the nearest authorized service center. - Lengthen the stitch length. Attach the presser foot that is scratched, or has a burr on . page 149 Troubleshooting 147 The bobbin case is appropriate for the type of stitch that appropriate for this machine is not used...


