

Accessory Catalog
Page 4
Brother General Sewing Accessories 05 Sew as you like. Its position can be adjusted exactly on the edge of zipper/piping, avoiding the non-flat parts of the presser foot and slide the presser foot so that the needle fits on the opening on the presser foot. 4. Screw on either ...left ). 2. Sew. Adjustable Zipper & Piping Foot Brother General Sewing Accessories 06 Adjustable Zipper & Piping Foot ...
Brother General Sewing Accessories 05 Sew as you like. Its position can be adjusted exactly on the edge of zipper/piping, avoiding the non-flat parts of the presser foot and slide the presser foot so that the needle fits on the opening on the presser foot. 4. Screw on either ...left ). 2. Sew. Adjustable Zipper & Piping Foot Brother General Sewing Accessories 06 Adjustable Zipper & Piping Foot ...

Accessory Catalog
Page 6
...fabrics. 1. Place the fabric with the wrong side facing up under the presser foot. 3. Non Stick Foot Designed for details.) www.brother.com Lower the presser foot so that the foot guide is exactly against the edge of the fabric behind the needle and lower the ...sew 2-3 stitches, making sure the fabric is rolling around the curled part of the foot. 8. Raise the needle and the presser foot. 5. Brother General Sewing Accessories 09 Narrow Hemmer Foot Non Stick Foot Overlock Foot Picot Foot Brother General Sewing Accessories 10 SA126 ABCDEFJKMN SA127 GHILOP Skirt Innov-is Project ...
...fabrics. 1. Place the fabric with the wrong side facing up under the presser foot. 3. Non Stick Foot Designed for details.) www.brother.com Lower the presser foot so that the foot guide is exactly against the edge of the fabric behind the needle and lower the ...sew 2-3 stitches, making sure the fabric is rolling around the curled part of the foot. 8. Raise the needle and the presser foot. 5. Brother General Sewing Accessories 09 Narrow Hemmer Foot Non Stick Foot Overlock Foot Picot Foot Brother General Sewing Accessories 10 SA126 ABCDEFJKMN SA127 GHILOP Skirt Innov-is Project ...

Users Manual - English
Page 3
...and scouring powders can damage the case and machine, and should never be used by or near a space heater, iron, halogen lamp, or other parts to assure correct installation. 8 For repair or adjustment: • If the Light unit (light-emitting diode) is damaged, it could cause the needle... in this manual and specifications of the operation manual to inspect and adjust the machine yourself. If the problem persists, please consult your local authorized Brother dealer. The contents of this manual. Do not use or store the machine near children. • Do not use outdoors. 7 For a ...
...and scouring powders can damage the case and machine, and should never be used by or near a space heater, iron, halogen lamp, or other parts to assure correct installation. 8 For repair or adjustment: • If the Light unit (light-emitting diode) is damaged, it could cause the needle... in this manual and specifications of the operation manual to inspect and adjust the machine yourself. If the problem persists, please consult your local authorized Brother dealer. The contents of this manual. Do not use or store the machine near children. • Do not use outdoors. 7 For a ...
Users Manual - English
Page 5
Contents Important Safety Instructions 1 Introduction ...7 Sewing Machine Features ...7 Accessories...8 Included accessories ...8 Optional accessories ...9 Names of Machine Parts and Their Functions 10 Front view ...10 Needle and presser foot section ...11 Right-side/rear view ...11 Operation buttons ...12 Operation panel ...13 GETTING ...
Contents Important Safety Instructions 1 Introduction ...7 Sewing Machine Features ...7 Accessories...8 Included accessories ...8 Optional accessories ...9 Names of Machine Parts and Their Functions 10 Front view ...10 Needle and presser foot section ...11 Right-side/rear view ...11 Operation buttons ...12 Operation panel ...13 GETTING ...

Users Manual - English
Page 9
...accessories The following accessories are included. Accessories After opening the box, check that the following items should also be used on this machine model NX-450. only) z Foot controller: Model N5V This foot controller can be included in the illustration below. 8 z The screw for the... presser foot holder is available through your authorized dealer. (Part code: XA4813-051) z The organized accessory tray is missing or damaged, contact your authorized dealer. (Part code: XC4489-051) ■ Attaching the stitch pattern plate The stitch pattern plate shows the...
...accessories The following accessories are included. Accessories After opening the box, check that the following items should also be used on this machine model NX-450. only) z Foot controller: Model N5V This foot controller can be included in the illustration below. 8 z The screw for the... presser foot holder is available through your authorized dealer. (Part code: XA4813-051) z The organized accessory tray is missing or damaged, contact your authorized dealer. (Part code: XC4489-051) ■ Attaching the stitch pattern plate The stitch pattern plate shows the...

Users Manual - English
Page 10
...33 Accessory bag 17 Twin needle X59296-151 34 Disc-shaped screwdriver 18 Cleaning brush X59476-051 35 Stitch pattern plate Part Code U.S.A./ Canada Others 135793-001 XC8349-051 X55468-051 130012-054 X55260-153 130013-154 XC4654-051 XA5523-050 ...optional accessories. 1. 2. 3. 4. 5. 1. Accessories 9 Side cutter Part code: SA177, F054(XC3879-002) 2. Wide table Part code: SA551, WT5(XC9567-152) 4. 1/4 inch quilting foot Part code: SA125, F001N(XC1944-052) 5. 1/4 inch quilting foot with guide Part code: SA185, F057(XC7416-252) Memo z To obtain optional ...
...33 Accessory bag 17 Twin needle X59296-151 34 Disc-shaped screwdriver 18 Cleaning brush X59476-051 35 Stitch pattern plate Part Code U.S.A./ Canada Others 135793-001 XC8349-051 X55468-051 130012-054 X55260-153 130013-154 XC4654-051 XA5523-050 ...optional accessories. 1. 2. 3. 4. 5. 1. Accessories 9 Side cutter Part code: SA177, F054(XC3879-002) 2. Wide table Part code: SA551, WT5(XC9567-152) 4. 1/4 inch quilting foot Part code: SA125, F001N(XC1944-052) 5. 1/4 inch quilting foot with guide Part code: SA185, F057(XC7416-252) Memo z To obtain optional ...

Users Manual - English
Page 11
... operate the sewing machine. (page 12) j Flat bed attachment with accessory compartment Store presser feet and bobbins in the accessory compartment of the machine parts. m Thread take-up lever check window Look through the thread cutter to learn the names of the flat bed attachment. c Spool pin Place a... tension dial Use the thread tension dial to check the position of thread on the spool pin. Names of Machine Parts and Their Functions The names of the various parts of the upper thread. 10 b Thread guide cover Pass the thread behind the thread guide cover when threading the upper...
... operate the sewing machine. (page 12) j Flat bed attachment with accessory compartment Store presser feet and bobbins in the accessory compartment of the machine parts. m Thread take-up lever check window Look through the thread cutter to learn the names of the flat bed attachment. c Spool pin Place a... tension dial Use the thread tension dial to check the position of thread on the spool pin. Names of Machine Parts and Their Functions The names of the various parts of the upper thread. 10 b Thread guide cover Pass the thread behind the thread guide cover when threading the upper...

Users Manual - English
Page 12
... the plug on the power cord into the foot controller jack. Names of pressure that the presser foot applies to adjust the amount of Machine Parts and Their Functions 11 Attach the appropriate presser foot for the selected stitch. i Presser foot holder The presser foot is being used with guides to...
... the plug on the power cord into the foot controller jack. Names of pressure that the presser foot applies to adjust the amount of Machine Parts and Their Functions 11 Attach the appropriate presser foot for the selected stitch. i Presser foot holder The presser foot is being used with guides to...

Users Manual - English
Page 14
...). k Decorative stitch key Press this key to select a decorative stitch, satin stitch, crossstitch or decorative satin stitch. Each time this key to one of Machine Parts and Their Functions 13 b Settings key Press this key is pressed, the font switches to select sewing settings, such as for left/ right mirror imaging...
...). k Decorative stitch key Press this key to select a decorative stitch, satin stitch, crossstitch or decorative satin stitch. Each time this key to one of Machine Parts and Their Functions 13 b Settings key Press this key is pressed, the font switches to select sewing settings, such as for left/ right mirror imaging...
Users Manual - English
Page 23
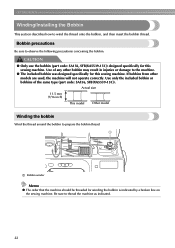
... READY Winding/Installing the Bobbin This section describes how to observe the following precautions concerning the bobbin. Use of the same type (part code: SA156, SFB(XA5539-151)). Use only the included bobbin or bobbins of any other models are used, the machine will not... injuries or damage to the machine. ● The included bobbin was designed specifically for this sewing machine. CAUTION ● Only use the bobbin (part code: SA156, SFB(XA5539-151)) designed specifically for winding the bobbin is indicated by a broken line on the sewing machine. Actual size 11.5 ...
... READY Winding/Installing the Bobbin This section describes how to observe the following precautions concerning the bobbin. Use of the same type (part code: SA156, SFB(XA5539-151)). Use only the included bobbin or bobbins of any other models are used, the machine will not... injuries or damage to the machine. ● The included bobbin was designed specifically for this sewing machine. CAUTION ● Only use the bobbin (part code: SA156, SFB(XA5539-151)) designed specifically for winding the bobbin is indicated by a broken line on the sewing machine. Actual size 11.5 ...
Users Manual - English
Page 27
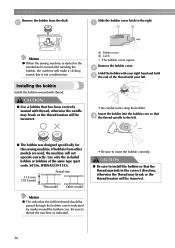
... may break or the thread tension will be incorrect. 26 b Hold the bobbin with your right hand and hold c the end of the same type (part code: SA156, SFB(XA5539-151)). Insert the bobbin into the bobbin case so that the bobbin thread should be passed through the bobbin case is...
... may break or the thread tension will be incorrect. 26 b Hold the bobbin with your right hand and hold c the end of the same type (part code: SA156, SFB(XA5539-151)). Insert the bobbin into the bobbin case so that the bobbin thread should be passed through the bobbin case is...

Users Manual - English
Page 34
.... ● Never use bent needles. Upper Threading 33 twin needle, refer to "Stitch Settings" (page 134). • For details, refer to use the twin needle (part code: X59296-151). Raise the presser foot lever, pass the end of the d thread through k of "Threading the upper thread" (page 28). Bent needles can...
.... ● Never use bent needles. Upper Threading 33 twin needle, refer to "Stitch Settings" (page 134). • For details, refer to use the twin needle (part code: X59296-151). Raise the presser foot lever, pass the end of the d thread through k of "Threading the upper thread" (page 28). Bent needles can...

Users Manual - English
Page 41
... (counterclockwise) to remove the needle. 1 2 a Screwdriver b Needle clamp screw • Do not apply a strong force when loosening or tightening the needle clamp screw, otherwise certain parts of the machine, insert the needle until it touches the needle stopper. 1 a Needle stopper 40 d While holding the needle with your left hand, and then...
... (counterclockwise) to remove the needle. 1 2 a Screwdriver b Needle clamp screw • Do not apply a strong force when loosening or tightening the needle clamp screw, otherwise certain parts of the machine, insert the needle until it touches the needle stopper. 1 a Needle stopper 40 d While holding the needle with your left hand, and then...

Users Manual - English
Page 47
... flat bed attachment removed, freearm sewing is possible. a The optional wide table makes sewing large pieces of fabric, remove the flat bed attachment. Slide the part that you are finished with free-arm sewing, c install the flat bed attachment back in its original position. Stitching cylindrical pieces Sewing large pieces of...
... flat bed attachment removed, freearm sewing is possible. a The optional wide table makes sewing large pieces of fabric, remove the flat bed attachment. Slide the part that you are finished with free-arm sewing, c install the flat bed attachment back in its original position. Stitching cylindrical pieces Sewing large pieces of...
Users Manual - English
Page 51
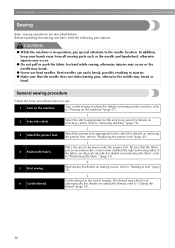
... stitch appropriate for the stitch.For details on cutting the thread, refer to the needle location. In addition, keep your hands away from all moving parts such as the needle and handwheel, otherwise injuries may occur. ● Do not pull or push the fabric too hard while sewing, otherwise injuries may...
... stitch appropriate for the stitch.For details on cutting the thread, refer to the needle location. In addition, keep your hands away from all moving parts such as the needle and handwheel, otherwise injuries may occur. ● Do not pull or push the fabric too hard while sewing, otherwise injuries may...

Users Manual - English
Page 86
Use chalk to the back, as shown below . Buttonhole Stitching/Button Sewing 85 Buttonholes are indicated below . 1 1 1 3 1 a Reinforcement stitching The names of parts of buttonhole b foot "A", and then insert the button that will be put through the buttonhole. Buttonhole sewing The maximum buttonhole length is used for sewing ...
Use chalk to the back, as shown below . Buttonhole Stitching/Button Sewing 85 Buttonholes are indicated below . 1 1 1 3 1 a Reinforcement stitching The names of parts of buttonhole b foot "A", and then insert the button that will be put through the buttonhole. Buttonhole sewing The maximum buttonhole length is used for sewing ...
Users Manual - English
Page 89
...the grooves, and then loosely tie it . c Adjust the stitch width to "Replacing the presser foot" (page 41). Hook the gimp thread onto the part of the fabric, and then tie it . Select stitch 52 or 53 . When sewing is finished, gently pull the gimp f thread to "Adjusting ...the stitch width" (page 58). With a seam ripper, cut the middle part of the h gimp thread remaining at the top end of fabric. ■ Sewing buttonholes on stretch fabrics When sewing buttonholes on stretch fabrics, use a ...
...the grooves, and then loosely tie it . c Adjust the stitch width to "Replacing the presser foot" (page 41). Hook the gimp thread onto the part of the fabric, and then tie it . Select stitch 52 or 53 . When sewing is finished, gently pull the gimp f thread to "Adjusting ...the stitch width" (page 58). With a seam ripper, cut the middle part of the h gimp thread remaining at the top end of fabric. ■ Sewing buttonholes on stretch fabrics When sewing buttonholes on stretch fabrics, use a ...

Users Manual - English
Page 125
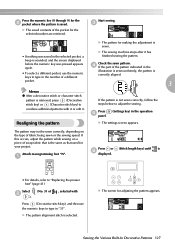
..., causing the needle to increase the length. X The screen for compact stitching. Select a satin stitch (No. 32-47 of , a selected with ). • Press to one part of a satin stitch can be set within the range of and . X The initial stitch screen appears again. 124 Changing the pattern length The length of...
..., causing the needle to increase the length. X The screen for compact stitching. Select a satin stitch (No. 32-47 of , a selected with ). • Press to one part of a satin stitch can be set within the range of and . X The initial stitch screen appears again. 124 Changing the pattern length The length of...
Users Manual - English
Page 128
... is sounded, and the screen displayed before the numeric key was saved in the illustration is sewn uniformly, the pattern is correctly aligned. d If the part of a different Check the sewn pattern. The pattern may not be sewn correctly, depending on a piece of fabric being sewn or the sewing speed. If...
... is sounded, and the screen displayed before the numeric key was saved in the illustration is sewn uniformly, the pattern is correctly aligned. d If the part of a different Check the sewn pattern. The pattern may not be sewn correctly, depending on a piece of fabric being sewn or the sewing speed. If...

Users Manual - English
Page 144
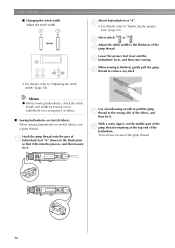
... bobbin case is a screw in the needle plate cover. a a Needle plate cover Use the disc-shaped screwdriver to the bobbin case. For a new bobbin case (part code: XC3153-151), contact your nearest authorized service center. ● Be sure that the projection g on the bobbin case aligns with the spring. ■ If...
... bobbin case is a screw in the needle plate cover. a a Needle plate cover Use the disc-shaped screwdriver to the bobbin case. For a new bobbin case (part code: XC3153-151), contact your nearest authorized service center. ● Be sure that the projection g on the bobbin case aligns with the spring. ■ If...

