Network Users Manual - English
Page 69
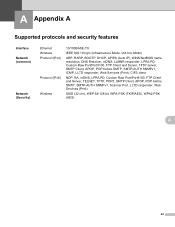
... NDP, RA, mDNS, LPR/LPD, Custom Raw Port/Port9100, FTP Client and Server, TELNET, TFTP, POP3, SMTP Client, APOP, POP before SMTP, SMTP-AUTH SNMPv1, Scanner Port, LLTD responder, Web Services (Print) SSID (32 chr), WEP 64/128 bit, WPA-PSK (TKIP/AES), WPA2-PSK (AES) A 64
... NDP, RA, mDNS, LPR/LPD, Custom Raw Port/Port9100, FTP Client and Server, TELNET, TFTP, POP3, SMTP Client, APOP, POP before SMTP, SMTP-AUTH SNMPv1, Scanner Port, LLTD responder, Web Services (Print) SSID (32 chr), WEP 64/128 bit, WPA-PSK (TKIP/AES), WPA2-PSK (AES) A 64
Quick Setup Guide - English
Page 5
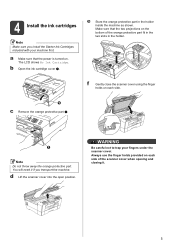
... when opening and closing it if you install the Starter Ink Cartridges included with your fingers under the scanner cover. Make sure that the power is turned on each side. 1 c Remove the orange protective part a. 1 Note Do not throw away the orange protective part. a ... the orange protective part in the holder. You will need it . 5 b Open the ink cartridge cover a. Always use the finger holds provided on . d Lift the scanner cover into the open position. 4 Install the ink cartridges Note Make sure you transport the machine. The LCD shows No Ink Cartridge.
... when opening and closing it if you install the Starter Ink Cartridges included with your fingers under the scanner cover. Make sure that the power is turned on each side. 1 c Remove the orange protective part a. 1 Note Do not throw away the orange protective part. a ... the orange protective part in the holder. You will need it . 5 b Open the ink cartridge cover a. Always use the finger holds provided on . d Lift the scanner cover into the open position. 4 Install the ink cartridges Note Make sure you transport the machine. The LCD shows No Ink Cartridge.

Quick Setup Guide - English
Page 12
... the sheet face up in chapter 2 of your product online using the On-Line Registration link from the installation CD-ROM or visit http://www.brother.com/registration/. d Enter the toll-free fax number: 1-877-268-9575. 12 c Make sure (FAX) is illuminated in Blue. a Fill out the Product Registration Sheet... into this slot. (Please note that only one sheet can be used at a time.) Use the manual feed slot to print or copy on the scanner glass. e Press Black Start.
... the sheet face up in chapter 2 of your product online using the On-Line Registration link from the installation CD-ROM or visit http://www.brother.com/registration/. d Enter the toll-free fax number: 1-877-268-9575. 12 c Make sure (FAX) is illuminated in Blue. a Fill out the Product Registration Sheet... into this slot. (Please note that only one sheet can be used at a time.) Use the manual feed slot to print or copy on the scanner glass. e Press Black Start.
Quick Setup Guide - English
Page 15
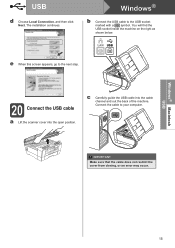
..., and then click Next. The installation continues. LAN USB e When this screen appears, go to the next step. 20 Connect the USB cable a Lift the scanner cover into the cable channel and out the back of the machine.
..., and then click Next. The installation continues. LAN USB e When this screen appears, go to the next step. 20 Connect the USB cable a Lift the scanner cover into the cable channel and out the back of the machine.
Quick Setup Guide - English
Page 16
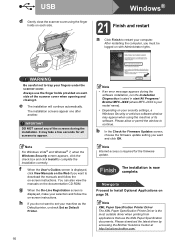
... on each side of the screens during the software installation, run the Installation Diagnostics located in start/All Programs/ Brother/MFC-JXXX (where MFC-JXXX is displayed, make your selection and follow the on the documentation CD-ROM. Please download the latest driver by ...accessing the Brother Solutions Center at http://solutions.brother.com/. USB Windows® d Gently close the scanner cover using the machine or its software. h If...
... on each side of the screens during the software installation, run the Installation Diagnostics located in start/All Programs/ Brother/MFC-JXXX (where MFC-JXXX is displayed, make your selection and follow the on the documentation CD-ROM. Please download the latest driver by ...accessing the Brother Solutions Center at http://solutions.brother.com/. USB Windows® d Gently close the scanner cover using the machine or its software. h If...

Quick Setup Guide - English
Page 17
Windows® Macintosh USB USB Macintosh For USB interface users (Mac OS X 10.4.11, 10.5.x, 10.6.x) 18 Before you are using, visit http://solutions.brother.com/. • For Mac OS X 10.4.0 to 10.4.10 users, upgrade to Mac OS X 10.4.11 - 10.6.x. 19 Connect the USB cable IMPORTANT • DO ... position. Connect the cable to your Macintosh. LAN USB Note • For the latest drivers and information on the right as shown below. a Lift the scanner cover into the cable channel and out the back of the machine. You will find the USB socket inside the machine on the Mac OS...
Windows® Macintosh USB USB Macintosh For USB interface users (Mac OS X 10.4.11, 10.5.x, 10.6.x) 18 Before you are using, visit http://solutions.brother.com/. • For Mac OS X 10.4.0 to 10.4.10 users, upgrade to Mac OS X 10.4.11 - 10.6.x. 19 Connect the USB cable IMPORTANT • DO ... position. Connect the cable to your Macintosh. LAN USB Note • For the latest drivers and information on the right as shown below. a Lift the scanner cover into the cable channel and out the back of the machine. You will find the USB socket inside the machine on the Mac OS...
Quick Setup Guide - English
Page 18
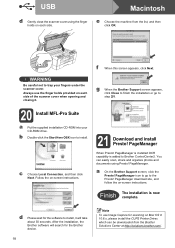
...can easily scan, share and organize photos and documents using the finger holds on each side of the scanner cover when opening and closing it will search for the Brother device. 18 Note To use the finger holds provided on Mac OS X 10.6.x, please install the ...follow the on -screen instructions. WARNING Be careful not to install. USB Macintosh d Gently close the scanner cover using Presto! e Choose the machine from the Brother Solutions Center at http://solutions.brother.com/. Always use Image Capture for scanning on each side. Finish The installation is added to install...
...can easily scan, share and organize photos and documents using the finger holds on each side of the scanner cover when opening and closing it will search for the Brother device. 18 Note To use the finger holds provided on Mac OS X 10.6.x, please install the ...follow the on -screen instructions. WARNING Be careful not to install. USB Macintosh d Gently close the scanner cover using Presto! e Choose the machine from the Brother Solutions Center at http://solutions.brother.com/. Always use Image Capture for scanning on each side. Finish The installation is added to install...

Quick Setup Guide - English
Page 19
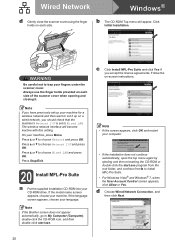
...them. b You will find the LAN socket marked with a symbol inside the machine on -screen instructions. 19 Connect the network cable a Lift the scanner cover into the cable channel and out the back of the machine. Remove the protective cap and connect the network cable to the latest Windows...of MFL-Pro Suite, follow the on the left as shown below. LAN USB Note • For the latest drivers and information, visit http://solutions.brother.com/. • The screens may occur. IMPORTANT Make sure that your network. Wired Network Windows® For wired network interface users (Windows®...
...them. b You will find the LAN socket marked with a symbol inside the machine on -screen instructions. 19 Connect the network cable a Lift the scanner cover into the cable channel and out the back of the machine. Remove the protective cap and connect the network cable to the latest Windows...of MFL-Pro Suite, follow the on the left as shown below. LAN USB Note • For the latest drivers and information, visit http://solutions.brother.com/. • The screens may occur. IMPORTANT Make sure that your network. Wired Network Windows® For wired network interface users (Windows®...
Quick Setup Guide - English
Page 20
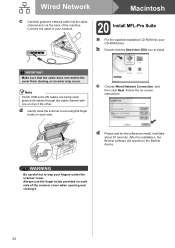
... by ejecting and then reinserting the CD-ROM or double-click the start .exe. Always use the finger holds provided on each side of the scanner cover when opening and closing it up your machine for a wireless network and then want to Wired LAN. Follow the on a wired network, you ... MFL-Pro Suite. • For Windows Vista® and Windows® 7, when the User Account Control screen appears, click Allow or Yes. Note If the Brother screen does not appear automatically, go to choose Network and press OK. If the model name screen appears, choose your machine, press Menu. Press Stop...
... by ejecting and then reinserting the CD-ROM or double-click the start .exe. Always use the finger holds provided on each side of the scanner cover when opening and closing it up your machine for a wireless network and then want to Wired LAN. Follow the on a wired network, you ... MFL-Pro Suite. • For Windows Vista® and Windows® 7, when the User Account Control screen appears, click Allow or Yes. Note If the Brother screen does not appear automatically, go to choose Network and press OK. If the model name screen appears, choose your machine, press Menu. Press Stop...
Quick Setup Guide - English
Page 23
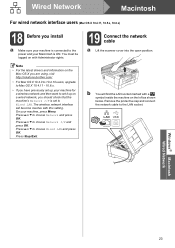
... Press a or b to the LAN socket. Press a or b to choose Network I /F is ON. Press Stop/Exit. 19 Connect the network cable a Lift the scanner cover into the open position. Wired Network Macintosh For wired network interface users (Mac OS X 10.4.11, 10.5.x, 10.6.x) 18 Before you have previously set...that the machine's Network I /F and press OK. Note • For the latest drivers and information on the Mac OS X you are using, visit http://solutions.brother.com/. • For Mac OS X 10.4.0 to 10.4.10 users, upgrade to Mac OS X 10.4.11 - 10.6.x. • If you install a Make ...
... Press a or b to the LAN socket. Press a or b to choose Network I /F is ON. Press Stop/Exit. 19 Connect the network cable a Lift the scanner cover into the open position. Wired Network Macintosh For wired network interface users (Mac OS X 10.4.11, 10.5.x, 10.6.x) 18 Before you have previously set...that the machine's Network I /F and press OK. Note • For the latest drivers and information on the Mac OS X you are using, visit http://solutions.brother.com/. • For Mac OS X 10.4.0 to 10.4.10 users, upgrade to Mac OS X 10.4.11 - 10.6.x. • If you install a Make ...
Quick Setup Guide - English
Page 24
d Gently close the scanner cover using the finger holds on -screen instructions. d Please wait for the Brother device. Always use the finger holds provided on top of the machine. After the installation, the Brother software will take about 30 seconds. IMPORTANT Make sure that the cable does not restrict the... cover from closing it will search for the software to trap your fingers under the scanner cover. Note If both USB and LAN cables...
d Gently close the scanner cover using the finger holds on -screen instructions. d Please wait for the Brother device. Always use the finger holds provided on top of the machine. After the installation, the Brother software will take about 30 seconds. IMPORTANT Make sure that the cable does not restrict the... cover from closing it will search for the software to trap your fingers under the scanner cover. Note If both USB and LAN cables...
Software Users Manual - English
Page 3
... driver 34 Scanning a document into the PC ...34 Pre-Scanning to crop a portion you want to scan 36 Auto Crop ...37 Settings in the Scanner Setup dialog box 38 Scanning a document using the WIA driver (Windows® XP/Windows Vista®/Windows® 7 42 WIA compliant ...42 Scanning ...a document into the PC ...42 Pre-Scanning and cropping a portion using the scanner glass 44 Scanning a document using the WIA driver (Windows® Photo Gallery and Windows® Fax and Scan users 47 Scanning a document into the PC...
... driver 34 Scanning a document into the PC ...34 Pre-Scanning to crop a portion you want to scan 36 Auto Crop ...37 Settings in the Scanner Setup dialog box 38 Scanning a document using the WIA driver (Windows® XP/Windows Vista®/Windows® 7 42 WIA compliant ...42 Scanning ...a document into the PC ...42 Pre-Scanning and cropping a portion using the scanner glass 44 Scanning a document using the WIA driver (Windows® Photo Gallery and Windows® Fax and Scan users 47 Scanning a document into the PC...
Software Users Manual - English
Page 6
PageManager...149 Features ...149 System requirements for MFC-J6510DW 123 Advanced settings ...124 Color Settings ...127 Advanced ...printing, scanning and faxing 115 Clearing data from the memory ...115 Status Monitor ...116 Using the Brother printer driver...118 Choosing page setup options ...118 Duplex Printing ...120 Choosing printing options ...121 Print ... Macintosh 8 Printing and Faxing 115 Setting up your Macintosh 137 Pre-Scanning an image ...137 Settings in the Scanner window ...139 Scanning a document using the ICA driver (Mac OS X 10.6.x 143 Using Image Capture...143 Scanning...
PageManager...149 Features ...149 System requirements for MFC-J6510DW 123 Advanced settings ...124 Color Settings ...127 Advanced ...printing, scanning and faxing 115 Clearing data from the memory ...115 Status Monitor ...116 Using the Brother printer driver...118 Choosing page setup options ...118 Duplex Printing ...120 Choosing printing options ...121 Print ... Macintosh 8 Printing and Faxing 115 Setting up your Macintosh 137 Pre-Scanning an image ...137 Settings in the Scanner window ...139 Scanning a document using the ICA driver (Mac OS X 10.6.x 143 Using Image Capture...143 Scanning...

Software Users Manual - English
Page 41
... this Guide are two ways in which you installed MFL-Pro Suite from your machine, but you use the ADF (automatic document feeder) or the scanner glass. a Load your operating system. Windows® XP/Windows Vista®/Windows® 7 users can select either use ScanSoft™ PaperPort™12SE... more information, see Using ScanSoft™ PaperPort™12SE with your applications. 2 (Windows® XP/Windows Vista®/Windows® 7) Two scanner drivers are using the TWAIN driver 2 The Brother MFL-Pro Suite software includes a TWAIN compliant...
... this Guide are two ways in which you installed MFL-Pro Suite from your machine, but you use the ADF (automatic document feeder) or the scanner glass. a Load your operating system. Windows® XP/Windows Vista®/Windows® 7 users can select either use ScanSoft™ PaperPort™12SE... more information, see Using ScanSoft™ PaperPort™12SE with your applications. 2 (Windows® XP/Windows Vista®/Windows® 7) Two scanner drivers are using the TWAIN driver 2 The Brother MFL-Pro Suite software includes a TWAIN compliant...
Software Users Manual - English
Page 42
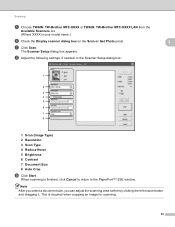
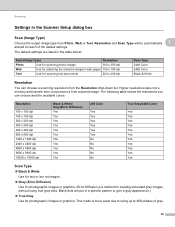
Scanning e Choose TWAIN: TW-Brother MFC-XXXX or TWAIN: TW-Brother MFC-XXXX LAN from the Available Scanners list. (Where XXXX is finished, click Cancel to return to the PaperPort™12SE window. When scanning is your model name.) f Check the Display scanner dialog box on the Scan or Get Photo panel. 2... you can adjust the scanning area further by clicking the left mouse button and dragging it. h Adjust the following settings, if needed, in the Scanner Setup dialog box: 1 2 3 4 5 6 7 8 1 Scan (Image Type) 2 Resolution 3 Scan Type 4 Reduce Noise 5 Brightness 6 Contrast 7 Document Size 8 Auto...
Scanning e Choose TWAIN: TW-Brother MFC-XXXX or TWAIN: TW-Brother MFC-XXXX LAN from the Available Scanners list. (Where XXXX is finished, click Cancel to return to the PaperPort™12SE window. When scanning is your model name.) f Check the Display scanner dialog box on the Scan or Get Photo panel. 2... you can adjust the scanning area further by clicking the left mouse button and dragging it. h Adjust the following settings, if needed, in the Scanner Setup dialog box: 1 2 3 4 5 6 7 8 1 Scan (Image Type) 2 Resolution 3 Scan Type 4 Reduce Noise 5 Brightness 6 Contrast 7 Document Size 8 Auto...
Software Users Manual - English
Page 43
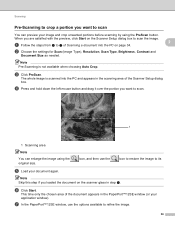
Note Skip this step if you are satisfied with the preview, click Start on the Scanner Setup dialog box to scan the image. f Click Start. c Click PreScan. The whole image is not available when choosing Auto Crop. d Press and hold down .... 2 b Choose the settings for Scan (Image Type), Resolution, Scan Type, Brightness, Contrast and Document Size as needed. This time only the chosen area of the Scanner Setup dialog box. icon, and then use the options available to refine the image. 36 g In the PaperPort™12SE window, use the icon to...
Note Skip this step if you are satisfied with the preview, click Start on the Scanner Setup dialog box to scan the image. f Click Start. c Click PreScan. The whole image is not available when choosing Auto Crop. d Press and hold down .... 2 b Choose the settings for Scan (Image Type), Resolution, Scan Type, Brightness, Contrast and Document Size as needed. This time only the chosen area of the Scanner Setup dialog box. icon, and then use the options available to refine the image. 36 g In the PaperPort™12SE window, use the icon to...

Software Users Manual - English
Page 44
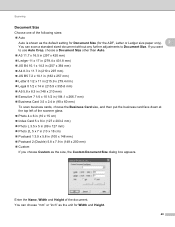
...(10 mm) or greater 2 0.8 in . (10 mm) apart from each other than Auto. You must place the documents away from the edges of the scanner glass as shown in the illustration. You must place the documents at least 0.4 in . (20 mm) or greater (bottom) Guidelines for Auto Crop 2 &#...61550; This setting is only available for up to a maximum of 16 documents depending on size of the document on the scanner glass by checking Auto Crop. When using Auto Crop, the machine will not work. Auto Crop is available for documents that are rectangular or...
...(10 mm) or greater 2 0.8 in . (10 mm) apart from each other than Auto. You must place the documents away from the edges of the scanner glass as shown in the illustration. You must place the documents at least 0.4 in . (20 mm) or greater (bottom) Guidelines for Auto Crop 2 &#...61550; This setting is only available for up to a maximum of 16 documents depending on size of the document on the scanner glass by checking Auto Crop. When using Auto Crop, the machine will not work. Auto Crop is available for documents that are rectangular or...
Software Users Manual - English
Page 45
Higher resolutions take more exact due to using true gray dots. Scanning Settings in the Scanner Setup dialog box 2 Scan (Image Type) 2 Choose the output image type from the Resolution drop-down list. The default settings are put in the table ...
Higher resolutions take more exact due to using true gray dots. Scanning Settings in the Scanner Setup dialog box 2 Scan (Image Type) 2 Choose the output image type from the Resolution drop-down list. The default settings are put in the table ...
Software Users Manual - English
Page 46
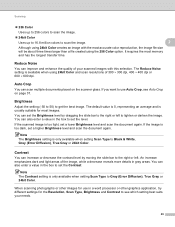
... placed on page 37. Note The Contrast setting is usually suitable for the Resolution, Scan Type, Brightness and Contrast to see Auto Crop on the scanner glass. Scanning 256 Color Uses up to 256 colors to scan the image. 24bit Color Uses up to 16.8 million colors to scan...
... placed on page 37. Note The Contrast setting is usually suitable for the Resolution, Scan Type, Brightness and Contrast to see Auto Crop on the scanner glass. Scanning 256 Color Uses up to 256 colors to scan the image. 24bit Color Uses up to 16.8 million colors to scan...
Software Users Manual - English
Page 47
... (148 x 200 mm) Custom If you choose Custom as the unit for Width and Height. 40 Enter the Name, Width and Height of the scanner glass. Photo 4 x 6 in (10 x 15 cm) Index Card 5 x 8 in (127 x 203.2 mm) Photo L 3.5 x 5 in (89 x 127 mm) Photo 2L 5 x 7 in (13...
... (148 x 200 mm) Custom If you choose Custom as the unit for Width and Height. 40 Enter the Name, Width and Height of the scanner glass. Photo 4 x 6 in (10 x 15 cm) Index Card 5 x 8 in (127 x 203.2 mm) Photo L 3.5 x 5 in (89 x 127 mm) Photo 2L 5 x 7 in (13...


