Users Manual - English
Page 65
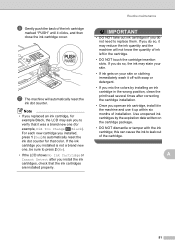
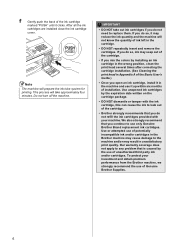
... installation. • Once you do not need to verify that the ink cartridges are installed properly. If you open an ink cartridge, install it clicks, and then close the ink cartridge cover. Note • If you replaced an ink cartridge, for example Black, the LCD may ask you install the... ink cartridges, check that it may stain your skin. • If ink gets on the cartridge package....
... installation. • Once you do not need to verify that the ink cartridges are installed properly. If you open an ink cartridge, install it clicks, and then close the ink cartridge cover. Note • If you replaced an ink cartridge, for example Black, the LCD may ask you install the... ink cartridges, check that it may stain your skin. • If ink gets on the cartridge package....
Users Manual - English
Page 70
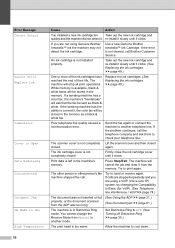
Use a new Genuine Brother Innobella™ Ink Cartridge. An ink cartridge is not cleared, call Brother Customer Service. If the sending machine has the ability to convert it closed . The scanner cover is not completely Lift the scanner cover and then close the ink cartridge cover until it clicks. again. The ink cartridge cover is not completely closed . The other person or other person...
Use a new Genuine Brother Innobella™ Ink Cartridge. An ink cartridge is not cleared, call Brother Customer Service. If the sending machine has the ability to convert it closed . The scanner cover is not completely Lift the scanner cover and then close the ink cartridge cover until it clicks. again. The ink cartridge cover is not completely closed . The other person or other person...
Users Manual - English
Page 72
... tray when you have not subscribed to the Caller ID service from your telephone company. (uuAdvanced User's Guide: Caller ID) Take out the new ink cartridge and reinstall it again, and then press Black Start or Color Start. (See Loading paper and other operations in progress finish, and then try... in Printer jam or paper jam uu page 62. Make sure the paper length guide is no incoming call your telephone company. The Jam Clear Cover is closed properly. Paper is jammed in the machine. Clean the paper pick-up rollers. (uuAdvanced User's Guide: Cleaning the paper pick-up . You did ...
... tray when you have not subscribed to the Caller ID service from your telephone company. (uuAdvanced User's Guide: Caller ID) Take out the new ink cartridge and reinstall it again, and then press Black Start or Color Start. (See Loading paper and other operations in progress finish, and then try... in Printer jam or paper jam uu page 62. Make sure the paper length guide is no incoming call your telephone company. The Jam Clear Cover is closed properly. Paper is jammed in the machine. Clean the paper pick-up rollers. (uuAdvanced User's Guide: Cleaning the paper pick-up . You did ...
Users Manual - English
Page 78
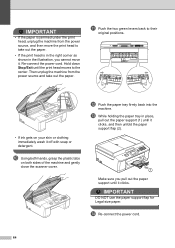
.../Exit until it clicks, and then unfold the paper support flap (2). 2 1 Make sure you cannot move the print head to their original positions. • If ink gets on both sides of the machine and gently close the scanner cover. l Push the paper tray firmly back into the machine.
.../Exit until it clicks, and then unfold the paper support flap (2). 2 1 Make sure you cannot move the print head to their original positions. • If ink gets on both sides of the machine and gently close the scanner cover. l Push the paper tray firmly back into the machine.
Users Manual - English
Page 80
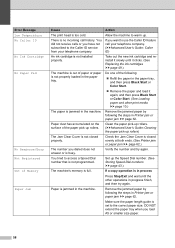
... are skewed. Stains appear on the cartridge package has passed. (Genuine Brother Innobella™ ink cartridges stay usable for over six months. The ink cartridge may not have set the Media Type of Make sure the paper is closed properly. Check the print quality. (See Checking the print quality uu... Make sure that your ink cartridges are printing a photo from your machine is loaded properly in your machine for up rollers) Smudge or stain at the bottom of paper. (See Acceptable paper and other print media uu page 10.) Make sure the Jam Clear Cover is not too thick ...
... are skewed. Stains appear on the cartridge package has passed. (Genuine Brother Innobella™ ink cartridges stay usable for over six months. The ink cartridge may not have set the Media Type of Make sure the paper is closed properly. Check the print quality. (See Checking the print quality uu... Make sure that your ink cartridges are printing a photo from your machine is loaded properly in your machine for up rollers) Smudge or stain at the bottom of paper. (See Acceptable paper and other print media uu page 10.) Make sure the Jam Clear Cover is not too thick ...
Advanced Users Manual - English
Page 36
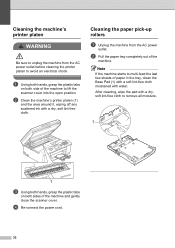
... both sides of the machine to remove all moisture. 1 1 c Using both hands, grasp the plastic tabs on both side of the machine and gently close the scanner cover. After cleaning, wipe the pad with a dry, soft lint-free cloth. b Clean the machine's printer platen (1) and the area around it, wiping off any...
... both sides of the machine to remove all moisture. 1 1 c Using both hands, grasp the plastic tabs on both side of the machine and gently close the scanner cover. After cleaning, wipe the pad with a dry, soft lint-free cloth. b Clean the machine's printer platen (1) and the area around it, wiping off any...
Advanced Users Manual - English
Page 37
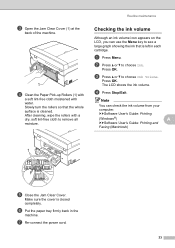
... cartridge. c Press a or b to choose Ink. a Press Menu. b Press a or b to choose Ink Volume. Press OK. Press OK. The LCD shows the ink volume. uuSoftware User's Guide: Printing (Windows®) A uuSoftware User's Guide: Printing and Faxing (Macintosh) 1 e Close the Jam Clear Cover. d Press Stop/Exit. c Open the Jam Clear Cover (1) at the back of the machine...
... cartridge. c Press a or b to choose Ink. a Press Menu. b Press a or b to choose Ink Volume. Press OK. Press OK. The LCD shows the ink volume. uuSoftware User's Guide: Printing (Windows®) A uuSoftware User's Guide: Printing and Faxing (Macintosh) 1 e Close the Jam Clear Cover. d Press Stop/Exit. c Open the Jam Clear Cover (1) at the back of the machine...
Advanced Users Manual - English
Page 38
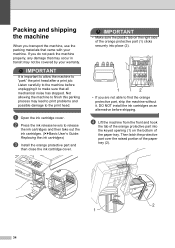
... packing materials that came with your warranty. Not allowing the machine to finish this parking process may not be covered by your machine. a Open the ink cartridge cover. d Lift the machine from the front and hook the tab of the orange protective part into the keyed ...IMPORTANT It is important to allow the machine to release the ink cartridges and then take out the ink cartridges. (uuBasic User's Guide: Replacing the ink cartridges) c Install the orange protective part and then close the ink cartridge cover. b Press the ink release levers to "park" the print head after a print ...
... packing materials that came with your warranty. Not allowing the machine to finish this parking process may not be covered by your machine. a Open the ink cartridge cover. d Lift the machine from the front and hook the tab of the orange protective part into the keyed ...IMPORTANT It is important to allow the machine to release the ink cartridges and then take out the ink cartridges. (uuBasic User's Guide: Replacing the ink cartridges) c Install the orange protective part and then close the ink cartridge cover. b Press the ink release levers to "park" the print head after a print ...

Advanced Users Manual - English
Page 39
...in the bag, then tape the bag on both sides of the machine. g Using both hands, use the plastic tabs on to lift the scanner cover into the open position. Then unplug the interface cable from the telephone wall jack and take the telephone line cord out of the machine and... gently close the scanner cover. A 35 Routine maintenance i Wrap the ink cartridges in the bag. e Unplug the machine from the machine, if it is connected. f Unplug the machine from the AC ...
...in the bag, then tape the bag on both sides of the machine. g Using both hands, use the plastic tabs on to lift the scanner cover into the open position. Then unplug the interface cable from the telephone wall jack and take the telephone line cord out of the machine and... gently close the scanner cover. A 35 Routine maintenance i Wrap the ink cartridges in the bag. e Unplug the machine from the machine, if it is connected. f Unplug the machine from the AC ...
Quick Setup Guide - English
Page 6
...Do not turn off the machine. If you do not refill the ink cartridges provided with the ink cartridge, this can cause the ink to leak out of the cartridge. • Brother strongly recommends that you open an ink cartridge, install it up within six months of installation. f Gently push...correcting the cartridge installation. (See Cleaning the print head in unsatisfactory print quality. To protect your machine. After all the ink cartridges are installed close the ink cartridge cover. If you do so, it clicks. IMPORTANT • DO NOT take approximately four minutes.
...Do not turn off the machine. If you do not refill the ink cartridges provided with the ink cartridge, this can cause the ink to leak out of the cartridge. • Brother strongly recommends that you open an ink cartridge, install it up within six months of installation. f Gently push...correcting the cartridge installation. (See Cleaning the print head in unsatisfactory print quality. To protect your machine. After all the ink cartridges are installed close the ink cartridge cover. If you do so, it clicks. IMPORTANT • DO NOT take approximately four minutes.
Network Users Manual - English
Page 71
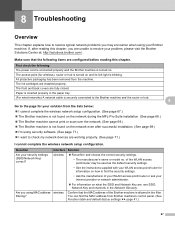
... correct? Confirm that the following : The power cord is connected properly and the Brother machine is allowed in the Network Glossary. The ink cartridges are fully closed. You can find the security settings. • Ask the manufacturer of your WLAN ...access point/router or ask your Brother machine. All protective packaging has been removed from Brother machine's control panel. (See Function table and default factory settings uu page 41.) 67 The front and back covers...
... correct? Confirm that the following : The power cord is connected properly and the Brother machine is allowed in the Network Glossary. The ink cartridges are fully closed. You can find the security settings. • Ask the manufacturer of your WLAN ...access point/router or ask your Brother machine. All protective packaging has been removed from Brother machine's control panel. (See Function table and default factory settings uu page 41.) 67 The front and back covers...


