
Software Users Manual - English
Page 72
...Start. c Press a or b to choose Scan to choose 1sided, 2sided (L)edge or 2sided (S)edge. Press OK. If your machine is an MFC-9440CN or DCP-9040CN, go to scan a document using the duplex scanning feature, you want the scanned data in color, choose color in the ...8226; If you would like to change the machine's Scan key settings, right-click the each Control Center buttons, click ControlCenter Configuration and click the Device Button tab. 65 If your machine is an MFC-9840CDW or DCP-9045CDN, go to File screen of the ControlCenter3 configuration. If you want to Step...
...Start. c Press a or b to choose Scan to choose 1sided, 2sided (L)edge or 2sided (S)edge. Press OK. If your machine is an MFC-9440CN or DCP-9040CN, go to scan a document using the duplex scanning feature, you want the scanned data in color, choose color in the ...8226; If you would like to change the machine's Scan key settings, right-click the each Control Center buttons, click ControlCenter Configuration and click the Device Button tab. 65 If your machine is an MFC-9840CDW or DCP-9045CDN, go to File screen of the ControlCenter3 configuration. If you want to Step...

Software Users Manual - English
Page 80
...Word, Corel® WordPerfect® or any word processing application on your machine choose the Device Button tab (right-click each Control Center button and click ControlCenter Configuration) in the configuration menu for each of the SCAN buttons. To configure the Software button in ControlCenter3... choose the Software Button tab (right-click each Control Center button and click ControlCenter Configuration) in the configuration menu for each of the SCAN buttons. ControlCenter3 gives you the ability to...
...Word, Corel® WordPerfect® or any word processing application on your machine choose the Device Button tab (right-click each Control Center button and click ControlCenter Configuration) in the configuration menu for each of the SCAN buttons. To configure the Software button in ControlCenter3... choose the Software Button tab (right-click each Control Center button and click ControlCenter Configuration) in the configuration menu for each of the SCAN buttons. ControlCenter3 gives you the ability to...
Software Users Manual - English
Page 82
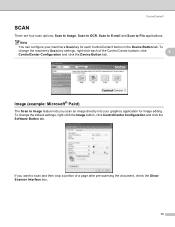
... SCAN 3 There are four scan options: Scan to Image, Scan to OCR, Scan to E-mail and Scan to scan and then crop a portion of the Control Center buttons, click 3 ControlCenter Configuration and click the Device Button tab. To change the machine's Scan key settings, right-click each ControlCenter3 button in the Device...
... SCAN 3 There are four scan options: Scan to Image, Scan to OCR, Scan to E-mail and Scan to scan and then crop a portion of the Control Center buttons, click 3 ControlCenter Configuration and click the Device Button tab. To change the machine's Scan key settings, right-click each ControlCenter3 button in the Device...

Software Users Manual - English
Page 107
...network. Note If you want the scanned data in color, choose color in the ADF, or face down on the control panel. b Press (Scan). If your machine is an MFC-9840CDW or DCP-9045CDN, go to put the document in the ADF and then choose 2sided (L)edge or 2sided (S)edge ...depending on the Device Button tab, Black Start or Color Start do not change the machine's Scan key settings, right-click each Control Center button, click ControlCenter ...
...network. Note If you want the scanned data in color, choose color in the ADF, or face down on the control panel. b Press (Scan). If your machine is an MFC-9840CDW or DCP-9045CDN, go to put the document in the ADF and then choose 2sided (L)edge or 2sided (S)edge ...depending on the Device Button tab, Black Start or Color Start do not change the machine's Scan key settings, right-click each Control Center button, click ControlCenter ...
Software Users Manual - English
Page 155
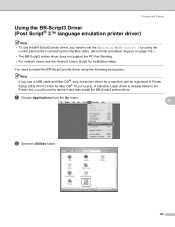
If a Brother Laser driver is already listed in Printer Setup Utility (Print Center for installation steps. Note If you need to set the Emulation to delete it and then install the BR-Script3 printer driver. a Choose Applications from ...;, only one printer driver for a machine can be registered in the Printer list, you will need to install the BR-Script3 printer driver using the control panel before connecting the interface cable. (See Printer Emulation Support on page 132.) • The BR-Script3 printer driver does not support the PC-Fax...
If a Brother Laser driver is already listed in Printer Setup Utility (Print Center for installation steps. Note If you need to set the Emulation to delete it and then install the BR-Script3 printer driver. a Choose Applications from ...;, only one printer driver for a machine can be registered in the Printer list, you will need to install the BR-Script3 printer driver using the control panel before connecting the interface cable. (See Printer Emulation Support on page 132.) • The BR-Script3 printer driver does not support the PC-Fax...

Software Users Manual - English
Page 186
...MFC-9440CN and MFC-9840CDW only) Lets you open the Status Monitor Utility. 10 10 179 PC-FAX - Lets you use your Macintosh® including network printers. ControlCenter2 ControlCenter2 gives you the ability to configure the hardware Scan key on your machine choose the Device Button (click each of the Control Center... of the SCAN buttons. To configure the Software button in ControlCenter2, choose the Software Button tab (click each of the Control Center buttons while holding down the Ctrl key and choose Software Button) in the configuration menu for each of the Remote Setup....
...MFC-9440CN and MFC-9840CDW only) Lets you open the Status Monitor Utility. 10 10 179 PC-FAX - Lets you use your Macintosh® including network printers. ControlCenter2 ControlCenter2 gives you the ability to configure the hardware Scan key on your machine choose the Device Button (click each of the Control Center... of the SCAN buttons. To configure the Software button in ControlCenter2, choose the Software Button tab (click each of the Control Center buttons while holding down the Ctrl key and choose Software Button) in the configuration menu for each of the Remote Setup....

Network Users Manual - English
Page 49
...can temporarily change the wireless settings on your computer, following the steps below : 1 Click Start and then Control Panel. 2 Click Network and Internet and then Network and Sharing Center icon. 4 3 Click Connect to change from 0.0.0.0. are numbers between 1 and 254). 39 Click View ... Vista™ users: You can temporarily change the wireless settings on your computer, following the steps below : 1 Click Start and then Control Panel. 2 Click Network and Internet Connections icon. 3 Click Network Connections icon. 4 Choose and right click Wireless Network Connection. It may...
...can temporarily change the wireless settings on your computer, following the steps below : 1 Click Start and then Control Panel. 2 Click Network and Internet and then Network and Sharing Center icon. 4 3 Click Connect to change from 0.0.0.0. are numbers between 1 and 254). 39 Click View ... Vista™ users: You can temporarily change the wireless settings on your computer, following the steps below : 1 Click Start and then Control Panel. 2 Click Network and Internet Connections icon. 3 Click Network Connections icon. 4 Choose and right click Wireless Network Connection. It may...

Network Users Manual - English
Page 62
... can temporarily change the wireless settings on your computer, following the steps below : 1 Click Start and then Control Panel. 2 Click Network and Internet and then Network and Sharing Center icon. 4 3 Click Connect to a network. 4 You can see the SSID of Wireless Network Connection (...Windows Vista™ users: You can temporarily change the wireless settings on your computer, following the steps below : 1 Click Start and then Control Panel. 2 Click Network and Internet Connections icon. 3 Click Network Connections icon. 4 Choose and right click Wireless Network Connection. Click View...
... can temporarily change the wireless settings on your computer, following the steps below : 1 Click Start and then Control Panel. 2 Click Network and Internet and then Network and Sharing Center icon. 4 3 Click Connect to a network. 4 You can see the SSID of Wireless Network Connection (...Windows Vista™ users: You can temporarily change the wireless settings on your computer, following the steps below : 1 Click Start and then Control Panel. 2 Click Network and Internet Connections icon. 3 Click Network Connections icon. 4 Choose and right click Wireless Network Connection. Click View...
Network Users Manual - English
Page 169
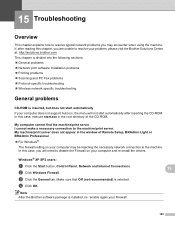
... problems you will not start automatically after reading this chapter, you are unable to resolve your problem, please visit the Brother Solutions Center at: http://solutions.brother.com This chapter is divided into the following sections: „ General problems „ Network print software installation problems &#.... Make sure that Off (not recommended) is selected. d Click OK. Windows® XP SP2 users: a Click the Start button, Control Panel, Network and Internet Connections. If, after inserting the CD-ROM. In this case, you may be rejecting the necessary network connection to...
... problems you will not start automatically after reading this chapter, you are unable to resolve your problem, please visit the Brother Solutions Center at: http://solutions.brother.com This chapter is divided into the following sections: „ General problems „ Network print software installation problems &#.... Make sure that Off (not recommended) is selected. d Click OK. Windows® XP SP2 users: a Click the Start button, Control Panel, Network and Internet Connections. If, after inserting the CD-ROM. In this case, you may be rejecting the necessary network connection to...

Users Manual - English
Page 123
... 14 Never push objects of any kind on the products plugged into this product through cabinet slots, since they may void your nearest Brother Authorized Service Center, please call your electrician to rest on the cord. 11 If an extension cord is used with this product, make sure that ...will often require extensive work by the operating instructions. Adjust only those controls that the total ampere ratings on the product. Never spill liquid of fire or electric shock. If you to a Brother Authorized Service Center.
... 14 Never push objects of any kind on the products plugged into this product through cabinet slots, since they may void your nearest Brother Authorized Service Center, please call your electrician to rest on the cord. 11 If an extension cord is used with this product, make sure that ...will often require extensive work by the operating instructions. Adjust only those controls that the total ampere ratings on the product. Never spill liquid of fire or electric shock. If you to a Brother Authorized Service Center.
Users Manual - English
Page 258
...59 B Belt unit 183 Broadcasting 36 canceling 37 setting up groups for 63 Brother accessories and supplies iii Brother numbers i Customer Service ii FAQs (frequently asked questions) ..........i product support ii service centers ii warranties iv, v, vii C Canceling broadcast in process 37 fax jobs ... Connecting external TAD (answering machine) .......53 external telephone 57 two-line external TAD or telephone .......55 Consumable items 169 242 Control panel overview 6 ControlCenter2 (for Windows®) See Software User's Guide on the CD-ROM. G Index A Accessories and supplies...
...59 B Belt unit 183 Broadcasting 36 canceling 37 setting up groups for 63 Brother accessories and supplies iii Brother numbers i Customer Service ii FAQs (frequently asked questions) ..........i product support ii service centers ii warranties iv, v, vii C Canceling broadcast in process 37 fax jobs ... Connecting external TAD (answering machine) .......53 external telephone 57 two-line external TAD or telephone .......55 Consumable items 169 242 Control panel overview 6 ControlCenter2 (for Windows®) See Software User's Guide on the CD-ROM. G Index A Accessories and supplies...


