
Advanced Users Manual - English
Page 80
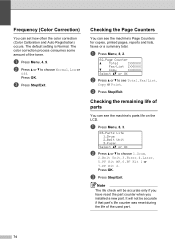
a Press Menu, 4, 9. Checking the remaining life of the toner. a Press Menu, 8, 3. 83.Parts Life 1.Drum 2.Belt Unit 3.Fuser Select ab or OK b Press a or b to choose Normal, Low or Off. b Press a or b to choose 1.Drum, 2.Belt Unit, 3.Fuser, 4.Laser, 5.PF Kit MP, 6.PF Kit 1 or 7.PF Kit 2. It will be accurate if that part's life...
a Press Menu, 4, 9. Checking the remaining life of the toner. a Press Menu, 8, 3. 83.Parts Life 1.Drum 2.Belt Unit 3.Fuser Select ab or OK b Press a or b to choose Normal, Low or Off. b Press a or b to choose 1.Drum, 2.Belt Unit, 3.Fuser, 4.Laser, 5.PF Kit MP, 6.PF Kit 1 or 7.PF Kit 2. It will be accurate if that part's life...
Advanced Users Manual - English
Page 82
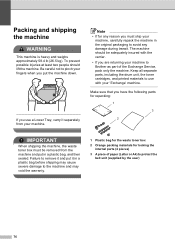
...packaging to remove it and put it separately from the machine and put the machine down. Keep all separate parts, including the drum unit, the toner cartridges, and printed materials to pinch your fingers when you are returning your machine. Be careful not to use a ...belt unit (supplied by the user) 76 The machine should lift the machine. Packing and shipping the machine A WARNING This machine is heavy and weighs approximately 58.4 lb (26.5 kg). Make sure that you have the following parts for locking the internal parts (4 pieces) 3 A piece of paper (Letter or A4) to Brother...
...packaging to remove it and put it separately from the machine and put the machine down. Keep all separate parts, including the drum unit, the toner cartridges, and printed materials to pinch your fingers when you are returning your machine. Be careful not to use a ...belt unit (supplied by the user) 76 The machine should lift the machine. Packing and shipping the machine A WARNING This machine is heavy and weighs approximately 58.4 lb (26.5 kg). Make sure that you have the following parts for locking the internal parts (4 pieces) 3 A piece of paper (Letter or A4) to Brother...
Advanced Users Manual - English
Page 85
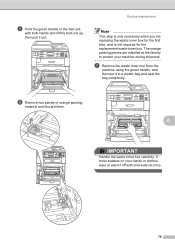
... are replacing the waste toner box for the replacement waste toner box. If toner scatters on your machine during shipment. f Remove two pieces of the belt unit with cold water at the factory to protect your hands or clothes, wipe or wash it off with both hands and lift the... belt unit up, then pull it in a plastic bag and seal the bag completely. g Remove the waste toner box from the machine using the green handle, and ...
... are replacing the waste toner box for the replacement waste toner box. If toner scatters on your machine during shipment. f Remove two pieces of the belt unit with cold water at the factory to protect your hands or clothes, wipe or wash it off with both hands and lift the... belt unit up, then pull it in a plastic bag and seal the bag completely. g Remove the waste toner box from the machine using the green handle, and ...
Advanced Users Manual - English
Page 86
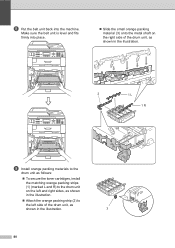
...firmly into the machine. h Put the belt unit back into place. Slide the small orange packing material (3) onto the metal shaft on the right side of the drum unit, as shown in the illustration. 2 1 L 1 R i Install orange packing materials to the drum unit as follows: To secure ...the toner cartridges, install the matching orange packing strips (1) (marked L and R) to the drum unit on the left and right sides, ...
...firmly into the machine. h Put the belt unit back into place. Slide the small orange packing material (3) onto the metal shaft on the right side of the drum unit, as shown in the illustration. 2 1 L 1 R i Install orange packing materials to the drum unit as follows: To secure ...the toner cartridges, install the matching orange packing strips (1) (marked L and R) to the drum unit on the left and right sides, ...

Advanced Users Manual - English
Page 87
A m Turn the green lock lever (1) clockwise to the belt unit. j Put a piece of paper (Letter or A4) on both sides of the drum unit to the c marks (1) on the belt unit to prevent damage to the lock position. 1 1 81 Routine maintenance l Match the guide ends (2) of the machine, then gently slide the drum unit into the machine until it stops at the green lock lever. 1 2 k Make sure the green lock lever (1) is in the release position as shown in the illustration.
A m Turn the green lock lever (1) clockwise to the belt unit. j Put a piece of paper (Letter or A4) on both sides of the drum unit to the c marks (1) on the belt unit to prevent damage to the lock position. 1 1 81 Routine maintenance l Match the guide ends (2) of the machine, then gently slide the drum unit into the machine until it stops at the green lock lever. 1 2 k Make sure the green lock lever (1) is in the release position as shown in the illustration.
Quick Setup Guide - English
Page 1
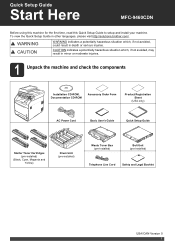
...-installed) Belt Unit (pre-installed) Telephone Line Cord Safety and Legal Booklet USA/CAN Version 0 1 CAUTION indicates a potentially hazardous situation which , if not avoided, could result in other languages, please visit http://solutions.brother.com/. To view the Quick Setup Guide in death or serious injuries. Quick Setup Guide Start Here MFC-9460CDN Before using...
...-installed) Belt Unit (pre-installed) Telephone Line Cord Safety and Legal Booklet USA/CAN Version 0 1 CAUTION indicates a potentially hazardous situation which , if not avoided, could result in other languages, please visit http://solutions.brother.com/. To view the Quick Setup Guide in death or serious injuries. Quick Setup Guide Start Here MFC-9460CDN Before using...
Quick Setup Guide - English
Page 25
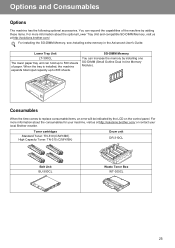
... can expand the capabilities of paper. Toner cartridges Standard Toner: TN-310 (C/M/Y/BK) High Capacity Toner: TN-315 (C/M/Y/BK) Drum unit DR-310CL Belt Unit BU-300CL Waste Toner Box WT-300CL 25 For installing the SO-DIMM Memory, see Installing extra memory in the Advanced User's Guide.... For more information about the consumables for your machine, visit us at http://solutions.brother.com/ or contact your local Brother reseller....
... can expand the capabilities of paper. Toner cartridges Standard Toner: TN-310 (C/M/Y/BK) High Capacity Toner: TN-315 (C/M/Y/BK) Drum unit DR-310CL Belt Unit BU-300CL Waste Toner Box WT-300CL 25 For installing the SO-DIMM Memory, see Installing extra memory in the Advanced User's Guide.... For more information about the consumables for your machine, visit us at http://solutions.brother.com/ or contact your local Brother reseller....
Users Manual - English
Page 26
.... 6 Drum life is approximate and may vary by type of use. Description Toner Cartridge Toner Cartridge Toner Cartridge Toner Cartridge Drum Unit Waste Toner Box Belt Unit Telephone Line Cord Basic User's Guide Quick Setup Guide Item TN-310BK (Approx. 2,500 pages) 1 2 3 TN-315BK (... 1 LG3077001 LX4374001 (English for USA and Canada) LX4374002 (French for Canada) (MFC-9460CDN) LX4371001 (English for USA and Canada) (MFC-9560CDW) LX4384001 (English for USA and Canada) (MFC-9460CDN) LX4371002 (French for Canada) (MFC-9560CDW) LX4384002 (French for Canada) 1 Letter or A4 size single-sided pages....
.... 6 Drum life is approximate and may vary by type of use. Description Toner Cartridge Toner Cartridge Toner Cartridge Toner Cartridge Drum Unit Waste Toner Box Belt Unit Telephone Line Cord Basic User's Guide Quick Setup Guide Item TN-310BK (Approx. 2,500 pages) 1 2 3 TN-315BK (... 1 LG3077001 LX4374001 (English for USA and Canada) LX4374002 (French for Canada) (MFC-9460CDN) LX4371001 (English for USA and Canada) (MFC-9560CDW) LX4384001 (English for USA and Canada) (MFC-9460CDN) LX4371002 (French for Canada) (MFC-9560CDW) LX4384002 (French for Canada) 1 Letter or A4 size single-sided pages....
Users Manual - English
Page 28
...Unit, Belt Unit, and Waste Toner Box. Except as Paper Feeding Kit, Fuser and Laser Units. v What is the length of the Warranty Periods: Machines: one year from the original purchase date. Accompanying Consumable and Accessory Items: 90 days from someone other than an authorized Brother... Consumable and Accessory Items include but are not the Original Purchaser and the product that this Product was used outside the United States). Brother® Color Laser One-Year On-Site Limited Warranty (USA only) Who is covered: This limited warranty ("...
...Unit, Belt Unit, and Waste Toner Box. Except as Paper Feeding Kit, Fuser and Laser Units. v What is the length of the Warranty Periods: Machines: one year from the original purchase date. Accompanying Consumable and Accessory Items: 90 days from someone other than an authorized Brother... Consumable and Accessory Items include but are not the Original Purchaser and the product that this Product was used outside the United States). Brother® Color Laser One-Year On-Site Limited Warranty (USA only) Who is covered: This limited warranty ("...
Users Manual - English
Page 34
... A Routine maintenance 58 Replacing the consumable items 58 Replacing a Toner cartridge 62 Cleaning the corona wires 68 Replacing the drum unit 72 Replacing the belt unit 79 Replacing the waste toner box 85 B Troubleshooting 92 Error and maintenance messages 92 Transferring your faxes or Fax Journal report ...100 Document Jams and Paper Jams 101 Document is jammed in the top of the ADF unit 101 Document is jammed ...
... A Routine maintenance 58 Replacing the consumable items 58 Replacing a Toner cartridge 62 Cleaning the corona wires 68 Replacing the drum unit 72 Replacing the belt unit 79 Replacing the waste toner box 85 B Troubleshooting 92 Error and maintenance messages 92 Transferring your faxes or Fax Journal report ...100 Document Jams and Paper Jams 101 Document is jammed in the top of the ADF unit 101 Document is jammed ...
Users Manual - English
Page 88
... can change the amount of time that the machine stays in Copy mode after the last copy operation. (See Mode Timer in Chapter 7 of the belt unit. You can change the following to 40 seconds until the machine finishes the color registrations and cleaning process of the Advanced User's Guide. Copy settings...
... can change the amount of time that the machine stays in Copy mode after the last copy operation. (See Mode Timer in Chapter 7 of the belt unit. You can change the following to 40 seconds until the machine finishes the color registrations and cleaning process of the Advanced User's Guide. Copy settings...
Users Manual - English
Page 95
... No. TN-310BK, TN-315BK, TN-310C, TN-315C, TN-310M, TN-315M, TN-310Y, TN-315Y Drum unit See Replacing the drum unit on page 79. Order No. DR-310CL Belt unit See Replacing the belt unit on page 72. WT-300CL 58 Order No. A Routine maintenance A Replacing the consumable items A The following messages appear...
... No. TN-310BK, TN-315BK, TN-310C, TN-315C, TN-310M, TN-315M, TN-310Y, TN-315Y Drum unit See Replacing the drum unit on page 79. Order No. DR-310CL Belt unit See Replacing the belt unit on page 72. WT-300CL 58 Order No. A Routine maintenance A Replacing the consumable items A The following messages appear...
Users Manual - English
Page 97
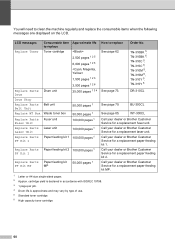
...Brother Customer Service for a replacement paper feeding kit 1. LCD messages Replace Toner Consumable item to replace Toner cartridge Approximate life 2,500 pages 1 2 5 6,000 pages 1 2 6 1,500 pages 1 2 5 Replace Parts Drum unit Drum 3,500 pages 1 2 6 25,000 pages 1 3 4 Drum Stop Replace Parts Belt Unit Replace WT Box Belt unit... Waste toner box 50,000 pages 1 50,000 pages 1 Replace Parts Fuser Unit Replace Parts Laser Unit Replace Parts PF Kit 1 Fuser unit 100,000 pages 1 Laser unit 100,000 pages 1 Paper feeding...
...Brother Customer Service for a replacement paper feeding kit 1. LCD messages Replace Toner Consumable item to replace Toner cartridge Approximate life 2,500 pages 1 2 5 6,000 pages 1 2 6 1,500 pages 1 2 5 Replace Parts Drum unit Drum 3,500 pages 1 2 6 25,000 pages 1 3 4 Drum Stop Replace Parts Belt Unit Replace WT Box Belt unit... Waste toner box 50,000 pages 1 50,000 pages 1 Replace Parts Fuser Unit Replace Parts Laser Unit Replace Parts PF Kit 1 Fuser unit 100,000 pages 1 Laser unit 100,000 pages 1 Paper feeding...
Users Manual - English
Page 116
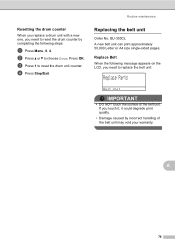
... the drum counter A When you replace a drum unit with a new one, you need to choose Drum. Replacing the belt unit A Order No. d Press Stop/Exit. c Press 1 to reset the drum counter by incorrect handling of the belt unit. Replace Belt A When the following message appears on the LCD,...a Press Menu, 8, 4. Press OK. BU-300CL A new belt unit can print approximately 50,000 Letter or A4 size single-sided pages. If you need to reset the drum unit counter. b Press a or b to replace the belt unit: Replace Parts Belt Unit IMPORTANT • DO NOT touch the surface of the...
... the drum counter A When you replace a drum unit with a new one, you need to choose Drum. Replacing the belt unit A Order No. d Press Stop/Exit. c Press 1 to reset the drum counter by incorrect handling of the belt unit. Replace Belt A When the following message appears on the LCD,...a Press Menu, 8, 4. Press OK. BU-300CL A new belt unit can print approximately 50,000 Letter or A4 size single-sided pages. If you need to reset the drum unit counter. b Press a or b to replace the belt unit: Replace Parts Belt Unit IMPORTANT • DO NOT touch the surface of the...
Users Manual - English
Page 119
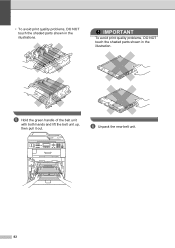
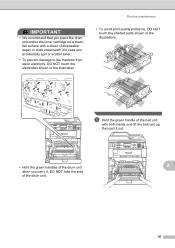
• To avoid print quality problems, DO NOT touch the shaded parts shown in the illustration. IMPORTANT To avoid print quality problems, DO NOT touch the shaded parts shown in the illustrations. f Unpack the new belt unit. 82 e Hold the green handle of the belt unit with both hands and lift the belt unit up, then pull it out.
• To avoid print quality problems, DO NOT touch the shaded parts shown in the illustration. IMPORTANT To avoid print quality problems, DO NOT touch the shaded parts shown in the illustrations. f Unpack the new belt unit. 82 e Hold the green handle of the belt unit with both hands and lift the belt unit up, then pull it out.
Users Manual - English
Page 120
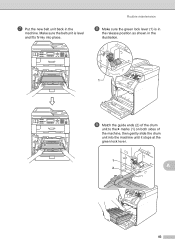
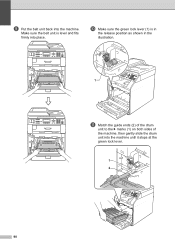
g Put the new belt unit back in the illustration. 1 i Match the guide ends (2) of the drum unit to the c marks (1) on both sides of the machine, then gently slide the drum unit into place. Routine maintenance h Make sure the green lock lever (1) is level and fits firmly into the machine until it stops at the green lock lever. 1 A 2 83 Make sure the belt unit is in the release position as shown in the machine.
g Put the new belt unit back in the illustration. 1 i Match the guide ends (2) of the drum unit to the c marks (1) on both sides of the machine, then gently slide the drum unit into place. Routine maintenance h Make sure the green lock lever (1) is level and fits firmly into the machine until it stops at the green lock lever. 1 A 2 83 Make sure the belt unit is in the release position as shown in the machine.
Users Manual - English
Page 121
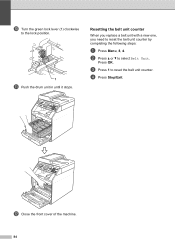
c Press 1 to reset the belt unit counter by completing the following steps: a Press Menu, 8, 4. Resetting the belt unit counter A When you replace a belt unit with a new one, you need to reset the belt unit counter. d Press Stop/Exit. b Press a or b to the lock position. 1 k Push the drum unit in until it stops. l Close the front cover of the machine. 84 j Turn the green lock lever (1) clockwise to select Belt Unit. Press OK.
c Press 1 to reset the belt unit counter by completing the following steps: a Press Menu, 8, 4. Resetting the belt unit counter A When you replace a belt unit with a new one, you need to reset the belt unit counter. d Press Stop/Exit. b Press a or b to the lock position. 1 k Push the drum unit in until it stops. l Close the front cover of the machine. 84 j Turn the green lock lever (1) clockwise to select Belt Unit. Press OK.
Users Manual - English
Page 124
.../or the toner cartridge on a clean, flat surface with both hands and lift the belt unit up, then pull it out. • Hold the green handles of the drum unit A when you carry it in case you accidentally spill or scatter toner. • To prevent damage to the machine from static electricity..., DO NOT touch the electrodes shown in the illustrations. e Hold the green handle of the belt unit with a sheet of the drum...
.../or the toner cartridge on a clean, flat surface with both hands and lift the belt unit up, then pull it out. • Hold the green handles of the drum unit A when you carry it in case you accidentally spill or scatter toner. • To prevent damage to the machine from static electricity..., DO NOT touch the electrodes shown in the illustrations. e Hold the green handle of the belt unit with a sheet of the drum...
Users Manual - English
Page 127
Make sure the belt unit is in the release position as shown in the illustration. 1 k Match the guide ends (2) of the drum unit to the c marks (1) on both sides of the machine, then gently slide the drum unit into place. j Make sure the green lock lever (1) is level and fits firmly into the machine until it stops at the green lock lever. 1 2 90 i Put the belt unit back into the machine.
Make sure the belt unit is in the release position as shown in the illustration. 1 k Match the guide ends (2) of the drum unit to the c marks (1) on both sides of the machine, then gently slide the drum unit into place. j Make sure the green lock lever (1) is level and fits firmly into the machine until it stops at the green lock lever. 1 2 90 i Put the belt unit back into the machine.

Users Manual - English
Page 129
...line. 92 Reinsert the device and try it on again. Put in a new drum unit. (See Replacing the drum unit on page 73.) Put in a new belt unit. (See Replacing the belt unit on page 85.) If the problem continues, call the telephone company and ask them ... any sophisticated office product, errors may occur and consumable items may need more help, the Brother Solutions Center offers the latest FAQs and troubleshooting tips: Visit us at http://solutions.brother.com/. The most errors and perform routine maintenance by Secure Function Lock. Error Message Access ...
...line. 92 Reinsert the device and try it on again. Put in a new drum unit. (See Replacing the drum unit on page 73.) Put in a new belt unit. (See Replacing the belt unit on page 85.) If the problem continues, call the telephone company and ask them ... any sophisticated office product, errors may occur and consumable items may need more help, the Brother Solutions Center offers the latest FAQs and troubleshooting tips: Visit us at http://solutions.brother.com/. The most errors and perform routine maintenance by Secure Function Lock. Error Message Access ...


