Users Manual - English
Page 4
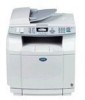
... purchase.) In USA: In Canada: 1-888-879-3232 (voice) 1-800-947-1445 (fax) http://www.brothermall.com 1-877-BROTHER (voice) Description Toner Cartridge OPC Belt Waste Toner Pack Fusing Unit Telephone Line Cord IEEE-1284 Bi-directional Cable Power Protector for A/C Power Telephone Line Surges and Voltage ...us online for a complete selection of fax back subjects. This system is available 24 hours a day, 7 days a week. Brother fax back system (USA only) Brother has installed an easy-to-use fax back system, so you can use the system to common technical questions and product information for...
... purchase.) In USA: In Canada: 1-888-879-3232 (voice) 1-800-947-1445 (fax) http://www.brothermall.com 1-877-BROTHER (voice) Description Toner Cartridge OPC Belt Waste Toner Pack Fusing Unit Telephone Line Cord IEEE-1284 Bi-directional Cable Power Protector for A/C Power Telephone Line Surges and Voltage ...us online for a complete selection of fax back subjects. This system is available 24 hours a day, 7 days a week. Brother fax back system (USA only) Brother has installed an easy-to-use fax back system, so you can use the system to common technical questions and product information for...
Users Manual - English
Page 6
...Accessory Items that expired in accordance with a copy of your dated bill of sale showing that this Product was purchased within the U.S. Brother® Color Laser One-Year On-Site Limited Warranty (USA only) Who is covered: • This limited warranty ("warranty") is given only to the original...or refurbished product), prior to your purchase you are not limited to Toner Cartridges, OPC Belt Assembly, Fuser Unit and Transfer Belt Assembly. • Except as otherwise provided herein, Brother warrants that the Machine and the accompanying Consumable and Accessory Items will ask you to ...
...Accessory Items that expired in accordance with a copy of your dated bill of sale showing that this Product was purchased within the U.S. Brother® Color Laser One-Year On-Site Limited Warranty (USA only) Who is covered: • This limited warranty ("warranty") is given only to the original...or refurbished product), prior to your purchase you are not limited to Toner Cartridges, OPC Belt Assembly, Fuser Unit and Transfer Belt Assembly. • Except as otherwise provided herein, Brother warrants that the Machine and the accompanying Consumable and Accessory Items will ask you to ...
Users Manual - English
Page 15
For your safety A-3 Disconnect device A-3 LAN connection A-3 Laser safety A-3 FDA regulations A-4 Important safety instructions A-4 Choosing a location A-6 To use the machine safely A-7 Trademarks...A-10 B Menu and Features On-screen programming B-1 Menu table...the scanner glass C-22 Cleaning to prevent paper jams C-22 Cleaning the laser glass C-24 Replacing the consumable items C-26 Toner cartridges C-28 Waste toner pack C-31 OPC belt cartridge C-33 Fusing unit C-35 Replacing the transfer belt cleaner C-37 Replacing the transfer roller C-39 Machine Information C-40 Checking ...
For your safety A-3 Disconnect device A-3 LAN connection A-3 Laser safety A-3 FDA regulations A-4 Important safety instructions A-4 Choosing a location A-6 To use the machine safely A-7 Trademarks...A-10 B Menu and Features On-screen programming B-1 Menu table...the scanner glass C-22 Cleaning to prevent paper jams C-22 Cleaning the laser glass C-24 Replacing the consumable items C-26 Toner cartridges C-28 Waste toner pack C-31 OPC belt cartridge C-33 Fusing unit C-35 Replacing the transfer belt cleaner C-37 Replacing the transfer roller C-39 Machine Information C-40 Checking ...
Users Manual - English
Page 30
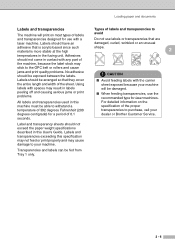
... will print on the specification of the machine, because the label stock may stick to the OPC belt or rollers and cause jams and print quality problems. No adhesive should be arranged so that is... transparencies used in this machine must be damaged. ■ When feeding transparencies, use the recommended type for laser machines. Labels should be fed from Tray 1 only. For detailed information on most types of labels and ... labels with any part of the proper transparencies to your dealer or Brother Customer Service. 2 - 6 Labels and transparencies exceeding this User's Guide.
... will print on the specification of the machine, because the label stock may stick to the OPC belt or rollers and cause jams and print quality problems. No adhesive should be arranged so that is... transparencies used in this machine must be damaged. ■ When feeding transparencies, use the recommended type for laser machines. Labels should be fed from Tray 1 only. For detailed information on most types of labels and ... labels with any part of the proper transparencies to your dealer or Brother Customer Service. 2 - 6 Labels and transparencies exceeding this User's Guide.
Users Manual - English
Page 123
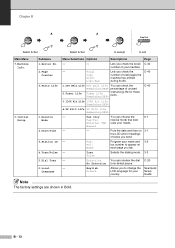
Station ID 4. OPC Belt Life OPC Belt Life You can shorten the dial C-20 No Detection tone detect pause. - PF Kit2 Life PF Kit2 Life Remaining:XXX% - Puts the date and time ...
Station ID 4. OPC Belt Life OPC Belt Life You can shorten the dial C-20 No Detection tone detect pause. - PF Kit2 Life PF Kit2 Life Remaining:XXX% - Puts the date and time ...
Users Manual - English
Page 127
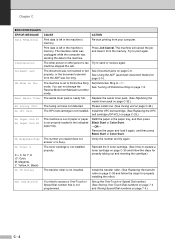
... left in the machine's memory. Install the OPC belt cartridge. (See Replacing the OPC belt cartridge (OP-4CL) on page C-35.) No OPC Belt The OPC belt cartridge is busy. Try to Off. Set up the One-Touch or Speed Dial number. (See Storing One-Touch Dial numbers on page 7-3 and Storing Speed-.... Remove the paper and load it from your computer. Print data is not properly loaded in the paper tray, and then press Black Start or Color Start. -OR- See Using the ADF (automatic document feeder) on page 7-4.) C - 2 Refill the paper in the indicated paper tray. Verify the number ...
... left in the machine's memory. Install the OPC belt cartridge. (See Replacing the OPC belt cartridge (OP-4CL) on page C-35.) No OPC Belt The OPC belt cartridge is busy. Try to Off. Set up the One-Touch or Speed Dial number. (See Storing One-Touch Dial numbers on page 7-3 and Storing Speed-.... Remove the paper and load it from your computer. Print data is not properly loaded in the paper tray, and then press Black Start or Color Start. -OR- See Using the ADF (automatic document feeder) on page 7-4.) C - 2 Refill the paper in the indicated paper tray. Verify the number ...
Users Manual - English
Page 128
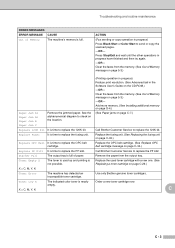
... time to replace the PF kit2. Call Brother Customer Service to replace the 120K kit. Use only Brother genuine toner cartridges. Press Stop/Exit and wait until the other operations in progress) Press Black Start or Color Start to replace the OPC belt cartridge. Remove the paper from the memory....toner cartridge. See the alphanumerical diagram to replace the fusing unit. Toner Empty X The toner is used toner cartridge with a new one. (See Replacing a toner cartridge on page D-4.) Paper Jam A1 Paper Jam A2 Paper Jam B Remove the jammed paper. Toner Low X The ...
... time to replace the PF kit2. Call Brother Customer Service to replace the 120K kit. Use only Brother genuine toner cartridges. Press Stop/Exit and wait until the other operations in progress) Press Black Start or Color Start to replace the OPC belt cartridge. Remove the paper from the memory....toner cartridge. See the alphanumerical diagram to replace the fusing unit. Toner Empty X The toner is used toner cartridge with a new one. (See Replacing a toner cartridge on page D-4.) Paper Jam A1 Paper Jam A2 Paper Jam B Remove the jammed paper. Toner Low X The ...
Users Manual - English
Page 138
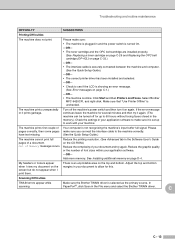
Select 'Brother MFC-9420CN', and right-click. If the error message continues leave the machine for this. Out ... on the screen but do not appear when I print them. Scanning Difficulties TWAIN errors appear while Make sure the Brother TWAIN driver is not recognizing the machine's input buffer full signal. My headers or footers appear when I view my...switch is turned On. -OR- • The toner cartridge and the OPC belt cartridge are installed properly. (See Replacing a toner cartridge on page C-29 and Replacing the OPC belt cartridge (OP-4CL) on page C-33.) -OR- • The interface ...
Select 'Brother MFC-9420CN', and right-click. If the error message continues leave the machine for this. Out ... on the screen but do not appear when I print them. Scanning Difficulties TWAIN errors appear while Make sure the Brother TWAIN driver is not recognizing the machine's input buffer full signal. My headers or footers appear when I view my...switch is turned On. -OR- • The toner cartridge and the OPC belt cartridge are installed properly. (See Replacing a toner cartridge on page C-29 and Replacing the OPC belt cartridge (OP-4CL) on page C-33.) -OR- • The interface ...

Users Manual - English
Page 142
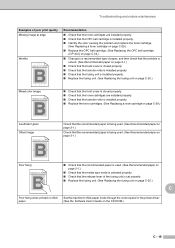
... paper to prevent paper jams on page C-22.) ■ If the problem continues, identify the color and replace that toner cartridge. (See Replacing a toner cartridge on page C-29.) ■ Replace the OPC belt cartridge. (See Replacing the OPC belt cartridge (OP-4CL) on page C-29.) C C - 17 ABCDEFGHIJKLMNOPQRSTUVWXYZ. 0123456789. abcdefghijklmnopqrstuvwxyz. ABCDEFGHIJKLMNOPQRSTUVWXYZ. 0123456789. abcdefghijklmnopqrstuvwxyz. abcdefghijklmnopqrstuvwxyz...
... paper to prevent paper jams on page C-22.) ■ If the problem continues, identify the color and replace that toner cartridge. (See Replacing a toner cartridge on page C-29.) ■ Replace the OPC belt cartridge. (See Replacing the OPC belt cartridge (OP-4CL) on page C-29.) C C - 17 ABCDEFGHIJKLMNOPQRSTUVWXYZ. 0123456789. abcdefghijklmnopqrstuvwxyz. ABCDEFGHIJKLMNOPQRSTUVWXYZ. 0123456789. abcdefghijklmnopqrstuvwxyz. abcdefghijklmnopqrstuvwxyz...

Users Manual - English
Page 143
... that toner cartridge. (See Replacing a toner cartridge on page C-29.) ■ Replace the OPC belt cartridge. (See Replacing the OPC belt cartridge (OP-4CL) on page C-33.) The color of your monitor. ■ Check to make sure the recommended paper was used. (See Recommended paper... Replace the cleaning roller. (See Replacing the transfer belt cleaner on page C-29.) ■ Perform the calibration. (Menu/Set, 4, 4) ■ Adjust the color by using the custom setting in the driver. Colors the machine can print and colors you expected All one color Shade on page C-33.) C - 18 The ...
... that toner cartridge. (See Replacing a toner cartridge on page C-29.) ■ Replace the OPC belt cartridge. (See Replacing the OPC belt cartridge (OP-4CL) on page C-33.) The color of your monitor. ■ Check to make sure the recommended paper was used. (See Recommended paper... Replace the cleaning roller. (See Replacing the transfer belt cleaner on page C-29.) ■ Perform the calibration. (Menu/Set, 4, 4) ■ Adjust the color by using the custom setting in the driver. Colors the machine can print and colors you expected All one color Shade on page C-33.) C - 18 The ...
Users Manual - English
Page 144
... is closed properly. ■ Check that the toner cartridges are installed properly. ■ Check that the OPC belt cartridge is installed properly. ■ Identify the color causing the problem and replace the toner cartridge. (See Replacing a toner cartridge on page C-29.) ■... Replace the OPC belt cartridge. (See Replacing the OPC belt cartridge (OP-4CL) on page C-33.) ■ Change to thick paper mode through the control panel or the printer driver. (See the Software User's Guide on page C-35.) Mixed color image ABCDEFGHIJKLMNOPQRSTUVWXYZ. 0123456789. ...
... is closed properly. ■ Check that the toner cartridges are installed properly. ■ Check that the OPC belt cartridge is installed properly. ■ Identify the color causing the problem and replace the toner cartridge. (See Replacing a toner cartridge on page C-29.) ■... Replace the OPC belt cartridge. (See Replacing the OPC belt cartridge (OP-4CL) on page C-33.) ■ Change to thick paper mode through the control panel or the printer driver. (See the Software User's Guide on page C-35.) Mixed color image ABCDEFGHIJKLMNOPQRSTUVWXYZ. 0123456789. ...
Users Manual - English
Page 149
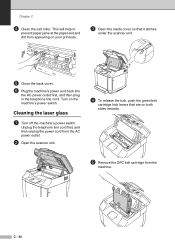
... the AC power outlet. 2 Open the scanner unit. 4 To release the lock, push the green belt cartridge lock levers that it latches under the scanner unit. 5 Close the back cover. 6 Plug the...into the AC power outlet first, and then plug in the telephone line cord. C - 24 Cleaning the laser glass 1 Turn off the machine's power switch. Turn on your printouts. 3 Open the inside cover so that... are on both sides inwards. 5 Remove the OPC belt cartridge from appearing on the machine's power switch. Chapter C 4 Clean the exit roller. This will ...
... the AC power outlet. 2 Open the scanner unit. 4 To release the lock, push the green belt cartridge lock levers that it latches under the scanner unit. 5 Close the back cover. 6 Plug the...into the AC power outlet first, and then plug in the telephone line cord. C - 24 Cleaning the laser glass 1 Turn off the machine's power switch. Turn on your printouts. 3 Open the inside cover so that... are on both sides inwards. 5 Remove the OPC belt cartridge from appearing on the machine's power switch. Chapter C 4 Clean the exit roller. This will ...
Users Manual - English
Page 150
... a flat surface and cover the shiny green OPC belt with a piece of paper to prevent exposing it to avoid damaging the belt. 7 Open the front cover of 74.3 footcandles or 800 lux) for cleaning the laser glass. Troubleshooting and routine maintenance 0 Open the laser glass cover. D Close the front cover and the...a dry soft, lint-free cloth. C Put all the toner cartridges out of the machine. 9 Clean the surface of the laser unit with your hands. ■ Do not expose the OPC belt cartridge to bright room light or sunlight (a light source of the machine. Do C not try to push or lock the...
... a flat surface and cover the shiny green OPC belt with a piece of paper to prevent exposing it to avoid damaging the belt. 7 Open the front cover of 74.3 footcandles or 800 lux) for cleaning the laser glass. Troubleshooting and routine maintenance 0 Open the laser glass cover. D Close the front cover and the...a dry soft, lint-free cloth. C Put all the toner cartridges out of the machine. 9 Clean the surface of the laser unit with your hands. ■ Do not expose the OPC belt cartridge to bright room light or sunlight (a light source of the machine. Do C not try to push or lock the...

Users Manual - English
Page 152
.... C C - 27 Replace OPC Belt (Continuously printed) OP-4CL Replace Fuser Fusing unit 60,000 pages2 See C-35. Call Brother Customer Service to replace See C-31. Troubleshooting and routine maintenance The following are maintenance messages that you will continue printing when any of these messages appear on a page contains only one color of either Cyan...
.... C C - 27 Replace OPC Belt (Continuously printed) OP-4CL Replace Fuser Fusing unit 60,000 pages2 See C-35. Call Brother Customer Service to replace See C-31. Troubleshooting and routine maintenance The following are maintenance messages that you will continue printing when any of these messages appear on a page contains only one color of either Cyan...
Users Manual - English
Page 154
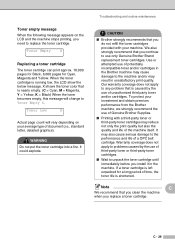
...install it in unsatisfactory print quality. C - 29 Use or attempted use of a OPC belt cartridge. Note C We recommend that you replace a toner cartridge. If a toner cartridge is... caused by the use of potentially incompatible toner and/or cartridges in the Brother machine may result in the machine. Troubleshooting and routine maintenance Toner empty message When the... your average type of document (i.e., standard letter, detailed graphics). X shows the toner color that is left unpacked for Cyan, Magenta and Yellow. Toner Low X Actual page ...
...install it in unsatisfactory print quality. C - 29 Use or attempted use of a OPC belt cartridge. Note C We recommend that you replace a toner cartridge. If a toner cartridge is... caused by the use of potentially incompatible toner and/or cartridges in the Brother machine may result in the machine. Troubleshooting and routine maintenance Toner empty message When the... your average type of document (i.e., standard letter, detailed graphics). X shows the toner color that is left unpacked for Cyan, Magenta and Yellow. Toner Low X Actual page ...
Users Manual - English
Page 158
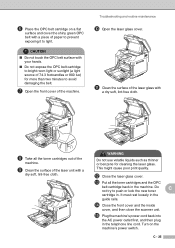
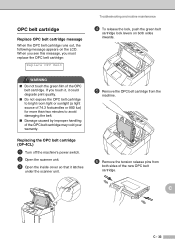
... the machine's power switch. 2 Open the scanner unit. 3 Open the inside cover so that it could degrade print quality. ■ Do not expose the OPC belt cartridge to bright room light or sunlight (a light source of 74.3 footcandles or 800 lux) for more than two minutes to avoid damaging the... belt. ■ Damage caused by improper handling of the OPC belt cartridge may void your warranty. When you see this message, you touch it, it latches under the scanner unit. 5 Remove...
... the machine's power switch. 2 Open the scanner unit. 3 Open the inside cover so that it could degrade print quality. ■ Do not expose the OPC belt cartridge to bright room light or sunlight (a light source of 74.3 footcandles or 800 lux) for more than two minutes to avoid damaging the... belt. ■ Damage caused by improper handling of the OPC belt cartridge may void your warranty. When you see this message, you touch it, it latches under the scanner unit. 5 Remove...
Users Manual - English
Page 159
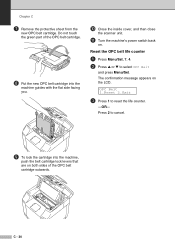
... message appears on . Press 2 to cancel. 9 To lock the cartridge into the machine, push the belt cartridge lock levers that are on both sides of the OPC belt cartridge. 8 Put the new OPC belt cartridge into the machine guides with the flat side facing you. 0 Close the inside cover, and then... close the scanner unit. C - 34 OPC Belt 1.Reset 2.Exit 3 Press 1 to select OPC Belt and press Menu/Set. Do not touch the green part of the OPC belt cartridge outwards. Reset the OPC belt life counter 1 Press Menu/Set, 7, 4. 2 Press ▲ or ▼ to ...
... message appears on . Press 2 to cancel. 9 To lock the cartridge into the machine, push the belt cartridge lock levers that are on both sides of the OPC belt cartridge. 8 Put the new OPC belt cartridge into the machine guides with the flat side facing you. 0 Close the inside cover, and then... close the scanner unit. C - 34 OPC Belt 1.Reset 2.Exit 3 Press 1 to select OPC Belt and press Menu/Set. Do not touch the green part of the OPC belt cartridge outwards. Reset the OPC belt life counter 1 Press Menu/Set, 7, 4. 2 Press ▲ or ▼ to ...

Users Manual - English
Page 162
...; Be sure to check how to connect them properly by looking at the old transfer belt cleaner before you install the transfer belt cleaner. Troubleshooting and routine maintenance Replacing the transfer belt cleaner CAUTION Both ends of the transfer belt cleaner roller consist of the machine so that connect the bias element to cancel...
...; Be sure to check how to connect them properly by looking at the old transfer belt cleaner before you install the transfer belt cleaner. Troubleshooting and routine maintenance Replacing the transfer belt cleaner CAUTION Both ends of the transfer belt cleaner roller consist of the machine so that connect the bias element to cancel...
Users Manual - English
Page 163
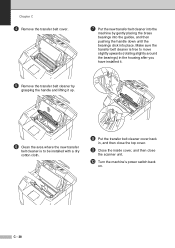
... into the machine by grasping the handle and lifting it up. 6 Clean the area where the new transfer belt cleaner is free to move slightly upwards (rotating slightly around the bearings) in , and then close the top cover. 9 Close the inside cover, and then .... 0 Turn the machine's power switch back on. C - 38 Make sure the transfer belt cleaner is to be installed with a dry cotton cloth. 8 Put the transfer belt cleaner cover back in the housing after you have installed it. 5 Remove the transfer belt cleaner by gently placing the brass bearings into the guides, and then...
... into the machine by grasping the handle and lifting it up. 6 Clean the area where the new transfer belt cleaner is free to move slightly upwards (rotating slightly around the bearings) in , and then close the top cover. 9 Close the inside cover, and then .... 0 Turn the machine's power switch back on. C - 38 Make sure the transfer belt cleaner is to be installed with a dry cotton cloth. 8 Put the transfer belt cleaner cover back in the housing after you have installed it. 5 Remove the transfer belt cleaner by gently placing the brass bearings into the guides, and then...
Users Manual - English
Page 165
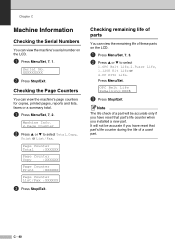
... of these parts on the LCD. 1 Press Menu/Set, 7, 1. Serial No. Machine Info. 2.Page Counter 2 Press ▲ or ▼ to select 1.OPC Belt Life, 2.Fuser Life, 3.120K Kit Life or 4.PF KIT2 Life. Page Counter Total :XXXXXX Page Counter Copy :XXXXXX Page Counter Print :XXXXXX Page Counter List... only if you have reset that part's life counter when you have reset that part's life counter during the life of a used part. OPC Belt Life Remaining:XXX% 3 Press Stop/Exit. Checking the Page Counters You can view the machine's page counters for copies, printed pages, reports and ...
... of these parts on the LCD. 1 Press Menu/Set, 7, 1. Serial No. Machine Info. 2.Page Counter 2 Press ▲ or ▼ to select 1.OPC Belt Life, 2.Fuser Life, 3.120K Kit Life or 4.PF KIT2 Life. Page Counter Total :XXXXXX Page Counter Copy :XXXXXX Page Counter Print :XXXXXX Page Counter List... only if you have reset that part's life counter when you have reset that part's life counter during the life of a used part. OPC Belt Life Remaining:XXX% 3 Press Stop/Exit. Checking the Page Counters You can view the machine's page counters for copies, printed pages, reports and ...


