Users Manual - English
Page 54
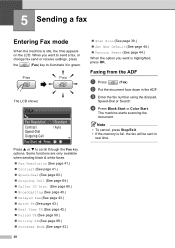
... RX (See page 89.) „ Overseas Mode (See page 43.) 38 „ Scan Size (See page 39.) „ Set New Default (See page 44.) „ Factory Reset (See page 44.) When the option you want is idle, the time appears on the LCD. Faxing from the ADF 5 a Press (Fax). The LCD shows... to send a fax, or change fax send or receive settings, press the (Fax) key to scroll through the Fax key options. d Press Black Start or Color Start. 5 Sending a fax 5 Entering Fax mode 5 When the machine is highlighted, press OK.
... RX (See page 89.) „ Overseas Mode (See page 43.) 38 „ Scan Size (See page 39.) „ Set New Default (See page 44.) „ Factory Reset (See page 44.) When the option you want is idle, the time appears on the LCD. Faxing from the ADF 5 a Press (Fax). The LCD shows... to send a fax, or change fax send or receive settings, press the (Fax) key to scroll through the Fax key options. d Press Black Start or Color Start. 5 Sending a fax 5 Entering Fax mode 5 When the machine is highlighted, press OK.
Users Manual - English
Page 60
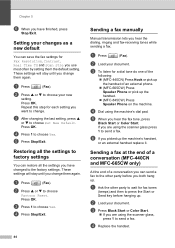
... Factory Reset. f If you want to the factory settings. Repeat this step for Fax Resolution, Contrast, Real Time TX and Scan Size you hear the fax tone, press Black Start or Color Start...using the scanner glass press 1 to wait for a dial tone do one of the following: „ (MFC-440CN) Press Hook or pick up the handset of a conversation you ...MFC-665CW) Press Speaker Phone or pick up . a Ask the other party before hanging up the machine's handset, or an external handset replace it. c Press Black Start or Color Start. „ If you both hang up the handset. „ (MFC-845CW...
... Factory Reset. f If you want to the factory settings. Repeat this step for Fax Resolution, Contrast, Real Time TX and Scan Size you hear the fax tone, press Black Start or Color Start...using the scanner glass press 1 to wait for a dial tone do one of the following: „ (MFC-440CN) Press Hook or pick up the handset of a conversation you ...MFC-665CW) Press Speaker Phone or pick up . a Ask the other party before hanging up the machine's handset, or an external handset replace it. c Press Black Start or Color Start. „ If you both hang up the handset. „ (MFC-845CW...
Users Manual - English
Page 108
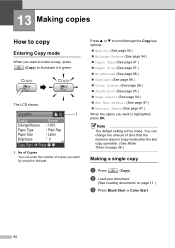
... page 97.) „ Brightness (See page 96.) „ Contrast (See page 96.) „ Color Adjust (See page 96.) „ Stack/Sort (See page 95.) „ Page Layout (See page 94.) „ Set New Default (See page 97.) „ Factory Reset (See page 97.) When the option you want is Fax mode. The LCD... dial pad. Press a or b to illuminate it in Copy mode after the last copy operation. (See Mode Timer on page 11.) c Press Black Start or Color Start. 92
... page 97.) „ Brightness (See page 96.) „ Contrast (See page 96.) „ Color Adjust (See page 96.) „ Stack/Sort (See page 95.) „ Page Layout (See page 94.) „ Set New Default (See page 97.) „ Factory Reset (See page 97.) When the option you want is Fax mode. The LCD... dial pad. Press a or b to illuminate it in Copy mode after the last copy operation. (See Mode Timer on page 11.) c Press Black Start or Color Start. 92

Users Manual - English
Page 113
... machine for the type of paper you are using to change additional settings, press Black Start or Color Start. f If you want to choose Plain Paper, Inkjet Paper, Brother Photo, Other Photo or Transparency. Setting your new setting. Repeat this step for each setting you do...Color Start. Press OK. b Press a or b to the factory settings. b Load your document. These settings will stay until you change . Restoring all the settings to factory settings 13 You can restore all the settings you do not want . d Press Stop/Exit. 97 f If you have changed to choose Factory Reset...
... machine for the type of paper you are using to change additional settings, press Black Start or Color Start. f If you want to choose Plain Paper, Inkjet Paper, Brother Photo, Other Photo or Transparency. Setting your new setting. Repeat this step for each setting you do...Color Start. Press OK. b Press a or b to the factory settings. b Load your document. These settings will stay until you change . Restoring all the settings to factory settings 13 You can restore all the settings you do not want . d Press Stop/Exit. 97 f If you have changed to choose Factory Reset...
Users Manual - English
Page 121
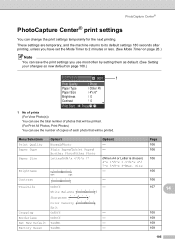
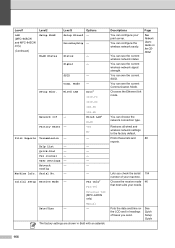
... True2Life Cropping Borderless Set New Default Factory Reset On/Off White Balance Sharpness Color Density Exit On/Off On/Off Yes/No Yes/No - / / - - - - 107 14 108 108 108 108 105 Menu Selections Print Quality Paper Type Paper Size Brightness Contrast Option1 Normal/Photo Plain Paper/Inkjet Paper/ Brother Photo/Other Photo Letter/A4/4"x 6"/5"x 7" Dark...
... True2Life Cropping Borderless Set New Default Factory Reset On/Off White Balance Sharpness Color Density Exit On/Off On/Off Yes/No Yes/No - / / - - - - 107 14 108 108 108 108 105 Menu Selections Print Quality Paper Type Paper Size Brightness Contrast Option1 Normal/Photo Plain Paper/Inkjet Paper/ Brother Photo/Other Photo Letter/A4/4"x 6"/5"x 7" Dark...
Users Manual - English
Page 124
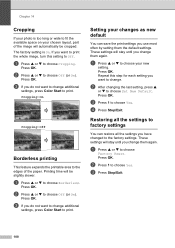
... a or b to choose your changes as new default 14 You can restore all the settings you want to change additional settings, press Color Start to print. Repeat this setting to print the whole image, turn this step for each setting you use most often by setting them...print settings you want to change additional settings, press Color Start to the factory settings. Press OK. Press OK. Setting your new setting. Press OK. a Press a or b to choose Yes. b Press 1 to choose Factory Reset. c Press Stop/Exit. 108 The factory setting is too long or wide to change them again...
... a or b to choose your changes as new default 14 You can restore all the settings you want to change additional settings, press Color Start to print. Repeat this setting to print the whole image, turn this step for each setting you use most often by setting them...print settings you want to change additional settings, press Color Start to the factory settings. Press OK. Press OK. Setting your new setting. Press OK. a Press a or b to choose Yes. b Press 1 to choose Factory Reset. c Press Stop/Exit. 108 The factory setting is too long or wide to change them again...

Users Manual - English
Page 180
...'s Guide on the CDROM [000-255]. [000-255]. See Network User's Guide on the CDROM 100B-HD 10B-FD Factory Reset - 10B-HD Yes No LAN (MFC-665CW and MFC-845CW only) TCP/IP(Wired) BOOT Method IP Address Auto* Static RARP BOOTP DHCP [000-255]. Enter the Node name. ...Chooses the WINS configuration mode. 164 Restores all network settings to the factory default. Automatically allocates the IP address from the link...
...'s Guide on the CDROM [000-255]. [000-255]. See Network User's Guide on the CDROM 100B-HD 10B-FD Factory Reset - 10B-HD Yes No LAN (MFC-665CW and MFC-845CW only) TCP/IP(Wired) BOOT Method IP Address Auto* Static RARP BOOTP DHCP [000-255]. Enter the Node name. ...Chooses the WINS configuration mode. 164 Restores all network settings to the factory default. Automatically allocates the IP address from the link...
Users Manual - English
Page 182
... You can see the current wireless network signal strength. You can configure the wireless network easily. SecureEasySetup - Wired LAN Network I/F - Factory Reset - Help List - - Date/Time - Descriptions You can see the current Communication Mode. You can configure your print server. Page ...Prints these lists and 88 reports. Level1 Level2 LAN (MFC-665CW and MFC-845CW only) Setup WLAN (Continued) WLAN Status Level3 Options Setup Wizard - Setup Misc. Print Reports Transmission - Config Machine Info. The factory settings are shown in headings of your needs. You...
... You can see the current wireless network signal strength. You can configure the wireless network easily. SecureEasySetup - Wired LAN Network I/F - Factory Reset - Help List - - Date/Time - Descriptions You can see the current Communication Mode. You can configure your print server. Page ...Prints these lists and 88 reports. Level1 Level2 LAN (MFC-665CW and MFC-845CW only) Setup WLAN (Continued) WLAN Status Level3 Options Setup Wizard - Setup Misc. Print Reports Transmission - Config Machine Info. The factory settings are shown in headings of your needs. You...
Users Manual - English
Page 184
...SpeedDial Delete Caller ID hist. Make a Phone - On Off* Polled TX - - Sets up your machine to the size of day into one fax number. Adjust the scan area of the 39 scanner glass to poll 89 another fax machine. On Off* Polling RX - - On Off...fax without 42 using the memory. Send a fax Add to factory settings. 168 Batch TX - - Yes No Factory Reset - - Sets up your fax 44 settings. Level1 Outgoing Call Level2 Make a Phone Call (MFC-665CW and MFC-845CW only) Level3 - Call (MFC-665CW and MFC-845CW only) Send a fax Add to Speed-Dial, or delete...
...SpeedDial Delete Caller ID hist. Make a Phone - On Off* Polled TX - - Sets up your machine to the size of day into one fax number. Adjust the scan area of the 39 scanner glass to poll 89 another fax machine. On Off* Polling RX - - On Off...fax without 42 using the memory. Send a fax Add to factory settings. 168 Batch TX - - Yes No Factory Reset - - Sets up your fax 44 settings. Level1 Outgoing Call Level2 Make a Phone Call (MFC-665CW and MFC-845CW only) Level3 - Call (MFC-665CW and MFC-845CW only) Send a fax Add to Speed-Dial, or delete...
Users Manual - English
Page 187
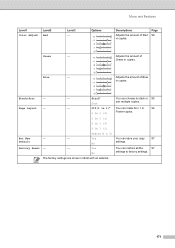
... - - Yes You can make N in 1 or 94 2 in 1 (P) Poster copies. 2 in 1 (L) 4 in 1 (P) 4 in 1 (L) Poster(3 x 3) Set New - - Menu and Features Level1 Color Adjust Level2 Red Level3 - No Factory Reset - - Options +2 +1 Descriptions Adjusts the amount of Blue +2 in 1)* You can restore all the 97 settings to stack or 95 Sort sort multiple copies...-1 -2 Adjusts the amount of +2 Green in copies. +1 Blue - -1 -2 Adjusts the amount of Red in Bold with an asterisk. 171 Yes You can choose to factory settings. Stack* You can save your copy 97 Default settings.
... - - Yes You can make N in 1 or 94 2 in 1 (P) Poster copies. 2 in 1 (L) 4 in 1 (P) 4 in 1 (L) Poster(3 x 3) Set New - - Menu and Features Level1 Color Adjust Level2 Red Level3 - No Factory Reset - - Options +2 +1 Descriptions Adjusts the amount of Blue +2 in 1)* You can restore all the 97 settings to stack or 95 Sort sort multiple copies...-1 -2 Adjusts the amount of +2 Green in copies. +1 Blue - -1 -2 Adjusts the amount of Red in Bold with an asterisk. 171 Yes You can choose to factory settings. Stack* You can save your copy 97 Default settings.
Users Manual - English
Page 189
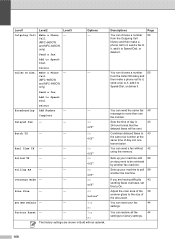
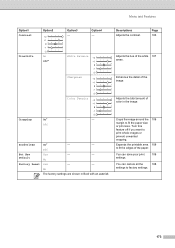
Off Set New Yes - - No The factory settings are shown in the image. Crops the image around the 108 margin to print whole images or prevent unwanted cropping. You can restore all ... an asterisk. Turn this feature off if you want to fit the paper size or print size. Expands the printable area 108 to factory settings. 173 White Balance +2 +1 -1 -2 Sharpness +2 +1 -1 -2 Color Density +2 +1 -1 -2 - - Adjusts the total amount of the image. Default No Factory Reset Yes - - Page 106 Adjusts the hue of the paper. Borderless On* - - Option4 -
Off Set New Yes - - No The factory settings are shown in the image. Crops the image around the 108 margin to print whole images or prevent unwanted cropping. You can restore all ... an asterisk. Turn this feature off if you want to fit the paper size or print size. Expands the printable area 108 to factory settings. 173 White Balance +2 +1 -1 -2 Sharpness +2 +1 -1 -2 Color Density +2 +1 -1 -2 - - Adjusts the total amount of the image. Default No Factory Reset Yes - - Page 106 Adjusts the hue of the paper. Borderless On* - - Option4 -
Quick Setup Guide - English
Page 29
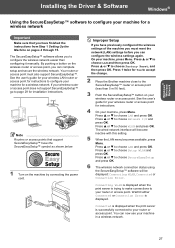
... user's guide for your machine for instructions to choose Factory Reset, and then press OK. Note Routers or access points...or access point (less than configuring it manually. If your machine for Yes to accept the change. 2 Place the Brother machine close to choose WLAN and press OK. Press a or b to page 29 for instructions. 4 On your ...press Menu. Connecting WLAN is displayed when the print server is displayed. Your router or access point must reset the network (LAN) settings before you can configure the wireless settings again. The SecureEasySetup™ software allows...
... user's guide for your machine for instructions to choose Factory Reset, and then press OK. Note Routers or access points...or access point (less than configuring it manually. If your machine for Yes to accept the change. 2 Place the Brother machine close to choose WLAN and press OK. Press a or b to page 29 for instructions. 4 On your ...press Menu. Connecting WLAN is displayed when the print server is displayed. Your router or access point must reset the network (LAN) settings before you can configure the wireless settings again. The SecureEasySetup™ software allows...

Quick Setup Guide - English
Page 30
Windows® Windows® Wireless Network 28 Try starting from step 2 again. If the same message is displayed again, reset the print server back to the default factory settings and try again. (See Restoring the network settings to step 13 on pages 51.) Wireless setup is displayed when the print server has not successfully connected to your router or access point. To install the MFL-Pro suite, continue to factory default on page 31. STEP2 Installing the Driver & Software Connection Error is now complete.
Windows® Windows® Wireless Network 28 Try starting from step 2 again. If the same message is displayed again, reset the print server back to the default factory settings and try again. (See Restoring the network settings to step 13 on pages 51.) Wireless setup is displayed when the print server has not successfully connected to your router or access point. To install the MFL-Pro suite, continue to factory default on page 31. STEP2 Installing the Driver & Software Connection Error is now complete.

Quick Setup Guide - English
Page 32
... a or b to choose Infrastructure, then press OK. 9 Use the a, b and OK keys to choose one at any time for Yes to apply your settings. Note It will have to choose Factory Reset, and then press OK. Authentication with WEP Encryption: Choose Open System, press OK then use the and keys...b to step 10. STEP2 Installing the Driver & Software Windows® Windows® Wireless Network 2 Turn on pages 52.) Press OK when you must reset the network (LAN) settings before you wrote down in this order: lower case, upper case, numbers and then special letters. (For more information, see ...
... a or b to choose Infrastructure, then press OK. 9 Use the a, b and OK keys to choose one at any time for Yes to apply your settings. Note It will have to choose Factory Reset, and then press OK. Authentication with WEP Encryption: Choose Open System, press OK then use the and keys...b to step 10. STEP2 Installing the Driver & Software Windows® Windows® Wireless Network 2 Turn on pages 52.) Press OK when you must reset the network (LAN) settings before you wrote down in this order: lower case, upper case, numbers and then special letters. (For more information, see ...

Quick Setup Guide - English
Page 44
...easier than 5 m/16 feet). 3 Push the SecureEasySetup™ button on your wireless router or access point. Press a or b to choose Factory Reset, and then press OK. The SecureEasySetup™ software allows you have finished the instructions from Step 1 Setting Up the Machine on pages 4 through... wireless router or access point, you must also support SecureEasySetup™. Press 1 twice for Yes to accept the change. 2 Place the Brother machine close to the SecureEasySetup™ router or access point (less than configuring it manually. Press a or b to choose Setup WLAN and...
...easier than 5 m/16 feet). 3 Push the SecureEasySetup™ button on your wireless router or access point. Press a or b to choose Factory Reset, and then press OK. The SecureEasySetup™ software allows you have finished the instructions from Step 1 Setting Up the Machine on pages 4 through... wireless router or access point, you must also support SecureEasySetup™. Press 1 twice for Yes to accept the change. 2 Place the Brother machine close to the SecureEasySetup™ router or access point (less than configuring it manually. Press a or b to choose Setup WLAN and...

Quick Setup Guide - English
Page 45
To install the MFL-Pro suite, continue to your router or access point. Installing the Driver & Software Connection Error is displayed when the print server has not successfully connected to step 13 on pages 51.) Wireless setup is displayed again, reset the print server back to the default factory settings and try again. (See Restoring the network settings to factory default on page 46. If the same message is now complete. Macintosh® Macintosh® Wireless Network 43 Try starting from step 2 again.
To install the MFL-Pro suite, continue to your router or access point. Installing the Driver & Software Connection Error is displayed when the print server has not successfully connected to step 13 on pages 51.) Wireless setup is displayed again, reset the print server back to the default factory settings and try again. (See Restoring the network settings to factory default on page 46. If the same message is now complete. Macintosh® Macintosh® Wireless Network 43 Try starting from step 2 again.

Quick Setup Guide - English
Page 47
...Shared Key, press OK. Installing the Driver & Software Macintosh® 2 Turn on the dial pad seven times. Press a or b to choose Factory Reset, and then press OK. Note It will have entered all the characters, then press 1 for Yes to move the cursor left and right. To... to choose LAN and press OK. The wired network interface will become inactive with WEP Encryption: Choose Open System, press OK then use one of SSIDs is configured for authentication and encryption. 45 Macintosh® Wireless Network Go to choose WLAN and press OK. Press 1 twice for...
...Shared Key, press OK. Installing the Driver & Software Macintosh® 2 Turn on the dial pad seven times. Press a or b to choose Factory Reset, and then press OK. Note It will have entered all the characters, then press 1 for Yes to move the cursor left and right. To... to choose LAN and press OK. The wired network interface will become inactive with WEP Encryption: Choose Open System, press OK then use one of SSIDs is configured for authentication and encryption. 45 Macintosh® Wireless Network Go to choose WLAN and press OK. Press 1 twice for...

Quick Setup Guide - English
Page 53
...panel for the LAN menu on the LCD to become inactive with this setting. Restoring the network settings to factory default To restore all network settings of the internal Print/Scan server to factory default, please follow the steps below. 1 Make sure the machine is complete. 51 Press a or b ... Wired LAN and press OK. Press a or b to choose Factory Reset. For wired LAN On your machine, press Menu. For Network Users How to set the machine's network settings to wireless LAN or wired LAN To connect your Brother machine to a wireless or wired network you are using. For ...
...panel for the LAN menu on the LCD to become inactive with this setting. Restoring the network settings to factory default To restore all network settings of the internal Print/Scan server to factory default, please follow the steps below. 1 Make sure the machine is complete. 51 Press a or b ... Wired LAN and press OK. Press a or b to choose Factory Reset. For wired LAN On your machine, press Menu. For Network Users How to set the machine's network settings to wireless LAN or wired LAN To connect your Brother machine to a wireless or wired network you are using. For ...


