Users Manual - English
Page 4
...: 1-877-552-MALL (6255) 1-800-947-1445 (fax) http://www.brothermall.com In Canada: 1-877-BROTHER Description Toner Cartridge Drum Unit Telephone Line Cord Telephone Handset Handset Curled Cord IEEE-1284 Bi-directional Cable (MFC-7220 and MFC-7225N only) Power Protector for A/C Power Telephone Line Surges and Voltage Spikes (2 outlets) Power Protector for A/C Power...
...: 1-877-552-MALL (6255) 1-800-947-1445 (fax) http://www.brothermall.com In Canada: 1-877-BROTHER Description Toner Cartridge Drum Unit Telephone Line Cord Telephone Handset Handset Curled Cord IEEE-1284 Bi-directional Cable (MFC-7220 and MFC-7225N only) Power Protector for A/C Power Telephone Line Surges and Voltage Spikes (2 outlets) Power Protector for A/C Power...
Users Manual - English
Page 6
Brother® One Year Limited Warranty and Replacement Service (USA only) Who is covered: • This limited ...Consumable and Accessory Items at 1-800-284-4329 for Fax, MFC and DCP and 1-800-276-7746 for Printers, or to in this warranty as Paper Feeding Kit, Fuser and Laser Units. You are also responsible for loss or damage to... this Product has been altered or modified in any way (including but are not limited to print heads, toner, drums, ink cartridges, print cartridges,...
Brother® One Year Limited Warranty and Replacement Service (USA only) Who is covered: • This limited ...Consumable and Accessory Items at 1-800-284-4329 for Fax, MFC and DCP and 1-800-276-7746 for Printers, or to in this warranty as Paper Feeding Kit, Fuser and Laser Units. You are also responsible for loss or damage to... this Product has been altered or modified in any way (including but are not limited to print heads, toner, drums, ink cartridges, print cartridges,...
Users Manual - English
Page 8
...Brother International Corporation (Canada) Ltd. ("Brother"), or its Authorized Service Centers, Distributors, Dealers, Agents or employees, shall create another warranty or modify this MFC/Facsimile machine free of charge if defective in excess of the specifications or with your nearest Authorized Service Center call 1-877-BROTHER. For laser products: Failure to remove the Toner Cartridge (and Toner... Drum Unit on applicable models) during shipping will cause severe damage to the MFC/Facsimile and will...
...Brother International Corporation (Canada) Ltd. ("Brother"), or its Authorized Service Centers, Distributors, Dealers, Agents or employees, shall create another warranty or modify this MFC/Facsimile machine free of charge if defective in excess of the specifications or with your nearest Authorized Service Center call 1-877-BROTHER. For laser products: Failure to remove the Toner Cartridge (and Toner... Drum Unit on applicable models) during shipping will cause severe damage to the MFC/Facsimile and will...
Users Manual - English
Page 10
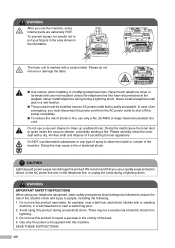
...people, including the following: 1. Never touch telephone wires or terminals that is marked with a caution label. Please carefully clean the toner dust with this product during an electrical storm. Do NOT use flammable substances or any type of the leak. 4. SAVE THESE INSTRUCTIONS...caution when installing or modifying telephone lines. WARNING IMPORTANT SAFETY INSTRUCTIONS When using this machine. WARNING After you use the machine, some internal parts are not insulated unless the telephone line has been disconnected at the walljack. To prevent injures, be a remote risk of ...
...people, including the following: 1. Never touch telephone wires or terminals that is marked with a caution label. Please carefully clean the toner dust with this product during an electrical storm. Do NOT use flammable substances or any type of the leak. 4. SAVE THESE INSTRUCTIONS...caution when installing or modifying telephone lines. WARNING IMPORTANT SAFETY INSTRUCTIONS When using this machine. WARNING After you use the machine, some internal parts are not insulated unless the telephone line has been disconnected at the walljack. To prevent injures, be a remote risk of ...
Users Manual - English
Page 13
...2-2 General Setup ...2-3 Setting the Mode Timer (FAX-2820, FAX-2910 and FAX-2920 only 2-3 Setting the Mode Timer (MFC-7220 and MFC-7225N only 2-3 Setting the Paper Type 2-4 Setting the Paper Size 2-4 Setting the Ring Volume 2-5 Setting the Beeper Volume 2-5 ...Setting the Speaker Volume 2-5 Setting the Handset Volume 2-6 Choosing the Handset Volume (For Volume Amplify 2-6 Setting Volume Amplify 2-7 Turning on Automatic Daylight Savings Time 2-7 Toner...
...2-2 General Setup ...2-3 Setting the Mode Timer (FAX-2820, FAX-2910 and FAX-2920 only 2-3 Setting the Mode Timer (MFC-7220 and MFC-7225N only 2-3 Setting the Paper Type 2-4 Setting the Paper Size 2-4 Setting the Ring Volume 2-5 Setting the Beeper Volume 2-5 ...Setting the Speaker Volume 2-5 Setting the Handset Volume 2-6 Choosing the Handset Volume (For Volume Amplify 2-6 Setting Volume Amplify 2-7 Turning on Automatic Daylight Savings Time 2-7 Toner...

Users Manual - English
Page 16
...10-2 Industry Canada Compliance Statement (Canada only 10-2 Disconnect device 10-3 LAN connection (MFC-7225N only 10-3 Laser safety 10-3 FDA regulations 10-3 Important safety instructions 10-4 Trademarks 10-5 Troubleshooting and ...routine maintenance Troubleshooting 11-1 Error messages 11-1 Checking if the machine has faxes in the United States only 10-1 Federal Communications Commission (FCC) Declaration of the machine 11-9 Paper is jammed inside the drum unit and toner...
...10-2 Industry Canada Compliance Statement (Canada only 10-2 Disconnect device 10-3 LAN connection (MFC-7225N only 10-3 Laser safety 10-3 FDA regulations 10-3 Important safety instructions 10-4 Trademarks 10-5 Troubleshooting and ...routine maintenance Troubleshooting 11-1 Error messages 11-1 Checking if the machine has faxes in the United States only 10-1 Federal Communications Commission (FCC) Declaration of the machine 11-9 Paper is jammed inside the drum unit and toner...
Users Manual - English
Page 17
...of the machine 11-21 Cleaning the scanner glass 11-22 Cleaning the laser scanner window 11-22 Cleaning the corona wire 11-24 Replacing the toner cartridge (TN-350 11-24 How to replace the toner cartridge 11-25 Replacing the drum unit (DR-350 11-27 Machine ...Information 11-29 Checking the Serial Numbers 11-29 Checking the Page Counters 11-29 Checking the Drum Life 11-29 A Appendix A Setting up telephone services A-1 Distinctive Ring A-1 What does your telephone company's 'Distinctive Ring' do A-1 What does Brother...
...of the machine 11-21 Cleaning the scanner glass 11-22 Cleaning the laser scanner window 11-22 Cleaning the corona wire 11-24 Replacing the toner cartridge (TN-350 11-24 How to replace the toner cartridge 11-25 Replacing the drum unit (DR-350 11-27 Machine ...Information 11-29 Checking the Serial Numbers 11-29 Checking the Page Counters 11-29 Checking the Drum Life 11-29 A Appendix A Setting up telephone services A-1 Distinctive Ring A-1 What does your telephone company's 'Distinctive Ring' do A-1 What does Brother...
Users Manual - English
Page 38
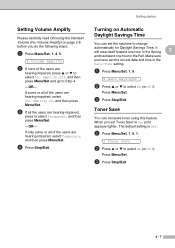
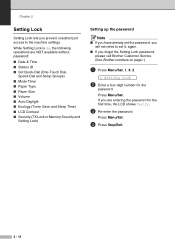
... press Menu/Set and go to select Permanent, and then press Menu/Set. -OR- Toner Save You can set the machine to select On (or Off). It will reset itself forward one hour in the Spring 2 and backward one hour in the Date/Time setting. 1 Press Menu/Set, 1, 5. 5.Auto Daylight 2 Press ▲ or...
... press Menu/Set and go to select Permanent, and then press Menu/Set. -OR- Toner Save You can set the machine to select On (or Off). It will reset itself forward one hour in the Spring 2 and backward one hour in the Date/Time setting. 1 Press Menu/Set, 1, 5. 5.Auto Daylight 2 Press ▲ or...
Users Manual - English
Page 43
...9632; Date & Time ■ Station ID ■ Set Quick-Dial (One-Touch Dial, Speed-Dial and Setup Groups) ■ Mode Timer ■ Paper Type ■ Paper Size ■ Volume ■ Auto Daylight ■ Ecology (Toner Save and Sleep Time) ■ LCD Contrast ■ Security (TX ... settings. Chapter 2 Setting Lock Setting Lock lets you prevent unauthorized access to set the password, you forget the Setting Lock password, please call Brother Customer Service. (See Brother numbers on page i.) 1 Press Menu/Set, 1, 8, 2. 2.Setting Lock 2 Enter a four-digit number for the first time, the ...
...9632; Date & Time ■ Station ID ■ Set Quick-Dial (One-Touch Dial, Speed-Dial and Setup Groups) ■ Mode Timer ■ Paper Type ■ Paper Size ■ Volume ■ Auto Daylight ■ Ecology (Toner Save and Sleep Time) ■ LCD Contrast ■ Security (TX ... settings. Chapter 2 Setting Lock Setting Lock lets you prevent unauthorized access to set the password, you forget the Setting Lock password, please call Brother Customer Service. (See Brother numbers on page i.) 1 Press Menu/Set, 1, 8, 2. 2.Setting Lock 2 Enter a four-digit number for the first time, the ...
Users Manual - English
Page 89
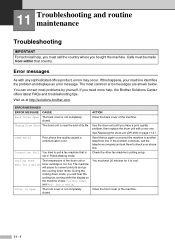
Visit us at http://solutions.brother.com. Change Drum Soon The drum unit is not completely closed . Use the drum unit until you bought the machine. Send the fax again or connect the machine to cool. Error messages As with a new one. You can correct most common ...error messages are shown below. Cover is Open The front cover is near the end of the drum unit or toner cartridge is too hot. 11 Troubleshooting and routine maintenance Troubleshooting IMPORTANT For technical help , the Brother Solutions Center offers ...
Visit us at http://solutions.brother.com. Change Drum Soon The drum unit is not completely closed . Use the drum unit until you bought the machine. Send the fax again or connect the machine to cool. Error messages As with a new one. You can correct most common ...error messages are shown below. Cover is Open The front cover is near the end of the drum unit or toner cartridge is too hot. 11 Troubleshooting and routine maintenance Troubleshooting IMPORTANT For technical help , the Brother Solutions Center offers ...
Users Manual - English
Page 91
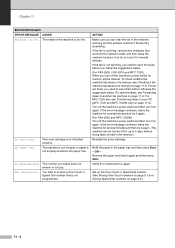
... access a One-Touch or Speed Dial number that surround the exhuast outlet, and then leave the machine turned on page 11-6. Verify the number and try it again. (The machine can hear the fan in the paper tray and then press Start. -OR- Set up to your PC (MFC-7220 and MFC-7225N only.... Chapter 11 ERROR MESSAGES ERROR MESSAGE CAUSE Machine too Hot The inside of paper or paper is not properly loaded in the memory.) Reinstall the toner cartridge. Not Registered You tried to another fax machine on again.
... access a One-Touch or Speed Dial number that surround the exhuast outlet, and then leave the machine turned on page 11-6. Verify the number and try it again. (The machine can hear the fan in the paper tray and then press Start. -OR- Set up to your PC (MFC-7220 and MFC-7225N only.... Chapter 11 ERROR MESSAGES ERROR MESSAGE CAUSE Machine too Hot The inside of paper or paper is not properly loaded in the memory.) Reinstall the toner cartridge. Not Registered You tried to another fax machine on again.
Users Manual - English
Page 92
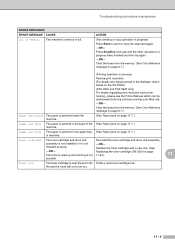
...) Press Start to send or copy the scanned pages. -OR- installed properly. Replace the toner cartridge with a new one. (See -OR- assembly is not installed or it is near the end of its Order a new toner cartridge now. Clear the faxes from the memory. (See Out of Memory message on page ...8-7.) (Printing operation in process) Reduce print resolution. (For details see the Printer Manual which can be downloaded from the solutions.brother.com Web site. -OR- Troubleshooting and...
...) Press Start to send or copy the scanned pages. -OR- installed properly. Replace the toner cartridge with a new one. (See -OR- assembly is not installed or it is near the end of its Order a new toner cartridge now. Clear the faxes from the memory. (See Out of Memory message on page ...8-7.) (Printing operation in process) Reduce print resolution. (For details see the Printer Manual which can be downloaded from the solutions.brother.com Web site. -OR- Troubleshooting and...
Users Manual - English
Page 96
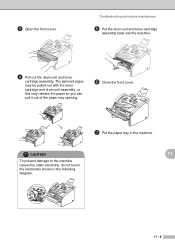
3 Open the front cover. Troubleshooting and routine maintenance 5 Put the drum unit and toner cartridge assembly back into the machine. 4 Pull out the drum unit and toner cartridge assembly. The jammed paper may be pulled out with the toner cartridge and drum unit assembly, or this may release the paper so you can pull it out of the paper tray opening. 6 Close the front cover. 7 Put the paper tray in the following diagram. 11 - 8 CAUTION 11 To prevent damage to the machine caused by static electricity, do not touch the electrodes shown in the machine.
3 Open the front cover. Troubleshooting and routine maintenance 5 Put the drum unit and toner cartridge assembly back into the machine. 4 Pull out the drum unit and toner cartridge assembly. The jammed paper may be pulled out with the toner cartridge and drum unit assembly, or this may release the paper so you can pull it out of the paper tray opening. 6 Close the front cover. 7 Put the paper tray in the following diagram. 11 - 8 CAUTION 11 To prevent damage to the machine caused by static electricity, do not touch the electrodes shown in the machine.
Users Manual - English
Page 97
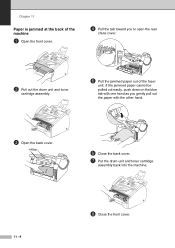
Chapter 11 Paper is jammed at the back of the machine 1 Open the front cover. 4 Pull the tab toward you gently pull out the paper with one hand as you to open the rear chute cover. 2 Pull out the drum unit and toner cartridge assembly. 5 Pull the jammed paper out of the fuser unit. If the jammed paper cannot be pulled out easily, push down on the blue tab with the other hand. 3 Open the back cover. 6 Close the back cover. 7 Put the drum unit and toner cartridge assembly back into the machine. 11 - 9 8 Close the front cover.
Chapter 11 Paper is jammed at the back of the machine 1 Open the front cover. 4 Pull the tab toward you gently pull out the paper with one hand as you to open the rear chute cover. 2 Pull out the drum unit and toner cartridge assembly. 5 Pull the jammed paper out of the fuser unit. If the jammed paper cannot be pulled out easily, push down on the blue tab with the other hand. 3 Open the back cover. 6 Close the back cover. 7 Put the drum unit and toner cartridge assembly back into the machine. 11 - 9 8 Close the front cover.
Users Manual - English
Page 98
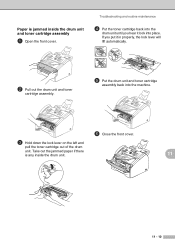
Take out the jammed paper if there is jammed inside the drum unit. 11 11 - 10 Troubleshooting and routine maintenance 4 Put the toner cartridge back into the drum unit until you put it lock into the machine. 6 Close the front cover. 3 Hold down the lock lever on the ...left and pull the toner cartridge out of the drum unit. Paper is any inside the drum unit and toner cartridge assembly 1 Open the front cover. If you hear it in properly, the lock lever will lift automatically...
Take out the jammed paper if there is jammed inside the drum unit. 11 11 - 10 Troubleshooting and routine maintenance 4 Put the toner cartridge back into the drum unit until you put it lock into the machine. 6 Close the front cover. 3 Hold down the lock lever on the ...left and pull the toner cartridge out of the drum unit. Paper is any inside the drum unit and toner cartridge assembly 1 Open the front cover. If you hear it in properly, the lock lever will lift automatically...
Users Manual - English
Page 101
... on again. Reduce the printing resolution. (See Advanced tab in and the power switch turned On. (See the Quick Setup Guide.) -OR- • The toner cartridge and drum unit are installed properly. (See Replacing the drum unit (DR-350) on page 11-1.) -OR- • The machine is online. If ...been installed and selected. -OR- • Check to allow for several minutes and then try again. Right-click 'Brother MFC-XXXX,' (where XXXX is set up to your PC (MFC-7220 and MFC-7225N only) on page 11-6.) Turn off the machine's power switch its memory see if the LCD is showing an error...
... on again. Reduce the printing resolution. (See Advanced tab in and the power switch turned On. (See the Quick Setup Guide.) -OR- • The toner cartridge and drum unit are installed properly. (See Replacing the drum unit (DR-350) on page 11-1.) -OR- • The machine is online. If ...been installed and selected. -OR- • Check to allow for several minutes and then try again. Right-click 'Brother MFC-XXXX,' (where XXXX is set up to your PC (MFC-7220 and MFC-7225N only) on page 11-6.) Turn off the machine's power switch its memory see if the LCD is showing an error...
Users Manual - English
Page 103
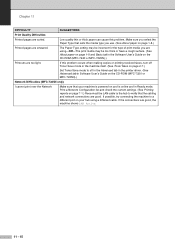
... Low quality thin or thick paper can cause this problem occurs when making copies or printing received faxes, turn off Toner Save mode in the machine itself. (See Toner Save on page 2-7.) Set Toner Save mode to a different port on your machine is powered on and is online and in the Software User... the machine to off in the Advanced tab in the printer driver. (See Advanced tab in Software User's Guide on the CD-ROM (MFC-7220 or MFC-7225N).) Network Difficulties (MFC-7225N only) I cannot print over the Network Make sure that your hub using -OR-The print media may be too thick or have a ...
... Low quality thin or thick paper can cause this problem occurs when making copies or printing received faxes, turn off Toner Save mode in the machine itself. (See Toner Save on page 2-7.) Set Toner Save mode to a different port on your machine is powered on and is online and in the Software User... the machine to off in the Advanced tab in the printer driver. (See Advanced tab in Software User's Guide on the CD-ROM (MFC-7220 or MFC-7225N).) Network Difficulties (MFC-7225N only) I cannot print over the Network Make sure that your hub using -OR-The print media may be too thick or have a ...
Users Manual - English
Page 104
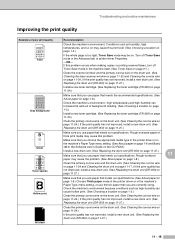
... itself. (See Toner Save on page 2-7.) Clean the scanner window and the primary corona wire on the drum unit. (See Cleaning the laser scanner window on... page 11-22 and Cleaning the corona wire on page 11-24.) If the print quality has not improved, install a new drum unit. (See Replacing the drum unit (DR-350) on page 11-27.) Install a new toner cartridge. (See Replacing the toner... abcdefghijk ABCD abcde 01234 Gray background Ghost ABCDEFGH abcdefghijk ABCD abcde 01234 Toner specks Hollow print All black Recommendation Check the machine's environment. Troubleshooting ...
... itself. (See Toner Save on page 2-7.) Clean the scanner window and the primary corona wire on the drum unit. (See Cleaning the laser scanner window on... page 11-22 and Cleaning the corona wire on page 11-24.) If the print quality has not improved, install a new drum unit. (See Replacing the drum unit (DR-350) on page 11-27.) Install a new toner cartridge. (See Replacing the toner... abcdefghijk ABCD abcde 01234 Gray background Ghost ABCDEFGH abcdefghijk ABCD abcde 01234 Toner specks Hollow print All black Recommendation Check the machine's environment. Troubleshooting ...
Users Manual - English
Page 105
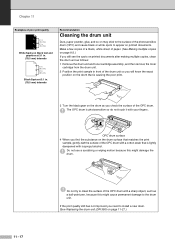
... on the drum that is photosensitive so do not touch it with a sharp object, such as follows: 1 Remove the drum unit and toner cartridge assembly, and then remove the toner cartridge from the drum unit. 2 Position the print sample in . (78.5 mm) intervals Recommendation Cleaning the drum unit Dust, paper powder, glue...
... on the drum that is photosensitive so do not touch it with a sharp object, such as follows: 1 Remove the drum unit and toner cartridge assembly, and then remove the toner cartridge from the drum unit. 2 Position the print sample in . (78.5 mm) intervals Recommendation Cleaning the drum unit Dust, paper powder, glue...
Users Manual - English
Page 106
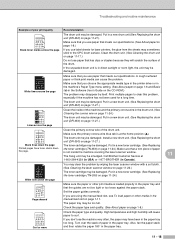
... window with a soft cloth. (See Cleaning the laser scanner window on page 1-11. Make sure the primary corona wire blue tab is not inside of the drum unit. Put in a new toner cartridge. (See Replacing the toner cartridge (TN-350) on page 11-24.) Make sure the paper or other media in ...wire on page 1-8.) Check the paper type and quality. Install a new drum unit. (See Replacing the drum unit (DR-350) on page 11-27). Call Brother Customer Service at the home position (▲). The paper tray may be damaged. ABCDEFGH abcdefghijk ABCD abcde 01234 White lines down the page Printed pages...
... window with a soft cloth. (See Cleaning the laser scanner window on page 1-11. Make sure the primary corona wire blue tab is not inside of the drum unit. Put in a new toner cartridge. (See Replacing the toner cartridge (TN-350) on page 11-24.) Make sure the paper or other media in ...wire on page 1-8.) Check the paper type and quality. Install a new drum unit. (See Replacing the drum unit (DR-350) on page 11-27). Call Brother Customer Service at the home position (▲). The paper tray may be damaged. ABCDEFGH abcdefghijk ABCD abcde 01234 White lines down the page Printed pages...


