Software Users Manual - English
Page 3
...I Windows® 1 Printing 2 Using the Brother printer driver...2 Features ...2 Choosing the right type of paper...3 Simultaneous printing, scanning and faxing 3 Clearing data from the memory ...3 Status Monitor...4 Monitoring the machine's status ...4 Turning off the Status Monitor ...5 Printer driver settings...6 Accessing the printer driver settings...6 Basic tab ...7 Media Type...8 Quality ...8 Paper Size ...9 Color Mode ...10 Page Layout ...10 Orientation ...10 Copies ...11 Automatic Duplex Printing (MFC-6890CDW only 12 Advanced tab...14 Color/Grayscale ...15 Color Settings ...15 Use...
...I Windows® 1 Printing 2 Using the Brother printer driver...2 Features ...2 Choosing the right type of paper...3 Simultaneous printing, scanning and faxing 3 Clearing data from the memory ...3 Status Monitor...4 Monitoring the machine's status ...4 Turning off the Status Monitor ...5 Printer driver settings...6 Accessing the printer driver settings...6 Basic tab ...7 Media Type...8 Quality ...8 Paper Size ...9 Color Mode ...10 Page Layout ...10 Orientation ...10 Copies ...11 Automatic Duplex Printing (MFC-6890CDW only 12 Advanced tab...14 Color/Grayscale ...15 Color Settings ...15 Use...
Software Users Manual - English
Page 52
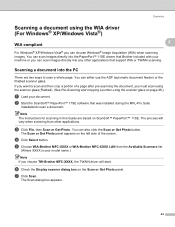
... on page 46.) a Load your document. Note The instructions for scanning in this Guide are two ways to scan and then crop a portion of the screen. You can either use the ADF (automatic document feeder) or the Flatbed scanner glass. You can also click the Scan or Get Photo button. The process will start. The Scan or Get Photo panel appears on the Scan or Get Photo panel. d Click Select button. e Choose WIA-Brother MFC-XXXX...
... on page 46.) a Load your document. Note The instructions for scanning in this Guide are two ways to scan and then crop a portion of the screen. You can either use the ADF (automatic document feeder) or the Flatbed scanner glass. You can also click the Scan or Get Photo button. The process will start. The Scan or Get Photo panel appears on the Scan or Get Photo panel. d Click Select button. e Choose WIA-Brother MFC-XXXX...
Software Users Manual - English
Page 120
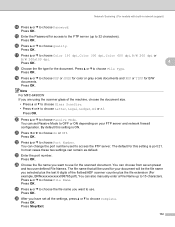
... choose Password. The default for your FTP server and network firewall configuration. Press OK. Network Scanning (For models with built-in network support) n Press a or b to choose Port Number. p Press a or b to choose Color 150 dpi, Color 300 dpi, Color 600 dpi, B/W 200 dpi or B/W 200x100 dpi. q Press a or b to choose Quality. In most cases these two settings can change the port number used for this setting is port 21. w Enter the port number. The file...
... choose Password. The default for your FTP server and network firewall configuration. Press OK. Network Scanning (For models with built-in network support) n Press a or b to choose Port Number. p Press a or b to choose Color 150 dpi, Color 300 dpi, Color 600 dpi, B/W 200 dpi or B/W 200x100 dpi. q Press a or b to choose Quality. In most cases these two settings can change the port number used for this setting is port 21. w Enter the port number. The file...
Software Users Manual - English
Page 217
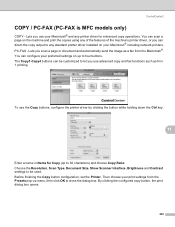
... scan a page or document and automatically send the image as N in Name for enhanced copy operations. Lets you use the Copy buttons, configure the printer driver by clicking the button while holding down the Ctrl key. 11 Enter a name in 1 printing. PC-FAX - ControlCenter2 COPY / PC-FAX (PC-FAX is MFC models only) 11 COPY - The Copy1-Copy4 buttons can configure your preferred settings on your Macintosh® including network printers. Before finishing the Copy button configuration, set the Printer. By clicking the configured copy button, the print...
... scan a page or document and automatically send the image as N in Name for enhanced copy operations. Lets you use the Copy buttons, configure the printer driver by clicking the button while holding down the Ctrl key. 11 Enter a name in 1 printing. PC-FAX - ControlCenter2 COPY / PC-FAX (PC-FAX is MFC models only) 11 COPY - The Copy1-Copy4 buttons can configure your preferred settings on your Macintosh® including network printers. Before finishing the Copy button configuration, set the Printer. By clicking the configured copy button, the print...
Software Users Manual - English
Page 236
.... Network Scanning (For models with built-in network support) n Press a or b to choose Passive Mode. v Press a or b to access the FTP server. You can change the port number used for the document. Press OK. Press OK. Note For MFC-6490CW If you want to choose the file name you selected plus the last 6 digits of the flatbed/ADF scanner counter plus the file extension (For example, BRNxxxxxxxxxxxx098765.pdf). You can set...
.... Network Scanning (For models with built-in network support) n Press a or b to choose Passive Mode. v Press a or b to access the FTP server. You can change the port number used for the document. Press OK. Press OK. Note For MFC-6490CW If you want to choose the file name you selected plus the last 6 digits of the flatbed/ADF scanner counter plus the file extension (For example, BRNxxxxxxxxxxxx098765.pdf). You can set...
Software Users Manual - English
Page 243
... the user defined names. By default this setting is ON. x Press a or b to choose the file name you want to 15 characters. Network Scanning (For models with built-in network support) r Press to choose Glass Scan Size. • Choose the document size you want. s Press a or b to choose Port Number. u Press a or b to choose Passive Mode. The default for B/W documents. You can be used for your FTP server and network firewall configuration...
... the user defined names. By default this setting is ON. x Press a or b to choose the file name you want to 15 characters. Network Scanning (For models with built-in network support) r Press to choose Glass Scan Size. • Choose the document size you want. s Press a or b to choose Port Number. u Press a or b to choose Passive Mode. The default for B/W documents. You can be used for your FTP server and network firewall configuration...
Users Manual - English
Page 12
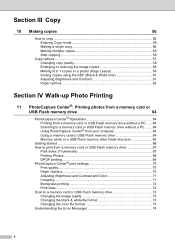
...10 Making copies 56 How to copy ...56 Entering Copy mode 56 Making a single copy 56 Making multiple copies 56 Stop copying 56 Copy options ...57 Changing copy quality 58 Enlarging or reducing the image copied 58 Making N in 1 copies or a poster (Page Layout 59 Sorting copies using the ADF (Black & White only 61 Adjusting Brightness and Contrast 61 Paper options 62 Section IV Walk-up Photo Printing 11 PhotoCapture Center®: Printing photos from a memory card or USB Flash memory drive 64 PhotoCapture Center® Operations 64 Printing from a memory card or USB Flash memory...
...10 Making copies 56 How to copy ...56 Entering Copy mode 56 Making a single copy 56 Making multiple copies 56 Stop copying 56 Copy options ...57 Changing copy quality 58 Enlarging or reducing the image copied 58 Making N in 1 copies or a poster (Page Layout 59 Sorting copies using the ADF (Black & White only 61 Adjusting Brightness and Contrast 61 Paper options 62 Section IV Walk-up Photo Printing 11 PhotoCapture Center®: Printing photos from a memory card or USB Flash memory drive 64 PhotoCapture Center® Operations 64 Printing from a memory card or USB Flash memory...
Users Manual - English
Page 41
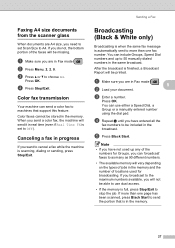
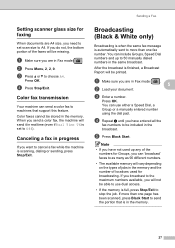
... in Fax mode . a Make sure you are in Fax mode b Load your document. . 5 c Enter a number. d Press Stop/Exit. Color faxes cannot be included in the broadcast. When you want to cancel a fax while the machine is scanning, dialing or sending, press Stop/Exit. You can 'broadcast' faxes to as many as 90 different numbers. • The available memory will vary depending on the types of jobs in the memory and the number of locations used up to 50 manually dialed numbers...
... in Fax mode . a Make sure you are in Fax mode b Load your document. . 5 c Enter a number. d Press Stop/Exit. Color faxes cannot be included in the broadcast. When you want to cancel a fax while the machine is scanning, dialing or sending, press Stop/Exit. You can 'broadcast' faxes to as many as 90 different numbers. • The available memory will vary depending on the types of jobs in the memory and the number of locations used up to 50 manually dialed numbers...

Users Manual - English
Page 66
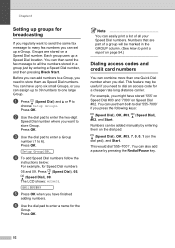
... dial. You can use them as Speed Dial numbers. You can then send the fax message to all your Speed Dial numbers. Before you can combine more than one large Group. f Use the dial pad to enter a name for Speed Dial numbers 05 and 09. Numbers can easily print a list of a group will be marked in a group just by entering them on the dial pad: (Speed Dial), OK, #03, 7, 0, 0, 1 (on page 54.) Dialing access codes and credit card numbers 8 You can add numbers...
... dial. You can use them as Speed Dial numbers. You can then send the fax message to all your Speed Dial numbers. Before you can combine more than one large Group. f Use the dial pad to enter a name for Speed Dial numbers 05 and 09. Numbers can easily print a list of a group will be marked in a group just by entering them on the dial pad: (Speed Dial), OK, #03, 7, 0, 0, 1 (on page 54.) Dialing access codes and credit card numbers 8 You can add numbers...

Users Manual - English
Page 67
... is Every 50 Faxes. c Enter the time to start printing in How to print a report on page 54. Note If you choose On+Image or Off+Image the image will print the report at specific intervals (every 50 faxes, 6, 12 or 24 hours, 2 or 7 days). Fax Journal (activity report) 9 You can still print the report by following the steps in 24-hour format. a Press Menu, 2, 3, 2. If the machine's memory becomes full with...
... is Every 50 Faxes. c Enter the time to start printing in How to print a report on page 54. Note If you choose On+Image or Off+Image the image will print the report at specific intervals (every 50 faxes, 6, 12 or 24 hours, 2 or 7 days). Fax Journal (activity report) 9 You can still print the report by following the steps in 24-hour format. a Press Menu, 2, 3, 2. If the machine's memory becomes full with...
Users Manual - English
Page 76
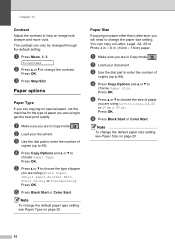
... 99). d Press Copy Options and a or b to choose Paper Type. b Load your document. b Load your document. e Press a or b to 99). Note To change the default paper size setting see Paper Type on Letter, Legal, A4, A5 or Photo 4 in. × 6 in. (10cm × 15cm) paper. c Use the dial pad to enter the number of copies (up to choose the size of paper you are in Copy mode . Press OK. c Press Stop/Exit. a Make sure you are using (Plain Paper, Inkjet Paper, Brother BP71, Other...
... 99). d Press Copy Options and a or b to choose Paper Type. b Load your document. b Load your document. e Press a or b to 99). Note To change the default paper size setting see Paper Type on Letter, Legal, A4, A5 or Photo 4 in. × 6 in. (10cm × 15cm) paper. c Use the dial pad to enter the number of copies (up to choose the size of paper you are in Copy mode . Press OK. c Press Stop/Exit. a Make sure you are using (Plain Paper, Inkjet Paper, Brother BP71, Other...

Users Manual - English
Page 89
...the machine will not be recognized). „ PhotoCapture Center® operations are not available when using the PictBridge feature. Normal, Fine, Printer Settings (Default setting) 2 On, Off, Printer Settings (Default setting) 2 1 See DPOF printing on page 76 for more details. 2 If your camera is in PictBridge mode. Setting your digital camera 12 Make sure your camera. Camera Menu Selections Paper Size Paper Type Layout DPOF setting 1 Print Quality Print Date Options Letter, A4, 4"×6", Printer Settings (Default setting) 2 Plain Paper, Glossy Paper, Inkjet Paper, Printer...
...the machine will not be recognized). „ PhotoCapture Center® operations are not available when using the PictBridge feature. Normal, Fine, Printer Settings (Default setting) 2 On, Off, Printer Settings (Default setting) 2 1 See DPOF printing on page 76 for more details. 2 If your camera is in PictBridge mode. Setting your digital camera 12 Make sure your camera. Camera Menu Selections Paper Size Paper Type Layout DPOF setting 1 Print Quality Print Date Options Letter, A4, 4"×6", Printer Settings (Default setting) 2 Plain Paper, Glossy Paper, Inkjet Paper, Printer...

Users Manual - English
Page 109
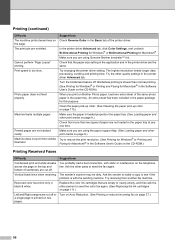
... using the paper support flap. (See Loading paper and other the printed page. If you are using photo paper, make sure that you have been stored properly before use Genuine Brother Innobella™ Ink. Troubleshooting and Routine Maintenance Printing (continued) Difficulty Suggestions Poor print quality Check the print quality. (See Checking the print quality on page 115.) Make sure that the Printer Driver or Paper Type setting in the menu matches the type of paper you are using. (See Printing for Windows® or Printing and Faxing...
... using the paper support flap. (See Loading paper and other the printed page. If you are using photo paper, make sure that you have been stored properly before use Genuine Brother Innobella™ Ink. Troubleshooting and Routine Maintenance Printing (continued) Difficulty Suggestions Poor print quality Check the print quality. (See Checking the print quality on page 115.) Make sure that the Printer Driver or Paper Type setting in the menu matches the type of paper you are using. (See Printing for Windows® or Printing and Faxing...

Users Manual - English
Page 116
... a black & white fax. Comm.Error Poor telephone line quality caused a communication error. If the problem continues, call Brother Customer Service. Lift the scanner cover and then close the ink cartridge cover until it clicks. Try to send or receive again. Document Jam The document was too long. Send the fax again or connect the machine to another telephone line. DR Mode in the machine's memory. You cannot change the Receive Mode from the memory. An ink cartridge is set to convert it clicks. Cannot Print Replace...
... a black & white fax. Comm.Error Poor telephone line quality caused a communication error. If the problem continues, call Brother Customer Service. Lift the scanner cover and then close the ink cartridge cover until it clicks. Try to send or receive again. Document Jam The document was too long. Send the fax again or connect the machine to another telephone line. DR Mode in the machine's memory. You cannot change the Receive Mode from the memory. An ink cartridge is set to convert it clicks. Cannot Print Replace...

Users Manual - English
Page 158
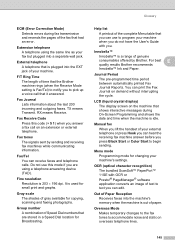
... Speed Dial numbers that are using the same line as your machine. Help list A printout of the complete Menu table that the Brother machine rings (when the Receive Mode setting is Fax/Tel) to pick up a voice call on the machine that had an error. You can hear the receiving fax machine answer before you are stored in a Speed Dial location for changing your machine's settings. Menu mode Programming mode for Broadcasting. F/T Ring Time The length of time that you can use this code...
... Speed Dial numbers that are using the same line as your machine. Help list A printout of the complete Menu table that the Brother machine rings (when the Receive Mode setting is Fax/Tel) to pick up a voice call on the machine that had an error. You can hear the receiving fax machine answer before you are stored in a Speed Dial location for changing your machine's settings. Menu mode Programming mode for Broadcasting. F/T Ring Time The length of time that you can use this code...
Users Manual - English
Page 41
... to more than one page has been scanned, press Black Start to A4. Sending a Fax Setting scanner glass size for faxing 5 When documents are A4 size, you need to set to machines that is scanning, dialing or sending, press Stop/Exit. If more than one fax number. You can 'broadcast' faxes to 50 manually dialed numbers in the memory and the number of the faxes will be printed. c Press a or b to be able to use either a Speed Dial, a Group or a manually entered number using the dial pad. d Repeat...
... to more than one page has been scanned, press Black Start to A4. Sending a Fax Setting scanner glass size for faxing 5 When documents are A4 size, you need to set to machines that is scanning, dialing or sending, press Stop/Exit. If more than one fax number. You can 'broadcast' faxes to 50 manually dialed numbers in the memory and the number of the faxes will be printed. c Press a or b to be able to use either a Speed Dial, a Group or a manually entered number using the dial pad. d Repeat...
Users Manual - English
Page 66
... Black Start. Press OK. You can then send the fax message to all your Speed Dial numbers. You can use them both to dial '555-7000' if you need to dial an access code for a cheaper rate long distance carrier. Press OK. Numbers can assign up to 39 numbers to one Quick Dial number when you need to store them on the dial pad: (Speed Dial), OK, #03, 7, 0, 0, 1 (on page 54.) Dialing access codes and credit card numbers...
... Black Start. Press OK. You can then send the fax message to all your Speed Dial numbers. You can use them both to dial '555-7000' if you need to dial an access code for a cheaper rate long distance carrier. Press OK. Numbers can assign up to 39 numbers to one Quick Dial number when you need to store them on the dial pad: (Speed Dial), OK, #03, 7, 0, 0, 1 (on page 54.) Dialing access codes and credit card numbers...
Users Manual - English
Page 110
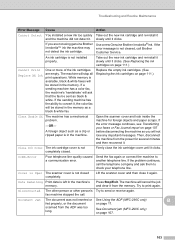
... make a copy to send the color fax again. (See Replacing the ink cartridges on page 111.) Left and Right margins are using the paper support flap. (See Loading paper and other party to reduce the print resolution. (See Printing for Windows® or Printing and Faxing for Macintosh® in the Software User's Guide on the CD-ROM.) When you are cut off. Vertical black lines when receiving. Printing (continued) Difficulty The machine prints dense lines on Brother Photo paper, load one time. Make sure you print...
... make a copy to send the color fax again. (See Replacing the ink cartridges on page 111.) Left and Right margins are using the paper support flap. (See Loading paper and other party to reduce the print resolution. (See Printing for Windows® or Printing and Faxing for Macintosh® in the Software User's Guide on the CD-ROM.) When you are cut off. Vertical black lines when receiving. Printing (continued) Difficulty The machine prints dense lines on Brother Photo paper, load one time. Make sure you print...
Users Manual - English
Page 117
... empty. Document Jam The document was too long. The machine will cancel the job and clear it clicks. (See Replacing the ink cartridges on page 17. slowly until it . If you will be stored in the memory as a black & white fax. If the Innobella™ ink the machine may error message is not installed properly. Customer Service. An ink cartridge is not cleared, call Brother not detect the ink cartridge. Take out the new ink cartridge and re-install it slowly...
... empty. Document Jam The document was too long. The machine will cancel the job and clear it clicks. (See Replacing the ink cartridges on page 17. slowly until it . If you will be stored in the memory as a black & white fax. If the Innobella™ ink the machine may error message is not installed properly. Customer Service. An ink cartridge is not cleared, call Brother not detect the ink cartridge. Take out the new ink cartridge and re-install it slowly...
Users Manual - English
Page 159
... (Error Correction Mode) Detects errors during On-Screen Programming and shows the date and time when the machine is used for small print and graphs. External telephone A telephone that it answered. Fax/Tel You can use this code (l 5 1) when you are stored in a Speed Dial location for copying, scanning and faxing photographs. Fine resolution Resolution is 203 × 196 dpi. For best E quality results Brother recommends Innobella™ Ink and Paper. Journal...
... (Error Correction Mode) Detects errors during On-Screen Programming and shows the date and time when the machine is used for small print and graphs. External telephone A telephone that it answered. Fax/Tel You can use this code (l 5 1) when you are stored in a Speed Dial location for copying, scanning and faxing photographs. Fine resolution Resolution is 203 × 196 dpi. For best E quality results Brother recommends Innobella™ Ink and Paper. Journal...


