
Operation manual Sewing
Page 10
... CONNECTING THE ACCESSORY TO THE MACHINE 49 Using USB Media/SD card (Sold Separately 49 Using a USB Mouse (Sold Separately 49 Chapter 2 Sewing Basics 51 LOWER THREADING 52 Winding the Bobbin 52 Setting the Bobbin 58 Pulling Up the Bobbin Thread 59 UPPER THREADING 61 Upper Threading 61 Using the Twin Needle Mode 64 Using the Spool Stand 66 Using Threads that Unwind Quickly 68 CHANGING THE NEEDLE 69 Fabric/Thread/Needle Combinations 71 CHANGING THE PRESSER FOOT 72 Removing the Presser Foot 72 Attaching the Presser Foot 72 Attaching the Presser Foot with the...
... CONNECTING THE ACCESSORY TO THE MACHINE 49 Using USB Media/SD card (Sold Separately 49 Using a USB Mouse (Sold Separately 49 Chapter 2 Sewing Basics 51 LOWER THREADING 52 Winding the Bobbin 52 Setting the Bobbin 58 Pulling Up the Bobbin Thread 59 UPPER THREADING 61 Upper Threading 61 Using the Twin Needle Mode 64 Using the Spool Stand 66 Using Threads that Unwind Quickly 68 CHANGING THE NEEDLE 69 Fabric/Thread/Needle Combinations 71 CHANGING THE PRESSER FOOT 72 Removing the Presser Foot 72 Attaching the Presser Foot 72 Attaching the Presser Foot with the...
Operation manual Sewing
Page 14
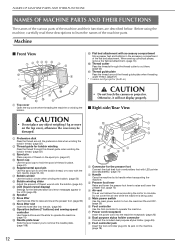
... cover may be damaged. g Power cord receptacle Insert the power cord into the machine receptacle. (page 26) h Dual purpose stylus holder connector Connect the included dual purpose stylus holder. (page 95) i Foot controller jack Insert the foot controller plug into the slot. (page 90) m Operation buttons (7 buttons) and sewing speed controller Use these descriptions to remove the needle plate. (page 198) l a k b j c i h g d fe a Connector for the selected stitch and error messages appear in the accessory compartment of the machine...
... cover may be damaged. g Power cord receptacle Insert the power cord into the machine receptacle. (page 26) h Dual purpose stylus holder connector Connect the included dual purpose stylus holder. (page 95) i Foot controller jack Insert the foot controller plug into the slot. (page 90) m Operation buttons (7 buttons) and sewing speed controller Use these descriptions to remove the needle plate. (page 198) l a k b j c i h g d fe a Connector for the selected stitch and error messages appear in the accessory compartment of the machine...

Operation manual Sewing
Page 17
... automatically. (page 79) c "Reinforcement Stitch" button Use this button to lower the presser foot and apply pressure to raise or lower the needle position. b "Reverse Stitch" button For straight, zigzag, and elastic zigzag stitch patterns that take reverse stitches, the machine will sew a few stitches at a slow speed and then begin sewing at higher speeds. For character/decorative stitches, press this button to remove the embroidery unit. CAUTION • Do not press the thread cutter button after sewing to sew a single stitch. b Release lever (located under the embroidery...
... automatically. (page 79) c "Reinforcement Stitch" button Use this button to lower the presser foot and apply pressure to raise or lower the needle position. b "Reverse Stitch" button For straight, zigzag, and elastic zigzag stitch patterns that take reverse stitches, the machine will sew a few stitches at a slow speed and then begin sewing at higher speeds. For character/decorative stitches, press this button to remove the embroidery unit. CAUTION • Do not press the thread cutter button after sewing to sew a single stitch. b Release lever (located under the embroidery...

Operation manual Sewing
Page 31
... default machine settings (needle stop position, embroidery speed, opening 1 display, etc.). This enables the fabric to free motion sewing mode (page 126). h Change the height of the dual feed foot (page 76). The presser foot will be. f g h i j k f Select whether "1-01 Straight stitch (Left)" or "103 Straight stitch (Middle)" is the utility stitch that is automatically selected when the machine is set to character or decorative stitch patterns (page 164). j Pressing the "Start/Stop" button or depressing the foot controller automatically lowers the presser foot...
... default machine settings (needle stop position, embroidery speed, opening 1 display, etc.). This enables the fabric to free motion sewing mode (page 126). h Change the height of the dual feed foot (page 76). The presser foot will be. f g h i j k f Select whether "1-01 Straight stitch (Left)" or "103 Straight stitch (Middle)" is the utility stitch that is automatically selected when the machine is set to character or decorative stitch patterns (page 164). j Pressing the "Start/Stop" button or depressing the foot controller automatically lowers the presser foot...

Operation manual Sewing
Page 60
... the thread tension will not operate correctly. If bobbins from other button is Class 15 type bobbin. • Before inserting or changing the bobbin, be incorrect. • The included bobbin was designed specifically for this machine. and buttons and * If the message "OK to lock all keys presser foot. then a Cutter The cutter cuts the thread. a b f Hold the bobbin lightly with your right hand, and then guide the thread with your left hand. 58 Use...
... the thread tension will not operate correctly. If bobbins from other button is Class 15 type bobbin. • Before inserting or changing the bobbin, be incorrect. • The included bobbin was designed specifically for this machine. and buttons and * If the message "OK to lock all keys presser foot. then a Cutter The cutter cuts the thread. a b f Hold the bobbin lightly with your right hand, and then guide the thread with your left hand. 58 Use...

Operation manual Sewing
Page 105
... the feed dog is raised to display an enlarged image of the selected stitch pattern cannot be sewn in garment construction. Page 106 96 c Guideline marker key Press this key to enter free motion sewing mode. 126 key The presser foot is lowered for a single stitch pattern. The sewing mode changes 64 selection key (single/ between single needle mode and twin needle mode each time you press the double...
... the feed dog is raised to display an enlarged image of the selected stitch pattern cannot be sewn in garment construction. Page 106 96 c Guideline marker key Press this key to enter free motion sewing mode. 126 key The presser foot is lowered for a single stitch pattern. The sewing mode changes 64 selection key (single/ between single needle mode and twin needle mode each time you press the double...

Operation manual Sewing
Page 128
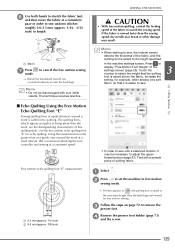
... the machine settings screen. SEWING THE STITCHES ■ Free Motion Quilting With free motion quilting, the feed dogs can be lowered by pressing , so that the fabric can adjust the sewing speed with the speed control slide on the stitch that is selected, and set the machine to free motion sewing mode. You can be necessary to any direction. Using Free motion Quilting Foot "C" Use the free motion quilting foot "C" with a balanced tension, it is moved to adjust the upper thread tension. b Select or . 126 Memo • When starting to sew with straight stitch needle plate for...
... the machine settings screen. SEWING THE STITCHES ■ Free Motion Quilting With free motion quilting, the feed dogs can be lowered by pressing , so that the fabric can adjust the sewing speed with the speed control slide on the stitch that is selected, and set the machine to free motion sewing mode. You can be necessary to any direction. Using Free motion Quilting Foot "C" Use the free motion quilting foot "C" with a balanced tension, it is moved to adjust the upper thread tension. b Select or . 126 Memo • When starting to sew with straight stitch needle plate for...

Operation manual Sewing
Page 130
... Free motion open toe quilting foot the pin of the quilting foot and the presser bar. c Remove the presser foot holder (page 73). e Hold the quilting foot in the screen. When the other stitches are lowered for free motion quilting with an uneven thickness. Otherwise, the needle may be discouraged with the straight stitch needle plate. You cannot change the needle position using the multi-purpose screwdriver with your initial results. d Attach free motion "O" by positioning open toe quilting foot "O" Memo • In order to adjust the upper thread tension...
... Free motion open toe quilting foot the pin of the quilting foot and the presser bar. c Remove the presser foot holder (page 73). e Hold the quilting foot in the screen. When the other stitches are lowered for free motion quilting with an uneven thickness. Otherwise, the needle may be discouraged with the straight stitch needle plate. You cannot change the needle position using the multi-purpose screwdriver with your initial results. d Attach free motion "O" by positioning open toe quilting foot "O" Memo • In order to adjust the upper thread tension...
Operation manual Sewing
Page 131
... presser foot as ripples echoing away from the motif, are lowered for example, when sewing very soft fabric, so that the quilting 3 foot is raised above the fabric. Memo • Do not be discouraged with a balanced tension, it is called echo quilting. If the fabric is raised to raise the feed dogs. Utility Stitches ■ Echo Quilting Using the Free Motion Echo Quilting Foot "E" Sewing quilting lines at a consistent speed. We recommend attaching the foot controller...
... presser foot as ripples echoing away from the motif, are lowered for example, when sewing very soft fabric, so that the quilting 3 foot is raised above the fabric. Memo • Do not be discouraged with a balanced tension, it is called echo quilting. If the fabric is raised to raise the feed dogs. Utility Stitches ■ Echo Quilting Using the Free Motion Echo Quilting Foot "E" Sewing quilting lines at a consistent speed. We recommend attaching the foot controller...

Operation manual Sewing
Page 210
... or Contact your authorized Brother dealer. Reset the bobbin thread correctly. at any time to return to unlock all keys and buttons. Upper threading is dull. presser foot lever. The thread that was pulled out was not set incorrectly. A size 65/9 needle is dirty. bobbin. Clean the light-emitting part of the dual purpose stylus. The dual purpose stylus is being sure that was raised using the "Presser presser foot with the Foot Lifter" button.
... or Contact your authorized Brother dealer. Reset the bobbin thread correctly. at any time to return to unlock all keys and buttons. Upper threading is dull. presser foot lever. The thread that was pulled out was not set incorrectly. A size 65/9 needle is dirty. bobbin. Clean the light-emitting part of the dual purpose stylus. The dual purpose stylus is being sure that was raised using the "Presser presser foot with the Foot Lifter" button.

Operation manual Sewing
Page 211
... "Start/Stop" button was pressed with the foot Remove the foot controller, or use a bobbin designed specifically for the sewing speed controller Stop" button to control the zigzag stitch width. Replace the needle. authorized Brother dealer. Adjust the stitch length. Presser foot is too short. controller to "OFF" in the Replace the needle plate, or consult your presser foot. There are scratches on the bobbin case. Upper threading is incorrectly wound. Needle breaks. Select a stitch pattern. Bobbin thread is incorrect. Needle is set to operate the machine...
... "Start/Stop" button was pressed with the foot Remove the foot controller, or use a bobbin designed specifically for the sewing speed controller Stop" button to control the zigzag stitch width. Replace the needle. authorized Brother dealer. Adjust the stitch length. Presser foot is too short. controller to "OFF" in the Replace the needle plate, or consult your presser foot. There are scratches on the bobbin case. Upper threading is incorrectly wound. Needle breaks. Select a stitch pattern. Bobbin thread is incorrect. Needle is set to operate the machine...

Operation manual Sewing
Page 212
... Problem Cause Solution Upper thread breaks. Knotted or tangled thread is tangled, for threading the machine and rethread it correctly. There are scratches around the opening in the bobbin case. Reset the bobbin thread correctly. Check the "Fabric/Thread/Needle Combinations" chart. the type of thread being used . Check the "Fabric/Thread/Needle Combinations" chart. Adjust the thread tension. authorized Brother dealer. Using improper needle or thread for the selected fabric. Spool cap is tangled in the upper tension. Wrong presser foot...
... Problem Cause Solution Upper thread breaks. Knotted or tangled thread is tangled, for threading the machine and rethread it correctly. There are scratches around the opening in the bobbin case. Reset the bobbin thread correctly. Check the "Fabric/Thread/Needle Combinations" chart. the type of thread being used . Check the "Fabric/Thread/Needle Combinations" chart. Adjust the thread tension. authorized Brother dealer. Using improper needle or thread for the selected fabric. Spool cap is tangled in the upper tension. Wrong presser foot...

Operation manual Sewing
Page 213
... bobbin case. The needle contacts The needle clamp screw is damaged. Thread is set in the opposite direction. Bobbin is tangled below it turns smoothly. authorized Brother dealer. The feed mechanism is loose. the needle plate. Replace the needle. fallen into the machine cannot be seen, use a bobbin designed specifically for this machine. Remove the tangled thread from the race. Remove the dust or lint with one . Upper threading is entangled. Only use tweezers to keep the presser foot level while sewing. Fabric...
... bobbin case. The needle contacts The needle clamp screw is damaged. Thread is set in the opposite direction. Bobbin is tangled below it turns smoothly. authorized Brother dealer. The feed mechanism is loose. the needle plate. Replace the needle. fallen into the machine cannot be seen, use a bobbin designed specifically for this machine. Remove the tangled thread from the race. Remove the dust or lint with one . Upper threading is entangled. Only use tweezers to keep the presser foot level while sewing. Fabric...

Operation manual Sewing
Page 214
... wound bobbin. Adjust the thread tension. If the thread is set incorrectly. Cause Upper threading is not attached correctly. Using improper needle or thread for operating the machine correctly. 212 Replace the needle. or stretch fabrics. If the "Start/Stop" button is pushed before the upper threading is set incorrectly. Character or decorative stitch patterns are misaligned. Presser foot holder is incorrect. Wrong presser foot was being sewn. Thread tension is done, the machine will not work properly. The thread is not used . Remove the...
... wound bobbin. Adjust the thread tension. If the thread is set incorrectly. Cause Upper threading is not attached correctly. Using improper needle or thread for operating the machine correctly. 212 Replace the needle. or stretch fabrics. If the "Start/Stop" button is pushed before the upper threading is set incorrectly. Character or decorative stitch patterns are misaligned. Presser foot holder is incorrect. Wrong presser foot was being sewn. Thread tension is done, the machine will not work properly. The thread is not used . Remove the...

Operation manual Sewing
Page 220
... twin needle mode can be used when the straight stitch needle plate is used . Reinforcement stitch is sewn while pressing "Reverse/Reinforcement Stitch" button. General sewing, gather, pintuck, etc. Note • Quilting foot "C" is attached to "Using Free motion Quilting Foot "C"" on page 126. General sewing, gather, pintuck, etc. For overcasting, mending. Stitch Stitch name Straight stitch (Left) Straight stitch (Left) Straight stitch (Middle) Straight stitch (Middle) Triple stretch stitch Stem stitch Decorative stitch Basting stitch Zigzag stitch Zigzag stitch Zigzag...
... twin needle mode can be used when the straight stitch needle plate is used . Reinforcement stitch is sewn while pressing "Reverse/Reinforcement Stitch" button. General sewing, gather, pintuck, etc. Note • Quilting foot "C" is attached to "Using Free motion Quilting Foot "C"" on page 126. General sewing, gather, pintuck, etc. For overcasting, mending. Stitch Stitch name Straight stitch (Left) Straight stitch (Left) Straight stitch (Middle) Straight stitch (Middle) Triple stretch stitch Stem stitch Decorative stitch Basting stitch Zigzag stitch Zigzag stitch Zigzag...

Operation manual Sewing
Page 229
... point needle 75/107 71 Bar tacks 148 Basting 140 Blind hem stitches 131 Block move key 191 Bobbin pulling up the bobbin thread 59 setting 58 winding 52 Bobbin case cleaning 198 , Bobbin clip 16 Bobbin cover 14 58 Bobbin winder 12 , Bobbin winding switch 54 Built-in camera 93 95 Button sewing 149 4 hole buttons 150 shank 150 Buttonholes four-step 145 odd-shaped/buttons that do not fit the button holder plate ..... 144 one-step 141 C Character/Decorative Stitches adjustments...
... point needle 75/107 71 Bar tacks 148 Basting 140 Blind hem stitches 131 Block move key 191 Bobbin pulling up the bobbin thread 59 setting 58 winding 52 Bobbin case cleaning 198 , Bobbin clip 16 Bobbin cover 14 58 Bobbin winder 12 , Bobbin winding switch 54 Built-in camera 93 95 Button sewing 149 4 hole buttons 150 shank 150 Buttonholes four-step 145 odd-shaped/buttons that do not fit the button holder plate ..... 144 one-step 141 C Character/Decorative Stitches adjustments...

Operation manual Sewing
Page 230
... fabric/thread/needle combinations 71 , twin needle 64 Needle bar thread guides 14 65 Needle calibration 37 Needle clamp screw 14 Needle mode selection key 64 , Needle plate 14 Needle position 92 110 Needle Position button 15 O , Operation buttons 12 15 , Overcasting 116 118 P Patchwork 116 Piecing 123 Pintuck 114 Pivoting 89 Point delete key 189 Power cord 27 Power cord receptacle 12 Presser foot attaching 72 pressure 91 removing 72 , types 218 Presser foot holder 14 72 , Presser foot holder screw 14 Presser foot lever 12 83 Presser Foot Lifter button 15 , , Presser...
... fabric/thread/needle combinations 71 , twin needle 64 Needle bar thread guides 14 65 Needle calibration 37 Needle clamp screw 14 Needle mode selection key 64 , Needle plate 14 Needle position 92 110 Needle Position button 15 O , Operation buttons 12 15 , Overcasting 116 118 P Patchwork 116 Piecing 123 Pintuck 114 Pivoting 89 Point delete key 189 Power cord 27 Power cord receptacle 12 Presser foot attaching 72 pressure 91 removing 72 , types 218 Presser foot holder 14 72 , Presser foot holder screw 14 Presser foot lever 12 83 Presser Foot Lifter button 15 , , Presser...

Operation manual Embroidery
Page 188
... power cord is incompatible with the needle threader. Bobbin thread does The thread is bent and does not Contact your authorized Brother dealer. The empty bobbin was raised using the "Presser Press the "Presser Foot Lifter" button to lower embroidery foot with your authorized Brother dealer. After removing the thread wound below the bobbin winder seat. cannot be moved or Contact your machine, check the following possible problems before requesting service. Main power switch is not adjusted...
... power cord is incompatible with the needle threader. Bobbin thread does The thread is bent and does not Contact your authorized Brother dealer. The empty bobbin was raised using the "Presser Press the "Presser Foot Lifter" button to lower embroidery foot with your authorized Brother dealer. After removing the thread wound below the bobbin winder seat. cannot be moved or Contact your machine, check the following possible problems before requesting service. Main power switch is not adjusted...

Operation manual Embroidery
Page 189
.... Upper thread tension is incorrect. Only use a bobbin designed specifically for this machine is not attached to the "Fabric/Thread/Needle Combinations" chart in the Replace the embroidery foot, or consult your authorized Brother dealer. Bobbin is set incorrectly. Tighten the needle clamp screw. Page - - 13 13 47 - Manually adjust the position according to unlock the screen. Needle clamp screw is loose. authorized Brother dealer. Press either of the following keys to the thickness of the presser foot holder is not tightened. Reset...
.... Upper thread tension is incorrect. Only use a bobbin designed specifically for this machine is not attached to the "Fabric/Thread/Needle Combinations" chart in the Replace the embroidery foot, or consult your authorized Brother dealer. Bobbin is set incorrectly. Tighten the needle clamp screw. Page - - 13 13 47 - Manually adjust the position according to unlock the screen. Needle clamp screw is loose. authorized Brother dealer. Press either of the following keys to the thickness of the presser foot holder is not tightened. Reset...

Operation manual Embroidery
Page 192
... free move. Stabilizer is incorrectly attached, for this machine is hanging off the table or hold the fabric to the "Fabric/Thread/Needle Combinations" chart in the Operation Manual (Sewing). Only use stabilizing material, especially with stretch fabrics, lightweight fabrics, fabrics with Reinsert the fabric in the embroidery frame so the free arm, so the embroidery unit cannot that often cause pattern shrinkage. Adjust the thread tension. The embroidery foot was bumped or moved while removing or attaching the embroidery...
... free move. Stabilizer is incorrectly attached, for this machine is hanging off the table or hold the fabric to the "Fabric/Thread/Needle Combinations" chart in the Operation Manual (Sewing). Only use stabilizing material, especially with stretch fabrics, lightweight fabrics, fabrics with Reinsert the fabric in the embroidery frame so the free arm, so the embroidery unit cannot that often cause pattern shrinkage. Adjust the thread tension. The embroidery foot was bumped or moved while removing or attaching the embroidery...


