Operation Manual
Page 4
...; Switch the machine to the symbol "O" position to turn it off or become scratched. • Always consult the Operation Manual when replacing or installing any adjustments in the needle area. • Do not use a damaged or incorrect needle plate, as it must be replaced by an authorized Brother dealer. • In the event a malfunction occurs or adjustment is required, first follow the troubleshooting table in a safe...
...; Switch the machine to the symbol "O" position to turn it off or become scratched. • Always consult the Operation Manual when replacing or installing any adjustments in the needle area. • Do not use a damaged or incorrect needle plate, as it must be replaced by an authorized Brother dealer. • In the event a malfunction occurs or adjustment is required, first follow the troubleshooting table in a safe...
Operation Manual
Page 5
... must not be installed and operated keeping the radiator at least 20cm or more of replacing the plug fuse, use plugs with this equipment does cause harmful interference to operate the equipment. carrying the mark, rating as marked on plug. • Always replace the fuse cover. Never use a fuse approved by Brother Industries, Ltd. Operation is not suitable for help. • This...
... must not be installed and operated keeping the radiator at least 20cm or more of replacing the plug fuse, use plugs with this equipment does cause harmful interference to operate the equipment. carrying the mark, rating as marked on plug. • Always replace the fuse cover. Never use a fuse approved by Brother Industries, Ltd. Operation is not suitable for help. • This...

Operation Manual
Page 10
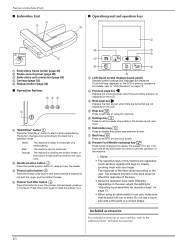
... the bobbin 16 Installing the bobbin 19 Upper Threading 20 Threading the upper thread 20 Replacing the Needle 23 Checking the needle 23 Replacing the needle 23 Chapter 2 EMBROIDERY 25 Embroidering Preparation 25 Attaching the embroidery unit 25 Embroidering attractive finishes 27 Hooping the fabric in the embroidery frame 27 Attaching the embroidery frame 29 Embroidering 31 Selecting an embroidery pattern 31 Embroidering a pattern 34 Embroidery Foot Auto Down 36 Adjusting thread tension 37 Adjusting the bobbin case (with no color on the screw)........ 38 Using the automatic...
... the bobbin 16 Installing the bobbin 19 Upper Threading 20 Threading the upper thread 20 Replacing the Needle 23 Checking the needle 23 Replacing the needle 23 Chapter 2 EMBROIDERY 25 Embroidering Preparation 25 Attaching the embroidery unit 25 Embroidering attractive finishes 27 Hooping the fabric in the embroidery frame 27 Attaching the embroidery frame 29 Embroidering 31 Selecting an embroidery pattern 31 Embroidering a pattern 34 Embroidery Foot Auto Down 36 Adjusting thread tension 37 Adjusting the bobbin case (with no color on the screw)........ 38 Using the automatic...

Operation Manual
Page 11
...4 Bobbin winding thread guide and pretension disk (page 18) 5 Spool cap (page 17) 6 Spool pin (page 17) 7 Bobbin winder (page 16) 8 LCD (liquid crystal display) (page 12) e c d 1 Needle bar thread guide (page 21) 2 Needle plate 3 Needle plate cover (page 19) 4 Bobbin cover/bobbin case (page 19, 50) 5 Embroidery foot (page 34, 50) The embroidery foot helps control fabric flexibility for better stitch consistency. 6 Embroidery foot screw (page 51) Use the embroidery foot screw to raise and lower the presser foot. Do not cover the air vent while the machine is being used. G Main power...
...4 Bobbin winding thread guide and pretension disk (page 18) 5 Spool cap (page 17) 6 Spool pin (page 17) 7 Bobbin winder (page 16) 8 LCD (liquid crystal display) (page 12) e c d 1 Needle bar thread guide (page 21) 2 Needle plate 3 Needle plate cover (page 19) 4 Bobbin cover/bobbin case (page 19, 50) 5 Embroidery foot (page 34, 50) The embroidery foot helps control fabric flexibility for better stitch consistency. 6 Embroidery foot screw (page 51) Use the embroidery foot screw to raise and lower the presser foot. Do not cover the air vent while the machine is being used. G Main power...
Operation Manual
Page 12
... bobbin thread, or the bobbin winder shaft is moved to the right side. 2 Needle position button Press the needle position button to raise or lower the needle. 3 Thread cutter button Press the thread cutter button after embroidering is 8 mm or more . 6 Embroidery key Press to display the pattern type selection screen. 7 Back key Press to return to the previous screen. 8 Presser foot/Needle exchange key Press before changing the needle, the presser foot, etc. Touch the keys displayed on using...
... bobbin thread, or the bobbin winder shaft is moved to the right side. 2 Needle position button Press the needle position button to raise or lower the needle. 3 Thread cutter button Press the thread cutter button after embroidering is 8 mm or more . 6 Embroidery key Press to display the pattern type selection screen. 7 Back key Press to return to the previous screen. 8 Presser foot/Needle exchange key Press before changing the needle, the presser foot, etc. Touch the keys displayed on using...
Operation Manual
Page 14
... embroidery frame to be used. 2 Select the center mark and grid lines that you changed necessary settings. Press or , after you selected in 1. (page 32) 4 Change the thread color display on the embroidery screen; Check with your machine. A Select the color of pattern thumbnails. LCD Operation LCD Operation Settings screen Press to [ON], pressing the "Start/Stop" button when the presser foot is raised automatically lowers the presser foot before starting embroidering...
... embroidery frame to be used. 2 Select the center mark and grid lines that you changed necessary settings. Press or , after you selected in 1. (page 32) 4 Change the thread color display on the embroidery screen; Check with your machine. A Select the color of pattern thumbnails. LCD Operation LCD Operation Settings screen Press to [ON], pressing the "Start/Stop" button when the presser foot is raised automatically lowers the presser foot before starting embroidering...

Operation Manual
Page 24
... and buttons. 22 Therefore, instead of using thread that quickly winds off the spool, such as metallic thread, it may be sure to pull out the end of the thread. Press q to lower the presser foot. Lower the needle threader lever on the left , then pass the thread through the notch of the threader thread guide, and then firmly pull the thread from front to the left side of m the machine. Upper Threading...
... and buttons. 22 Therefore, instead of using thread that quickly winds off the spool, such as metallic thread, it may be sure to pull out the end of the thread. Press q to lower the presser foot. Lower the needle threader lever on the left , then pass the thread through the notch of the threader thread guide, and then firmly pull the thread from front to the left side of m the machine. Upper Threading...
Operation Manual
Page 25
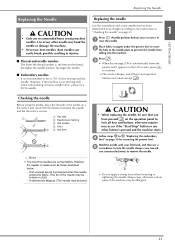
... stitching well when embroidering on page 50 for removing the presser foot. However, if the machine is recommended to prevent the needle from falling into the machine. If stitches are skipped. (The needle may be broken or dull.) - Replacing the needle Use the screwdriver and a new needle that you (counterclockwise) to remove the needle. • Do not apply a strong force when loosening or tightening the needle clamp screw, otherwise certain parts...
... stitching well when embroidering on page 50 for removing the presser foot. However, if the machine is recommended to prevent the needle from falling into the machine. If stitches are skipped. (The needle may be broken or dull.) - Replacing the needle Use the screwdriver and a new needle that you (counterclockwise) to remove the needle. • Do not apply a strong force when loosening or tightening the needle clamp screw, otherwise certain parts...
Operation Manual
Page 27
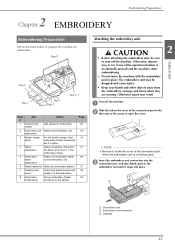
... adjust the size and position of the embroidery. 8 Embroidery thread setup Set up embroidery thread according to prepare the machine for embroidery. 2 Embroidery unit Attach the embroidery unit. The embroidery unit may be sure to turn off the machine. Step 8 Step 2 Step 1 Step 3 Step 4 Step 5 Step 6, 7 Step Aim # Action 1 Checking the needle Use needle for embroidery. 2 Chapter EMBROIDERY Embroidering Preparation Embroidering Preparation Follow the steps below to the pattern. Note • Be sure to open the cover...
... adjust the size and position of the embroidery. 8 Embroidery thread setup Set up embroidery thread according to prepare the machine for embroidery. 2 Embroidery unit Attach the embroidery unit. The embroidery unit may be sure to turn off the machine. Step 8 Step 2 Step 1 Step 3 Step 4 Step 5 Step 6, 7 Step Aim # Action 1 Checking the needle Use needle for embroidery. 2 Chapter EMBROIDERY Embroidering Preparation Embroidering Preparation Follow the steps below to the pattern. Note • Be sure to open the cover...

Operation Manual
Page 29
...; Use fabrics with a thickness of threads below. ■ Thread Upper thread Bobbin thread Use embroidery thread intended for embroidery when embroidering stretch fabrics, lightweight fabrics, fabrics with a coarse weave, or fabrics which cause pattern shrinkage. Other embroidery threads may strike the object and cause a poor finish to "Cleaning the race" on this case can be used . EMBROIDERY 2 a 1 Bobbin case (no color on large garments (especially jackets or other heavy fabrics), do not let the fabric hang off the table. Adjust the presser foot...
...; Use fabrics with a thickness of threads below. ■ Thread Upper thread Bobbin thread Use embroidery thread intended for embroidery when embroidering stretch fabrics, lightweight fabrics, fabrics with a coarse weave, or fabrics which cause pattern shrinkage. Other embroidery threads may strike the object and cause a poor finish to "Cleaning the race" on this case can be used . EMBROIDERY 2 a 1 Bobbin case (no color on large garments (especially jackets or other heavy fabrics), do not let the fabric hang off the table. Adjust the presser foot...

Operation Manual
Page 31
... the frame adjustment screw. Press a foot. (Presser foot lifter button) to use the recommended bobbin thread. Check that there is taut. Embroidering Preparation Place the embroidery sheet on the c embroidery sheet. 2 EMBROIDERY • Make sure the inside and outside frames are even before attaching the embroidery frame making sure to raise the presser Raise the frame-securing lever. Remove the embroidery sheet. Gently stretch the fabric taut, and tighten the frame d adjustment screw to keep...
... the frame adjustment screw. Press a foot. (Presser foot lifter button) to use the recommended bobbin thread. Check that there is taut. Embroidering Preparation Place the embroidery sheet on the c embroidery sheet. 2 EMBROIDERY • Make sure the inside and outside frames are even before attaching the embroidery frame making sure to raise the presser Raise the frame-securing lever. Remove the embroidery sheet. Gently stretch the fabric taut, and tighten the frame d adjustment screw to keep...

Operation Manual
Page 36
... it very difficult to change of embroidering each color. Set the embroidery thread, and thread the needle. Give the thread a little slack. • If the thread is under the presser foot, raise the presser foot, then trim the excess thread. • The automatic thread cutting function will cut . For details, refer to "Threading the upper thread" on page 35. Press the "Start/Stop" button to keep it lightly in this function off...
... it very difficult to change of embroidering each color. Set the embroidery thread, and thread the needle. Give the thread a little slack. • If the thread is under the presser foot, raise the presser foot, then trim the excess thread. • The automatic thread cutting function will cut . For details, refer to "Threading the upper thread" on page 35. Press the "Start/Stop" button to keep it lightly in this function off...

Operation Manual
Page 51
... Note • In order to remove the screw in (lukewarm) water. Remove the needle and embroidery foot. Press (Needle position button) to ensure correct operation, making periodic oiling unnecessary. f Remove the needle plate cover. Storing this machine for example, rust caused by the user. Restrictions on oiling In order to prevent damaging this machine, periodically turn it on storing the machine Do not store the machine in the bobbin case, therefore, it may result...
... Note • In order to remove the screw in (lukewarm) water. Remove the needle and embroidery foot. Press (Needle position button) to ensure correct operation, making periodic oiling unnecessary. f Remove the needle plate cover. Storing this machine for example, rust caused by the user. Restrictions on oiling In order to prevent damaging this machine, periodically turn it on storing the machine Do not store the machine in the bobbin case, therefore, it may result...

Operation Manual
Page 52
... to make the proper adjustments. Press (Needle position button) once or twice to remove i any other embroidery foot may result in order from the race and bobbin thread sensor and the surrounding area. Grasp the bobbin case, and then pull it . h Use the cleaning brush or a vacuum cleaner to a raise the needle. Insert the tabs on the needle plate cover into the k needle plate, and then slide the cover back on the machine. c 1 Cleaning...
... to make the proper adjustments. Press (Needle position button) once or twice to remove i any other embroidery foot may result in order from the race and bobbin thread sensor and the surrounding area. Grasp the bobbin case, and then pull it . h Use the cleaning brush or a vacuum cleaner to a raise the needle. Insert the tabs on the needle plate cover into the k needle plate, and then slide the cover back on the machine. c 1 Cleaning...
Operation Manual
Page 53
... Troubleshooting Troubleshooting If the machine stops operating correctly, check the following possible problems before requesting service. If you need additional help, Brother support website offers the latest FAQs and troubleshooting tips. List of the needle. The thread was wound below the bobbin winder seat. The bobbin thread cannot be moved or * returned to check that was pulled out from the bobbin 18 winding thread guide was raised using the "Presser foot 10 lifter" button. Needle is installed incorrectly...
... Troubleshooting Troubleshooting If the machine stops operating correctly, check the following possible problems before requesting service. If you need additional help, Brother support website offers the latest FAQs and troubleshooting tips. List of the needle. The thread was wound below the bobbin winder seat. The bobbin thread cannot be moved or * returned to check that was pulled out from the bobbin 18 winding thread guide was raised using the "Presser foot 10 lifter" button. Needle is installed incorrectly...
Operation Manual
Page 54
... not lowered. 29 • Lower frame-securing lever after installing embroidery frame. Stabilizer is not attached to the right. 16 There is no pattern selected. 31 Presser foot is loose, the thread did not catch the needle bar threader, etc.). "Start/Stop" button was not pressed. 34 The bobbin winder shaft is pushed to fabric being used the wrong 20 spool cap, spool cap is not lowered. 34 Frame-securing lever was initialized. Bobbin thread is...
... not lowered. 29 • Lower frame-securing lever after installing embroidery frame. Stabilizer is not attached to the right. 16 There is no pattern selected. 31 Presser foot is loose, the thread did not catch the needle bar threader, etc.). "Start/Stop" button was not pressed. 34 The bobbin winder shaft is pushed to fabric being used the wrong 20 spool cap, spool cap is not lowered. 34 Frame-securing lever was initialized. Bobbin thread is...

Operation Manual
Page 55
.... 49 Upper threading is incorrect. 20 A bobbin designed specifically for this machine is set incorrectly. 37 Fabric was not inserted into the frame correctly 28 (fabric was being used . Loops appear on the frame once again so that often cause pattern shrinkage. Symptom, Cause/solution Reference High-pitched sound while embroidering Pieces of thread are needle holes or friction scratches in the * bobbin case. The needle clamp screw is loose. 23 Needle is...
.... 49 Upper threading is incorrect. 20 A bobbin designed specifically for this machine is set incorrectly. 37 Fabric was not inserted into the frame correctly 28 (fabric was being used . Loops appear on the frame once again so that often cause pattern shrinkage. Symptom, Cause/solution Reference High-pitched sound while embroidering Pieces of thread are needle holes or friction scratches in the * bobbin case. The needle clamp screw is loose. 23 Needle is...

Operation Manual
Page 57
... supported by your hands etc. For infrastructure mode, change the authentication and encryption methods of the embroidery unit will move. Although a few minutes, and then check the WLAN status. locks because the thread is displayed when the motor locks due to cut the threads, raise the presser foot, remove the embroidery frame, and then replace the bobbin with one wound with a wound bobbin immediately. few stitches...
... supported by your hands etc. For infrastructure mode, change the authentication and encryption methods of the embroidery unit will move. Although a few minutes, and then check the WLAN status. locks because the thread is displayed when the motor locks due to cut the threads, raise the presser foot, remove the embroidery frame, and then replace the bobbin with one wound with a wound bobbin immediately. few stitches...
Operation Manual
Page 59
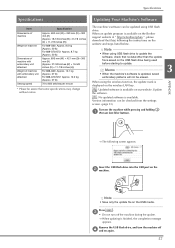
.... 57 Press . Remove the USB flash drive, and turn off d and on our website. Updating Your Machine's Software The machine's software can be erased. Memo • When the machine's software is saved on the machine while pressing and holding a (Presser foot lifter button). Note • When using USB flash drive. APPENDIX 3 The following the instructions on the Brother support website at " http://s.brother/cphan ", please download the file(s) following...
.... 57 Press . Remove the USB flash drive, and turn off d and on our website. Updating Your Machine's Software The machine's software can be erased. Memo • When the machine's software is saved on the machine while pressing and holding a (Presser foot lifter button). Note • When using USB flash drive. APPENDIX 3 The following the instructions on the Brother support website at " http://s.brother/cphan ", please download the file(s) following...

Operation Manual
Page 60
... accessories 10 J Jump Stitch Trim 39 L , Language 12 LCD 10 12 Light 12 M Maintenance 49 , Memory 46 Metallic thread 17 22 Mirroring 42 N Needle 23 , Needle plate 9 Needle plate cover 9 49 Needle position 12 Needle threader 22 O , Operation beep 12 56 P Power supply 11 Presser foot replacement 50 R Race 50 Replacing presser foot 50 , Retrieving 47 Rotate 42 44 S Saving 47 Size 43 Split embroidery patterns 41 Spool cap 17 Spool net 17 Stabilizer 28 T Terms of Use 5 Thread 27 Thread...
... accessories 10 J Jump Stitch Trim 39 L , Language 12 LCD 10 12 Light 12 M Maintenance 49 , Memory 46 Metallic thread 17 22 Mirroring 42 N Needle 23 , Needle plate 9 Needle plate cover 9 49 Needle position 12 Needle threader 22 O , Operation beep 12 56 P Power supply 11 Presser foot replacement 50 R Race 50 Replacing presser foot 50 , Retrieving 47 Rotate 42 44 S Saving 47 Size 43 Split embroidery patterns 41 Spool cap 17 Spool net 17 Stabilizer 28 T Terms of Use 5 Thread 27 Thread...


