
Operation Manual for Premium Pack I Optional accessories
Page 3
.... (page 23) • Embroidering patterns for bobbin work embroidery patterns or sew using decorative thread or ribbon too thick to flow freely through the needle. (page 5) • Positioning of character patterns has been added to the procedure outlined in the LCD screen. Additional new machine features and instructions are included, allowing you to embroider the added bobbin work ) are located in this upgrade Operation Manual. BEFORE YOU START It is important to...
.... (page 23) • Embroidering patterns for bobbin work embroidery patterns or sew using decorative thread or ribbon too thick to flow freely through the needle. (page 5) • Positioning of character patterns has been added to the procedure outlined in the LCD screen. Additional new machine features and instructions are included, allowing you to embroider the added bobbin work ) are located in this upgrade Operation Manual. BEFORE YOU START It is important to...
Operation Manual for Premium Pack I Optional accessories
Page 6
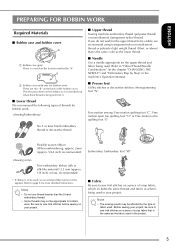
...; Upper thread Sewing machine embroidery thread (polyester thread) or monofilament (transparent nylon) thread. b Bobbin cover with tabs (for bobbin work ) There are ribs "B" on the bobbin so it . ■ Lower thread We recommend the following types of threads for the upper thread to "Fabric/Thread/Needle Combinations" (in the chapter "CHANGING THE NEEDLE") and "Embroidery Step by Step" in the machine's Operation Manual. ■ Presser foot Utility stitches or decorative stitches: Monogramming foot "N" Free motion sewing: Free motion quilting foot "C", Free motion open toe quilting foot...
...; Upper thread Sewing machine embroidery thread (polyester thread) or monofilament (transparent nylon) thread. b Bobbin cover with tabs (for bobbin work ) There are ribs "B" on the bobbin so it . ■ Lower thread We recommend the following types of threads for the upper thread to "Fabric/Thread/Needle Combinations" (in the chapter "CHANGING THE NEEDLE") and "Embroidery Step by Step" in the machine's Operation Manual. ■ Presser foot Utility stitches or decorative stitches: Monogramming foot "N" Free motion sewing: Free motion quilting foot "C", Free motion open toe quilting foot...
Operation Manual for Premium Pack I Optional accessories
Page 9
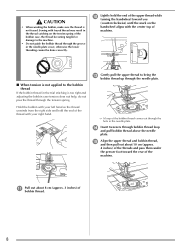
... the end of the upper thread while turning the handwheel toward the rear of bobbin thread. 8 m Gently pull the upper thread to the machine. • Do not guide the bobbin thread through the hole in the needle plate cover, otherwise the lower threading cannot be done correctly. CAUTION • When winding the bobbin, make sure the thread is too tight and adjusting the bobbin case tension does not help, do not pass the thread through the tension spring.
... the end of the upper thread while turning the handwheel toward the rear of bobbin thread. 8 m Gently pull the upper thread to the machine. • Do not guide the bobbin thread through the hole in the needle plate cover, otherwise the lower threading cannot be done correctly. CAUTION • When winding the bobbin, make sure the thread is too tight and adjusting the bobbin case tension does not help, do not pass the thread through the tension spring.
Operation Manual for Premium Pack I Optional accessories
Page 12
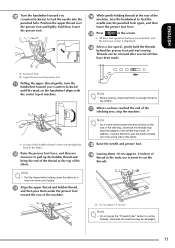
... "Thread Cutter" button to cut the threads, otherwise the machine may break. Note • Pull the thread while holding threads at the end of the stitching, otherwise the threads may become tangled or the needle may be difficult to pull the bobbin thread up the bobbin thread and bring the end of the thread to feed the needle into the punched hole again, and then lower the presser foot lever. m Align the upper thread and bobbin thread...
... "Thread Cutter" button to cut the threads, otherwise the machine may break. Note • Pull the thread while holding threads at the end of the stitching, otherwise the threads may become tangled or the needle may be difficult to pull the bobbin thread up the bobbin thread and bring the end of the thread to feed the needle into the punched hole again, and then lower the presser foot lever. m Align the upper thread and bobbin thread...

Operation Manual
Page 8
... the embroidery position can be changed while the desired thread density is sewn using the special bobbin case (gray) included with normal pattern resizing. See Operation Manual Addendum. 6 OUTSTANDING FEATURES Display the Fabric While Aligning the Embroidering Position Expand Your Creativity With Bobbin Work Example with decorative stitches The fabric hooped in addition to starting/stopping sewing, such as thread cutting and reverse stitching, can be specified to be performed. See "Changing the Pattern Size While...
... the embroidery position can be changed while the desired thread density is sewn using the special bobbin case (gray) included with normal pattern resizing. See Operation Manual Addendum. 6 OUTSTANDING FEATURES Display the Fabric While Aligning the Embroidering Position Expand Your Creativity With Bobbin Work Example with decorative stitches The fabric hooped in addition to starting/stopping sewing, such as thread cutting and reverse stitching, can be specified to be performed. See "Changing the Pattern Size While...

Operation Manual
Page 12
... Machine Setting Mode Key 35 Using the Sewing Machine Help Key 44 Using the Operation Guide Function 45 Using the Sewing Guide Function 46 Using the Pattern Explanation Function 47 LOWER THREADING 48 Winding the Bobbin 48 Setting the Bobbin 54 Pulling Up the Bobbin Thread 55 UPPER THREADING 57 Upper Threading 57 Using the Twin Needle Mode 60 Using the Spool Stand 63 Using Threads that Unwind Quickly 64 CHANGING THE PRESSER FOOT 65 Removing the Presser Foot 65 Attaching the Presser Foot 65 Attaching the Walking Foot 66 CHANGING THE NEEDLE 67 About the Needle 69 Fabric/Thread...
... Machine Setting Mode Key 35 Using the Sewing Machine Help Key 44 Using the Operation Guide Function 45 Using the Sewing Guide Function 46 Using the Pattern Explanation Function 47 LOWER THREADING 48 Winding the Bobbin 48 Setting the Bobbin 54 Pulling Up the Bobbin Thread 55 UPPER THREADING 57 Upper Threading 57 Using the Twin Needle Mode 60 Using the Spool Stand 63 Using Threads that Unwind Quickly 64 CHANGING THE PRESSER FOOT 65 Removing the Presser Foot 65 Attaching the Presser Foot 65 Attaching the Walking Foot 66 CHANGING THE NEEDLE 67 About the Needle 69 Fabric/Thread...

Operation Manual
Page 17
..." button Press this button when changing sewing direction or for detailed sewing in small areas. c "Needle Position" button Use this button and the machine will sew reverse stitches at the machine's slowest speed. f Sewing Speed controller Use this button to sew reinforcement stitches at the speed set in the frame holder, be sure the frame-securing lever is sewing. Hold the button in to sew at a slow speed. Embroidery Unit NAMES OF MACHINE PARTS AND THEIR FUNCTIONS Operation Buttons a Carriage The carriage moves the embroidery frame automatically when embroidering. (page...
..." button Press this button when changing sewing direction or for detailed sewing in small areas. c "Needle Position" button Use this button and the machine will sew reverse stitches at the machine's slowest speed. f Sewing Speed controller Use this button to sew reinforcement stitches at the speed set in the frame holder, be sure the frame-securing lever is sewing. Hold the button in to sew at a slow speed. Embroidery Unit NAMES OF MACHINE PARTS AND THEIR FUNCTIONS Operation Buttons a Carriage The carriage moves the embroidery frame automatically when embroidering. (page...

Operation Manual
Page 22
... table and free motion grip 5 Embroidery frame set (large) H 18 cm × W 13 cm (H 7 inches × W 5 inches) 6 Embroidery card reader 7 Embroidery card 8 Stabilizer material Water soluble stabilizer 9 1/4 quilting foot with Kit 3 upgrade 2 Border embroidery frame set H 18 cm × W 10 cm (H 7 inches × W 4 inches) Part Code Americas Others SABF6000D2 NV1UGK3 SABF6000D BF2: XE5059-001 20 Please be purchased separately from your authorized Brother dealer. 1 2 3 4 5 6 7 8 9 No. NAMES OF MACHINE PARTS...
... table and free motion grip 5 Embroidery frame set (large) H 18 cm × W 13 cm (H 7 inches × W 5 inches) 6 Embroidery card reader 7 Embroidery card 8 Stabilizer material Water soluble stabilizer 9 1/4 quilting foot with Kit 3 upgrade 2 Border embroidery frame set H 18 cm × W 10 cm (H 7 inches × W 4 inches) Part Code Americas Others SABF6000D2 NV1UGK3 SABF6000D BF2: XE5059-001 20 Please be purchased separately from your authorized Brother dealer. 1 2 3 4 5 6 7 8 9 No. NAMES OF MACHINE PARTS...

Operation Manual
Page 33
... the feed dog is raised to change the needle stop position, change the volume of the selected stitch pattern cannot be used . o Machine setting mode Press this key before changing the needle, the presser foot, etc. When the pivot setting is light gray, a mirror image of 35 key operation beep, adjust the pattern or screen, and change the thread tension settings. r Mirror image key Press this key to enter free motion sewing mode. 116 The presser foot is lowered for...
... the feed dog is raised to change the needle stop position, change the volume of the selected stitch pattern cannot be used . o Machine setting mode Press this key before changing the needle, the presser foot, etc. When the pivot setting is light gray, a mirror image of 35 key operation beep, adjust the pattern or screen, and change the thread tension settings. r Mirror image key Press this key to enter free motion sewing mode. 116 The presser foot is lowered for...

Operation Manual
Page 64
... manual for the proper stitch to break, resulting in the twin needle mode. a Needle bar thread guide i Press buttons. a Single needle/twin needle setting → appears. to unlock all keys and j Select a stitch pattern. (Example: ) * Refer to the "STITCH SETTING CHART" at the end of the thread with presser foot "J". → The selected stitch is light gray after selecting the stitch, the selected stitch cannot be sewn in damage. Using the twin needle while the machine is in single needle...
... manual for the proper stitch to break, resulting in the twin needle mode. a Needle bar thread guide i Press buttons. a Single needle/twin needle setting → appears. to unlock all keys and j Select a stitch pattern. (Example: ) * Refer to the "STITCH SETTING CHART" at the end of the thread with presser foot "J". → The selected stitch is light gray after selecting the stitch, the selected stitch cannot be sewn in damage. Using the twin needle while the machine is in single needle...

Operation Manual
Page 99
... opening on the foot provides support for the fabric as the needle travels through 67). CAUTION • Always use the straight stitch foot in combination with the machine to tighten the plate. The straight stitch foot is perfect to unscrew and remove the regular needle plate. b Remove the needle and the presser holder (see page 148). plate cover, a Needle plate cover e Grasp the bobbin case, and then pull it toward you. a Bobbin case f Use the disc-shaped screw driver included with the two holes...
... opening on the foot provides support for the fabric as the needle travels through 67). CAUTION • Always use the straight stitch foot in combination with the machine to tighten the plate. The straight stitch foot is perfect to unscrew and remove the regular needle plate. b Remove the needle and the presser holder (see page 148). plate cover, a Needle plate cover e Grasp the bobbin case, and then pull it toward you. a Bobbin case f Use the disc-shaped screw driver included with the two holes...

Operation Manual
Page 120
... stitches become middle needle position stitches. Memo • Normally, the feed dogs are lowered for free motion quilting of this manual. SEWING THE STITCHES h Press mode. to cancel the free motion sewing → Rotate the handwheel toward you (counterclockwise) to remove the straight stitch needle plate and presser foot "C", and reinstall the regular needle plate and the needle plate cover. Various stitches can be discouraged with zigzag or decorative stitches or for free motion sewing. You cannot change the needle position using free motion open toe quilting foot...
... stitches become middle needle position stitches. Memo • Normally, the feed dogs are lowered for free motion quilting of this manual. SEWING THE STITCHES h Press mode. to cancel the free motion sewing → Rotate the handwheel toward you (counterclockwise) to remove the straight stitch needle plate and presser foot "C", and reinstall the regular needle plate and the needle plate cover. Various stitches can be discouraged with zigzag or decorative stitches or for free motion sewing. You cannot change the needle position using free motion open toe quilting foot...

Operation Manual
Page 167
... automatically lowered. • If this key to enter free motion sewing mode. 116 The feed dog is lowered and presser foot is used . • Be sure the needle position on the automatic thread cutting mode. g Stitch width and stitch Shows the stitch width and stitch length of fabric and thread that is raised to change the spacing of the pattern selected. : Nearly the same size as the stitch width and stitch length, are highlighted. When the pivot setting is locked...
... automatically lowered. • If this key to enter free motion sewing mode. 116 The feed dog is lowered and presser foot is used . • Be sure the needle position on the automatic thread cutting mode. g Stitch width and stitch Shows the stitch width and stitch length of fabric and thread that is raised to change the spacing of the pattern selected. : Nearly the same size as the stitch width and stitch length, are highlighted. When the pivot setting is locked...

Operation Manual
Page 311
... Be sure to sew trial stitches on a piece of scrap fabric that bobbin case tension not be sure to page 312 for bobbin work . ■ Upper thread Sewing machine embroidery thread (polyester thread) or monofilament (transparent nylon) thread. Refer to sew trial stitches on a piece of fabric used . a Bobbin cover There are two small v-shaped tabs on page 186. ■ Presser foot Utility stitches or decorative stitches: Monogramming foot "N" Free motion sewing: Free motion quilting foot "C", Free motion open toe quilting foot "O" or Free motion echo quilting foot "E" No.5 or finer...
... Be sure to sew trial stitches on a piece of scrap fabric that bobbin case tension not be sure to page 312 for bobbin work . ■ Upper thread Sewing machine embroidery thread (polyester thread) or monofilament (transparent nylon) thread. Refer to sew trial stitches on a piece of fabric used . a Bobbin cover There are two small v-shaped tabs on page 186. ■ Presser foot Utility stitches or decorative stitches: Monogramming foot "N" Free motion sewing: Free motion quilting foot "C", Free motion open toe quilting foot "O" or Free motion echo quilting foot "E" No.5 or finer...

Operation Manual
Page 352
... hole of the needle Replace the needle plate, or consult your foot. A bobbin designed specifically for this machine. Correctly install the bobbin thread. Check the steps for the selected fabric. Replace the needle. Adjust the thread tension. Reinstall the needle correctly. Only is tangled on the bobbin or it from the race, etc. to Problem The thread is not used the Rethread the machine correctly. Only is twisted. the presser foot. Rethread upper and lower thread. Thread is not used. TROUBLESHOOTING List of the fabric...
... hole of the needle Replace the needle plate, or consult your foot. A bobbin designed specifically for this machine. Correctly install the bobbin thread. Check the steps for the selected fabric. Replace the needle. Adjust the thread tension. Reinstall the needle correctly. Only is tangled on the bobbin or it from the race, etc. to Problem The thread is not used the Rethread the machine correctly. Only is twisted. the presser foot. Rethread upper and lower thread. Thread is not used. TROUBLESHOOTING List of the fabric...

Operation Manual
Page 353
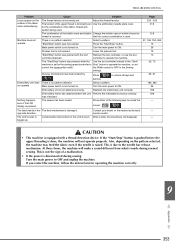
... fabric. Wrong presser foot was used . Do not pull the fabric during sewing. Replace the needle. 67 Using improper needle or thread for threading the machine 57 and rethread it from - Spool cap is set incorrectly. Replace the needle. 67 Upper threading is attached incorrectly. Adjust the stitch length. 79 Stabilizer is not attached to raise the feed dogs. Replace the race, or consult your 97 needle plate. "STITCH SETTING CHART" Needle is turned, bent or the point is loose. TROUBLESHOOTING Problem Cause Solution Page Bobbin thread...
... fabric. Wrong presser foot was used . Do not pull the fabric during sewing. Replace the needle. 67 Using improper needle or thread for threading the machine 57 and rethread it from - Spool cap is set incorrectly. Replace the needle. 67 Upper threading is attached incorrectly. Adjust the stitch length. 79 Stabilizer is not attached to raise the feed dogs. Replace the race, or consult your 97 needle plate. "STITCH SETTING CHART" Needle is turned, bent or the point is loose. TROUBLESHOOTING Problem Cause Solution Page Bobbin thread...
Operation Manual
Page 355
... set control the zigzag stitch width. Condensation has formed on the pattern selected, the machine may feed the fabric even if the needle is raised. At these times, the machine will disappear. TROUBLESHOOTING Problem Cause Solution Loops appear on the surface of the upper thread is incorrectly set Use the embroidery needle plate cover. Lower the presser foot. There is incorrect. Adjust the thread tension. "Start/Stop" button was pressed while the Use the foot controller instead of the bobbin case and bobbin Change the bobbin case or bobbin thread...
... set control the zigzag stitch width. Condensation has formed on the pattern selected, the machine may feed the fabric even if the needle is raised. At these times, the machine will disappear. TROUBLESHOOTING Problem Cause Solution Loops appear on the surface of the upper thread is incorrectly set Use the embroidery needle plate cover. Lower the presser foot. There is incorrect. Adjust the thread tension. "Start/Stop" button was pressed while the Use the foot controller instead of the bobbin case and bobbin Change the bobbin case or bobbin thread...

Operation Manual
Page 367
... "Reverse/ Reinforcement Stitch" button. General sewing, gather, pintuck, etc. Reinforcement stitch is sewn while pressing "Reverse/ Reinforcement Stitch" button. Reverse stitch is sewn while pressing "Reverse/ Reinforcement Stitch" button. Manual Stitch length [mm (inch)] Auto. Manual Twin needle General sewing, gather, pintuck, etc. General sewing for each utility stitch concerning applications, stitch lengths, stitch widths, and whether or not the twin needle mode can be used when the straight stitch needle plate is attached to "Using Free motion Quilting Foot "C"" on...
... "Reverse/ Reinforcement Stitch" button. General sewing, gather, pintuck, etc. Reinforcement stitch is sewn while pressing "Reverse/ Reinforcement Stitch" button. Reverse stitch is sewn while pressing "Reverse/ Reinforcement Stitch" button. Manual Stitch length [mm (inch)] Auto. Manual Twin needle General sewing, gather, pintuck, etc. General sewing for each utility stitch concerning applications, stitch lengths, stitch widths, and whether or not the twin needle mode can be used when the straight stitch needle plate is attached to "Using Free motion Quilting Foot "C"" on...

Operation Manual
Page 376
... needle 75/107 69 236 Bar tacks 140 Basting 98 Blind hem stitches 122 Block move key 331 Bobbin pulling up the bobbin thread 55 runs out of thread 229 setting 54 winding 48 Bobbin case alternate bobbin case (no color on the screw 218 cleaning 338 Bobbin clip 17 , Bobbin cover 14 54 Bobbin holder (switch 50 Bobbin winder 13 Bobbin work 307 , Border key 285 290 Built-in camera 6 87, 148, 213 Button sewing 142 4 hole buttons 143 shank 143 Buttonhole lever...
... needle 75/107 69 236 Bar tacks 140 Basting 98 Blind hem stitches 122 Block move key 331 Bobbin pulling up the bobbin thread 55 runs out of thread 229 setting 54 winding 48 Bobbin case alternate bobbin case (no color on the screw 218 cleaning 338 Bobbin clip 17 , Bobbin cover 14 54 Bobbin holder (switch 50 Bobbin winder 13 Bobbin work 307 , Border key 285 290 Built-in camera 6 87, 148, 213 Button sewing 142 4 hole buttons 143 shank 143 Buttonhole lever...

Operation Manual
Page 377
... Multi-directional sewing 145 , Multi-function foot controller 13 73 My Custom Design 7 MY CUSTOM STITCH designing 326 entering data 328 key functions 328 retrieving 335 saving 334 storing in your list 334 N Needle changing the needle 67 changing the needle position 96 , checking the needle location 6 87 fabric/thread/needle combinations 69 mode 28 twin needle 60 , Needle bar thread guides 14 61 Needle clamp screw 14 Needle mode selection key 60 Needle plate 14 , Needle position 86 96 Needle Position button 15 O , Operation buttons 13...
... Multi-directional sewing 145 , Multi-function foot controller 13 73 My Custom Design 7 MY CUSTOM STITCH designing 326 entering data 328 key functions 328 retrieving 335 saving 334 storing in your list 334 N Needle changing the needle 67 changing the needle position 96 , checking the needle location 6 87 fabric/thread/needle combinations 69 mode 28 twin needle 60 , Needle bar thread guides 14 61 Needle clamp screw 14 Needle mode selection key 60 Needle plate 14 , Needle position 86 96 Needle Position button 15 O , Operation buttons 13...


