
Operation Manual
Page 7
... the machine ...14 Preparing for Upper and Lower Threading 15 Winding the bobbin ...15 Installing the bobbin ...18 Threading the upper thread ...20 Using the twin needle ...24 Replacing the Needle ...27 Needle precautions ...27 Needle types and their uses ...28 Checking the needle ...29 Replacing the needle ...29 Replacing the Presser Foot 31 Presser foot precautions ...31 Replacing the presser foot ...31 Removing the presser foot holder ...32 Using the optional walking foot ...33 Useful Functions ...35 Changing the needle stop position ...35 Changing the initial needle position ...36 Sewing...
... the machine ...14 Preparing for Upper and Lower Threading 15 Winding the bobbin ...15 Installing the bobbin ...18 Threading the upper thread ...20 Using the twin needle ...24 Replacing the Needle ...27 Needle precautions ...27 Needle types and their uses ...28 Checking the needle ...29 Replacing the needle ...29 Replacing the Presser Foot 31 Presser foot precautions ...31 Replacing the presser foot ...31 Removing the presser foot holder ...32 Using the optional walking foot ...33 Useful Functions ...35 Changing the needle stop position ...35 Changing the initial needle position ...36 Sewing...

Operation Manual
Page 8
... Free-motion quilting ...73 Reinforcement Stitching ...75 Triple stretch stitching ...75 Bar tack stitching ...76 Decorative stitching ...78 Fagoting ...79 Scallop stitching ...79 Smocking ...80 Shell tuck stitching ...81 Joining ...81 Heirloom stitching ...82 Using the side cutter (optional) ...84 4. Sewing curves ...48 Sewing thick fabrics ...48 Sewing thin fabrics ...49 Sewing stretch fabrics ...49 Sewing hook-and-loop fastener ...50 Pulling up the bobbin thread ...51 3. APPENDIX ...86 Stitch settings ...86 Utility stitches ...86 Maintenance ...90 Restrictions on oiling ...90 Cleaning...
... Free-motion quilting ...73 Reinforcement Stitching ...75 Triple stretch stitching ...75 Bar tack stitching ...76 Decorative stitching ...78 Fagoting ...79 Scallop stitching ...79 Smocking ...80 Shell tuck stitching ...81 Joining ...81 Heirloom stitching ...82 Using the side cutter (optional) ...84 4. Sewing curves ...48 Sewing thick fabrics ...48 Sewing thin fabrics ...49 Sewing stretch fabrics ...49 Sewing hook-and-loop fastener ...50 Pulling up the bobbin thread ...51 3. APPENDIX ...86 Stitch settings ...86 Utility stitches ...86 Maintenance ...90 Restrictions on oiling ...90 Cleaning...
Operation Manual
Page 10
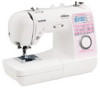
... a spool of Machine Parts and Their Functions Machine a Bobbin winder (page 15) Use the bobbin winder when winding the bobbin. f Thread cutter (page 46) Pass the threads through the thread cutter to operate the sewing machine. i Operation panel (page 10) Use to adjust the tension of the upper thread. l Main power switch (page 14) Use this manual, store it where it can quickly be accessed for the correct operation of slot. p Presser foot lever (page 20) Raise and lower this thread guide when winding the bobbin thread and threading the machine. q Thread guide...
... a spool of Machine Parts and Their Functions Machine a Bobbin winder (page 15) Use the bobbin winder when winding the bobbin. f Thread cutter (page 46) Pass the threads through the thread cutter to operate the sewing machine. i Operation panel (page 10) Use to adjust the tension of the upper thread. l Main power switch (page 14) Use this manual, store it where it can quickly be accessed for the correct operation of slot. p Presser foot lever (page 20) Raise and lower this thread guide when winding the bobbin thread and threading the machine. q Thread guide...
Operation Manual
Page 11
...Needle clamp screw Use the needle clamp screw to 5 stitches on top of sewing while the button is lowered into the bobbin case. Operation buttons The operation buttons help sew straight seams. k Needle bar thread guide Pass the upper thread through the needle bar thread guide. g Feed dogs The feed dogs feed the fabric. Reinforcement stitches are sewn by sewing 3 to hold the presser foot holder in the opposite direction. d Sewing speed controller Slide the sewing speed controller to the left to reduce the sewing speed, or slide the speed controller to the right to sew reverse...
...Needle clamp screw Use the needle clamp screw to 5 stitches on top of sewing while the button is lowered into the bobbin case. Operation buttons The operation buttons help sew straight seams. k Needle bar thread guide Pass the upper thread through the needle bar thread guide. g Feed dogs The feed dogs feed the fabric. Reinforcement stitches are sewn by sewing 3 to hold the presser foot holder in the opposite direction. d Sewing speed controller Slide the sewing speed controller to the left to reduce the sewing speed, or slide the speed controller to the right to sew reverse...
Operation Manual
Page 13
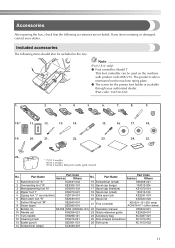
... used on machine) XZ5134-001 19 Extra spool pin XE2241-001 6 Blind stitch foot "R" XE2650-001 20 Spool net XA5523-020 7 Button fitting foot "M" 8 Seam ripper XE2643-001 XZ5082-001 21 Foot controller XD0501-121 (EU area) XC8816-071 (other areas) 9 Bobbin (4) SA156 SFB (XA5539-151) 22 Operation manual XF6232-001 10 Needle set X58358-021 23 Quick reference guide XE2429-001 11 Twin needle X59296-121 24 Accessory bag XC4487-021 12 Cleaning...
... used on machine) XZ5134-001 19 Extra spool pin XE2241-001 6 Blind stitch foot "R" XE2650-001 20 Spool net XA5523-020 7 Button fitting foot "M" 8 Seam ripper XE2643-001 XZ5082-001 21 Foot controller XD0501-121 (EU area) XC8816-071 (other areas) 9 Bobbin (4) SA156 SFB (XA5539-151) 22 Operation manual XF6232-001 10 Needle set X58358-021 23 Quick reference guide XE2429-001 11 Twin needle X59296-121 24 Accessory bag XC4487-021 12 Cleaning...
Operation Manual
Page 19
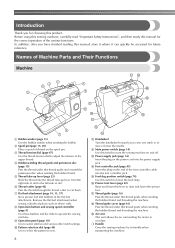
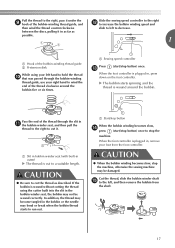
... bobbin from the foot controller. If the bobbin is cut it. a Sewing speed controller Press m (start /stop the machine. CAUTION ● Be sure to stop button) once to cut the thread as possible. 1 a Hook of the bobbin-winding thread guide b Pretension disk While using the cutter built into the slit in k the bobbin winder seat, and then pull the thread to the right to cut to a suitable length. Cut the thread, slide the bobbin winder...
... bobbin from the foot controller. If the bobbin is cut it. a Sewing speed controller Press m (start /stop the machine. CAUTION ● Be sure to stop button) once to cut the thread as possible. 1 a Hook of the bobbin-winding thread guide b Pretension disk While using the cutter built into the slit in k the bobbin winder seat, and then pull the thread to the right to cut to a suitable length. Cut the thread, slide the bobbin winder...
Operation Manual
Page 20
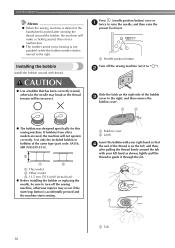
... raise the presser foot lever. GETTING READY Memo ● When the sewing machine is started or the handwheel is moved to " "). If bobbins from other models are used, the machine will make a clicking sound; Installing the bobbin Install the bobbin wound with your left , and then, after winding the thread around the tab with thread. Press (needle position button) once or a twice to the right, and then remove the bobbin cover. a Tab 18 this sewing machine.
... raise the presser foot lever. GETTING READY Memo ● When the sewing machine is started or the handwheel is moved to " "). If bobbins from other models are used, the machine will make a clicking sound; Installing the bobbin Install the bobbin wound with your left , and then, after winding the thread around the tab with thread. Press (needle position button) once or a twice to the right, and then remove the bobbin cover. a Tab 18 this sewing machine.

Operation Manual
Page 26
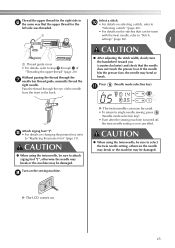
... thread winds off from the front of the needle from the front to "Replacing the needle" (page 29). If the needle threader is used with the c upper thread. Pass the thread through the eye of the spool. For details on installing a needle, refer to the back. c a a Presser foot lever Pass the end of the thread through m of the machine. b • For details, refer to use the twin needle (part code: X59296121). a a 5 cm (2 inches) Using the twin needle...
... thread winds off from the front of the needle from the front to "Replacing the needle" (page 29). If the needle threader is used with the c upper thread. Pass the thread through the eye of the spool. For details on installing a needle, refer to the back. c a a Presser foot lever Pass the end of the thread through m of the machine. b • For details, refer to use the twin needle (part code: X59296121). a a 5 cm (2 inches) Using the twin needle...
Operation Manual
Page 27
..., the twin needle setting is not cancelled. Pass the thread through the g needle bar thread guide, manually thread the right needle. i X The twin needle can be used. • To return to the back. Thread the upper thread for the right side in f the same way that the needle does not touch the presser foot. If the needle hits the presser foot, the needle may be damaged. Press k (Needle mode selection key). X The LCD comes on the sewing machine. Attach zigzag foot "J".
..., the twin needle setting is not cancelled. Pass the thread through the g needle bar thread guide, manually thread the right needle. i X The twin needle can be used. • To return to the back. Thread the upper thread for the right side in f the same way that the needle does not touch the presser foot. If the needle hits the presser foot, the needle may be damaged. Press k (Needle mode selection key). X The LCD comes on the sewing machine. Attach zigzag foot "J".

Operation Manual
Page 45
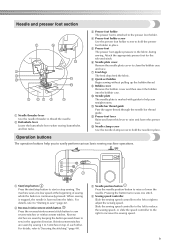
... started and stopped using the sewing speed controller will sew at a faster speed. When the end of the sewing machine. When you continue pressing the (start/stop button The machine starts sewing. 2 • If you are finished sewing, raise the d needle, and then cut the threads. a Foot controller jack Turn on b the side of the stitching is reached, c press (start/stop button) once. Insert the foot controller plug into its jack on the sewing machine. c Slide the sewing speed controller...
... started and stopped using the sewing speed controller will sew at a faster speed. When the end of the sewing machine. When you continue pressing the (start/stop button The machine starts sewing. 2 • If you are finished sewing, raise the d needle, and then cut the threads. a Foot controller jack Turn on b the side of the stitching is reached, c press (start/stop button) once. Insert the foot controller plug into its jack on the sewing machine. c Slide the sewing speed controller...

Operation Manual
Page 49
... fabric b c Upper thread d Bobbin thread e The upper thread is too tight. a a Wrong side of fabric b Right side of the fabric, the upper thread is not installed correctly, it may be adjusted to stop a b c e d a Wrong side of fabric b Right side of fabric c Upper thread d Bobbin thread e The bobbin thread is correct for the type of fabric being sewn (according to "Needle types and their uses" (page 28)), the thread tension will automatically be pressed to the appropriate setting. Memo ● Reverse/reinforcement stitches...
... fabric b c Upper thread d Bobbin thread e The upper thread is too tight. a a Wrong side of fabric b Right side of the fabric, the upper thread is not installed correctly, it may be adjusted to stop a b c e d a Wrong side of fabric b Right side of fabric c Upper thread d Bobbin thread e The bobbin thread is correct for the type of fabric being sewn (according to "Needle types and their uses" (page 28)), the thread tension will automatically be pressed to the appropriate setting. Memo ● Reverse/reinforcement stitches...

Operation Manual
Page 53
...a Upper thread b Bobbin thread Pull out about 10 cm (4 inches) of the bobbin g thread under the presser foot toward the rear of the upper thread. h Reattach the bobbin cover. Pass the bobbin thread through d of "Installing the bobbin" on the right side (B). B A 51 Pulling up the bobbin thread When making gathers or before free-motion quilting, first pull up the bobbin thread as described below. a a Upper thread With the needle raised, press e position button) twice. (needle a Needle position button a b a Upper thread b Bobbin thread Turn off the sewing machine. i Insert the...
...a Upper thread b Bobbin thread Pull out about 10 cm (4 inches) of the bobbin g thread under the presser foot toward the rear of the upper thread. h Reattach the bobbin cover. Pass the bobbin thread through d of "Installing the bobbin" on the right side (B). B A 51 Pulling up the bobbin thread When making gathers or before free-motion quilting, first pull up the bobbin thread as described below. a a Upper thread With the needle raised, press e position button) twice. (needle a Needle position button a b a Upper thread b Bobbin thread Turn off the sewing machine. i Insert the...
Operation Manual
Page 56
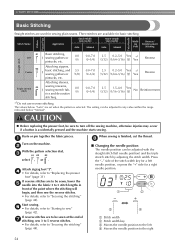
... Manual Walking Foot Reverse/ Reinforcement Stitching Left Center Triple stretch stitch Basic stitching, J sewing gathers or pintucks, etc. 0.0 (0) Attaching zippers, J basic stitching, and sewing gathers or 3.5 (1/8) pintucks, etc. UTILITY STITCHES Basic Stitching Straight stitch Pattern Presser Foot Twin Needle Straight stitches are used for sewing plain seams. Three stitches are set when the pattern is selected. Attaching sleeves, sewing inseams, J sewing stretch fab- The values below "Manual". The setting can be sure to "Replacing the presser foot" (page 31). Baste...
... Manual Walking Foot Reverse/ Reinforcement Stitching Left Center Triple stretch stitch Basic stitching, J sewing gathers or pintucks, etc. 0.0 (0) Attaching zippers, J basic stitching, and sewing gathers or 3.5 (1/8) pintucks, etc. UTILITY STITCHES Basic Stitching Straight stitch Pattern Presser Foot Twin Needle Straight stitches are used for sewing plain seams. Three stitches are set when the pattern is selected. Attaching sleeves, sewing inseams, J sewing stretch fab- The values below "Manual". The setting can be sure to "Replacing the presser foot" (page 31). Baste...

Operation Manual
Page 61
...) on the scale. Pass the upper thread down through the buttonhole. Use chalk to mark on the fabric the position a and length of the buttonhole. 2 1 a Marks on fabric b Button hole sewing Pull out the button guide plate of buttonhole b foot "A", and then insert the button that will not be sewn with the correct size. 59 d Attach buttonhole foot "A". e • For details, refer to "Replacing the presser foot" (page 31). Turn on the machine. c With the pattern selection dial, select a stitch.
...) on the scale. Pass the upper thread down through the buttonhole. Use chalk to mark on the fabric the position a and length of the buttonhole. 2 1 a Marks on fabric b Button hole sewing Pull out the button guide plate of buttonhole b foot "A", and then insert the button that will not be sewn with the correct size. 59 d Attach buttonhole foot "A". e • For details, refer to "Replacing the presser foot" (page 31). Turn on the machine. c With the pattern selection dial, select a stitch.

Operation Manual
Page 64
... rear of the machine) X The feed dogs are lowered. Then, slide the button so that the needle does not touch the button, otherwise the needle may bend or break. 62 e • For details, refer to the left as if the needle will hit the button, remeasure the distance between the holes in the button. g Raise the presser foot lever, and then slide the b drop feed lever, located at the...
... rear of the machine) X The feed dogs are lowered. Then, slide the button so that the needle does not touch the button, otherwise the needle may bend or break. 62 e • For details, refer to the left as if the needle will hit the button, remeasure the distance between the holes in the button. g Raise the presser foot lever, and then slide the b drop feed lever, located at the...

Operation Manual
Page 76
... to lower the feed dogs. a Pattern • Reverse stitches cannot be sewn when the feed dogs are normally left hand. a CAUTION ● Be sure to securely tighten the screw with your right d hand, and then tighten the presser foot holder screw using the enclosed screwdriver in your left raised. Use both hands to stretch the fabric taut, and h then move the fabric to bend or break. UTILITY STITCHES Hold the quilting foot...
... to lower the feed dogs. a Pattern • Reverse stitches cannot be sewn when the feed dogs are normally left hand. a CAUTION ● Be sure to securely tighten the screw with your right d hand, and then tighten the presser foot holder screw using the enclosed screwdriver in your left raised. Use both hands to stretch the fabric taut, and h then move the fabric to bend or break. UTILITY STITCHES Hold the quilting foot...

Operation Manual
Page 106
.... Correctly wind the bobbin. Only use a bobbin designed specifically for the type of fabric, thread and needle is incorrectly installed. Clean the bobbin case. Replace the bobbin case. page 15 104 APPENDIX Symptom Probable Cause Remedy Reference The upper thread is scratched. Select a thread and needle that are appropriate for this machine is produced while sewing. The presser foot holder is bent or blunt. Bobbins from older models, which have a different thickness, will not work properly. Select a thread and needle that...
.... Correctly wind the bobbin. Only use a bobbin designed specifically for the type of fabric, thread and needle is incorrectly installed. Clean the bobbin case. Replace the bobbin case. page 15 104 APPENDIX Symptom Probable Cause Remedy Reference The upper thread is scratched. Select a thread and needle that are appropriate for this machine is produced while sewing. The presser foot holder is bent or blunt. Bobbins from older models, which have a different thickness, will not work properly. Select a thread and needle that...

Operation Manual
Page 107
Correctly install the needle. The appropriate presser foot for the Attach the presser foot that is type of stitch that was pulled out was wound below the bobbin winder seat, wind the page 100 bobbin correctly. page 47 The thread is appropriate for example, in the bobbin case, clean the race. If the thread is damaged. Lengthen the stitch length. page 17 The thread that page 86 not used. page 97 The fabric feeds in...
Correctly install the needle. The appropriate presser foot for the Attach the presser foot that is type of stitch that was pulled out was wound below the bobbin winder seat, wind the page 100 bobbin correctly. page 47 The thread is appropriate for example, in the bobbin case, clean the race. If the thread is damaged. Lengthen the stitch length. page 17 The thread that page 86 not used. page 97 The fabric feeds in...

Operation Manual
Page 108
... dial was depressed if it is connected.) while the buttonhole lever is connected. Lower the presser foot before continuing the operation. Move the bobbin winder shaft to the right. Cancel the twin needle setting, and then select a stitch. APPENDIX Error messages If the sewing machine is selected. The buttonhole or bar tack stitch was selected and the start/stop button was pressed (The foot controller was turned to select a pattern while the twin needle setting is incorrectly operated...
... dial was depressed if it is connected.) while the buttonhole lever is connected. Lower the presser foot before continuing the operation. Move the bobbin winder shaft to the right. Cancel the twin needle setting, and then select a stitch. APPENDIX Error messages If the sewing machine is selected. The buttonhole or bar tack stitch was selected and the start/stop button was pressed (The foot controller was turned to select a pattern while the twin needle setting is incorrectly operated...

Operation Manual
Page 110
... blind hem stitching 55 blind stitch foot 11 bobbin 11 bobbin cover 18 bobbin , thread 15 18, 51 button fitting foot 11 buttonhole 57 buttonhole , foot 11 59, 76 , buttonhole lever 60 76 buttonhole stitching 57 C changing sewing direction 48 cleaning 90 , cleaning brush 11 91 crazy quilts 71 D disc-shaped screwdriver 11 E error messages 106 , extra spool pin 11 24 , eyelet punch 11 60 F fagoting 79 , feed dog position switch 73 74 feed dogs 74 flat bed attachment 10 foot controller 11 free-motion quilting 73 H heirloom stitching 82 I included accessories...
... blind hem stitching 55 blind stitch foot 11 bobbin 11 bobbin cover 18 bobbin , thread 15 18, 51 button fitting foot 11 buttonhole 57 buttonhole , foot 11 59, 76 , buttonhole lever 60 76 buttonhole stitching 57 C changing sewing direction 48 cleaning 90 , cleaning brush 11 91 crazy quilts 71 D disc-shaped screwdriver 11 E error messages 106 , extra spool pin 11 24 , eyelet punch 11 60 F fagoting 79 , feed dog position switch 73 74 feed dogs 74 flat bed attachment 10 foot controller 11 free-motion quilting 73 H heirloom stitching 82 I included accessories...


