
Quick Setup Guide - English
Page 15
... support flap. 5 Put the paper tray firmly back into the printer. 3 Make sure that the paper is off. Remove the label covering the AC power inlet. 5 Print a test page Improper Setup DO NOT connect the interface cable yet. 4 Connect the AC power cord to avoid paper jams and misfeeds. 1 Lift the ...LCD display and adjust it is completely inserted into the printer. Make sure that the printer power switch is flat in the paper tray. Setting Up the Machine 3 Fan the stack of...
... support flap. 5 Put the paper tray firmly back into the printer. 3 Make sure that the paper is off. Remove the label covering the AC power inlet. 5 Print a test page Improper Setup DO NOT connect the interface cable yet. 4 Connect the AC power cord to avoid paper jams and misfeeds. 1 Lift the ...LCD display and adjust it is completely inserted into the printer. Make sure that the printer power switch is flat in the paper tray. Setting Up the Machine 3 Fan the stack of...
Users Manual - English
Page 8
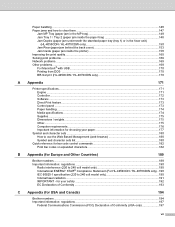
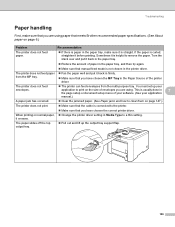
... 190 Internal laser radiation ...191 IMPORTANT - Paper handling ...146 Paper jams and how to clear them ...147 Jam MP Tray (paper jam in the MP tray 148 Jam Tray 1 / Tray 2 (paper jam inside the paper tray 148 Jam Duplex (paper jam underneath the standard paper tray (tray 1) or in the fuser unit) (HL-4050CDN / HL-4070CDW only 150 Jam Rear (paper jam behind the back cover 153 Jam Inside (paper jam inside the printer 156...
... 190 Internal laser radiation ...191 IMPORTANT - Paper handling ...146 Paper jams and how to clear them ...147 Jam MP Tray (paper jam in the MP tray 148 Jam Tray 1 / Tray 2 (paper jam inside the paper tray 148 Jam Duplex (paper jam underneath the standard paper tray (tray 1) or in the fuser unit) (HL-4050CDN / HL-4070CDW only 150 Jam Rear (paper jam behind the back cover 153 Jam Inside (paper jam inside the printer 156...
Users Manual - English
Page 16
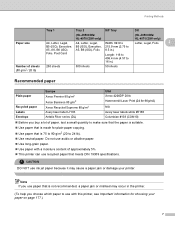
... laser labels white #5160 Columbian #138 (COM10) Before you choose which paper to 24 lb). Use paper that is 75 to 90 g/m2 (20 to use paper that is not recommended, a paper jam or misfeed may cause a paper jam or damage your paper on page 177.) 7 Do not use recycled paper that meets DIN 19309 specifications. Use neutral paper. This printer can...
... laser labels white #5160 Columbian #138 (COM10) Before you choose which paper to 24 lb). Use paper that is 75 to 90 g/m2 (20 to use paper that is not recommended, a paper jam or misfeed may cause a paper jam or damage your paper on page 177.) 7 Do not use recycled paper that meets DIN 19309 specifications. Use neutral paper. This printer can...
Users Manual - English
Page 17
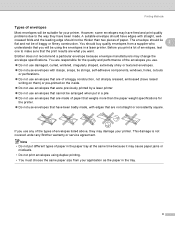
... a pile. Brother does not recommend a particular envelope because envelope manufacturers may damage your printer. Do not use envelopes that are not straight or consistently square. Do not use envelopes that weighs more than two pieces of paper. However, some envelopes may cause paper jams or misfeeds. ... be of baggy or flimsy construction. Before you use envelopes that have been badly made of paper that were previously printed by a laser printer. You are responsible for your printer. Do not use . Printing Methods Types of envelopes 2 Most envelopes will be using duplex ...
... a pile. Brother does not recommend a particular envelope because envelope manufacturers may damage your printer. Do not use envelopes that are not straight or consistently square. Do not use envelopes that weighs more than two pieces of paper. However, some envelopes may cause paper jams or misfeeds. ... be of baggy or flimsy construction. Before you use envelopes that have been badly made of paper that were previously printed by a laser printer. You are responsible for your printer. Do not use . Printing Methods Types of envelopes 2 Most envelopes will be using duplex ...
Users Manual - English
Page 29
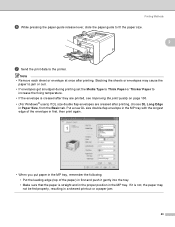
...; Make sure that the paper is not, the paper may cause the paper to jam or curl. • If envelopes get smudged during printing set the Media Type to Thick Paper or Thicker Paper to the printer. Printing Methods f While pressing the paper-guide release lever, slide the paper guide to fit the paper size. 2 g Send ... each sheet or envelope at once after printing, choose DL Long Edge in a skewed printout or a paper jam. 20 Stacking the sheets or envelopes may not be fed properly, resulting in Paper Size, from the Basic tab. Put a new DL size double-flap envelope in the MP tray with...
...; Make sure that the paper is not, the paper may cause the paper to jam or curl. • If envelopes get smudged during printing set the Media Type to Thick Paper or Thicker Paper to the printer. Printing Methods f While pressing the paper-guide release lever, slide the paper guide to fit the paper size. 2 g Send ... each sheet or envelope at once after printing, choose DL Long Edge in a skewed printout or a paper jam. 20 Stacking the sheets or envelopes may not be fed properly, resulting in Paper Size, from the Basic tab. Put a new DL size double-flap envelope in the MP tray with...
Users Manual - English
Page 30
...duplex function, it is possible that the paper tray is completely inserted into the printer. • If paper is curled, straighten it and then put it back in the paper tray. • You should use bond paper. If the paper is a paper jam, see Paper jams and how to choose the settings, see... the Help text in this section are using the Macintosh® Printer Driver, see Improving the print quality on page...
...duplex function, it is possible that the paper tray is completely inserted into the printer. • If paper is curled, straighten it and then put it back in the paper tray. • You should use bond paper. If the paper is a paper jam, see Paper jams and how to choose the settings, see... the Help text in this section are using the Macintosh® Printer Driver, see Improving the print quality on page...

Users Manual - English
Page 31
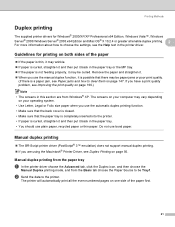
... Methods c Remove the printed even-numbered pages from the output tray and put them , or you may get paper jams. a In the printer driver choose the Advanced tab, click the Duplex icon, then choose the Manual Duplex printing mode, and then from the MP tray 2 Note Before putting... the MP tray, you will now automatically print all the even-numbered pages. 22 b Put the paper in the paper tray, first empty the tray. Follow the instructions on the computer screen. 2 d The printer will have printed all the odd-numbered pages on the computer screen. Follow the instructions on the other...
... Methods c Remove the printed even-numbered pages from the output tray and put them , or you may get paper jams. a In the printer driver choose the Advanced tab, click the Duplex icon, then choose the Manual Duplex printing mode, and then from the MP tray 2 Note Before putting... the MP tray, you will now automatically print all the even-numbered pages. 22 b Put the paper in the paper tray, first empty the tray. Follow the instructions on the computer screen. 2 d The printer will have printed all the odd-numbered pages on the computer screen. Follow the instructions on the other...
Users Manual - English
Page 151
...the following: The AC power cord is connected properly and the printer is set up to connect to the printer and the computer. The interface cable is incorrect (See Solving print problems on page 146 and Paper jams and how to the page suggested below. LCD Messages (See ...You can correct most problems by yourself. Visit us at http://solutions.brother.com. The correct driver for the printer has been chosen and is inserted properly in the paper tray. Printer does not print: If you need additional help, the Brother Solutions Center offers the latest FAQs and troubleshooting tips.
...the following: The AC power cord is connected properly and the printer is set up to connect to the printer and the computer. The interface cable is incorrect (See Solving print problems on page 146 and Paper jams and how to the page suggested below. LCD Messages (See ...You can correct most problems by yourself. Visit us at http://solutions.brother.com. The correct driver for the printer has been chosen and is inserted properly in the paper tray. Printer does not print: If you need additional help, the Brother Solutions Center offers the latest FAQs and troubleshooting tips.
Users Manual - English
Page 152
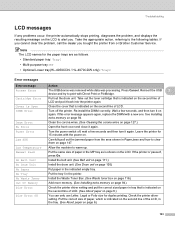
... paper on the second line of LCD and put the correct sized paper in the MP tray as follows. • Standard paper tray: Tray1 • Multi-purpose tray: MP • Optional Lower tray(HL-4050CDN / HL-... No Tray Put the tray1 in Paper jams and how to alert you bought the printer from the area shown in the printer. Manual Feed Put the same size of paper in tray that is 'paused', ... Clean the corona wires. (See Cleaning the corona wires on again. Jam XXX Carefully pull out the jammed paper from or Brother Customer Service. No Belt Unit Install the belt unit. (See Belt ...
... paper on the second line of LCD and put the correct sized paper in the MP tray as follows. • Standard paper tray: Tray1 • Multi-purpose tray: MP • Optional Lower tray(HL-4050CDN / HL-... No Tray Put the tray1 in Paper jams and how to alert you bought the printer from the area shown in the printer. Manual Feed Put the same size of paper in tray that is 'paused', ... Clean the corona wires. (See Cleaning the corona wires on again. Jam XXX Carefully pull out the jammed paper from or Brother Customer Service. No Belt Unit Install the belt unit. (See Belt ...
Users Manual - English
Page 155
... you are using paper that meets Brother recommended paper specifications. (See About paper on the size of the printer driver. If the paper is not chosen in the printer driver. Reduce the amount of paper in 7 the page setup or document setup menu of your software. (See your application to a thin setting. Clear the jammed paper. (See Paper jams and how to...
... you are using paper that meets Brother recommended paper specifications. (See About paper on the size of the printer driver. If the paper is not chosen in the printer driver. Reduce the amount of paper in 7 the page setup or document setup menu of your software. (See your application to a thin setting. Clear the jammed paper. (See Paper jams and how to...
Users Manual - English
Page 156
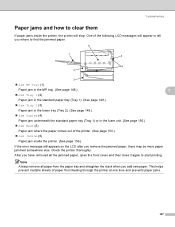
... the jammed paper. 6 1 5 4 2 3 Jam MP Tray (1) Paper jam in the MP tray. (See page 148.) 7 Jam Tray 1 (2) Paper jam in the standard paper tray (Tray 1). (See page 148.) Jam Tray 2 (3) Paper jam in the lower tray (Tray 2). (See page 148.) Jam Duplex (4) Paper jam underneath the standard paper tray (Tray 1) or in the fuser unit. (See page 150.) Jam Rear (5) Paper jam where the paper comes out of the printer. (See...
... the jammed paper. 6 1 5 4 2 3 Jam MP Tray (1) Paper jam in the MP tray. (See page 148.) 7 Jam Tray 1 (2) Paper jam in the standard paper tray (Tray 1). (See page 148.) Jam Tray 2 (3) Paper jam in the lower tray (Tray 2). (See page 148.) Jam Duplex (4) Paper jam underneath the standard paper tray (Tray 1) or in the fuser unit. (See page 150.) Jam Rear (5) Paper jam where the paper comes out of the printer. (See...
Users Manual - English
Page 157
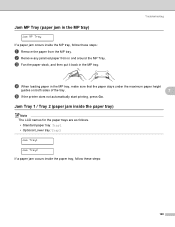
... that the paper stays under the maximum paper height guides on both sides of the tray. 7 e If the printer does not automatically start printing, press Go. b Remove any jammed paper from the MP tray. Troubleshooting 7 d When loading paper in the MP tray. Jam MP Tray (paper jam in the MP tray) Jam MP Tray If a paper jam occurs inside the paper tray, follow...
... that the paper stays under the maximum paper height guides on both sides of the tray. 7 e If the printer does not automatically start printing, press Go. b Remove any jammed paper from the MP tray. Troubleshooting 7 d When loading paper in the MP tray. Jam MP Tray (paper jam in the MP tray) Jam MP Tray If a paper jam occurs inside the paper tray, follow...
Users Manual - English
Page 158
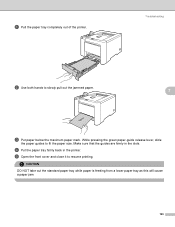
d Put the paper tray firmly back in the slots. CA UTI ON DO NOT take out the standard paper tray while paper is feeding from a lower paper tray as this will cause a paper jam. 149 While pressing the green paper-guide release lever, slide the paper guides to slowly pull out the jammed paper. 7 c Put paper below the maximum paper mark. Troubleshooting b Use both hands to fit the paper size. Make sure that the guides are firmly in the printer. e Open the front cover and close it to resume printing. a Pull the paper tray completely out of the printer.
d Put the paper tray firmly back in the slots. CA UTI ON DO NOT take out the standard paper tray while paper is feeding from a lower paper tray as this will cause a paper jam. 149 While pressing the green paper-guide release lever, slide the paper guides to slowly pull out the jammed paper. 7 c Put paper below the maximum paper mark. Troubleshooting b Use both hands to fit the paper size. Make sure that the guides are firmly in the printer. e Open the front cover and close it to resume printing. a Pull the paper tray completely out of the printer.
Users Manual - English
Page 159
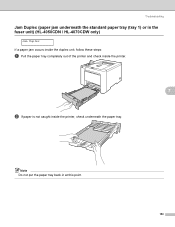
Troubleshooting Jam Duplex (paper jam underneath the standard paper tray (tray 1) or in at this point. 150 Note Do not put the paper tray back in the fuser unit) (HL-4050CDN / HL-4070CDW only) 7 Jam Duplex If a paper jam occurs inside the duplex unit, follow these steps: a Pull the paper tray completely out of the printer and check inside the printer. 7 b If paper is not caught inside the printer, check underneath the paper tray.
Troubleshooting Jam Duplex (paper jam underneath the standard paper tray (tray 1) or in at this point. 150 Note Do not put the paper tray back in the fuser unit) (HL-4050CDN / HL-4070CDW only) 7 Jam Duplex If a paper jam occurs inside the duplex unit, follow these steps: a Pull the paper tray completely out of the printer and check inside the printer. 7 b If paper is not caught inside the printer, check underneath the paper tray.
Users Manual - English
Page 161
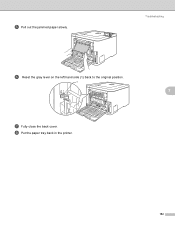
e Pull out the jammed paper slowly. h Put the paper tray back in the printer. 152 Troubleshooting f Reset the gray lever on the left hand side (1) back to the original position. 1 7 g Fully close the back cover.
e Pull out the jammed paper slowly. h Put the paper tray back in the printer. 152 Troubleshooting f Reset the gray lever on the left hand side (1) back to the original position. 1 7 g Fully close the back cover.
Users Manual - English
Page 162
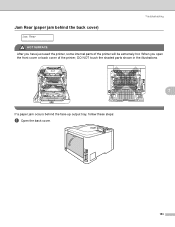
Troubleshooting Jam Rear (paper jam behind the face-up output tray, follow these steps: a Open the back cover. 153 When you open the front cover or back cover of the printer, DO NOT touch the shaded parts shown in the illustrations. 7 If a paper jam occurs behind the back cover) 7 Jam Rear HOT SURFACE After you have just used the printer, some internal parts of the printer will be extremely hot.
Troubleshooting Jam Rear (paper jam behind the face-up output tray, follow these steps: a Open the back cover. 153 When you open the front cover or back cover of the printer, DO NOT touch the shaded parts shown in the illustrations. 7 If a paper jam occurs behind the back cover) 7 Jam Rear HOT SURFACE After you have just used the printer, some internal parts of the printer will be extremely hot.
Users Manual - English
Page 163
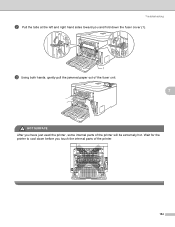
Troubleshooting b Pull the tabs at the left and right hand sides toward you and fold down before you have just used the printer, some internal parts of the printer. 154 Wait for the printer to cool down the fuser cover (1). 1 c Using both hands, gently pull the jammed paper out of the fuser unit. 7 HOT SURFACE After you touch the internal parts of the printer will be extremely hot.
Troubleshooting b Pull the tabs at the left and right hand sides toward you and fold down before you have just used the printer, some internal parts of the printer. 154 Wait for the printer to cool down the fuser cover (1). 1 c Using both hands, gently pull the jammed paper out of the fuser unit. 7 HOT SURFACE After you touch the internal parts of the printer will be extremely hot.

Users Manual - English
Page 165
Press the front cover release button and then open the front cover or back cover of the printer will be extremely hot. Troubleshooting Jam Inside (paper jam inside the printer, follow these steps: a Turn off the printer power switch. When you have just used the printer, some internal parts of the printer, DO NOT touch the shaded parts shown in the illustrations. 7 If a paper jam occurs inside the printer) 7 Jam Inside HOT SURFACE After you open the front cover. 156
Press the front cover release button and then open the front cover or back cover of the printer will be extremely hot. Troubleshooting Jam Inside (paper jam inside the printer, follow these steps: a Turn off the printer power switch. When you have just used the printer, some internal parts of the printer, DO NOT touch the shaded parts shown in the illustrations. 7 If a paper jam occurs inside the printer) 7 Jam Inside HOT SURFACE After you open the front cover. 156
Users Manual - English
Page 186
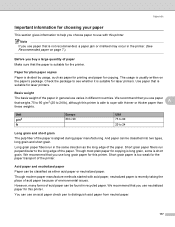
... you buy a large quantity of the paper in general use long grain paper for this printer. Acid paper and neutralized paper A Paper can use with acid paper, neutralized paper is suitable for the printer. Paper for plain paper copies A Paper is suitable for laser printers. Basis weight A The basis weight of paper A Make sure that is not recommended, a paper jam or misfeed may occur in different countries...
... you buy a large quantity of the paper in general use long grain paper for this printer. Acid paper and neutralized paper A Paper can use with acid paper, neutralized paper is suitable for the printer. Paper for plain paper copies A Paper is suitable for laser printers. Basis weight A The basis weight of paper A Make sure that is not recommended, a paper jam or misfeed may occur in different countries...
Users Manual - English
Page 211
Multi-purpose tray 14, 22 N Network 66 Network connectivity 172 NETWORK menu 82, 83 P Paper 6, 177 Paper handling 174 Paper jams 147 Paper Tray 78 Parallel interface 67 PCL printer driver 36 PictBridge 26, 86 Plain paper 7 Power supply 5 Print Menu 80 Print quality 39 Printer driver 36, 47, 64, 173 Processor 172 R Register your product 189, 194 Reprint...
Multi-purpose tray 14, 22 N Network 66 Network connectivity 172 NETWORK menu 82, 83 P Paper 6, 177 Paper handling 174 Paper jams 147 Paper Tray 78 Parallel interface 67 PCL printer driver 36 PictBridge 26, 86 Plain paper 7 Power supply 5 Print Menu 80 Print quality 39 Printer driver 36, 47, 64, 173 Processor 172 R Register your product 189, 194 Reprint...


