
Users Manual - English
Page 4
... drop or insert foreign objects in this machine, avoid direct sunlight and high humidity locations. Never allow children to change without notice. If the problem persists, please consult your work area clear: • Never operate the machine with this machine. The contents of this manual and specifications of the sewing machine and foot control free from all moving parts. IMPORTANT SAFETY INSTRUCTIONS 5 Always keep your local authorized Brother dealer. Use only...
... drop or insert foreign objects in this machine, avoid direct sunlight and high humidity locations. Never allow children to change without notice. If the problem persists, please consult your work area clear: • Never operate the machine with this machine. The contents of this manual and specifications of the sewing machine and foot control free from all moving parts. IMPORTANT SAFETY INSTRUCTIONS 5 Always keep your local authorized Brother dealer. Use only...
Users Manual - English
Page 9
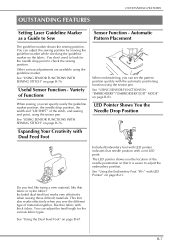
... nylon fabric? Automatic Pattern Placement The guideline marker shows the sewing position. You can set the pattern position quickly with thick fabric. OUTSTANDING FEATURES OUTSTANDING FEATURES Setting Laser Guideline Marker as a Guide to Sew Sensor Function - See "USING SENSOR FUNCTIONS WITH SEWING STITCH" on page B-67. This foot also works effectively when you can adjust the feed length for the needle drop point to adjust the embroidery position. See "Using the Dual Feed Foot" on page B-76. When embroidering, you sew...
... nylon fabric? Automatic Pattern Placement The guideline marker shows the sewing position. You can set the pattern position quickly with thick fabric. OUTSTANDING FEATURES OUTSTANDING FEATURES Setting Laser Guideline Marker as a Guide to Sew Sensor Function - See "USING SENSOR FUNCTIONS WITH SEWING STITCH" on page B-67. This foot also works effectively when you can adjust the feed length for the needle drop point to adjust the embroidery position. See "Using the Dual Feed Foot" on page B-76. When embroidering, you sew...
Users Manual - English
Page 11
... Stitching 5 Sewing Curves 7 Changing Sewing Direction 7 Sewing Heavyweight Fabrics 7 Sewing Hook-and-Loop Fastener 8 Sewing Lightweight Fabrics 9 Sewing Stretch Fabrics 9 STITCH SETTINGS 10 Setting the Stitch Width 10 Setting the Stitch Length 10 Setting the "L/R SHIFT 11 Setting the Thread Tension 12 USEFUL FUNCTIONS 13 Automatic Thread Cutting 13 Adjusting the Needle Drop Position with the Guideline Marker (For models equipped with the guideline marker 14 Using the Knee Lifter 15 Pivoting 15 Automatic Fabric Sensor System (Automatic Presser Foot Pressure 17 Needle Position...
... Stitching 5 Sewing Curves 7 Changing Sewing Direction 7 Sewing Heavyweight Fabrics 7 Sewing Hook-and-Loop Fastener 8 Sewing Lightweight Fabrics 9 Sewing Stretch Fabrics 9 STITCH SETTINGS 10 Setting the Stitch Width 10 Setting the Stitch Length 10 Setting the "L/R SHIFT 11 Setting the Thread Tension 12 USEFUL FUNCTIONS 13 Automatic Thread Cutting 13 Adjusting the Needle Drop Position with the Guideline Marker (For models equipped with the guideline marker 14 Using the Knee Lifter 15 Pivoting 15 Automatic Fabric Sensor System (Automatic Presser Foot Pressure 17 Needle Position...

Users Manual - English
Page 12
... Power 28 MAKING EMBROIDERY ADJUSTMENTS........... 30 Adjusting Thread Tension 30 Adjusting the Bobbin Case (with No Color on the Screw) ...... 31 Using the Automatic Thread Cutting Function (END COLOR TRIM 32 Using the Thread Trimming Function (JUMP STITCH TRIM) ..... 32 Adjusting the Embroidery Speed 33 Changing the Thread Color Display 34 Changing the "Embroidery Frame Display 35 REVISING THE PATTERN 36 Moving the Pattern 36 Aligning the Pattern and the Needle 36 Changing the Size of the Pattern 37 Rotating the Pattern...
... Power 28 MAKING EMBROIDERY ADJUSTMENTS........... 30 Adjusting Thread Tension 30 Adjusting the Bobbin Case (with No Color on the Screw) ...... 31 Using the Automatic Thread Cutting Function (END COLOR TRIM 32 Using the Thread Trimming Function (JUMP STITCH TRIM) ..... 32 Adjusting the Embroidery Speed 33 Changing the Thread Color Display 34 Changing the "Embroidery Frame Display 35 REVISING THE PATTERN 36 Moving the Pattern 36 Aligning the Pattern and the Needle 36 Changing the Size of the Pattern 37 Rotating the Pattern...

Users Manual - English
Page 13
... FOR BOBBIN WORK 3 Required Materials 3 Upper Threading 4 Preparing the Bobbin Thread 5 CREATING BOBBIN WORK (SEWING 9 Positioning the Fabric and Sewing 9 Bobbin Work Free Motion Sewing 11 CREATING BOBBIN WORK (EMBROIDERY)..... 12 Selecting the Pattern 12 Start Embroidering 14 ADJUSTING THE THREAD TENSION 16 TROUBLESHOOTING 17 Chapter2 Maintenance and Troubleshooting 18 CARE AND MAINTENANCE 19 Restrictions on oiling 19 Precautions on storing the machine 19 Cleaning the LCD Screen 19 Cleaning the Machine Casing 19 Cleaning the Race 19 Cleaning the Cutter in the Bobbin Case...
... FOR BOBBIN WORK 3 Required Materials 3 Upper Threading 4 Preparing the Bobbin Thread 5 CREATING BOBBIN WORK (SEWING 9 Positioning the Fabric and Sewing 9 Bobbin Work Free Motion Sewing 11 CREATING BOBBIN WORK (EMBROIDERY)..... 12 Selecting the Pattern 12 Start Embroidering 14 ADJUSTING THE THREAD TENSION 16 TROUBLESHOOTING 17 Chapter2 Maintenance and Troubleshooting 18 CARE AND MAINTENANCE 19 Restrictions on oiling 19 Precautions on storing the machine 19 Cleaning the LCD Screen 19 Cleaning the Machine Casing 19 Cleaning the Race 19 Cleaning the Cutter in the Bobbin Case...
Users Manual - English
Page 14
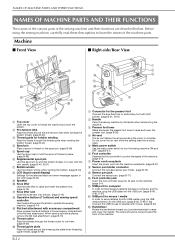
... pen holder. (page B-72) i Sensor pen jack Connect the sensor pen. (page B-71) j Foot controller jack Insert the foot controller plug into the slot. (page S-15) l Operation buttons (7 buttons) and sewing speed controller Use these descriptions to control the speed of the machine parts. c Presser foot lever Raise and lower the presser foot lever to raise and lower the presser foot. (page B-55) d Air vent The air vent allows the air surrounding the motor to thread the machine and wind the bobbin.
... pen holder. (page B-72) i Sensor pen jack Connect the sensor pen. (page B-71) j Foot controller jack Insert the foot controller plug into the slot. (page S-15) l Operation buttons (7 buttons) and sewing speed controller Use these descriptions to control the speed of the machine parts. c Presser foot lever Raise and lower the presser foot lever to raise and lower the presser foot. (page B-55) d Air vent The air vent allows the air surrounding the motor to thread the machine and wind the bobbin.

Users Manual - English
Page 16
... stopped. (see page S-5) d "Needle Position" button Use this button when changing sewing direction or for detailed sewing in small areas. Move the slide to the left to the machine may occur. Beginners should sew at slower speeds. h "Automatic Threading" button Use this button to lower the presser foot and apply pressure to automatically trim the excess thread. CAUTION • Do not press the thread cutter button after sewing to the fabric. The needle may break and threads may become tangled, or...
... stopped. (see page S-5) d "Needle Position" button Use this button when changing sewing direction or for detailed sewing in small areas. Move the slide to the left to the machine may occur. Beginners should sew at slower speeds. h "Automatic Threading" button Use this button to lower the presser foot and apply pressure to automatically trim the excess thread. CAUTION • Do not press the thread cutter button after sewing to the fabric. The needle may break and threads may become tangled, or...
Users Manual - English
Page 19
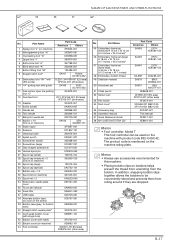
... Free motion open toe quilting foot "O" XF4873-001 12 Dual feed foot DF1: XF4166-001 (EU area) XF3165-001 (other area) 13 Adapter XF3613-001 14 Screw (small) XA4813-051 15 Needle set X58358-051 16 Twin needle X59296-151 17 Ball point needle set 51 Chalk pencil 52 Sensor pen 53 Pen holder 54 Dust cover* 55 Accessory bag 56 Operation manual 57 Quick Reference Guide 58 MY CUSTOM STITCH CD* Part Code...
... Free motion open toe quilting foot "O" XF4873-001 12 Dual feed foot DF1: XF4166-001 (EU area) XF3165-001 (other area) 13 Adapter XF3613-001 14 Screw (small) XA4813-051 15 Needle set X58358-051 16 Twin needle X59296-151 17 Ball point needle set 51 Chalk pencil 52 Sensor pen 53 Pen holder 54 Dust cover* 55 Accessory bag 56 Operation manual 57 Quick Reference Guide 58 MY CUSTOM STITCH CD* Part Code...

Users Manual - English
Page 30
... turned on the stitch selection screen when the "Sewing" is automatically detected by an internal sensor while sewing. Memo • Press or next to the page numbers, to change the default machine settings (needle stop position, embroidery speed, opening display, etc.). b Make adjustments to "ON", the thickness of the dual feed foot (see page S-15). e Fine tune the feed of the fabric is selected. k When set to be changed. Adjust the presser foot to one...
... turned on the stitch selection screen when the "Sewing" is automatically detected by an internal sensor while sewing. Memo • Press or next to the page numbers, to change the default machine settings (needle stop position, embroidery speed, opening display, etc.). b Make adjustments to "ON", the thickness of the dual feed foot (see page S-15). e Fine tune the feed of the fabric is selected. k When set to be changed. Adjust the presser foot to one...
Users Manual - English
Page 80
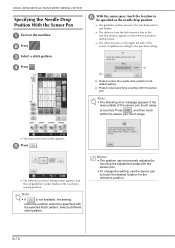
... on the machine. c Select a stitch pattern. e Press . → The reference position setting screen appears, and the red guideline marker flashes at the machine's sewing position. Note • The following error message appears if the area outside of the screen is updated according to the specified setting. Select a different stitch pattern. b Press to stop specifying a setting with the sensor pen. • To change the setting, use the sensor...
... on the machine. c Select a stitch pattern. e Press . → The reference position setting screen appears, and the red guideline marker flashes at the machine's sewing position. Note • The following error message appears if the area outside of the screen is updated according to the specified setting. Select a different stitch pattern. b Press to stop specifying a setting with the sensor pen. • To change the setting, use the sensor...
Users Manual - English
Page 90
... Fabrics 7 ■ If the Fabric does not Fit under the Presser Foot 8 ■ If the Fabric does not Feed 8 Sewing Hook-and-Loop Fastener 8 Sewing Lightweight Fabrics 9 Sewing Stretch Fabrics 9 STITCH SETTINGS 10 Setting the Stitch Width 10 Setting the Stitch Length 10 Setting the "L/R SHIFT 11 Setting the Thread Tension 12 ■ Proper Thread Tension 12 ■ Upper Thread is Too Tight 12 ■ Upper Thread is Too Loose 12 USEFUL FUNCTIONS 13 Automatic Thread Cutting 13 Adjusting the Needle Drop Position with the Guideline Marker (For models...
... Fabrics 7 ■ If the Fabric does not Fit under the Presser Foot 8 ■ If the Fabric does not Feed 8 Sewing Hook-and-Loop Fastener 8 Sewing Lightweight Fabrics 9 Sewing Stretch Fabrics 9 STITCH SETTINGS 10 Setting the Stitch Width 10 Setting the Stitch Length 10 Setting the "L/R SHIFT 11 Setting the Thread Tension 12 ■ Proper Thread Tension 12 ■ Upper Thread is Too Tight 12 ■ Upper Thread is Too Loose 12 USEFUL FUNCTIONS 13 Automatic Thread Cutting 13 Adjusting the Needle Drop Position with the Guideline Marker (For models...
Users Manual - English
Page 95
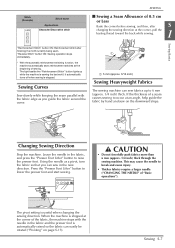
...) Sewing Heavyweight Fabrics The sewing machine can sew in the fabric, and press the "Presser Foot Lifter" button to lower the presser foot and start sewing. Changing Sewing Direction Stop the machine. "Reverse Stitch" button ON: Sewing operation stops immediately. * With the automatic reinforcement stitching function, the machine automatically sews reinforcement stitches at an angle, help guide the fabric by hand and sew on page S-15). The pivot setting is stopped. This may cause the needle to occur at the beginning of a seam causes sewing to break and...
...) Sewing Heavyweight Fabrics The sewing machine can sew in the fabric, and press the "Presser Foot Lifter" button to lower the presser foot and start sewing. Changing Sewing Direction Stop the machine. "Reverse Stitch" button ON: Sewing operation stops immediately. * With the automatic reinforcement stitching function, the machine automatically sews reinforcement stitches at an angle, help guide the fabric by hand and sew on page S-15). The pivot setting is stopped. This may cause the needle to occur at the beginning of a seam causes sewing to break and...

Users Manual - English
Page 127
... screws with a sample piece of the quilting foot and the presser bar. b Select a stitch. You can adjust the sewing speed with your right hand, and tighten the presser foot holder screw using the disc-shaped screwdriver with the speed control slide on the machine. e Hold the quilting foot in place with your left of quilting fabric. In this mode, the presser foot is not slanted. c Remove the presser foot holder. ■ Free Motion Quilting With free motion quilting, the feed dogs can be lowered by positioning open toe quilting foot...
... screws with a sample piece of the quilting foot and the presser bar. b Select a stitch. You can adjust the sewing speed with your right hand, and tighten the presser foot holder screw using the disc-shaped screwdriver with the speed control slide on the machine. e Hold the quilting foot in place with your left of quilting fabric. In this mode, the presser foot is not slanted. c Remove the presser foot holder. ■ Free Motion Quilting With free motion quilting, the feed dogs can be lowered by positioning open toe quilting foot...

Users Manual - English
Page 282
...9632; Bobbin case and bobbin cover 3 ■ Lower thread 4 ■ Upper thread 4 ■ Needle 4 ■ Presser foot 4 ■ Fabric 4 Upper Threading 4 Preparing the Bobbin Thread 5 ■ When tension is applied to the bobbin thread 6 ■ When tension is not applied to the bobbin thread 7 CREATING BOBBIN WORK (SEWING 9 Positioning the Fabric and Sewing 9 ■ Finishing the thread ends 11 Bobbin Work Free Motion Sewing 11 CREATING BOBBIN WORK (EMBROIDERY 12 Selecting the Pattern 12 Start Embroidering 14 ADJUSTING THE THREAD TENSION 16 ■ Adjusting the upper...
...9632; Bobbin case and bobbin cover 3 ■ Lower thread 4 ■ Upper thread 4 ■ Needle 4 ■ Presser foot 4 ■ Fabric 4 Upper Threading 4 Preparing the Bobbin Thread 5 ■ When tension is applied to the bobbin thread 6 ■ When tension is not applied to the bobbin thread 7 CREATING BOBBIN WORK (SEWING 9 Positioning the Fabric and Sewing 9 ■ Finishing the thread ends 11 Bobbin Work Free Motion Sewing 11 CREATING BOBBIN WORK (EMBROIDERY 12 Selecting the Pattern 12 Start Embroidering 14 ADJUSTING THE THREAD TENSION 16 ■ Adjusting the upper...
Users Manual - English
Page 284
... bobbin case tension not be applied. Free motion sewing: Free motion open toe quilting foot "O" Embroidery foot "W" or embroidery foot with the upper thread. Before sewing your project. ■ Upper thread Sewing machine embroidery thread (polyester thread) or monofilament (transparent nylon) thread. For details on your project, be visible, we recommend using transparent nylon monofilament thread or polyester light weight thread (50wt. PREPARING FOR BOBBIN WORK ■ Lower thread We recommend the following types of threads for bobbin work . Refer to sew trial stitches before...
... bobbin case tension not be applied. Free motion sewing: Free motion open toe quilting foot "O" Embroidery foot "W" or embroidery foot with the upper thread. Before sewing your project. ■ Upper thread Sewing machine embroidery thread (polyester thread) or monofilament (transparent nylon) thread. For details on your project, be visible, we recommend using transparent nylon monofilament thread or polyester light weight thread (50wt. PREPARING FOR BOBBIN WORK ■ Lower thread We recommend the following types of threads for bobbin work . Refer to sew trial stitches before...

Users Manual - English
Page 290
...; All keys and operation buttons are unlocked, and the previous screen is displayed. n While gently holding down the fabric so it does not move out of the fabric. a Punched hole b Upper thread over the presser foot and lightly hold the threads behind the presser foot and start sewing. Note • Pull the thread while holding threads at lower right of the bobbin thread comes out through the hole in the fabric. CREATING BOBBIN WORK (SEWING) h Use the presser presser foot.
...; All keys and operation buttons are unlocked, and the previous screen is displayed. n While gently holding down the fabric so it does not move out of the fabric. a Punched hole b Upper thread over the presser foot and lightly hold the threads behind the presser foot and start sewing. Note • Pull the thread while holding threads at lower right of the bobbin thread comes out through the hole in the fabric. CREATING BOBBIN WORK (SEWING) h Use the presser presser foot.
Users Manual - English
Page 310
... not work properly. too tight. lower the presser foot. Presser foot holder is too strong. Upper thread tension is not attached correctly. use a bobbin designed specifically for threading the machine and rethread the machine. to increase the bobbin winding speed. Upper thread breaks Machine is installed incorrectly. Using improper needle or thread for the selected fabric. Using improper needle or thread for the selected fabric. Needle is not threaded correctly (used the Rethread the machine correctly. Reset the bobbin thread correctly. Reattach the presser foot...
... not work properly. too tight. lower the presser foot. Presser foot holder is too strong. Upper thread tension is not attached correctly. use a bobbin designed specifically for threading the machine and rethread the machine. to increase the bobbin winding speed. Upper thread breaks Machine is installed incorrectly. Using improper needle or thread for the selected fabric. Using improper needle or thread for the selected fabric. Needle is not threaded correctly (used the Rethread the machine correctly. Reset the bobbin thread correctly. Reattach the presser foot...

Users Manual - English
Page 311
... needle clamp screw. Using improper needle or thread for the selected fabric. Check the needle and fabric combination. Upper thread tension is defective. There are scratches on the bobbin case. There are scratches around the hole(s) in the needle plate. Attach the presser foot correctly. Securely tighten the screw of the presser foot holder is loose. Stabilizer is set incorrectly. Attach stabilizer. Feed dogs are scratches around the holes in the Replace the presser foot, or consult your presser foot. Wrong presser foot was used . Replace the needle. Adjust...
... needle clamp screw. Using improper needle or thread for the selected fabric. Check the needle and fabric combination. Upper thread tension is defective. There are scratches on the bobbin case. There are scratches around the hole(s) in the needle plate. Attach the presser foot correctly. Securely tighten the screw of the presser foot holder is loose. Stabilizer is set incorrectly. Attach stabilizer. Feed dogs are scratches around the holes in the Replace the presser foot, or consult your presser foot. Wrong presser foot was used . Replace the needle. Adjust...
Users Manual - English
Page 313
... the main power to ON. Manually adjust the position according to the needle bar release mechanism. This is not the sign of the bobbin case and bobbin thread is incorrectly Use the embroidery needle plate cover. Turn the main power to OFF and unplug the machine. was attached before the upper threading is done, the machine will not operate properly. Pointer of the fabric when embroidering The thread tension is incorrectly set for the first time, be sure...
... the main power to ON. Manually adjust the position according to the needle bar release mechanism. This is not the sign of the bobbin case and bobbin thread is incorrectly Use the embroidery needle plate cover. Turn the main power to OFF and unplug the machine. was attached before the upper threading is done, the machine will not operate properly. Pointer of the fabric when embroidering The thread tension is incorrectly set for the first time, be sure...

Users Manual - English
Page 321
...24 twin needle B-51 , Needle bar thread guides B-13 B-52 Needle clamp screw B-13 Needle mode selection key B-51 Needle plate B-13 , Needle position S-18 S-25 Needle Position button B-14 O , Operation buttons B-12 B-14 , Overcasting S-31 S-33 P Patchwork S-32 Piecing S-36 Pintuck S-30 Pivoting S-15 Point delete key S-101 Power cord B-22 Power cord receptacle B-12 Presser foot adapter B-55 attaching B-55 pressure S-17 removing B-55 types S-62 Presser foot code E-9 , Presser foot holder B-13 B-55 Presser foot holder screw B-13 , Presser foot lever B-12 S-8 Presser Foot...
...24 twin needle B-51 , Needle bar thread guides B-13 B-52 Needle clamp screw B-13 Needle mode selection key B-51 Needle plate B-13 , Needle position S-18 S-25 Needle Position button B-14 O , Operation buttons B-12 B-14 , Overcasting S-31 S-33 P Patchwork S-32 Piecing S-36 Pintuck S-30 Pivoting S-15 Point delete key S-101 Power cord B-22 Power cord receptacle B-12 Presser foot adapter B-55 attaching B-55 pressure S-17 removing B-55 types S-62 Presser foot code E-9 , Presser foot holder B-13 B-55 Presser foot holder screw B-13 , Presser foot lever B-12 S-8 Presser Foot...


