
Brother International DreamWeaver„ XE VM6200D Support Question
Brother International DreamWeaver„ XE VM6200D Support Question
Find answers below for this question about Brother International DreamWeaver„ XE VM6200D.Need a Brother International DreamWeaver„ XE VM6200D manual? We have 4 online manuals for this item!
Question posted by carols06 on August 23rd, 2013
How To Change Setting From Cm To Inches On Dreamweaver Xe
The person who posted this question about this Brother International product did not include a detailed explanation. Please use the "Request More Information" button to the right if more details would help you to answer this question.
Current Answers
Related Brother International DreamWeaver„ XE VM6200D Manual Pages
Users Manual - English - Page 4
... a heat source, such as contained in any air openings blocked. Use this machine. Use only the sensor pen included with the bag due to change without notice. Special care is required around the machine needle. • Switch the sewing machine to the symbol "O" position to turn it must be replaced by an authorized dealer. •...
Users Manual - English - Page 6
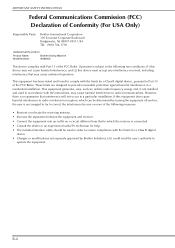
...tested and found to comply with the limits for a Class B digital
device. • Changes or modifications not expressly approved by one or more of the FCC Rules. These limits are ... USA TEL : (908) 704-1700
declares that the product
Product Name: Model Number:
Brother Sewing Machine VM6200D
This device complies with Part 15 of the following two conditions: (1) this device may not cause...
Users Manual - English - Page 11
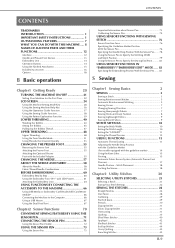
... "EMBROIDERY"/"EMBROIDERY EDIT" MODE ..... 83
Specifying the Embroidering Position With the Sensor Pen....... 83
S Sewing
Chapter1 Getting Ready
20
TURNING THE MACHINE ON/OFF 21
Setting Your Machine for the First Time 22
LCD SCREEN 24
Using the Machine Setting Mode Key 28 Using the Sewing Machine Help Key 36 Using the Operation Guide Function 37 Using the...
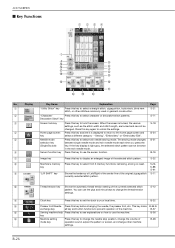
Users Manual - English - Page 14
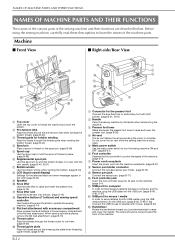
... bobbin. (page B-40)
h LCD (liquid crystal display)
Settings for the presser foot
Connect the dual feed foot or embroidery foot with mouse. (page B-67)
m Handwheel
Rotate the handwheel toward the front of the machine. e Main power switch
Use the main power switch to turn the sewing machine ON and OFF. (page B-21)
f Foot controller...
Users Manual - English - Page 22
...; Selecting the Initial Screen Display 32 ■ Choosing the Display Language 33 ■ Changing the Background Colors of the Embroidery Patterns....... 33 ■ Specifying the Size of Pattern Thumbnails 34 ■ Saving a Settings Screen Image to USB Media 35 Using the Sewing Machine Help Key 36 Using the Operation Guide Function 37 Using the...
Users Manual - English - Page 28
...the screen is locked, the various
S-18
settings, such as the stitch width and stitch ...changed. The sewing mode changes B-51
selection key
between single needle mode and twin needle mode each time you press the
(Single/Double)
key.
This key locks B-55 to
exchange key
all key and button functions to use the sensor function. B-57
m
Sewing machine help Press this key before changing...
Users Manual - English - Page 34
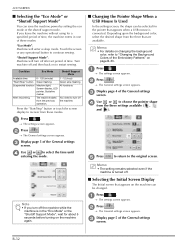
... Shape When a USB Mouse Is Used
In the settings screen, the shape can save the machine power by setting the eco mode or the shutoff support mode. page
4
of the Embroidery Patterns" on changing the background color, refer to select mode. e Press
to return to continue sewing.
LCD SCREEN
■ Selecting the "Eco Mode" or...
Users Manual - English - Page 42
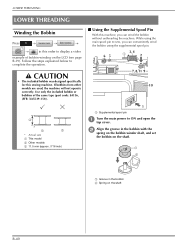
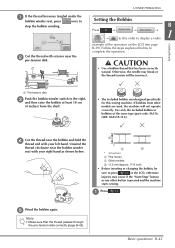
... the bobbin winder shaft, and set
the bobbin on the shaft. While using the supplemental spool pin. Follow the steps explained below to sew, you can conveniently wind the bobbin using the main spool pin to complete the operation.
■ Using the Supplemental Spool Pin
With this sewing machine. power
to display a video
example...
Users Manual - English - Page 47
... to complete the operation.
a Pre-tension disk
c
Push the bobbin winder switch to the right, and then raise the bobbin at least 10 cm
(4 inches) from other button is pressed and the machine starts sewing. If bobbins from the shaft.
• The included bobbin was designed specifically for this order to press
in this...
Users Manual - English - Page 59
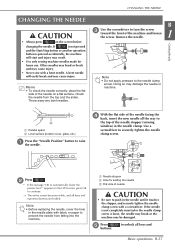
... break and may be damaged. A bent needle
will start and injury may result.
• Use only sewing machine needles made for setting the needle c Flat side of the needle on the screen before
changing the needle. CHANGING THE NEEDLE
CHANGING THE NEEDLE
CAUTION
• Always press
on a flat surface. If
is not pressed
and the Start...
Users Manual - English - Page 90
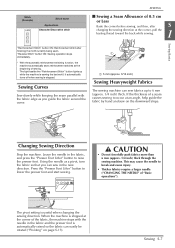
... Stitching 5 Sewing Curves 7 Changing Sewing Direction 7
■ Sewing a Seam Allowance of 0.5 cm or Less 7 Sewing Heavyweight Fabrics 7
■ If the Fabric does not Fit under the Presser Foot 8 ■ If the Fabric does not Feed 8 Sewing Hook-and-Loop Fastener 8 Sewing Lightweight Fabrics 9 Sewing Stretch Fabrics 9
STITCH SETTINGS 10
Setting the Stitch Width 10 Setting the Stitch...
Users Manual - English - Page 91
... the machine is used, the needle may strike the presser foot and bend or break, possibly resulting in injury. Keep your left corner of the stitch you can use the correct presser foot.
b Press the key of the LCD screen. Normally, you want to set the needle in
presser foot. Refer to sew...
Users Manual - English - Page 95
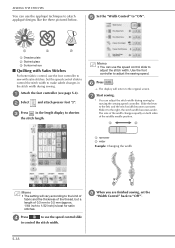
... the motif currently being sewn. The pivot setting is automatically raised so the fabric can sew fabrics up while the machine is stopped. Stitch (Example)
Stitch name
Applications Character/Decorative stitch
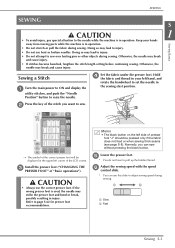
SEWING
■ Sewing a Seam Allowance of 0.5 cm
or Less
Baste the corner before sewing, and then, after
S
changing the sewing direction at the corner of the fabric, the...
Users Manual - English - Page 126
... middle needle position. Slide it to "OFF". h
When you are finished sewing, set "Width Control" back to the right, the stitch width becomes wider. The size of the width changes equally on both sides of 0.3 mm to 0.5 mm (approx. 1/64 inch to 1/32 inch) is best for satin stitches.
Memo
• You can use the...
Users Manual - English - Page 148
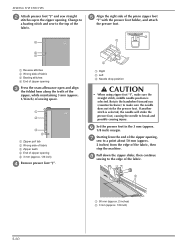
... side of fabric c Zipper teeth d End of sewing space.
g
Starting from the edge of the
fabric. Change
to
a basting stitch and sew to break and possibly causing injury.
h
Pull down the zipper slider, then sewing to the edge of the pin in
the
3
mm
(approx. f
Set the presser foot 1/8 inch) margin. e
Align the right side of...
Users Manual - English - Page 167
... key
When 7mm satin stitch patterns are locked
and cannot be changed.
"Basic
(Single/Double)
operations"
l
Sensor function key
Press this key to delete stitch patterns.
t
Home page screen key (For embroidery and sewing machine only)
- Press this key to unlock the settings.
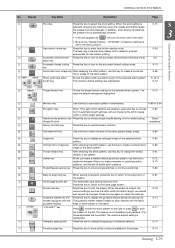
EDITING STITCH PATTERNS
No
Display
.
d
Automatic reinforcement Press this key...
Users Manual - English - Page 284
..." on page B-57.
For details on threading the machine, refer to "CHANGING THE NEEDLE" on page B-48. Be sure to sew trial stitches before sewing on a piece of scrap fabric, which gives the best...threads for bobbin work . or above) that is the same color as 3.5mm (approx. 1/8 inch) is to be appropriate for
bobbin work .
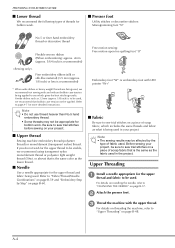
■ Presser foot
Utility stitches or decorative stitches: ...
Users Manual - English - Page 289
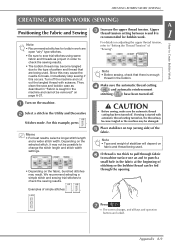
... this may cause the needle to check the sewing results.
• The bobbin thread may become tangled or the machine may become tangled due to the type of "Sewing".
f
If thread is caught in order to break, immediately stop sewing if this occurs. Upper thread tension setting between 6 and 8 is enough
thread in the Utility...
Users Manual - English - Page 317
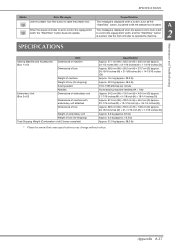
... is set to 1050 stitches per minute Home sewing machine needles (HA × 130) Approx. 54.5 cm (W) × 13.0 cm (H) × 46.4 cm (D) (approx. 21-7/16 inches (W) × 5-1/8 inch (H) × 18-1/4 inches (D)) Approx. 81.5 cm (W) × 33.2 cm (H) × 46.4 cm (D) (approx. 32-1/16 inches (W) × 13-1/16 inch (H) × 18-1/4 inches (D)) Approx. 68.5 cm (W) × 55.0 cm (H) ×...
Sewing End Point 1.05 or Later - English - Page 1
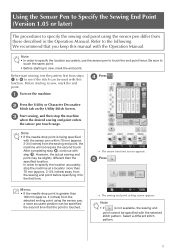
... the Operation Manual. Note
• If the needle drop point is touched.
→ The sewing end point setting screen appears. However, the actual sewing end point may be slightly different than 70 mm (approx. 2-3/4 inches) away from the sewing end point, the machine will not require the second touch.
Select a different stitch pattern.
1 We recommend that...
Similar Questions

How To Change Stitch On Brother Ls 590 Sewing Machine
(Posted by dasstd 9 years ago)

How To Set Up A Ce-5000prw Sewing Machine?
(Posted by gggmrs 10 years ago)

How To Set The Bubbie From A Sewing Machine Brother Vx-1435
(Posted by stoggozzy6 10 years ago)

What Are The Normal Settings For A Brother Lx2500 Sewing Machine
(Posted by vavBonmp1 10 years ago)

Download Embroidery Designs From Computer
How do I download designs other than Brother to my Dreamweaver XE 6200?
How do I download designs other than Brother to my Dreamweaver XE 6200?
(Posted by Suzannequilt713 10 years ago)