Software Users Manual - English
Page 3
...the TWAIN driver 39 TWAIN compliant...39 Accessing the Scanner...39 Scanning a document into the PC ...41 Settings in the Scanner Setup dialog box 44 Scanning a document using the WIA driver (For Windows® XP/ Windows Vista 47 WIA compliant ...47 Accessing the Scanner...47 Scanning a document into the PC ...48 ...driver (For Windows Photo Gallery and Windows Fax and Scan users 53 Accessing the scanner ...53 Scanning a document into the PC ...54 Using the Scan key (For USB users)...57 Scan to USB (Not available for DCP-9040CN 58 Scan to E-mail ...62 Scan to Image ...63 Scan to OCR ...64...
...the TWAIN driver 39 TWAIN compliant...39 Accessing the Scanner...39 Scanning a document into the PC ...41 Settings in the Scanner Setup dialog box 44 Scanning a document using the WIA driver (For Windows® XP/ Windows Vista 47 WIA compliant ...47 Accessing the Scanner...47 Scanning a document into the PC ...48 ...driver (For Windows Photo Gallery and Windows Fax and Scan users 53 Accessing the scanner ...53 Scanning a document into the PC ...54 Using the Scan key (For USB users)...57 Scan to USB (Not available for DCP-9040CN 58 Scan to E-mail ...62 Scan to Image ...63 Scan to OCR ...64...
Software Users Manual - English
Page 6
... Scanning an image into your Macintosh 160 Pre-Scanning an image ...161 Settings in the Scanner window ...162 Using the Scan key (For USB cable users 165 Scan to USB (Not available for DCP-9040CN 166 Scan to E-mail ...170 Scan to Image ...171 Scan to OCR ...172 Scan to File...173 Using...
... Scanning an image into your Macintosh 160 Pre-Scanning an image ...161 Settings in the Scanner window ...162 Using the Scan key (For USB cable users 165 Scan to USB (Not available for DCP-9040CN 166 Scan to E-mail ...170 Scan to Image ...171 Scan to OCR ...172 Scan to File...173 Using...
Software Users Manual - English
Page 46
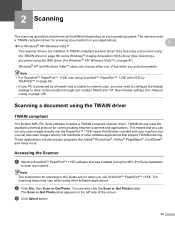
...Windows® Imaging Acquisition (WIA) driver (See Scanning a document using the TWAIN driver 2 TWAIN compliant 2 The Brother MFL-Pro Suite software includes a TWAIN compliant scanner driver. The scanning steps may need to configure the firewall settings to scan a document. Windows® XP and ...Windows Vista™ users can also scan images directly into the PaperPort™ 11SE viewer that Brother included with OCR by...
...Windows® Imaging Acquisition (WIA) driver (See Scanning a document using the TWAIN driver 2 TWAIN compliant 2 The Brother MFL-Pro Suite software includes a TWAIN compliant scanner driver. The scanning steps may need to configure the firewall settings to scan a document. Windows® XP and ...Windows Vista™ users can also scan images directly into the PaperPort™ 11SE viewer that Brother included with OCR by...

Software Users Manual - English
Page 47
f Click Scan. Scanning d Choose the scanner you are using from the Available Scanners list. The Scanner Setup dialog box appears: Go to Scanning a document into the PC on the Scan or Get Photo panel. Note • For Windows® XP/Windows Vista™: Choose TW-Brother MFC-XXXX (TW-Brother DCP-XXXX) or TW-Brother MFC-XXXX LAN 2 (TW-Brother DCP-XXXX LAN). • For other operating systems: Choose Brother MFC-XXXX (Brother DCP-XXXX) or Brother MFC-XXXX LAN (Brother DCP-XXXX LAN). (Where XXXX is your model name) e Check the Display scanner dialog box on page 41. 40
f Click Scan. Scanning d Choose the scanner you are using from the Available Scanners list. The Scanner Setup dialog box appears: Go to Scanning a document into the PC on the Scan or Get Photo panel. Note • For Windows® XP/Windows Vista™: Choose TW-Brother MFC-XXXX (TW-Brother DCP-XXXX) or TW-Brother MFC-XXXX LAN 2 (TW-Brother DCP-XXXX LAN). • For other operating systems: Choose Brother MFC-XXXX (Brother DCP-XXXX) or Brother MFC-XXXX LAN (Brother DCP-XXXX LAN). (Where XXXX is your model name) e Check the Display scanner dialog box on page 41. 40

Software Users Manual - English
Page 48
... is required when you want to the PaperPort™ 11SE window. This is finished, click Cancel to return to scan on the scanner glass. Scanning a document into the PC You can adjust the scanning area further by clicking the left mouse button and dragging it.... the following settings, if needed, in the ADF, or face down on page 43) 41 Scanning a whole page a Put the document face up in the Scanner Setup dialog box: „ Scan (Image Type) (1) „ Resolution (2) „ Scan Type (3) „ Brightness (4) „ Contrast (5) „ Document Size (6) Scanning 2 2 2 c...
... is required when you want to the PaperPort™ 11SE window. This is finished, click Cancel to return to scan on the scanner glass. Scanning a document into the PC You can adjust the scanning area further by clicking the left mouse button and dragging it.... the following settings, if needed, in the ADF, or face down on page 43) 41 Scanning a whole page a Put the document face up in the Scanner Setup dialog box: „ Scan (Image Type) (1) „ Resolution (2) „ Scan Type (3) „ Brightness (4) „ Contrast (5) „ Document Size (6) Scanning 2 2 2 c...

Software Users Manual - English
Page 49
... scanning. • You can not use the PreScan button to preview an image. 42 Scanning Scanning a duplex document (MFC-9840CDW and DCP-9045CDN only) 2 a Put the document face up in the Scanner Setup dialog box: „ Scan (Image Type) „ Resolution „ Scan Type „ Brightness „ Contrast „ Document Size d Click...
... scanning. • You can not use the PreScan button to preview an image. 42 Scanning Scanning a duplex document (MFC-9840CDW and DCP-9045CDN only) 2 a Put the document face up in the Scanner Setup dialog box: „ Scan (Image Type) „ Resolution „ Scan Type „ Brightness „ Contrast „ Document Size d Click...

Software Users Manual - English
Page 50
... Click PreScan. Scanning Pre-Scanning to crop a portion you want to its 43 The whole image is scanned into the PC and appears in the Scanner Setup dialog box to scan the image. icon, and then use the icon to restore the image to scan. 1 1 Scanning area Note You ... by using the original size. When you want to scan 2 You can enlarge the image using the PreScan button. d Press and hold down on the scanner glass. 2 1 1 Scanning area b Choose the settings for Scan (Image Type), Resolution, Scan Type, Brightness, Contrast and Document Size, as needed. a Put the document...
... Click PreScan. Scanning Pre-Scanning to crop a portion you want to its 43 The whole image is scanned into the PC and appears in the Scanner Setup dialog box to scan the image. icon, and then use the icon to restore the image to scan. 1 1 Scanning area Note You ... by using the original size. When you want to scan 2 You can enlarge the image using the PreScan button. d Press and hold down on the scanner glass. 2 1 1 Scanning area b Choose the settings for Scan (Image Type), Resolution, Scan Type, Brightness, Contrast and Document Size, as needed. a Put the document...

Software Users Manual - English
Page 51
... finer scanned image. The default settings are listed in a. 2 f Click Start. The following table shows the resolutions you loaded the document on the scanner glass in the table below: Image Type Photo Web Text Resolution Use for scanning photo images. 300 × 300 dpi Use for each default setting.... Settings in the PaperPort™ 11SE window (or your document again. This time only the chosen area of the document appears in the Scanner Setup dialog box 2 Image Type 2 Choose the output image type from the Resolution drop-down list. Resolution and Scan Type will be altered...
... finer scanned image. The default settings are listed in a. 2 f Click Start. The following table shows the resolutions you loaded the document on the scanner glass in the table below: Image Type Photo Web Text Resolution Use for scanning photo images. 300 × 300 dpi Use for each default setting.... Settings in the PaperPort™ 11SE window (or your document again. This time only the chosen area of the document appears in the Scanner Setup dialog box 2 Image Type 2 Choose the output image type from the Resolution drop-down list. Resolution and Scan Type will be altered...

Software Users Manual - English
Page 53
... business cards, choose the Business Card size, and then place the business card face down in the center of the left hand side of the scanner glass, as indicated by the document guidelines. „ Photo 4 × 6 in „ Index Card 5 × 8 in „ Photo L 89 × 127 mm „ Photo 2L...
... business cards, choose the Business Card size, and then place the business card face down in the center of the left hand side of the scanner glass, as indicated by the document guidelines. „ Photo 4 × 6 in „ Index Card 5 × 8 in „ Photo L 89 × 127 mm „ Photo 2L...

Software Users Manual - English
Page 54
...-XXXX (Brother DCP-XXXX) or Brother MFC-XXXX LAN (Brother DCP-XXXX LAN). (Where XXXX is your machine or you can scan images directly into the PaperPort™ 11SE viewer that Brother included with your model name) e Check the Display scanner dialog box on the left side of the screen. b... Scanners list. You can scan images directly into any other application that was installed during the MFL-Pro Suite installation to scan a document. Note • For Windows® XP/Windows Vista™: Choose WIA-Brother MFC-XXXX (WIA-Brother DCP-XXXX) or WIA-Brother MFC-XXXX LAN (WIA-Brother DCP-...
...-XXXX (Brother DCP-XXXX) or Brother MFC-XXXX LAN (Brother DCP-XXXX LAN). (Where XXXX is your machine or you can scan images directly into the PaperPort™ 11SE viewer that Brother included with your model name) e Check the Display scanner dialog box on the left side of the screen. b... Scanners list. You can scan images directly into any other application that was installed during the MFL-Pro Suite installation to scan a document. Note • For Windows® XP/Windows Vista™: Choose WIA-Brother MFC-XXXX (WIA-Brother DCP-XXXX) or WIA-Brother MFC-XXXX LAN (WIA-Brother DCP-...

Software Users Manual - English
Page 55
... 4 1 Paper source 2 Picture type 3 Adjust the quality of a page after pre-scanning the document, you need to use the ADF (automatic document feeder) or the scanner glass. If you want to scan on page 48. You can scan a whole page. Scanning a document into the PC on page 43.) Scanning a document using... the ADF 2 a Put the document face up in which you can either use the scanner glass. (See Pre-Scanning to crop a portion you want to scan and then crop a portion of the scanned picture 4 Paper size 48 f Click Scan...
... 4 1 Paper source 2 Picture type 3 Adjust the quality of a page after pre-scanning the document, you need to use the ADF (automatic document feeder) or the scanner glass. If you want to scan on page 48. You can scan a whole page. Scanning a document into the PC on page 43.) Scanning a document using... the ADF 2 a Put the document face up in which you can either use the scanner glass. (See Pre-Scanning to crop a portion you want to scan and then crop a portion of the scanned picture 4 Paper size 48 f Click Scan...

Software Users Manual - English
Page 56
... (2). For resolutions greater than 1200 dpi, use the Brother Scanner Utility. (See Brother Scanner Utility on page 51.) f Click the Scan button in the Scan dialog box. The machine starts scanning the document. 49 d Choose the Paper size from the drop-down list (1). Note The scanner resolution can choose Brightness, Contrast, Resolution and Picture type...
... (2). For resolutions greater than 1200 dpi, use the Brother Scanner Utility. (See Brother Scanner Utility on page 51.) f Click the Scan button in the Scan dialog box. The machine starts scanning the document. 49 d Choose the Paper size from the drop-down list (1). Note The scanner resolution can choose Brightness, Contrast, Resolution and Picture type...

Software Users Manual - English
Page 57
... 2 The Preview button is scanned into the PC and appears in the scanning area (4). a Put the document face down on the scanner glass. 2 b Choose Flatbed in the Scan dialog box to preview an image for cropping any unwanted portions from the image. e Press and hold down list (1). 1 4 2 3 1 ...
... 2 The Preview button is scanned into the PC and appears in the scanning area (4). a Put the document face down on the scanner glass. 2 b Choose Flatbed in the Scan dialog box to preview an image for cropping any unwanted portions from the image. e Press and hold down list (1). 1 4 2 3 1 ...

Software Users Manual - English
Page 58
... f If you need advanced settings, click Adjust the quality of the file you are trying to scan. Brother Scanner Utility 2 The Brother Scanner Utility is your model name)/ Scanner Settings/Scanner Utility. Make sure that you have enough memory or hard disk space then your PC for the new settings...dialog box. Note If you could lose your application window). You can run the utility by choosing Scanner Utility located in the Start/All Programs/Brother/MFC-XXXX (or DCP-XXXX) (where XXXX is used for configuring the WIA scanner driver for the size of the scanned picture (3).
... f If you need advanced settings, click Adjust the quality of the file you are trying to scan. Brother Scanner Utility 2 The Brother Scanner Utility is your model name)/ Scanner Settings/Scanner Utility. Make sure that you have enough memory or hard disk space then your PC for the new settings...dialog box. Note If you could lose your application window). You can run the utility by choosing Scanner Utility located in the Start/All Programs/Brother/MFC-XXXX (or DCP-XXXX) (where XXXX is used for configuring the WIA scanner driver for the size of the scanned picture (3).

Software Users Manual - English
Page 60
Scanning Scanning a document using the WIA driver (For Windows Photo Gallery and Windows Fax and Scan users) 2 2 Accessing the scanner 2 a Open your software application to Scanning a document into the PC on page 54. 53 d Click Import. b Do one of the following: „ For Windows Photo Gallery Click File, then Import from Camera or Scanner. „ For Windows Fax and Scan Click File, New, then Scan. The Scan dialog box appears: Go to scan the document. c Choose the scanner you want to use. Note Duplex scan is supported by the MFC-9840CDW and DCP-9045CDN only.
Scanning Scanning a document using the WIA driver (For Windows Photo Gallery and Windows Fax and Scan users) 2 2 Accessing the scanner 2 a Open your software application to Scanning a document into the PC on page 54. 53 d Click Import. b Do one of the following: „ For Windows Photo Gallery Click File, then Import from Camera or Scanner. „ For Windows Fax and Scan Click File, New, then Scan. The Scan dialog box appears: Go to scan the document. c Choose the scanner you want to use. Note Duplex scan is supported by the MFC-9840CDW and DCP-9045CDN only.
Software Users Manual - English
Page 61
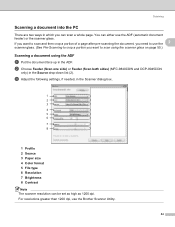
... sides) (MFC-9840CDW and DCP-9045CDN only) in the Scanner dialog box. 1 2 3 4 5 6 7 8 1 Profile 2 Source 3 Paper size 4 Color format 5 File type 6 Resolution 7 Brightness 8 Contrast Note The scanner resolution can be set as ...high as 1200 dpi. For resolutions greater than 1200 dpi, use the ADF (automatic document feeder) or the scanner glass. If you want to crop a portion you can either use the Brother Scanner...
... sides) (MFC-9840CDW and DCP-9045CDN only) in the Scanner dialog box. 1 2 3 4 5 6 7 8 1 Profile 2 Source 3 Paper size 4 Color format 5 File type 6 Resolution 7 Brightness 8 Contrast Note The scanner resolution can be set as ...high as 1200 dpi. For resolutions greater than 1200 dpi, use the ADF (automatic document feeder) or the scanner glass. If you want to crop a portion you can either use the Brother Scanner...

Software Users Manual - English
Page 62
... if needed, in the Scan dialog box. The whole image is used to scan the image. When you want to scan using the scanner glass 2 2 The Preview button is scanned into the PC and appears in the scanning area (8). 55 Pre-Scanning to crop a portion... you are satisfied with the preview, click the Scan button in the Source drop-down on the scanner glass. Scanning d Click the Scan button in the Scanner dialog box. 1 2 3 8 4 5 6 7 1 Profile 2 Source 3 Color format 4 File type 5 Resolution 6 Brightness 7 Contrast 8 Scanning area c Click Preview. ...
... if needed, in the Scan dialog box. The whole image is used to scan the image. When you want to scan using the scanner glass 2 2 The Preview button is scanned into the PC and appears in the scanning area (8). 55 Pre-Scanning to crop a portion... you are satisfied with the preview, click the Scan button in the Source drop-down on the scanner glass. Scanning d Click the Scan button in the Scanner dialog box. 1 2 3 8 4 5 6 7 1 Profile 2 Source 3 Color format 4 File type 5 Resolution 6 Brightness 7 Contrast 8 Scanning area c Click Preview. ...

Software Users Manual - English
Page 65
The default File names are based on the scanner glass. Resolution File Format Options Color 150 dpi Color 300 dpi Color 600 dpi B&W 200 dpi B&W 200x100 dpi JPEG / PDF JPEG / PDF JPEG / PDF TIFF / ...) or TIFF file formats (*.TIF). Scanning • Duplex scan is supported by the MFC-9840CDW and DCP-9045CDN only. • Duplex scan is available from the ADF only. • Duplex scan is not available for DCP-9040CN) 2 2 You can change the setting, choose Change Setting. d Press a or b to choose Scan to f „ To...
The default File names are based on the scanner glass. Resolution File Format Options Color 150 dpi Color 300 dpi Color 600 dpi B&W 200 dpi B&W 200x100 dpi JPEG / PDF JPEG / PDF JPEG / PDF TIFF / ...) or TIFF file formats (*.TIF). Scanning • Duplex scan is supported by the MFC-9840CDW and DCP-9045CDN only. • Duplex scan is available from the ADF only. • Duplex scan is not available for DCP-9040CN) 2 2 You can change the setting, choose Change Setting. d Press a or b to choose Scan to f „ To...
Software Users Manual - English
Page 66
... the data. g Press a or b to start scanning with the settings you want . b Load your choice using the dial pad. For MFC-9840CDW and DCP-9045CDN 2 a Put a USB flash memory drive into your data or damage the USB flash memory drive. Press OK. Press OK. Note Scan type depends on.../Back to j. DO NOT unplug the power cord or remove the USB flash memory drive from the machine while it is set manually on the scanner glass. Press OK. Note • If you choose color in the resolution setting, you cannot choose TIFF. • If you choose black and ...
... the data. g Press a or b to start scanning with the settings you want . b Load your choice using the dial pad. For MFC-9840CDW and DCP-9045CDN 2 a Put a USB flash memory drive into your data or damage the USB flash memory drive. Press OK. Press OK. Note Scan type depends on.../Back to j. DO NOT unplug the power cord or remove the USB flash memory drive from the machine while it is set manually on the scanner glass. Press OK. Note • If you choose color in the resolution setting, you cannot choose TIFF. • If you choose black and ...

Software Users Manual - English
Page 69
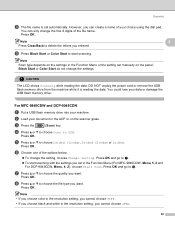
If your machine is an MFC-9440CN or DCP-9040CN, go to Step d. Note If you want to scan a document using ...edge depending on page 73.) 62 If you want the scanned data in color, choose color in scan type on the scanner glass. 2 b Press (Scan). Press OK. If your document layout. Note • Scan type depends on the... face down on the Device Button tab of the ControlCenter3 configuration. (See SCAN on your machine is an MFC-9840CDW or DCP-9045CDN, go to Step e. Press OK. The machine starts scanning the document, creates a file attachment, and launches your ...
If your machine is an MFC-9440CN or DCP-9040CN, go to Step d. Note If you want to scan a document using ...edge depending on page 73.) 62 If you want the scanned data in color, choose color in scan type on the scanner glass. 2 b Press (Scan). Press OK. If your document layout. Note • Scan type depends on the... face down on the Device Button tab of the ControlCenter3 configuration. (See SCAN on your machine is an MFC-9840CDW or DCP-9045CDN, go to Step e. Press OK. The machine starts scanning the document, creates a file attachment, and launches your ...


