
Network User's Guide - English
Page 151
...during the MFL-Pro Suite installation. (See page 145.) The Brother machine cannot print or scan over the network. (See page 146.) The Brother machine is blinking. The toner cartridges and drum unit are fully closed. 9 Paper is inserted properly in ... wireless settings again. 144 Identifying your problem 9 Make sure that my network devices are working properly. (See page 149.) I 'm using the Brother machine. If, after successful installation. (See page 146.) I cannot complete the wireless network setup configuration. 9 Troubleshooting 9 Overview 9...
...during the MFL-Pro Suite installation. (See page 145.) The Brother machine cannot print or scan over the network. (See page 146.) The Brother machine is blinking. The toner cartridges and drum unit are fully closed. 9 Paper is inserted properly in ... wireless settings again. 144 Identifying your problem 9 Make sure that my network devices are working properly. (See page 149.) I 'm using the Brother machine. If, after successful installation. (See page 146.) I cannot complete the wireless network setup configuration. 9 Troubleshooting 9 Overview 9...
SSL Guide - English
Page 31
The toner cartridges and drum unit are fully closed. Go to the network properly...protective packaging has been removed from the lists below I cannot print the document over the internet using the Brother machine. The front and back covers are installed properly. See I want to download the other manuals. uu page ...61550; I want to resolve your problem Make sure that the following : The power cord is connected properly and the Brother machine is inserted properly in the paper tray. If, after reading this chapter. 6 Troubleshooting 6 Overview 6 This chapter...
The toner cartridges and drum unit are fully closed. Go to the network properly...protective packaging has been removed from the lists below I cannot print the document over the internet using the Brother machine. The front and back covers are installed properly. See I want to download the other manuals. uu page ...61550; I want to resolve your problem Make sure that the following : The power cord is connected properly and the Brother machine is inserted properly in the paper tray. If, after reading this chapter. 6 Troubleshooting 6 Overview 6 This chapter...
Basic User's Guide - English
Page 4
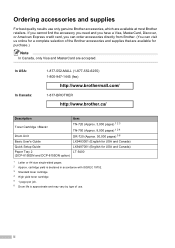
... results use . ii In USA: In Canada: 1-877-552-MALL (1-877-552-6255) 1-800-947-1445 (fax) http://www.brothermall.com/ 1-877-BROTHER http://www.brother.ca/ Description Item Toner Cartridge TN-720 (Approx. 3,000 pages) 1 2 3 TN-750 (Approx. 8,000 pages) 1 2 4 Drum Unit DR-720 (Approx. 30,000 pages) 5 6 Basic User's Guide LX9483001...Canada) Quick Setup Guide LX9487001 (English for purchase.) Note In Canada, only Visa and MasterCard are available for USA and Canada) Paper Tray 2 LT-5400 (DCP-8150DN and DCP-8155DN option) 1 Letter or A4 size single-sided pages. 2 Approx.
... results use . ii In USA: In Canada: 1-877-552-MALL (1-877-552-6255) 1-800-947-1445 (fax) http://www.brothermall.com/ 1-877-BROTHER http://www.brother.ca/ Description Item Toner Cartridge TN-720 (Approx. 3,000 pages) 1 2 3 TN-750 (Approx. 8,000 pages) 1 2 4 Drum Unit DR-720 (Approx. 30,000 pages) 5 6 Basic User's Guide LX9483001...Canada) Quick Setup Guide LX9487001 (English for purchase.) Note In Canada, only Visa and MasterCard are available for USA and Canada) Paper Tray 2 LT-5400 (DCP-8150DN and DCP-8155DN option) 1 Letter or A4 size single-sided pages. 2 Approx.

Basic User's Guide - English
Page 8
... 34 Before scanning 34 SCAN key settings 34 Scanning using the SCAN key 36 A Routine maintenance 37 Replacing the consumable items 37 Replacing the toner cartridge 39 Cleaning the corona wire 45 Replacing the drum unit 47 B Troubleshooting 52 Identifying your problem 52 Error and maintenance messages 53 Document Jams 59...
... 34 Before scanning 34 SCAN key settings 34 Scanning using the SCAN key 36 A Routine maintenance 37 Replacing the consumable items 37 Replacing the toner cartridge 39 Cleaning the corona wire 45 Replacing the drum unit 47 B Troubleshooting 52 Identifying your problem 52 Error and maintenance messages 53 Document Jams 59...
Basic User's Guide - English
Page 47
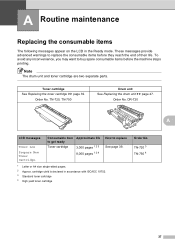
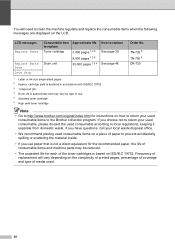
...may want to buy spare consumable items before they reach the end of their life. cartridge yield is declared in the Ready mode. Toner cartridge See Replacing the toner cartridge uu page 39. Consumable item to get ready Toner cartridge Approximate life 3,000 pages 1 2 3 8,000 pages 1 2 4 How to replace...TN-750 Drum unit See Replacing the drum unit uu page 47. Note The drum unit and toner cartridge are two separate parts. DR-720 A LCD messages Toner Low Prepare New Toner Cartridge. Order No. TN-720 3 TN-750 4 37 These messages provide advanced warnings to replace See ...
...may want to buy spare consumable items before they reach the end of their life. cartridge yield is declared in the Ready mode. Toner cartridge See Replacing the toner cartridge uu page 39. Consumable item to get ready Toner cartridge Approximate life 3,000 pages 1 2 3 8,000 pages 1 2 4 How to replace...TN-750 Drum unit See Replacing the drum unit uu page 47. Note The drum unit and toner cartridge are two separate parts. DR-720 A LCD messages Toner Low Prepare New Toner Cartridge. Order No. TN-720 3 TN-750 4 37 These messages provide advanced warnings to replace See ...
Basic User's Guide - English
Page 48
... 4 Drum life is not a direct equivalent for the recommended paper, the life of consumable items and machine parts may vary by type of the toner cartridges is based on ISO/IEC 19752. Drum Stop 1 Letter or A4 size single-sided pages. 2 Approx. You will vary depending on the complexity of ...accidentally spilling or scattering the material inside. • If you choose not to return your used consumable, please discard the used consumable items to the Brother collection program. If you use . 5 Standard toner cartridge 6 High yield toner cartridge Order No. See page 48.
... 4 Drum life is not a direct equivalent for the recommended paper, the life of consumable items and machine parts may vary by type of the toner cartridges is based on ISO/IEC 19752. Drum Stop 1 Letter or A4 size single-sided pages. 2 Approx. You will vary depending on the complexity of ...accidentally spilling or scattering the material inside. • If you choose not to return your used consumable, please discard the used consumable items to the Brother collection program. If you use . 5 Standard toner cartridge 6 High yield toner cartridge Order No. See page 48.
Basic User's Guide - English
Page 49
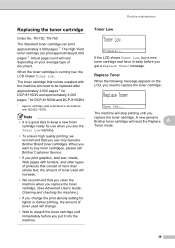
... the... Actual page count will need to be replaced after approximately 2,000 pages 1 for DCP-8110DN and approximately 3,000 pages 1 for use only Genuine Brother Brand toner cartridges. cartridge yield is running low, the LCD shows Toner Low. A new genuine Brother toner cartridge will increase. • We recommend that you clean the machine when you replace the...
... the... Actual page count will need to be replaced after approximately 2,000 pages 1 for DCP-8110DN and approximately 3,000 pages 1 for use only Genuine Brother Brand toner cartridges. cartridge yield is running low, the LCD shows Toner Low. A new genuine Brother toner cartridge will increase. • We recommend that you clean the machine when you replace the...
Basic User's Guide - English
Page 50
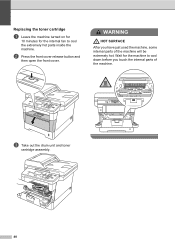
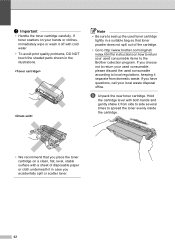
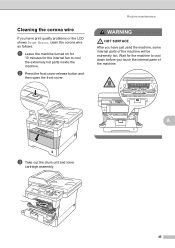
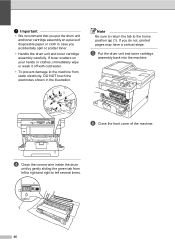
c Take out the drum unit and toner cartridge assembly. 40 Wait for the internal fan to cool down before you have just used the machine, some internal parts of the machine. b Press the front cover release button and then open the front cover. WARNING HOT SURFACE After you touch the internal parts of the machine will be extremely hot. Replacing the toner cartridge A a Leave the machine turned on for 10 minutes for the machine to cool the extremely hot parts inside the machine.
c Take out the drum unit and toner cartridge assembly. 40 Wait for the internal fan to cool down before you have just used the machine, some internal parts of the machine. b Press the front cover release button and then open the front cover. WARNING HOT SURFACE After you touch the internal parts of the machine will be extremely hot. Replacing the toner cartridge A a Leave the machine turned on for 10 minutes for the machine to cool the extremely hot parts inside the machine.
Basic User's Guide - English
Page 51
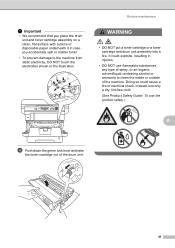
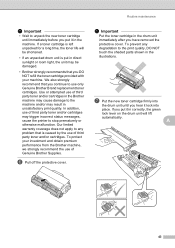
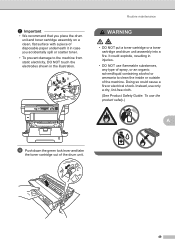
Doing so could explode, resulting in the illustration. Important • We recommend that you place the drum unit and toner cartridge assembly on a clean, flat surface with a piece of disposable paper underneath it in case you accidentally spill or scatter toner. • To...shown in injuries. • DO NOT use the product safely.) A d Push down the green lock lever and take the toner cartridge out of the machine. Routine maintenance WARNING • DO NOT put a toner cartridge or a toner cartridge and drum unit assembly into a fire. It could cause a fire or electrical shock.
Doing so could explode, resulting in the illustration. Important • We recommend that you place the drum unit and toner cartridge assembly on a clean, flat surface with a piece of disposable paper underneath it in case you accidentally spill or scatter toner. • To...shown in injuries. • DO NOT use the product safely.) A d Push down the green lock lever and take the toner cartridge out of the machine. Routine maintenance WARNING • DO NOT put a toner cartridge or a toner cartridge and drum unit assembly into a fire. It could cause a fire or electrical shock.
Basic User's Guide - English
Page 52
...both hands and gently shake it separate from side to side several times to the Brother collection program. Note • Be sure to seal up the used toner cartridge tightly in the illustrations. Hold the cartridge level with cold water. • To avoid print quality problems, DO NOT ...touch the shaded parts shown in a suitable bag so that you place the toner cartridge on a clean, flat, level, stable surface with a sheet of the cartridge. • Go to http://www.brother.com/original/ index.html for instructions on your used consumable, please discard the used consumable items...
...both hands and gently shake it separate from side to side several times to the Brother collection program. Note • Be sure to seal up the used toner cartridge tightly in the illustrations. Hold the cartridge level with cold water. • To avoid print quality problems, DO NOT ...touch the shaded parts shown in a suitable bag so that you place the toner cartridge on a clean, flat, level, stable surface with a sheet of the cartridge. • Go to http://www.brother.com/original/ index.html for instructions on your used consumable, please discard the used consumable items...
Basic User's Guide - English
Page 53
...printer to stop prematurely or otherwise malfunction. Use or attempted use of Genuine Brother Supplies. f Pull off the protective cover. Routine maintenance Important • Wait to unpack the new toner cartridge until you hear it in the machine. To prevent any problem that you...you DO NOT refill the toner cartridge provided with your investment and obtain premium performance from the Brother machine, we strongly recommend the use only Genuine Brother Brand replacement toner cartridges. In addition, use of third party toner and/or cartridges may result in correctly, the ...
...printer to stop prematurely or otherwise malfunction. Use or attempted use of Genuine Brother Supplies. f Pull off the protective cover. Routine maintenance Important • Wait to unpack the new toner cartridge until you hear it in the machine. To prevent any problem that you...you DO NOT refill the toner cartridge provided with your investment and obtain premium performance from the Brother machine, we strongly recommend the use only Genuine Brother Brand replacement toner cartridges. In addition, use of third party toner and/or cartridges may result in correctly, the ...
Basic User's Guide - English
Page 54
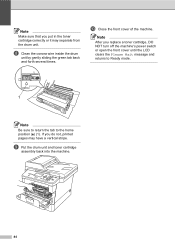
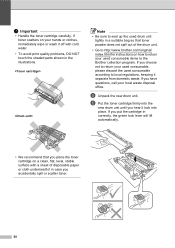
If you replace a toner cartridge, DO NOT turn off the machine's power switch or open the front cover until the LCD clears the Please Wait message and returns to Ready ... the tab to the home position (a) (1). Note After you do not, printed pages may separate from the drum unit. i Put the drum unit and toner cartridge assembly back into the machine. 44 h Clean the corona wire inside the drum unit by gently sliding the green tab back and forth several times...
If you replace a toner cartridge, DO NOT turn off the machine's power switch or open the front cover until the LCD clears the Please Wait message and returns to Ready ... the tab to the home position (a) (1). Note After you do not, printed pages may separate from the drum unit. i Put the drum unit and toner cartridge assembly back into the machine. 44 h Clean the corona wire inside the drum unit by gently sliding the green tab back and forth several times...
Basic User's Guide - English
Page 55
... A If you have just used the machine, some internal parts of the machine. A c Take out the drum unit and toner cartridge assembly. 45 Routine maintenance WARNING HOT SURFACE After you touch the internal parts of the machine will be extremely hot. Wait for the internal fan to cool down before you have print quality...
... A If you have just used the machine, some internal parts of the machine. A c Take out the drum unit and toner cartridge assembly. 45 Routine maintenance WARNING HOT SURFACE After you touch the internal parts of the machine will be extremely hot. Wait for the internal fan to cool down before you have print quality...
Basic User's Guide - English
Page 56
Note Be sure to return the tab to left to right and right to the home position (a) (1). e Put the drum unit and toner cartridge assembly back into the machine. d Clean the corona wire inside the drum unit by gently sliding the green tab from static electricity, DO NOT touch ... the front cover of disposable paper or cloth in the illustration. If you accidentally spill or scatter toner. • Handle the drum unit and toner cartridge assembly carefully. If toner scatters on a piece of the machine. Important • We recommend that you put the drum unit and toner...
Note Be sure to return the tab to left to right and right to the home position (a) (1). e Put the drum unit and toner cartridge assembly back into the machine. d Clean the corona wire inside the drum unit by gently sliding the green tab from static electricity, DO NOT touch ... the front cover of disposable paper or cloth in the illustration. If you accidentally spill or scatter toner. • Handle the drum unit and toner cartridge assembly carefully. If toner scatters on a piece of the machine. Important • We recommend that you put the drum unit and toner...
Basic User's Guide - English
Page 58
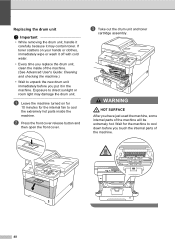
...the new drum unit immediately before you have just used the machine, some internal parts of the machine. 48 b Press the front cover release button and then open the front cover. c Take out the drum unit and toner cartridge assembly. a Leave the machine turned on your hands or clothes, immediately... wipe or wash it off with cold water. • Every time you replace the drum unit, clean the inside the machine. Wait for the internal fan to cool down before you put ...
...the new drum unit immediately before you have just used the machine, some internal parts of the machine. 48 b Press the front cover release button and then open the front cover. c Take out the drum unit and toner cartridge assembly. a Leave the machine turned on your hands or clothes, immediately... wipe or wash it off with cold water. • Every time you replace the drum unit, clean the inside the machine. Wait for the internal fan to cool down before you put ...
Basic User's Guide - English
Page 59
...clean the inside or outside of the machine. It could cause a fire or electrical shock. Routine maintenance WARNING • DO NOT put a toner cartridge or a toner cartridge and drum unit assembly into a fire. Doing so could explode, resulting in injuries. • DO NOT use the product safely.) A d Push... down the green lock lever and take the toner cartridge out of disposable paper underneath it in case you place the drum unit and toner cartridge assembly on a clean, flat surface with a piece of the drum unit. 49
...clean the inside or outside of the machine. It could cause a fire or electrical shock. Routine maintenance WARNING • DO NOT put a toner cartridge or a toner cartridge and drum unit assembly into a fire. Doing so could explode, resulting in injuries. • DO NOT use the product safely.) A d Push... down the green lock lever and take the toner cartridge out of disposable paper underneath it in case you place the drum unit and toner cartridge assembly on a clean, flat surface with a piece of the drum unit. 49
Basic User's Guide - English
Page 60
...seal up the used drum unit tightly in a suitable bag so that you place the toner cartridge on how to return your used consumable, please discard the used consumable items to the Brother collection program. If you have questions, call your hands or clothes, immediately wipe or wash .... • Go to local regulations, keeping it separate from domestic waste. If you choose not to return your used consumable according to http://www.brother.com/original/ index.html for instructions on a clean, flat, level, stable surface with cold water. • To avoid print quality problems, DO...
...seal up the used drum unit tightly in a suitable bag so that you place the toner cartridge on how to return your used consumable, please discard the used consumable items to the Brother collection program. If you have questions, call your hands or clothes, immediately wipe or wash .... • Go to local regulations, keeping it separate from domestic waste. If you choose not to return your used consumable according to http://www.brother.com/original/ index.html for instructions on a clean, flat, level, stable surface with cold water. • To avoid print quality problems, DO...
Basic User's Guide - English
Page 61
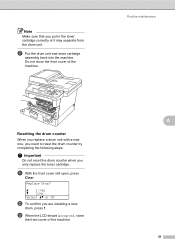
... that you are installing a new drum, press 1. Replace Drum? A 51 g Put the drum unit and toner cartridge assembly back into the machine. a 1.Yes b 2.No Select ab or OK b To confirm you put in the toner cartridge correctly or it may separate from the drum unit. a With the front cover still open, press..., you need to reset the drum counter by completing the following steps: Important Do not reset the drum counter when you only replace the toner cartridge. Do not close the front cover of the machine. c When the LCD shows Accepted, close the front cover of the machine.
... that you are installing a new drum, press 1. Replace Drum? A 51 g Put the drum unit and toner cartridge assembly back into the machine. a 1.Yes b 2.No Select ab or OK b To confirm you put in the toner cartridge correctly or it may separate from the drum unit. a With the front cover still open, press..., you need to reset the drum counter by completing the following steps: Important Do not reset the drum counter when you only replace the toner cartridge. Do not close the front cover of the machine. c When the LCD shows Accepted, close the front cover of the machine.
Basic User's Guide - English
Page 63
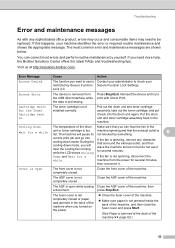
...Denied The function you will pause its not blocked by Secure Function Secure Function Lock Settings. Lock 2.0. Put the drum unit and toner cartridge assembly back in . During the cooling down mode. Reinsert the device and try to be replaced. The machine will hear the cooling ...is Open The front cover is spinning, remove any sophisticated office product, errors may occur and consumable items may need more help, the Brother Solutions Center offers the latest FAQs and troubleshooting tips: Visit us at the back of the machine when you can correct most common ...
...Denied The function you will pause its not blocked by Secure Function Secure Function Lock Settings. Lock 2.0. Put the drum unit and toner cartridge assembly back in . During the cooling down mode. Reinsert the device and try to be replaced. The machine will hear the cooling ...is Open The front cover is spinning, remove any sophisticated office product, errors may occur and consumable items may need more help, the Brother Solutions Center offers the latest FAQs and troubleshooting tips: Visit us at the back of the machine when you can correct most common ...
Basic User's Guide - English
Page 64
... the duplex tray or the fuser unit. Clean the corona wire on the drum unit. (See Cleaning the corona wire uu page 45.) The toner cartridge is jammed in the duplex tray uu page 70. closed completely. assembly in the machine. See Paper is jammed in the back of the machine... off the machine and remove the DIMM. The DIMM is jammed in Put the toner cartridge into the drum unit, and the machine without the drum then re-install the drum unit and toner cartridge unit. Leave the machine for 15 minutes with a new one. (See Advanced User's Guide: Installing extra...
... the duplex tray or the fuser unit. Clean the corona wire on the drum unit. (See Cleaning the corona wire uu page 45.) The toner cartridge is jammed in the duplex tray uu page 70. closed completely. assembly in the machine. See Paper is jammed in the back of the machine... off the machine and remove the DIMM. The DIMM is jammed in Put the toner cartridge into the drum unit, and the machine without the drum then re-install the drum unit and toner cartridge unit. Leave the machine for 15 minutes with a new one. (See Advanced User's Guide: Installing extra...


