
Quick Setup Guide - English
Page 5
For more information about recommended paper, see Recommended paper and print media in the machine. Note For Legal or Folio size paper, press the release button in the bottom of the paper tray and then pull ...out the back of paper well to avoid paper jams and misfeeds. Make sure that it will cause paper jams. The side to be printed on must be face down. The paper guides touch the sides of the paper so it is below the maximum paper mark (b b b) a. Over filling...
For more information about recommended paper, see Recommended paper and print media in the machine. Note For Legal or Folio size paper, press the release button in the bottom of the paper tray and then pull ...out the back of paper well to avoid paper jams and misfeeds. Make sure that it will cause paper jams. The side to be printed on must be face down. The paper guides touch the sides of the paper so it is below the maximum paper mark (b b b) a. Over filling...
Quick Setup Guide - English
Page 9
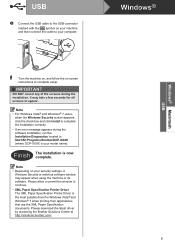
...your security settings, a Windows Security or antivirus software window may take a few seconds for Windows Vista® and Windows® 7 when printing from applications that use the XML Paper Specification documents. f Turn the machine on, and follow the on your computer. Note • Depending...IMPORTANT DO NOT cancel any of the screens during the software installation, run the Installation Diagnostics located in Start/All Programs/Brother/DCP-XXXX (where DCP-XXXX is the most suitable driver for all screens to continue. • XML Paper Specification Printer Driver The XML Paper...
...your security settings, a Windows Security or antivirus software window may take a few seconds for Windows Vista® and Windows® 7 when printing from applications that use the XML Paper Specification documents. f Turn the machine on, and follow the on your computer. Note • Depending...IMPORTANT DO NOT cancel any of the screens during the software installation, run the Installation Diagnostics located in Start/All Programs/Brother/DCP-XXXX (where DCP-XXXX is the most suitable driver for all screens to continue. • XML Paper Specification Printer Driver The XML Paper...
Quick Setup Guide - English
Page 13
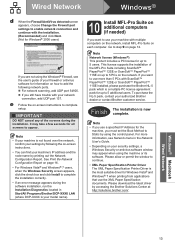
...for Windows® 2000 users) If you are not using the Windows® Firewall, see Network menu in Start/All Programs/Brother/DCP-XXXX LAN (where DCP-XXXX is your model name). 10 Install MFL-Pro Suite on additional computers (if needed) If you still have trouble with ...during the installation. Note Network license (Windows®) This product includes a PC license for Windows Vista® and Windows® 7 when printing from applications that use more information, see the user's guide of the screens during the software installation, run the Installation Diagnostics located in ...
...for Windows® 2000 users) If you are not using the Windows® Firewall, see Network menu in Start/All Programs/Brother/DCP-XXXX LAN (where DCP-XXXX is your model name). 10 Install MFL-Pro Suite on additional computers (if needed) If you still have trouble with ...during the installation. Note Network license (Windows®) This product includes a PC license for Windows Vista® and Windows® 7 when printing from applications that use more information, see the user's guide of the screens during the software installation, run the Installation Diagnostics located in ...

Quick Setup Guide - English
Page 15
See Print the Network Configuration Report on page 14. You can find your machine's MAC Address (Ethernet Address) and IP Address by using Presto! On the Brother Support screen, click Presto! Note If you use your machine with the "Scan To" function on the machine box. • ...for the machine, you press (SCAN) and choose a scan option. (For more information, see Network Scanning in Display Name up to Static by printing out the Network Configuration Report. PageManager is installed OCR capability is added to d. 10 Download and install Presto! PageManager. Go to step 10 on...
See Print the Network Configuration Report on page 14. You can find your machine's MAC Address (Ethernet Address) and IP Address by using Presto! On the Brother Support screen, click Presto! Note If you use your machine with the "Scan To" function on the machine box. • ...for the machine, you press (SCAN) and choose a scan option. (For more information, see Network Scanning in Display Name up to Static by printing out the Network Configuration Report. PageManager is installed OCR capability is added to d. 10 Download and install Presto! PageManager. Go to step 10 on...
Quick Setup Guide - English
Page 16
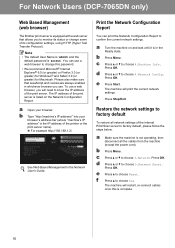
For Network Users (DCP-7065DN only) Web Based Management (web browser) The Brother print server is equipped with a web server that JavaScript and cookies are always enabled in whichever browser you use. Please also make sure that allows you will print the current network settings. The IP address of its... "machine's IP address" is in the Network User's Guide. Press OK. The machine will need to know the IP address of the internal Print/Scan server to factory default To restore all the cables from the machine (except the power cord). b Press Menu. The machine will restart...
For Network Users (DCP-7065DN only) Web Based Management (web browser) The Brother print server is equipped with a web server that JavaScript and cookies are always enabled in whichever browser you use. Please also make sure that allows you will print the current network settings. The IP address of its... "machine's IP address" is in the Network User's Guide. Press OK. The machine will need to know the IP address of the internal Print/Scan server to factory default To restore all the cables from the machine (except the power cord). b Press Menu. The machine will restart...
Advanced Users Manual - English
Page 2
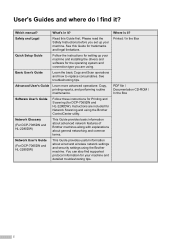
...Brother machine. Please read the Safety Instructions before you are included for trademarks and legal limitations. Software User's Guide Follow these instructions for Printing and Scanning (for the operating system and connection type you set up your machine and installing the drivers and software for DCP-7065DN.... Network Glossary (For DCP-7065DN and HL-2280DW) This Guide provides basic information about advanced network features of Brother machines along with explanations about general networking and common terms. Network User's Guide (For DCP-7065DN and HL-2280DW) This...
...Brother machine. Please read the Safety Instructions before you are included for trademarks and legal limitations. Software User's Guide Follow these instructions for Printing and Scanning (for the operating system and connection type you set up your machine and installing the drivers and software for DCP-7065DN.... Network Glossary (For DCP-7065DN and HL-2280DW) This Guide provides basic information about advanced network features of Brother machines along with explanations about general networking and common terms. Network User's Guide (For DCP-7065DN and HL-2280DW) This...
Advanced Users Manual - English
Page 5
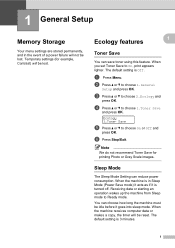
b Press a or b to On, print appears lighter. f Press Stop/Exit. When the machine is in the event of a power failure will be reset. The default setting is turned off. The ... example, Contrast) will be lost . You can save toner using this feature. Sleep Mode 1 The Sleep Mode Setting can reduce power consumption. Temporary settings (for printing Photo or Gray Scale images. d Press a or b to Ready mode. Receiving data or starting an operation wakes up the machine from Sleep mode to choose...
b Press a or b to On, print appears lighter. f Press Stop/Exit. When the machine is in the event of a power failure will be reset. The default setting is turned off. The ... example, Contrast) will be lost . You can save toner using this feature. Sleep Mode 1 The Sleep Mode Setting can reduce power consumption. Temporary settings (for printing Photo or Gray Scale images. d Press a or b to Ready mode. Receiving data or starting an operation wakes up the machine from Sleep mode to choose...
Advanced Users Manual - English
Page 6
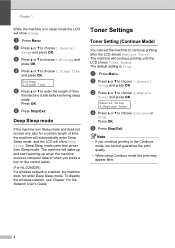
... before entering sleep mode. The default setting is enabled, the machine does not enter Deep Sleep mode. Press OK. c Press a or b to continue printing after the LCD shows Replace Toner. Toner Settings 1 Toner Setting (Continue Mode) 1 You can set the machine to choose 2.Ecology and press OK. The...LCD will show Deep Sleep. Ecology 2.Sleep Time e Press a or b to choose 1.General Setup and press OK. Press OK. The machine will continue printing until the LCD shows Toner Ended. Note • If you press a key on the control panel. (For HL-2280DW) If a wireless network is Stop....
... before entering sleep mode. The default setting is enabled, the machine does not enter Deep Sleep mode. Press OK. c Press a or b to continue printing after the LCD shows Replace Toner. Toner Settings 1 Toner Setting (Continue Mode) 1 You can set the machine to choose 2.Ecology and press OK. The...LCD will show Deep Sleep. Ecology 2.Sleep Time e Press a or b to choose 1.General Setup and press OK. Press OK. The machine will continue printing until the LCD shows Toner Ended. Note • If you press a key on the control panel. (For HL-2280DW) If a wireless network is Stop....
Advanced Users Manual - English
Page 7
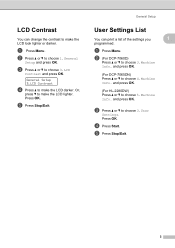
LCD Contrast 1 You can print a list of the settings you 1 programmed. e Press Stop/Exit. Press OK. d Press Start. b Press a or b to choose 3.LCD Contrast and press OK. Press OK. a Press .... (For HL-2280DW) Press a or b to choose 3.User Settings. Or, press b to make the LCD darker. b (For DCP-7060D) Press a or b to choose 4.Machine Info. and press OK. a Press Menu. and press OK. (For DCP-7065DN) Press a or b to choose 3.Machine Info. General Setup 3.LCD Contrast d Press a to make the LCD look lighter...
LCD Contrast 1 You can print a list of the settings you 1 programmed. e Press Stop/Exit. Press OK. d Press Start. b Press a or b to choose 3.LCD Contrast and press OK. Press OK. a Press .... (For HL-2280DW) Press a or b to choose 3.User Settings. Or, press b to make the LCD darker. b (For DCP-7060D) Press a or b to choose 4.Machine Info. and press OK. a Press Menu. and press OK. (For DCP-7065DN) Press a or b to choose 3.Machine Info. General Setup 3.LCD Contrast d Press a to make the LCD look lighter...
Advanced Users Manual - English
Page 8
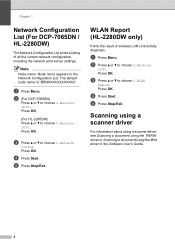
... Menu. The default node name is "BRNXXXXXXXXXXXX". WLAN Report (HL-2280DW only) 1 Prints the result of all the current network configuration, including the network print server settings. Press OK. Chapter 1 Network Configuration List (For DCP-7065DN / HL-2280DW) 1 The Network Configuration List prints a listing of wireless LAN connectivity diagnosis. a Press Menu. Press OK. Press OK...
... Menu. The default node name is "BRNXXXXXXXXXXXX". WLAN Report (HL-2280DW only) 1 Prints the result of all the current network configuration, including the network print server settings. Press OK. Chapter 1 Network Configuration List (For DCP-7065DN / HL-2280DW) 1 The Network Configuration List prints a listing of wireless LAN connectivity diagnosis. a Press Menu. Press OK. Press OK...
Advanced Users Manual - English
Page 14
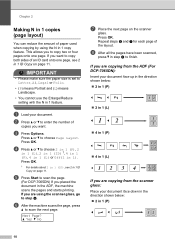
... direction shown below : 2 in 1 (P) 2 in 1 (L) 4 in 1 (P) 4 in 1 (L) If you are copying from the ADF (For DCP-7065DN): 2 Insert your document. Press OK. 1 For details about 2 in 1 (ID), see 2 in 1 ID Copy on page 11. This allows you want . c Press Options. f After... : 2 in 1 (P) 10 h After all the pages have been scanned, press b in the ADF, the machine scans the pages and starts printing. Chapter 2 Making N in 1 copies (page layout) 2 You can reduce the amount of paper used when copying by using the scanner glass, go to ...
... direction shown below : 2 in 1 (P) 2 in 1 (L) 4 in 1 (P) 4 in 1 (L) If you are copying from the ADF (For DCP-7065DN): 2 Insert your document. Press OK. 1 For details about 2 in 1 (ID), see 2 in 1 ID Copy on page 11. This allows you want . c Press Options. f After... : 2 in 1 (P) 10 h After all the pages have been scanned, press b in the ADF, the machine scans the pages and starts printing. Chapter 2 Making N in 1 copies (page layout) 2 You can reduce the amount of paper used when copying by using the scanner glass, go to ...
Advanced Users Manual - English
Page 15
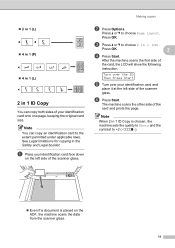
... machine sets the quality to Photo and the contrast to +2 (-nnnno+). Even if a document is placed on the left side of the card and prints the page. Turn over the ID Then Press Start e Turn over your identification card and place it at the left side of your identification card...
... machine sets the quality to Photo and the contrast to +2 (-nnnno+). Even if a document is placed on the left side of the card and prints the page. Turn over the ID Then Press Start e Turn over your identification card and place it at the left side of your identification card...
Advanced Users Manual - English
Page 16
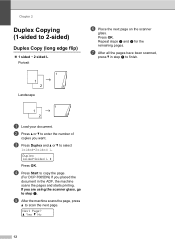
... and starts printing. Duplex 1sidedi2sided L e Press OK. Next Page? If you are using the scanner glass, go to finish. 12 d Press Start to enter the number of copies you placed the document in step e to step e. Repeat steps e and f for the remaining pages. b Press a or b to copy the page. (For DCP-7065DN) If...
... and starts printing. Duplex 1sidedi2sided L e Press OK. Next Page? If you are using the scanner glass, go to finish. 12 d Press Start to enter the number of copies you placed the document in step e to step e. Repeat steps e and f for the remaining pages. b Press a or b to copy the page. (For DCP-7065DN) If...
Advanced Users Manual - English
Page 17
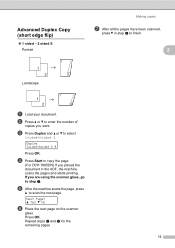
... enter the number of copies you are using the scanner glass, go to finish. 2 2 1 2 11 2 a Load your document. d Press Start to copy the page. (For DCP-7065DN) If you placed the document in step e to step e. a Yes b No f Place the next page on the scanner glass. Next Page? Press OK. Duplex 1sidedi2sided...) 1 sided i 2 sided S Portrait 1 1 2 Landscape 2 Making copies g After all the pages have been scanned, press b in the ADF, the machine scans the pages and starts printing. If you want.
... enter the number of copies you are using the scanner glass, go to finish. 2 2 1 2 11 2 a Load your document. d Press Start to copy the page. (For DCP-7065DN) If you placed the document in step e to step e. a Yes b No f Place the next page on the scanner glass. Next Page? Press OK. Duplex 1sidedi2sided...) 1 sided i 2 sided S Portrait 1 1 2 Landscape 2 Making copies g After all the pages have been scanned, press b in the ADF, the machine scans the pages and starts printing. If you want.
Advanced Users Manual - English
Page 20
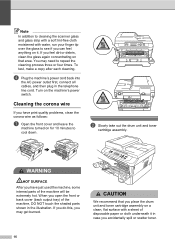
...b Slowly take out the drum unit and toner cartridge assembly. CAUTION We recommend that area. You may get burned. WARNING HOT SURFACE After you have print quality problems, clean the corona wire as follows: a Open the front cover and leave the machine turned on that you place the drum unit and ...toner cartridge assembly on it in the telephone line cord. If you do this, you have just used the machine, some internal parts of the machine, DO NOT touch the shaded parts shown in the illustration. Note In addition to cleaning the scanner glass and glass strip...
...b Slowly take out the drum unit and toner cartridge assembly. CAUTION We recommend that area. You may get burned. WARNING HOT SURFACE After you have print quality problems, clean the corona wire as follows: a Open the front cover and leave the machine turned on that you place the drum unit and ...toner cartridge assembly on it in the telephone line cord. If you do this, you have just used the machine, some internal parts of the machine, DO NOT touch the shaded parts shown in the illustration. Note In addition to cleaning the scanner glass and glass strip...
Advanced Users Manual - English
Page 21
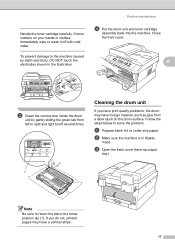
If you have print quality problems, the drum may have foreign material, such as glue from left to right and right to left several times. Handle the toner cartridge ... the drum surface. Routine maintenance d Put the drum unit and toner cartridge assembly back into the machine. Cleaning the drum unit A If you do not, printed pages may have a vertical stripe. 17 To prevent damage to the machine caused by gently sliding the green tab from a label stuck on your hands...
If you have print quality problems, the drum may have foreign material, such as glue from left to right and right to left several times. Handle the toner cartridge ... the drum surface. Routine maintenance d Put the drum unit and toner cartridge assembly back into the machine. Cleaning the drum unit A If you do not, printed pages may have a vertical stripe. 17 To prevent damage to the machine caused by gently sliding the green tab from a label stuck on your hands...
Advanced Users Manual - English
Page 23
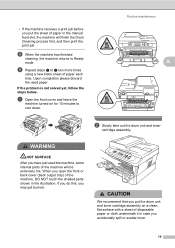
... times using a new blank sheet of paper each time. Upon completion please discard the used the machine, some internal parts of the machine will finish the Drum Cleaning process first, and then print the print job. If the problem is not solved yet, follow the steps below. If you do this, you may... get burned. • If the machine receives a print job before you put the drum unit and toner cartridge assembly on...
... times using a new blank sheet of paper each time. Upon completion please discard the used the machine, some internal parts of the machine will finish the Drum Cleaning process first, and then print the print job. If the problem is not solved yet, follow the steps below. If you do this, you may... get burned. • If the machine receives a print job before you put the drum unit and toner cartridge assembly on...

Advanced Users Manual - English
Page 24
c Push down the green lock lever and take the toner cartridge out of the drum unit. • To prevent damage to the machine caused by static electricity, DO NOT touch the electrodes shown in the illustration. If toner scatters on your hands or clothes, immediately wipe or wash it off with cold water. IMPORTANT • To avoid print quality problems, DO NOT touch the shaded parts shown in the illustration. 20 Handle the toner cartridge carefully. To prevent damage to the machine from static electricity, DO NOT touch the electrodes shown in the illustrations below.
c Push down the green lock lever and take the toner cartridge out of the drum unit. • To prevent damage to the machine caused by static electricity, DO NOT touch the electrodes shown in the illustration. If toner scatters on your hands or clothes, immediately wipe or wash it off with cold water. IMPORTANT • To avoid print quality problems, DO NOT touch the shaded parts shown in the illustration. 20 Handle the toner cartridge carefully. To prevent damage to the machine from static electricity, DO NOT touch the electrodes shown in the illustrations below.
Advanced Users Manual - English
Page 25
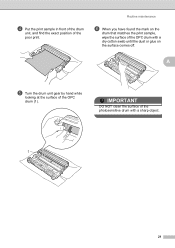
A e Turn the drum unit gear by hand while looking at the surface of the poor print. d Put the print sample in front of the drum unit, and find the exact position of the OPC drum (1). IMPORTANT DO NOT clean the surface of the photosensitive drum with a dry cotton swab until the dust or glue on the drum that matches the print sample, wipe the surface of the OPC drum with a sharp object. 1 21 Routine maintenance f When you have found the mark on the surface comes off.
A e Turn the drum unit gear by hand while looking at the surface of the poor print. d Put the print sample in front of the drum unit, and find the exact position of the OPC drum (1). IMPORTANT DO NOT clean the surface of the photosensitive drum with a dry cotton swab until the dust or glue on the drum that matches the print sample, wipe the surface of the OPC drum with a sharp object. 1 21 Routine maintenance f When you have found the mark on the surface comes off.

Advanced Users Manual - English
Page 28
...Copy or Print. e Press Stop/Exit. a Press Menu. Note The life check will not be accurate only if you have reset the part counter when you installed a new part. b Press a or b to choose one of the following: 4.Drum Life (DCP-7060D) 5.Drum Life (DCP-7065DN) ...was reset during the life of the used part. 24 c Press a or b to choose one of the following : 3.Machine Info. (DCP-7060D) 4.Machine Info. (DCP-7065DN) 5.Machine Info. (HL-2280DW) Press OK. b Press a or b to choose 2.Page Counter. a Press Menu. Checking the remaining ...
...Copy or Print. e Press Stop/Exit. a Press Menu. Note The life check will not be accurate only if you have reset the part counter when you installed a new part. b Press a or b to choose one of the following: 4.Drum Life (DCP-7060D) 5.Drum Life (DCP-7065DN) ...was reset during the life of the used part. 24 c Press a or b to choose one of the following : 3.Machine Info. (DCP-7060D) 4.Machine Info. (DCP-7065DN) 5.Machine Info. (HL-2280DW) Press OK. b Press a or b to choose 2.Page Counter. a Press Menu. Checking the remaining ...


