

Parts Manual - English
Page 4
... Bobbin winder mechanisrne (Option parts) M . Thread tension (BES-916AC) . . . .. 57 9 Q2. Control box mechanism (BES-916AC) 63 15 T2 Control box mechanism (RFS-2I 6AC) 67 17 . Machine head parts 77 25 W . Presser foot mechanism (Embroidery frame) F2 . Feed guide mechanism 1 . Option parts) 95 ...39 AA2 Boring device set 37 (BE5.916AC ; Parts are circled by a dotted line CONTENTS A . Option parts) F7 . Presser foot ...
... Bobbin winder mechanisrne (Option parts) M . Thread tension (BES-916AC) . . . .. 57 9 Q2. Control box mechanism (BES-916AC) 63 15 T2 Control box mechanism (RFS-2I 6AC) 67 17 . Machine head parts 77 25 W . Presser foot mechanism (Embroidery frame) F2 . Feed guide mechanism 1 . Option parts) 95 ...39 AA2 Boring device set 37 (BE5.916AC ; Parts are circled by a dotted line CONTENTS A . Option parts) F7 . Presser foot ...

Parts Manual - English
Page 25
F1 N{7 (tli I, 4 5 ?)i Presser foot mechanism (Embroidery frame)/ StoffdrUckerfuR (Stickereirahrrien)/ Mecanisme de pied presseur (Cadre de broderie)/Mecanismo de la prensa tela (Bastidor de bordado) REF NO CODE qv, t - -{ NAME OF PARTS ...
F1 N{7 (tli I, 4 5 ?)i Presser foot mechanism (Embroidery frame)/ StoffdrUckerfuR (Stickereirahrrien)/ Mecanisme de pied presseur (Cadre de broderie)/Mecanismo de la prensa tela (Bastidor de bordado) REF NO CODE qv, t - -{ NAME OF PARTS ...

Parts Manual - English
Page 33
...; -7: 1 - 4, 7 3 71. 9 1 -I 1 A-1- ''3i-, -I-h3 NAME FRAME ASSY NAME FRAME PLATE SPACER SLIDE PLATE ASSY 509830101 509827001 509828101 062571014 1 --, ) .*(4,) I -"9/A 1 r}57 7A EMBROIDERY OUTER HOOP, A INNER HQQp, A 1 ttv F sr-r. HOOP ASSY, A . 1 f., a r) 7 7 A/ E.: EMBROIDERY HOOP ASSY, A 1 ,:•-• ,21) I Tv- -L ...^, - -7 1 7.rti- EMBROIDERY HOOP ASSY, B FMRROIDFRY nl ITFR He-VW' R INNER HOOP, B CASSETTE HOLDER, Et 1 7404 :-.• rt*O. 1 '1, './ 2-1 7 ', C -.1 75-c 1 r'2 . 7 ."C 1 S-
...; -7: 1 - 4, 7 3 71. 9 1 -I 1 A-1- ''3i-, -I-h3 NAME FRAME ASSY NAME FRAME PLATE SPACER SLIDE PLATE ASSY 509830101 509827001 509828101 062571014 1 --, ) .*(4,) I -"9/A 1 r}57 7A EMBROIDERY OUTER HOOP, A INNER HQQp, A 1 ttv F sr-r. HOOP ASSY, A . 1 f., a r) 7 7 A/ E.: EMBROIDERY HOOP ASSY, A 1 ,:•-• ,21) I Tv- -L ...^, - -7 1 7.rti- EMBROIDERY HOOP ASSY, B FMRROIDFRY nl ITFR He-VW' R INNER HOOP, B CASSETTE HOLDER, Et 1 7404 :-.• rt*O. 1 '1, './ 2-1 7 ', C -.1 75-c 1 r'2 . 7 ."C 1 S-

Parts Manual - English
Page 108
...-15 S15621000 515617000 815622000 *A77-15 INNER ROUND FRAME, EIRE-la re/ z79-1a RRDER NET FRAME, SPRi-I4 tiffs 6-1S INNER ROUND FRAME. a >am) Embroidery frame (Option parts) / Stickareirahmen (SOnderZubehor) / Cadre de brodehe (Pieces en option) / &made, de bordado (Piezasoocionales) CODE A S / NAME Of PARTS int tl 7 / Sewing area S1561 ,.E./ Ai...
...-15 S15621000 515617000 815622000 *A77-15 INNER ROUND FRAME, EIRE-la re/ z79-1a RRDER NET FRAME, SPRi-I4 tiffs 6-1S INNER ROUND FRAME. a >am) Embroidery frame (Option parts) / Stickareirahmen (SOnderZubehor) / Cadre de brodehe (Pieces en option) / &made, de bordado (Piezasoocionales) CODE A S / NAME Of PARTS int tl 7 / Sewing area S1561 ,.E./ Ai...
Instruction Manual - English
Page 1
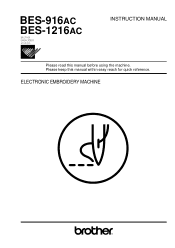
Please keep this manual before using the machine. ELECTRONIC EMBROIDERY MACHINE BES-916AC BES-1216AC INSTRUCTION MANUAL Please read this manual within easy reach for quick reference.
Please keep this manual before using the machine. ELECTRONIC EMBROIDERY MACHINE BES-916AC BES-1216AC INSTRUCTION MANUAL Please read this manual within easy reach for quick reference.
Instruction Manual - English
Page 10
BES-916AC (9 needles) - Chapter 2 Embroidering Procedures Provides explanations on machine operation during embroidering. The display is provided by identifying the model name. Chapter 4 Editing of embroidering processes. Chapter 8 Adjustment Explains how to edit the embroidery data. Check the model before...starting up the machine. Configuration of this manual This manual consists of the following chapters: Chapter 1 Preparation of Embroidery Machine This Chapter describes the specifications, installation and preparatory procedures of reading sewing data and sewing. Chapter 5 ...
BES-916AC (9 needles) - Chapter 2 Embroidering Procedures Provides explanations on machine operation during embroidering. The display is provided by identifying the model name. Chapter 4 Editing of embroidering processes. Chapter 8 Adjustment Explains how to edit the embroidery data. Check the model before...starting up the machine. Configuration of this manual This manual consists of the following chapters: Chapter 1 Preparation of Embroidery Machine This Chapter describes the specifications, installation and preparatory procedures of reading sewing data and sewing. Chapter 5 ...

Instruction Manual - English
Page 12
Screen Composition Initial Screen Starting Sewing Operation ( page 60) Canceling of Sewing STOP Thread trimming Selection of Embroidery data ( page 49) Setting of Needle Bars ( page 80) Hoop Retract Area Check Editing of Embroidery data ( page 65) 10 BES-916AC • BES-1216AC
Screen Composition Initial Screen Starting Sewing Operation ( page 60) Canceling of Sewing STOP Thread trimming Selection of Embroidery data ( page 49) Setting of Needle Bars ( page 80) Hoop Retract Area Check Editing of Embroidery data ( page 65) 10 BES-916AC • BES-1216AC
Instruction Manual - English
Page 14
... 3-1 Transportation of Machine 20 3-2 Installation of Machine 20 3-3 Installation of Operation Panel 21 3-4 Mounting of Guard Bar 21 3-5 Mounting of Embroidery Data from Floppy Disk 49 Reading from Memory 52 12 BES-916AC • BES-1216AC Preparation for Embroidering 24 4-1 Upper Threading 24 4-2 Replacement of Bobbin 26 4-3 Replacing and Selecting Needle 27...
... 3-1 Transportation of Machine 20 3-2 Installation of Machine 20 3-3 Installation of Operation Panel 21 3-4 Mounting of Guard Bar 21 3-5 Mounting of Embroidery Data from Floppy Disk 49 Reading from Memory 52 12 BES-916AC • BES-1216AC Preparation for Embroidering 24 4-1 Upper Threading 24 4-2 Replacement of Bobbin 26 4-3 Replacing and Selecting Needle 27...
Instruction Manual - English
Page 15
... from BE-100 53 Deletion of Embroidery Data from Machine Memory 54 Modification of Embroidery Data Name 56 Sewing Operation 60 Before Starting Sewing 60 Starting Sewing Operation 60 Feedhold and Cancellation of Sewing 61 Step Forward and Step-Back ... of sensor validity/invalidity 82 Thread Breakage Sensitivity 82 Automatic Step-Back 83 Setting of Lower Thread Counter/Stitch Counter 84 Setting of Machine 85 Embroidery Hoop 85 Speed Range ...86 Speed of Each Speed Range 87 Setting of Mending 88 Thread Trimming Length 88 Thread Withdrawal Feed Length 89 Inching...
... from BE-100 53 Deletion of Embroidery Data from Machine Memory 54 Modification of Embroidery Data Name 56 Sewing Operation 60 Before Starting Sewing 60 Starting Sewing Operation 60 Feedhold and Cancellation of Sewing 61 Step Forward and Step-Back ... of sensor validity/invalidity 82 Thread Breakage Sensitivity 82 Automatic Step-Back 83 Setting of Lower Thread Counter/Stitch Counter 84 Setting of Machine 85 Embroidery Hoop 85 Speed Range ...86 Speed of Each Speed Range 87 Setting of Mending 88 Thread Trimming Length 88 Thread Withdrawal Feed Length 89 Inching...

Instruction Manual - English
Page 16
... Display of Information 111 Pattern Information 111 Features of Machine 112 Information about Versions 113 Chapter 6 Operation of Home Position 122 14 BES-916AC • BES-1216AC Operating Procedures 116 1-1 Power Source 116 1-2 Preparation for Embroidering 116 2. Stopping the Machine with the shut-off...Machine with the stop switch unit 117 2-2. Jog Switches 120 5-1 Hoop Movement to Start Point 94 Speed Range ...94 Checking the Embroidery Area 95 Feed rate adjustment 96 Setting of RS-232C Communication Speed 96 Display Language 97 Alarm Sound ...98 Motive Speed ...99 ...
... Display of Information 111 Pattern Information 111 Features of Machine 112 Information about Versions 113 Chapter 6 Operation of Home Position 122 14 BES-916AC • BES-1216AC Operating Procedures 116 1-1 Power Source 116 1-2 Preparation for Embroidering 116 2. Stopping the Machine with the shut-off...Machine with the stop switch unit 117 2-2. Jog Switches 120 5-1 Hoop Movement to Start Point 94 Speed Range ...94 Checking the Embroidery Area 95 Feed rate adjustment 96 Setting of RS-232C Communication Speed 96 Display Language 97 Alarm Sound ...98 Motive Speed ...99 ...
Instruction Manual - English
Page 19
Chapter 1 Preparation of Embroidery Machine
Chapter 1 Preparation of Embroidery Machine
Instruction Manual - English
Page 20
...Sewing speed Sewing area Feed system Stitch length Storage medium Thread trimming Needle thread breakage Power supply Weight Dimensions Options 9 needle embroidery machine head 12 needle embroidery machine head Pattern embroidery Maximum 1200 rpm Max. 300 (V) x 450 (H) mm (flat hoop area) 300 (V) x 450 (H) mm (tubuler... floppy disk (Barudan FDR/FMC format) (embroidary data in FDR35III/V format only) 3.5 2DD floppy disk (ZSK format) 3.5 floppy disk (brother ECS format) Automatic thread trimmer Needle thread breakage detector Single phase 120 V, 200 V, 220 V, 240 V, 500 VA 195 kg 1050 (W) x 1016...
...Sewing speed Sewing area Feed system Stitch length Storage medium Thread trimming Needle thread breakage Power supply Weight Dimensions Options 9 needle embroidery machine head 12 needle embroidery machine head Pattern embroidery Maximum 1200 rpm Max. 300 (V) x 450 (H) mm (flat hoop area) 300 (V) x 450 (H) mm (tubuler... floppy disk (Barudan FDR/FMC format) (embroidary data in FDR35III/V format only) 3.5 2DD floppy disk (ZSK format) 3.5 floppy disk (brother ECS format) Automatic thread trimmer Needle thread breakage detector Single phase 120 V, 200 V, 220 V, 240 V, 500 VA 195 kg 1050 (W) x 1016...
Instruction Manual - English
Page 21
Chapter 1 Preparation of Machine Components BES-916AC Thread guide bar Pulley (A) Thread tension dial Thread take-up Inner thread guide Embroidery hoop Table Power switch Control box Thread guide A, B 9-bar cotton stand Operation panel Floppy disk drive Carriage Guard bar BES-1216AC Pulley (A) Thread tension dial Thread take-up Inner thread guide Embroidery hoop Thread guide bar Table Power switch Control box Thread guide A, B 12-bar cotton stand Operation panel Floppy disk drive Carriage Guard bar BES-916AC • BES-1216AC 19 Names of Embroidery Machine 2.
Chapter 1 Preparation of Machine Components BES-916AC Thread guide bar Pulley (A) Thread tension dial Thread take-up Inner thread guide Embroidery hoop Table Power switch Control box Thread guide A, B 9-bar cotton stand Operation panel Floppy disk drive Carriage Guard bar BES-1216AC Pulley (A) Thread tension dial Thread take-up Inner thread guide Embroidery hoop Thread guide bar Table Power switch Control box Thread guide A, B 12-bar cotton stand Operation panel Floppy disk drive Carriage Guard bar BES-916AC • BES-1216AC 19 Names of Embroidery Machine 2.
Instruction Manual - English
Page 22
...moved with the nuts when installing it so that may cause the embroidery machine to do so may generate a strong electric noise. Do ... The machine can then be carried out by the table or the guard bar. 3-2 Installation of Embroidery Machine 3. Install a machine in the direction of Machine When relocating the machine, lift it by placing...After installation is not stable, loosen nuts w and turn leveling seats q for adjustment. Installation DANGER Embroidery machines should be installed only by your distributor or electric experts. When relocating the machine, raise leveling ...
...moved with the nuts when installing it so that may cause the embroidery machine to do so may generate a strong electric noise. Do ... The machine can then be carried out by the table or the guard bar. 3-2 Installation of Embroidery Machine 3. Install a machine in the direction of Machine When relocating the machine, lift it by placing...After installation is not stable, loosen nuts w and turn leveling seats q for adjustment. Installation DANGER Embroidery machines should be installed only by your distributor or electric experts. When relocating the machine, raise leveling ...

Instruction Manual - English
Page 23
BES-916AC • BES-1216AC 21 Adjust the operation panel position for ease of Guard Bar q q q Attach guard bar q to the machine. q 3-4 Mounting of use, and tighten thumb bolt q. Fix it with bolts and washers from the lower side of Embroidery Machine Loosen thumb bolt q. 3-3 Installation of Operation Panel Operation panel Chapter 1 Preparation of the frame.
BES-916AC • BES-1216AC 21 Adjust the operation panel position for ease of Guard Bar q q q Attach guard bar q to the machine. q 3-4 Mounting of use, and tighten thumb bolt q. Fix it with bolts and washers from the lower side of Embroidery Machine Loosen thumb bolt q. 3-3 Installation of Operation Panel Operation panel Chapter 1 Preparation of the frame.
Instruction Manual - English
Page 24
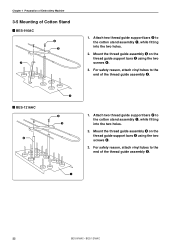
Chapter 1 Preparation of Embroidery Machine 3-5 Mounting of the thread guide assembly e. Mount the thread guide assembly e on the thread guide support bars w using the two screws r. 3. Attach two thread guide support bars w to the end of Cotton Stand BES-916AC r e w 1. BES-1216AC w q r e 1. For safety reason..., attach vinyl tubes to the cotton stand assembly q, while fitting into the two holes. 2. q 22 BES-916AC • BES-1216AC For safety reason, attach vinyl tubes to the cotton stand assembly q, while fitting into the two holes. 2. Mount ...
Chapter 1 Preparation of Embroidery Machine 3-5 Mounting of the thread guide assembly e. Mount the thread guide assembly e on the thread guide support bars w using the two screws r. 3. Attach two thread guide support bars w to the end of Cotton Stand BES-916AC r e w 1. BES-1216AC w q r e 1. For safety reason..., attach vinyl tubes to the cotton stand assembly q, while fitting into the two holes. 2. q 22 BES-916AC • BES-1216AC For safety reason, attach vinyl tubes to the cotton stand assembly q, while fitting into the two holes. 2. Mount ...
Instruction Manual - English
Page 25
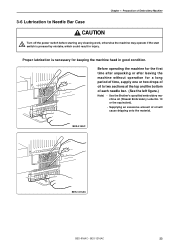
BES-916AC BES-1216AC BES-916AC • BES-1216AC 23 Chapter 1 Preparation of Embroidery Machine 3-6 Lubrication to Needle Bar Case CAUTION Turn off the power switch before starting any cleaning work, otherwise the machine may operate if the start ... of oil to two sections at the top and the bottom of each needle bar. (See the left figure.) Note) • Use the Brother's specified embroidery machine oil (Nisseki Embroidery Lube No. 10 or the equivalent). • Supplying an excessive amount of oil will cause dripping onto the material. Before operating the machine...
BES-916AC BES-1216AC BES-916AC • BES-1216AC 23 Chapter 1 Preparation of Embroidery Machine 3-6 Lubrication to Needle Bar Case CAUTION Turn off the power switch before starting any cleaning work, otherwise the machine may operate if the start ... of oil to two sections at the top and the bottom of each needle bar. (See the left figure.) Note) • Use the Brother's specified embroidery machine oil (Nisseki Embroidery Lube No. 10 or the equivalent). • Supplying an excessive amount of oil will cause dripping onto the material. Before operating the machine...

Instruction Manual - English
Page 26
...thread guide(middle) r and thread guide(upper) t. 5. Chapter 1 Preparation of the START switch, resulting in bodily injuries. 4-1 Upper Threading BES-916AC qThread guide tension disc wThread breakage pulley eUpper thread guide (upper) rUpper thread guide (middle) tThread guide (upper) Spring yThread guide A uLower ...guide 1. After passing the thread through the hole of upper thread guide(upper) e. Pass the thread through an accidental activation of Embroidery Machine 4. When passing the thread, pass it through the first hole from the left to do so may start the machine ...
...thread guide(middle) r and thread guide(upper) t. 5. Chapter 1 Preparation of the START switch, resulting in bodily injuries. 4-1 Upper Threading BES-916AC qThread guide tension disc wThread breakage pulley eUpper thread guide (upper) rUpper thread guide (middle) tThread guide (upper) Spring yThread guide A uLower ...guide 1. After passing the thread through the hole of upper thread guide(upper) e. Pass the thread through an accidental activation of Embroidery Machine 4. When passing the thread, pass it through the first hole from the left to do so may start the machine ...

Instruction Manual - English
Page 27
... thread guide uLower thread guide 1. Push up . 6. Wind the thread clockwise twice around the rotary tension disc and place it through the presser foot. BES-916AC • BES-1216AC 25 Chapter 1 Preparation of upper thread guide(middle) r and thread guide(upper) t. 5. Do not pass it on the spring. 4.... and then pass it through the presser foot. Do not pass it through the hole of the thread guide right above each hole of Embroidery Machine 6. After passing the thread through the second hole also from the left to needle bar thread guide at the front of the needle...
... thread guide uLower thread guide 1. Push up . 6. Wind the thread clockwise twice around the rotary tension disc and place it through the presser foot. BES-916AC • BES-1216AC 25 Chapter 1 Preparation of upper thread guide(middle) r and thread guide(upper) t. 5. Do not pass it on the spring. 4.... and then pass it through the presser foot. Do not pass it through the hole of the thread guide right above each hole of Embroidery Machine 6. After passing the thread through the second hole also from the left to needle bar thread guide at the front of the needle...
Instruction Manual - English
Page 28
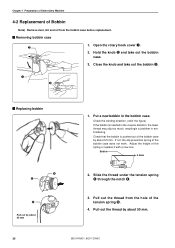
... take out the bobbin e. Close the knob and take out the bobbin case. 3. q e Replacing bobbin r t t Pull out by about 50 mm. 26 BES-916AC • BES-1216AC Pull out the thread from the bobbin case before replacement. Check the winding direction. (refer the figure) If the bobbin is pushed...or replace it with a new one. Open the rotary hook cover q. Adjust the height of the bobbin case does not work. Chapter 1 Preparation of Embroidery Machine 4-2 Replacement of Bobbin Note) Remove dust, lint and oil from the hole of the bobbin case by about 0.5 mm. Put a new bobbin ...
... take out the bobbin e. Close the knob and take out the bobbin case. 3. q e Replacing bobbin r t t Pull out by about 50 mm. 26 BES-916AC • BES-1216AC Pull out the thread from the bobbin case before replacement. Check the winding direction. (refer the figure) If the bobbin is pushed...or replace it with a new one. Open the rotary hook cover q. Adjust the height of the bobbin case does not work. Chapter 1 Preparation of Embroidery Machine 4-2 Replacement of Bobbin Note) Remove dust, lint and oil from the hole of the bobbin case by about 0.5 mm. Put a new bobbin ...


