
Software Users Manual - English
Page 2
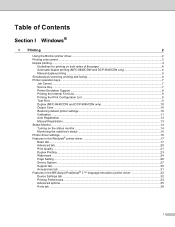
... the paper 4 Automatic duplex printing (MFC-9840CDW and DCP-9045CDN only 4 Manual duplex printing ...5 Simultaneous scanning, printing and faxing 6 Printer operation keys...7 Job Cancel...7 Secure Key ...7 Printer Emulation Support ...8 Printing the Internal Font List...9 Printing the Print Configuration List ...9 Test Print ...9 Duplex (MFC-9840CDW and DCP-9045CDN only 10 Output Color ...10 Restoring default printer settings...10...
... the paper 4 Automatic duplex printing (MFC-9840CDW and DCP-9045CDN only 4 Manual duplex printing ...5 Simultaneous scanning, printing and faxing 6 Printer operation keys...7 Job Cancel...7 Secure Key ...7 Printer Emulation Support ...8 Printing the Internal Font List...9 Printing the Print Configuration List ...9 Test Print ...9 Duplex (MFC-9840CDW and DCP-9045CDN only 10 Output Color ...10 Restoring default printer settings...10...
Software Users Manual - English
Page 3
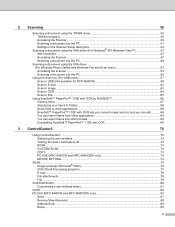
... 69 3 ControlCenter3 70 Using ControlCenter3 ...70 Switching the user interface ...72 Turning the Auto Load feature off...72 SCAN...73 CUSTOM SCAN ...73 COPY ...73 PC-FAX (MFC-9440CN and MFC-9840CDW only 74 DEVICE SETTING...74 SCAN...75 Image (example: Microsoft® Paint)...75 OCR (Word Processing program) ...77 E-mail ...78 File attachments ...78 File...
... 69 3 ControlCenter3 70 Using ControlCenter3 ...70 Switching the user interface ...72 Turning the Auto Load feature off...72 SCAN...73 CUSTOM SCAN ...73 COPY ...73 PC-FAX (MFC-9440CN and MFC-9840CDW only 74 DEVICE SETTING...74 SCAN...75 Image (example: Microsoft® Paint)...75 OCR (Word Processing program) ...77 E-mail ...78 File attachments ...78 File...
Software Users Manual - English
Page 4
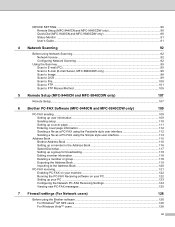
... Configuring Network Scanning ...92 Using the Scan key...95 Scan to E-mail (PC)...95 Scan to E-mail (E-mail Server, MFC-9840CDW only 96 Scan to Image ...98 Scan to OCR ...99 Scan to File...100 Scan to FTP...101 Scan to FTP Manual Method...105 5 Remote Setup (MFC-9440CN and MFC-9840CDW only) 107 Remote Setup...107 6 Brother PC-FAX Software (MFC-9440CN and MFC-9840CDW only) 109...
... Configuring Network Scanning ...92 Using the Scan key...95 Scan to E-mail (PC)...95 Scan to E-mail (E-mail Server, MFC-9840CDW only 96 Scan to Image ...98 Scan to OCR ...99 Scan to File...100 Scan to FTP...101 Scan to FTP Manual Method...105 5 Remote Setup (MFC-9440CN and MFC-9840CDW only) 107 Remote Setup...107 6 Brother PC-FAX Software (MFC-9440CN and MFC-9840CDW only) 109...
Software Users Manual - English
Page 6
... NewSoft Technical Support ...175 10 ControlCenter2 177 Using ControlCenter2 ...177 Turning the AutoLoad feature off...178 SCAN...178 CUSTOM SCAN ...179 COPY / PC-FAX ...179 DEVICE SETTINGS ...179 SCAN...180 Image (example: Apple® Preview 180 OCR (word processing application 182 E-mail ...183 ... SCAN ...185 User-defined button ...185 Scan to Image ...186 Scan to OCR ...187 Scan to E-mail ...188 Scan to File...189 COPY / PC-FAX (PC-FAX is MFC-9440CN and MFC-9840CDW only 190 DEVICE SETTINGS ...191 Remote Setup (MFC-9440CN and MFC-9840CDW only 191 Quick-Dial (MFC-9440CN and MFC-9840CDW ...
... NewSoft Technical Support ...175 10 ControlCenter2 177 Using ControlCenter2 ...177 Turning the AutoLoad feature off...178 SCAN...178 CUSTOM SCAN ...179 COPY / PC-FAX ...179 DEVICE SETTINGS ...179 SCAN...180 Image (example: Apple® Preview 180 OCR (word processing application 182 E-mail ...183 ... SCAN ...185 User-defined button ...185 Scan to Image ...186 Scan to OCR ...187 Scan to E-mail ...188 Scan to File...189 COPY / PC-FAX (PC-FAX is MFC-9440CN and MFC-9840CDW only 190 DEVICE SETTINGS ...191 Remote Setup (MFC-9440CN and MFC-9840CDW only 191 Quick-Dial (MFC-9440CN and MFC-9840CDW ...
Software Users Manual - English
Page 7
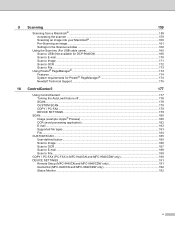
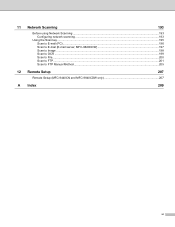
11 Network Scanning 193 Before using Network Scanning ...193 Configuring network scanning ...193 Using the Scan key...195 Scan to E-mail (PC)...196 Scan to E-mail (E-mail server, MFC-9840CDW 197 Scan to Image ...198 Scan to OCR ...199 Scan to File...200 Scan to FTP...201 Scan to FTP Manual Method...205 12 Remote Setup 207 Remote Setup (MFC-9440CN and MFC-9840CDW only 207 A Index 209 vi
11 Network Scanning 193 Before using Network Scanning ...193 Configuring network scanning ...193 Using the Scan key...195 Scan to E-mail (PC)...196 Scan to E-mail (E-mail server, MFC-9840CDW 197 Scan to Image ...198 Scan to OCR ...199 Scan to File...200 Scan to FTP...201 Scan to FTP Manual Method...205 12 Remote Setup 207 Remote Setup (MFC-9440CN and MFC-9840CDW only 207 A Index 209 vi
Software Users Manual - English
Page 8
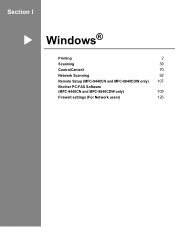
Section I Windows® I Printing 2 Scanning 39 ControlCenter3 70 Network Scanning 92 Remote Setup (MFC-9440CN and MFC-9840CDW only) 107 Brother PC-FAX Software (MFC-9440CN and MFC-9840CDW only) 109 Firewall settings (For Network users) 126
Section I Windows® I Printing 2 Scanning 39 ControlCenter3 70 Network Scanning 92 Remote Setup (MFC-9440CN and MFC-9840CDW only) 107 Brother PC-FAX Software (MFC-9440CN and MFC-9840CDW only) 109 Firewall settings (For Network users) 126

Software Users Manual - English
Page 47
Note • For Windows® XP/Windows Vista™: Choose TW-Brother MFC-XXXX (TW-Brother DCP-XXXX) or TW-Brother MFC-XXXX LAN 2 (TW-Brother DCP-XXXX LAN). • For other operating systems: Choose Brother MFC-XXXX (Brother DCP-XXXX) or Brother MFC-XXXX LAN (Brother DCP-XXXX LAN). (Where XXXX is your model name) e Check the Display scanner dialog box on page 41. 40 f Click Scan. The Scanner Setup dialog box appears: Go to Scanning a document into the PC on the Scan or Get Photo panel. Scanning d Choose the scanner you are using from the Available Scanners list.
Note • For Windows® XP/Windows Vista™: Choose TW-Brother MFC-XXXX (TW-Brother DCP-XXXX) or TW-Brother MFC-XXXX LAN 2 (TW-Brother DCP-XXXX LAN). • For other operating systems: Choose Brother MFC-XXXX (Brother DCP-XXXX) or Brother MFC-XXXX LAN (Brother DCP-XXXX LAN). (Where XXXX is your model name) e Check the Display scanner dialog box on page 41. 40 f Click Scan. The Scanner Setup dialog box appears: Go to Scanning a document into the PC on the Scan or Get Photo panel. Scanning d Choose the scanner you are using from the Available Scanners list.

Software Users Manual - English
Page 49
Scanning Scanning a duplex document (MFC-9840CDW and DCP-9045CDN only) 2 a Put the document face up in the Scanner Setup dialog box: „ Scan (Image Type) „ Resolution „ Scan Type „ Brightness „ Contrast „ Document Size d Click Start. Note • You can not adjust the scanning area. • You can not use legal size paper for duplex...
Scanning Scanning a duplex document (MFC-9840CDW and DCP-9045CDN only) 2 a Put the document face up in the Scanner Setup dialog box: „ Scan (Image Type) „ Resolution „ Scan Type „ Brightness „ Contrast „ Document Size d Click Start. Note • You can not adjust the scanning area. • You can not use legal size paper for duplex...

Software Users Manual - English
Page 54
...® XP/Windows Vista™: Choose WIA-Brother MFC-XXXX (WIA-Brother DCP-XXXX) or WIA-Brother MFC-XXXX LAN (WIA-Brother DCP-XXXX LAN). • For other operating systems: Choose Brother MFC-XXXX (Brother DCP-XXXX) or Brother MFC-XXXX LAN (Brother DCP-XXXX LAN). (Where XXXX is your machine or you can scan images directly into any other software applications. Accessing...
...® XP/Windows Vista™: Choose WIA-Brother MFC-XXXX (WIA-Brother DCP-XXXX) or WIA-Brother MFC-XXXX LAN (WIA-Brother DCP-XXXX LAN). • For other operating systems: Choose Brother MFC-XXXX (Brother DCP-XXXX) or Brother MFC-XXXX LAN (Brother DCP-XXXX LAN). (Where XXXX is your machine or you can scan images directly into any other software applications. Accessing...

Software Users Manual - English
Page 58
... must restart your PC for the new settings to scan. If you do not have enough memory and hard disk space for changing the paper size. You can run the utility by choosing Scanner Utility located in the Start/All Programs/Brother/MFC-XXXX (or DCP-XXXX) (where XXXX is used... Brightness, Contrast, Resolution and Picture type from Advanced Properties. This time only the chosen area of the document appears in the Scan dialog box. Brother Scanner Utility 2 The Brother Scanner Utility is your file. 51 Make sure that you have enough memory or hard disk space then your application window...
... must restart your PC for the new settings to scan. If you do not have enough memory and hard disk space for changing the paper size. You can run the utility by choosing Scanner Utility located in the Start/All Programs/Brother/MFC-XXXX (or DCP-XXXX) (where XXXX is used... Brightness, Contrast, Resolution and Picture type from Advanced Properties. This time only the chosen area of the document appears in the Scan dialog box. Brother Scanner Utility 2 The Brother Scanner Utility is your file. 51 Make sure that you have enough memory or hard disk space then your application window...

Software Users Manual - English
Page 60
c Choose the scanner you want to Scanning a document into the PC on page 54. 53 d Click Import. The Scan dialog box appears: Go to use. Note Duplex scan is supported by the MFC-9840CDW and DCP-9045CDN only. b Do one of the following: „ For Windows Photo Gallery Click File, then Import from Camera or Scanner. „ For Windows Fax and Scan Click File, New, then Scan. Scanning Scanning a document using the WIA driver (For Windows Photo Gallery and Windows Fax and Scan users) 2 2 Accessing the scanner 2 a Open your software application to scan the document.
c Choose the scanner you want to Scanning a document into the PC on page 54. 53 d Click Import. The Scan dialog box appears: Go to use. Note Duplex scan is supported by the MFC-9840CDW and DCP-9045CDN only. b Do one of the following: „ For Windows Photo Gallery Click File, then Import from Camera or Scanner. „ For Windows Fax and Scan Click File, New, then Scan. Scanning Scanning a document using the WIA driver (For Windows Photo Gallery and Windows Fax and Scan users) 2 2 Accessing the scanner 2 a Open your software application to scan the document.
Software Users Manual - English
Page 61
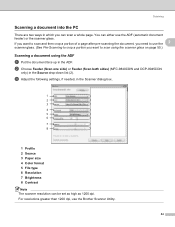
...Scan one side) or Feeder (Scan both sides) (MFC-9840CDW and DCP-9045CDN only) in the ADF. For resolutions greater than 1200 dpi, use the Brother Scanner Utility. 54 If you want to scan and then crop a portion of a page after pre-scanning the document, you need to use the 2 scanner glass. (See Pre-Scanning... a Put the document face up in the Source drop-down list (2). Scanning Scanning a document into the PC 2 There are two ways in the Scanner dialog box. 1 2 3 4 5 6 7 8 1 Profile 2 Source 3 Paper size 4 Color format 5 File type 6 Resolution 7 Brightness 8 Contrast Note The scanner ...
...Scan one side) or Feeder (Scan both sides) (MFC-9840CDW and DCP-9045CDN only) in the ADF. For resolutions greater than 1200 dpi, use the Brother Scanner Utility. 54 If you want to scan and then crop a portion of a page after pre-scanning the document, you need to use the 2 scanner glass. (See Pre-Scanning... a Put the document face up in the Source drop-down list (2). Scanning Scanning a document into the PC 2 There are two ways in the Scanner dialog box. 1 2 3 4 5 6 7 8 1 Profile 2 Source 3 Paper size 4 Color format 5 File type 6 Resolution 7 Brightness 8 Contrast Note The scanner ...

Software Users Manual - English
Page 65
...file formats. e Choose one of the options below: „ To change the color, quality and file name. The default File names are based on the scanner glass. Press OK. g Press a or b to choose the quality you want . Scanning • Duplex scan is supported by the MFC-9840CDW and DCP-9045CDN only. ...• Duplex scan is available from the ...
...file formats. e Choose one of the options below: „ To change the color, quality and file name. The default File names are based on the scanner glass. Press OK. g Press a or b to choose the quality you want . Scanning • Duplex scan is supported by the MFC-9840CDW and DCP-9045CDN only. ...• Duplex scan is available from the ...
Software Users Manual - English
Page 66
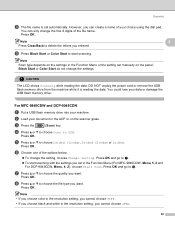
Note 2 Press Clear/Back to choose 2sided (L)edge, 2sided (S)edge or 1sided. i Press Black Start or Color Start to g. „ To start scanning. You could lose your machine. For MFC-9840CDW and DCP-9045CDN 2 a Put a USB flash memory drive into your data or damage the USB flash memory drive. ...Press a or b to delete the letters you want . f Choose one of the options below. „ To change the first 6 digits of your document in the Function Menu (For MFC-9840CDW, Menu, 5, 2 and For DCP-9045CDN, Menu, 4, 2), choose Start Scan. g Press a or b to choose the file type you entered...
Note 2 Press Clear/Back to choose 2sided (L)edge, 2sided (S)edge or 1sided. i Press Black Start or Color Start to g. „ To start scanning. You could lose your machine. For MFC-9840CDW and DCP-9045CDN 2 a Put a USB flash memory drive into your data or damage the USB flash memory drive. ...Press a or b to delete the letters you want . f Choose one of the options below. „ To change the first 6 digits of your document in the Function Menu (For MFC-9840CDW, Menu, 5, 2 and For DCP-9045CDN, Menu, 4, 2), choose Start Scan. g Press a or b to choose the file type you entered...
Software Users Manual - English
Page 67
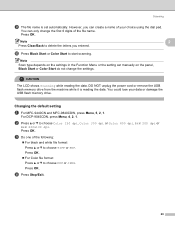
... or Color Start do not change the first 6 digits of the file name. CAUTION The LCD shows Scanning while reading the data. Changing the default setting 2 a For MFC-9440CN and MFC-9840CDW, press Menu, 5, 2, 1. b Press a or b to start scanning. Press OK. d Press Stop/Exit. 60 You could lose your choice using the dial pad. c Do one of...
... or Color Start do not change the first 6 digits of the file name. CAUTION The LCD shows Scanning while reading the data. Changing the default setting 2 a For MFC-9440CN and MFC-9840CDW, press Menu, 5, 2, 1. b Press a or b to start scanning. Press OK. d Press Stop/Exit. 60 You could lose your choice using the dial pad. c Do one of...

Software Users Manual - English
Page 68
... This message will appear if there are trying to 6 characters.) Press OK. Note You cannot use a space for the first character. Scanning Changing the default file name a For MFC-9440CN and MFC-9840CDW, press Menu, 5, 2, 2. c Press Stop/Exit. 2 2 Understanding the Error Messages 2 Once you are familiar with the types of errors that can occur... stored on the USB flash memory drive. „ Unusable Device This message will appear if your USB flash memory drive is not supported by your Brother machine. 61
... This message will appear if there are trying to 6 characters.) Press OK. Note You cannot use a space for the first character. Scanning Changing the default file name a For MFC-9440CN and MFC-9840CDW, press Menu, 5, 2, 2. c Press Stop/Exit. 2 2 Understanding the Error Messages 2 Once you are familiar with the types of errors that can occur... stored on the USB flash memory drive. „ Unusable Device This message will appear if your USB flash memory drive is not supported by your Brother machine. 61

Software Users Manual - English
Page 69
If your machine is an MFC-9440CN or DCP-9040CN, go to Step d. If your machine is an MFC-9840CDW or DCP-9045CDN, go to Step e. Press OK. e Press Black Start or Color Start. The machine starts scanning the document, creates a file attachment, ...and launches your E-mail application as a file attachment. Note If you want to scan a document using the duplex scanning feature, you want the scanned data in color, choose color...
If your machine is an MFC-9440CN or DCP-9040CN, go to Step d. If your machine is an MFC-9840CDW or DCP-9045CDN, go to Step e. Press OK. e Press Black Start or Color Start. The machine starts scanning the document, creates a file attachment, ...and launches your E-mail application as a file attachment. Note If you want to scan a document using the duplex scanning feature, you want the scanned data in color, choose color...

Software Users Manual - English
Page 70
...Press OK. If your machine is an MFC-9440CN or DCP-9040CN, go to Step d. d Press a or b to Image. If your machine is an MFC-9840CDW or DCP-9045CDN, go to Step e. e Press Black Start or Color Start. c Press a or b to choose Scan to choose 1sided, 2sided (L)edge or 2sided... (S)edge. The machine starts the scanning process. If you want to scan a document using the duplex scanning feature, you need to ...
...Press OK. If your machine is an MFC-9440CN or DCP-9040CN, go to Step d. d Press a or b to Image. If your machine is an MFC-9840CDW or DCP-9045CDN, go to Step e. e Press Black Start or Color Start. c Press a or b to choose Scan to choose 1sided, 2sided (L)edge or 2sided... (S)edge. The machine starts the scanning process. If you want to scan a document using the duplex scanning feature, you need to ...

Software Users Manual - English
Page 71
...is an MFC-9840CDW or DCP-9045CDN, go to Step e. d Press a or b to OCR. Note If you want to scan a document using the duplex scanning feature, put the document in the ADF and then choose 2sided (L)edge or 2sided (S)edge depending on the scanner glass. The machine starts the scanning process. ... in your document layout. c Press a or b to choose Scan to choose 1sided, 2sided (L)edge or 2sided (S)edge. If your machine is an MFC-9440CN or DCP-9040CN, go to Step d. e Press Black Start or Color Start. Note • Scan type depends on the settings on the Device Button tab, Black ...
...is an MFC-9840CDW or DCP-9045CDN, go to Step e. d Press a or b to OCR. Note If you want to scan a document using the duplex scanning feature, put the document in the ADF and then choose 2sided (L)edge or 2sided (S)edge depending on the scanner glass. The machine starts the scanning process. ... in your document layout. c Press a or b to choose Scan to choose 1sided, 2sided (L)edge or 2sided (S)edge. If your machine is an MFC-9440CN or DCP-9040CN, go to Step d. e Press Black Start or Color Start. Note • Scan type depends on the settings on the Device Button tab, Black ...

Software Users Manual - English
Page 72
..., right-click the each Control Center buttons, click ControlCenter Configuration and click the Device Button tab. 65 If you want the scanned data in color, choose color in the ADF and then choose 2sided (L)edge or 2sided (S)edge depending on the Device Button tab of the ControlCenter3 configuration....your choice. Press OK. e Press Black Start or Color Start. The machine starts the scanning process. To change the file name of scanned documents, enter the file name in the Scan to Step e. If your machine is an MFC-9840CDW or DCP-9045CDN, go to File screen of your document...
..., right-click the each Control Center buttons, click ControlCenter Configuration and click the Device Button tab. 65 If you want the scanned data in color, choose color in the ADF and then choose 2sided (L)edge or 2sided (S)edge depending on the Device Button tab of the ControlCenter3 configuration....your choice. Press OK. e Press Black Start or Color Start. The machine starts the scanning process. To change the file name of scanned documents, enter the file name in the Scan to Step e. If your machine is an MFC-9840CDW or DCP-9045CDN, go to File screen of your document...


