

Quick Setup Guide - English
Page 4
Do NOT connect the interface cable at this time. Getting Started 1 Carton components 1 Carton components may vary from one country to a USB port on a keyboard or non-powered USB hub. „ Network cable Use a straight-through Category5 (or greater) twisted-pair cable for ...10 Face-down Output Tray Support 11 Multi-purpose tray (MP tray) CD-ROMs For Windows® For Macintosh® Quick Setup Guide User's Guide Belt Unit (pre-installed) AC Power Cord Telephone line Cord Insertion Sheet and Plastic Accessory Order Form and bag for repacking Test Sheet (USA only) Toner cartridges...
Do NOT connect the interface cable at this time. Getting Started 1 Carton components 1 Carton components may vary from one country to a USB port on a keyboard or non-powered USB hub. „ Network cable Use a straight-through Category5 (or greater) twisted-pair cable for ...10 Face-down Output Tray Support 11 Multi-purpose tray (MP tray) CD-ROMs For Windows® For Macintosh® Quick Setup Guide User's Guide Belt Unit (pre-installed) AC Power Cord Telephone line Cord Insertion Sheet and Plastic Accessory Order Form and bag for repacking Test Sheet (USA only) Toner cartridges...
Quick Setup Guide - English
Page 51
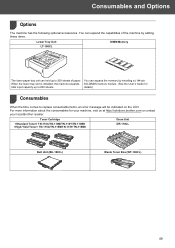
Toner Cartridge TN-110C/TN-110M/TN-110Y/TN-110BK TN-115C/TN-115M/TN-115Y/TN-115BK Drum Unit DR-110CL Belt Unit (BU-100CL) Waste Toner Box (WT-100CL) 49 details.) Consumables 2 When the time comes to 500 sheets of paper. For more information about the consumables ... accessories. You can expand the capabilities of the machine by adding these items. Lower Tray Unit LT-100CL DIMM Memory The lower paper tray unit can expand the memory by installing a (144-pin When the lower tray unit is installed, the machine expands SO-DIMM) memory module. (See the User's Guide for your...
Toner Cartridge TN-110C/TN-110M/TN-110Y/TN-110BK TN-115C/TN-115M/TN-115Y/TN-115BK Drum Unit DR-110CL Belt Unit (BU-100CL) Waste Toner Box (WT-100CL) 49 details.) Consumables 2 When the time comes to 500 sheets of paper. For more information about the consumables ... accessories. You can expand the capabilities of the machine by adding these items. Lower Tray Unit LT-100CL DIMM Memory The lower paper tray unit can expand the memory by installing a (144-pin When the lower tray unit is installed, the machine expands SO-DIMM) memory module. (See the User's Guide for your...
Users Manual - English
Page 5
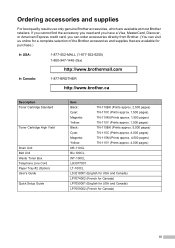
...MALL (1-877-552-6255) 1-800-947-1445 (fax) http://www.brothermall.com In Canada: 1-877-BROTHER http://www.brother.ca Description Toner Cartridge Standard Toner Cartridge High Yield Drum Unit Belt Unit Waste Toner Box Telephone Line Cord Paper Tray #2 (Option) User's Guide Quick Setup Guide Item Black:... (French for Canada) LP7059001 (English for USA and Canada) LP7059002 (French for a complete selection of the Brother accessories and supplies that are available at most Brother retailers. If you cannot find the accessory you need and you have a Visa, MasterCard, Discover, or American...
...MALL (1-877-552-6255) 1-800-947-1445 (fax) http://www.brothermall.com In Canada: 1-877-BROTHER http://www.brother.ca Description Toner Cartridge Standard Toner Cartridge High Yield Drum Unit Belt Unit Waste Toner Box Telephone Line Cord Paper Tray #2 (Option) User's Guide Quick Setup Guide Item Black:... (French for Canada) LP7059001 (English for USA and Canada) LP7059002 (French for a complete selection of the Brother accessories and supplies that are available at most Brother retailers. If you cannot find the accessory you need and you have a Visa, MasterCard, Discover, or American...
Users Manual - English
Page 7
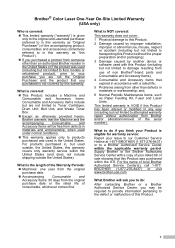
...Toner Cartridges, Drum Unit, Belt Unit, and Waste Toner Box. „ Except as Paper Feeding Kit, Fuser and Laser Units. What to do : After contacting Brother or a Brother Authorized Service Center, you purchased a product from someone other than an authorized Brother reseller in the United States or if the... the name of consumable, whichever comes first. Brother® Color Laser One-Year On-Site Limited Warranty (USA only) Who is covered: „ This limited warranty ("warranty") is given only to the original end-use of non Brother®-brand parts and Consumable and Accessory Items);...
...Toner Cartridges, Drum Unit, Belt Unit, and Waste Toner Box. „ Except as Paper Feeding Kit, Fuser and Laser Units. What to do : After contacting Brother or a Brother Authorized Service Center, you purchased a product from someone other than an authorized Brother reseller in the United States or if the... the name of consumable, whichever comes first. Brother® Color Laser One-Year On-Site Limited Warranty (USA only) Who is covered: „ This limited warranty ("warranty") is given only to the original end-use of non Brother®-brand parts and Consumable and Accessory Items);...
Users Manual - English
Page 15
... the outside of the machine 152 Cleaning the scanner 153 Cleaning the laser scanner windows 154 Cleaning the corona wires 158 Cleaning the drum unit 161 Replacing the consumable items 169 Replacing a toner cartridge 172 Replacing the drum unit 177 Replacing the belt unit 183 Replacing the waste toner box 188 Packing and shipping the...
... the outside of the machine 152 Cleaning the scanner 153 Cleaning the laser scanner windows 154 Cleaning the corona wires 158 Cleaning the drum unit 161 Replacing the consumable items 169 Replacing a toner cartridge 172 Replacing the drum unit 177 Replacing the belt unit 183 Replacing the waste toner box 188 Packing and shipping the...
Users Manual - English
Page 32
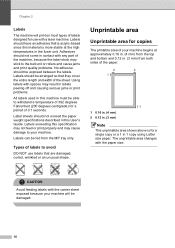
Using labels with a laser machine. Labels exceeding this specification may not feed or print properly and may...machine will be fed from both sides of the paper. 2 2 1 1 1 0.16 in. (4 mm) 2 0.12 in the fuser unit. Labels should not exceed the paper weight specifications described in this material is more stable at approximately 0.16 in. (4 mm) from the top ...on most types of labels designed for copies 2 The printable area of labels to the belt unit or rollers and cause jams and print quality problems. No adhesive should be exposed between the labels. Types of your...
Using labels with a laser machine. Labels exceeding this specification may not feed or print properly and may...machine will be fed from both sides of the paper. 2 2 1 1 1 0.16 in. (4 mm) 2 0.12 in the fuser unit. Labels should not exceed the paper weight specifications described in this material is more stable at approximately 0.16 in. (4 mm) from the top ...on most types of labels designed for copies 2 The printable area of labels to the belt unit or rollers and cause jams and print quality problems. No adhesive should be exposed between the labels. Types of your...
Users Manual - English
Page 94
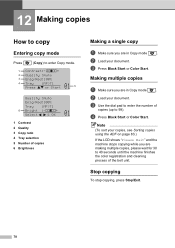
...c Use the dial pad to enter the number of copies (up to 40 seconds until the machine finishes the color registration and cleaning process of copies 6 Brightness Making a single copy 12 a Make sure you are in Copy ...the machine stops copying while you are making multiple copies, please wait for 30 to 99). c Press Black Start or Color Start. 12 Making copies 12 How to copy 12 Entering copy mode 12 Press (Copy) to enter Copy mode. 1... 01 6 Bright :- + Select & OK 1 Contrast 2 Quality 3 Copy ratio 4 Tray selection 5 Number of the belt unit. d Press Black Start or Color Start.
...c Use the dial pad to enter the number of copies (up to 40 seconds until the machine finishes the color registration and cleaning process of copies 6 Brightness Making a single copy 12 a Make sure you are in Copy ...the machine stops copying while you are making multiple copies, please wait for 30 to 99). c Press Black Start or Color Start. 12 Making copies 12 How to copy 12 Entering copy mode 12 Press (Copy) to enter Copy mode. 1... 01 6 Bright :- + Select & OK 1 Contrast 2 Quality 3 Copy ratio 4 Tray selection 5 Number of the belt unit. d Press Black Start or Color Start.

Users Manual - English
Page 140
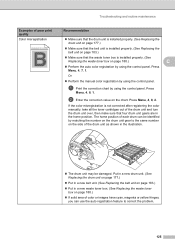
... and Basic tab in the Software User's Guide on the CD-ROM.) „ The drum unit may not be able to reproduce the colors on your printouts are not what you expected. All one color Recommendation „ Make sure that you see on a monitor are different. Roughsurfaced paper or thick...that the drum unit is installed properly. (See Replacing the drum unit on page 177.) „ Make sure that the belt unit is installed properly. (See Replacing the belt unit on page 183.) „ Perform the calibration. Press Menu, 4, 6. (See Software User's Guide on the CD-ROM.) „ Adjust the color by using ...
... and Basic tab in the Software User's Guide on the CD-ROM.) „ The drum unit may not be able to reproduce the colors on your printouts are not what you expected. All one color Recommendation „ Make sure that you see on a monitor are different. Roughsurfaced paper or thick...that the drum unit is installed properly. (See Replacing the drum unit on page 177.) „ Make sure that the belt unit is installed properly. (See Replacing the belt unit on page 183.) „ Perform the calibration. Press Menu, 4, 6. (See Software User's Guide on the CD-ROM.) „ Adjust the color by using ...
Users Manual - English
Page 141
... to correct the problem. 125 Press Menu, 4, 8, 2. Put in a new drum unit. (See Replacing the drum unit on page 177.) „ Put in a new belt unit. (See Replacing the belt unit on page 188.) „ If solid area of color or images have cyan, magenta or yellow fringes, you can be damaged. Troubleshooting and routine maintenance Examples...
... to correct the problem. 125 Press Menu, 4, 8, 2. Put in a new drum unit. (See Replacing the drum unit on page 177.) „ Put in a new belt unit. (See Replacing the belt unit on page 188.) „ If solid area of color or images have cyan, magenta or yellow fringes, you can be damaged. Troubleshooting and routine maintenance Examples...
Users Manual - English
Page 149
...one of its life. Do one . (See Replacing the drum unit on page 177.) The drum unit counter was not reset when a new drum was installed. Change Parts It is time to reset the drum unit counter. then replace the drum unit... belt unit. (See Replacing the belt unit on page 188.) „ If the problem continues, call Brother Customer Service. Press Menu, 8, 4, and then a or b to replace the fuser unit. Change Parts Fuser Unit ...the drum unit again. 1 The toner cartridge color with direct print or PictBridge. Press Black Start or Color Start and try to replace the fuser unit. 133...
...one of its life. Do one . (See Replacing the drum unit on page 177.) The drum unit counter was not reset when a new drum was installed. Change Parts It is time to reset the drum unit counter. then replace the drum unit... belt unit. (See Replacing the belt unit on page 188.) „ If the problem continues, call Brother Customer Service. Press Menu, 8, 4, and then a or b to replace the fuser unit. Change Parts Fuser Unit ...the drum unit again. 1 The toner cartridge color with direct print or PictBridge. Press Black Start or Color Start and try to replace the fuser unit. 133...
Users Manual - English
Page 151
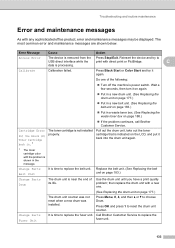
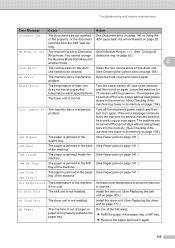
... mode. Turn off Ring mode. to Off. (See Turning off the machine's power switch and then turn it again. Install the belt unit. (See Replacing the belt unit on again. problem. Low Temperature The temperature of the machine Increase room temperature to print, copy or scan again. Fuser Error The... jams on page 177.) No Paper The machine is out of the following: „ Refill the paper in the paper tray. Do one of paper or paper is too hot. Troubleshooting and routine maintenance Error Message Cause Action Document Jam The document was too long. If the...
... mode. Turn off Ring mode. to Off. (See Turning off the machine's power switch and then turn it again. Install the belt unit. (See Replacing the belt unit on again. problem. Low Temperature The temperature of the machine Increase room temperature to print, copy or scan again. Fuser Error The... jams on page 177.) No Paper The machine is out of the following: „ Refill the paper in the paper tray. Do one of paper or paper is too hot. Troubleshooting and routine maintenance Error Message Cause Action Document Jam The document was too long. If the...
Users Manual - English
Page 153
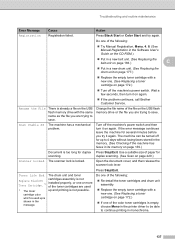
... 137 Wait a few seconds, then turn it again. Change the file name of the color toner cartridges is shown in the printer driver to be turned off for up and printing is... too long for duplex Press Stop/Exit. Do one of the file on again. „ If the problem continues, call Brother Customer Service. Turn off the machine's power switch. duplex ... in a new belt unit. (See Replacing the belt unit on page 183.) C „ Put in a new drum unit. (See Replacing the drum unit on page 177.) „ Replace the empty toner cartridge with a new one of the toner ...
... 137 Wait a few seconds, then turn it again. Change the file name of the color toner cartridges is shown in the printer driver to be turned off for up and printing is... too long for duplex Press Stop/Exit. Do one of the file on again. „ If the problem continues, call Brother Customer Service. Turn off the machine's power switch. duplex ... in a new belt unit. (See Replacing the belt unit on page 183.) C „ Put in a new drum unit. (See Replacing the drum unit on page 177.) „ Replace the empty toner cartridge with a new one of the toner ...
Users Manual - English
Page 187
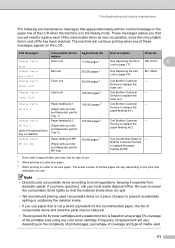
...to replace the fuser unit. Brother Customer Service to replace the paper feeding kit MP. 1 Drum yield is based on an average 5% coverage of the printable area using any of these messages appear on the LCD. Change Parts Laser Unit Laser unit 100,000 pages 3 Call Brother Customer - Note ... Parts Belt Unit Belt unit 50,000 pages 2 See Replacing the belt unit on page 177. Frequency of replacement will vary depending on Letter or A4 size paper. Drum unit 17,000 pages 1 See Replacing the drum DR-110CL C unit on page 183. Service to replace the laser unit. Troubleshooting...
...to replace the fuser unit. Brother Customer Service to replace the paper feeding kit MP. 1 Drum yield is based on an average 5% coverage of the printable area using any of these messages appear on the LCD. Change Parts Laser Unit Laser unit 100,000 pages 3 Call Brother Customer - Note ... Parts Belt Unit Belt unit 50,000 pages 2 See Replacing the belt unit on page 177. Frequency of replacement will vary depending on Letter or A4 size paper. Drum unit 17,000 pages 1 See Replacing the drum DR-110CL C unit on page 183. Service to replace the laser unit. Troubleshooting...

Users Manual - English
Page 199
... this message, you touch it, it could degrade print quality. Troubleshooting and routine maintenance Replacing the belt unit C a Turn off the machine's power switch. Replacing the belt unit C Order Number: BU-100CL Change Parts Belt Unit message C When the belt unit runs out, the following message appears on the LCD. The LCD shows the parts name which needs...
... this message, you touch it, it could degrade print quality. Troubleshooting and routine maintenance Replacing the belt unit C a Turn off the machine's power switch. Replacing the belt unit C Order Number: BU-100CL Change Parts Belt Unit message C When the belt unit runs out, the following message appears on the LCD. The LCD shows the parts name which needs...
Users Manual - English
Page 201
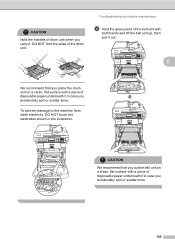
... that you place the drum unit on a clean, flat surface with a piece of disposable paper underneath it in case you accidentally spill or scatter toner. C We recommend that you put the belt unit on a clean, flat surface with both hands and lift the belt unit up, then pull it .... Troubleshooting and routine maintenance d Hold the green parts of the belt unit with a piece of disposable paper underneath it in the illustration. ...
... that you place the drum unit on a clean, flat surface with a piece of disposable paper underneath it in case you accidentally spill or scatter toner. C We recommend that you put the belt unit on a clean, flat surface with both hands and lift the belt unit up, then pull it .... Troubleshooting and routine maintenance d Hold the green parts of the belt unit with a piece of disposable paper underneath it in the illustration. ...

Users Manual - English
Page 202
f Put the new belt unit in the machine. e Unpack the new belt unit, and remove the protective cover and paper. Push down on the green area of the belt unit to the g mark on the belt unit to lock it in place. 1 1 186 Push down the gray lock lever (1). g Put the drum unit back in the machine as follows. 1 Make sure that the gray lock lever (1) is in the up position and put the drum unit in the machine. Match the h mark on the machine.
f Put the new belt unit in the machine. e Unpack the new belt unit, and remove the protective cover and paper. Push down on the green area of the belt unit to the g mark on the belt unit to lock it in place. 1 1 186 Push down the gray lock lever (1). g Put the drum unit back in the machine as follows. 1 Make sure that the gray lock lever (1) is in the up position and put the drum unit in the machine. Match the h mark on the machine.

Users Manual - English
Page 203
Note When you need to the green arrows (2) on the machine's power switch. 187 When you replace the belt unit with a new one, you put the drum unit in until it stops. C 2 1 h Close the front cover of the machine. 2 1 Troubleshooting and routine maintenance 2 Push the drum unit in the machine, match the green guides (1) of the drum unit handle to reset the belt unit counter by completing the following steps: i Turn on both sides of the machine.
Note When you need to the green arrows (2) on the machine's power switch. 187 When you replace the belt unit with a new one, you put the drum unit in until it stops. C 2 1 h Close the front cover of the machine. 2 1 Troubleshooting and routine maintenance 2 Push the drum unit in the machine, match the green guides (1) of the drum unit handle to reset the belt unit counter by completing the following steps: i Turn on both sides of the machine.
Users Manual - English
Page 204
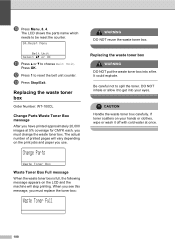
The LCD shows the parts name which needs to be reset the counter. 84.Reset Menu Belt Unit Select ab or OK k Press a or b to reset the belt unit counter. Replacing the waste toner box C Order Number: WT-100CL Change Parts Waste Toner Box message C After you have printed approximately 20.... Press OK. It could explode. The actual number of printed pages will stop printing. j Press Menu, 8, 4. m Press Stop/Exit. l Press 1 to choose Belt Unit. Be careful not to get into a fire. DO NOT inhale or allow it off with cold water at 5% coverage for CMYK each, you use. If...
The LCD shows the parts name which needs to be reset the counter. 84.Reset Menu Belt Unit Select ab or OK k Press a or b to reset the belt unit counter. Replacing the waste toner box C Order Number: WT-100CL Change Parts Waste Toner Box message C After you have printed approximately 20.... Press OK. It could explode. The actual number of printed pages will stop printing. j Press Menu, 8, 4. m Press Stop/Exit. l Press 1 to choose Belt Unit. Be careful not to get into a fire. DO NOT inhale or allow it off with cold water at 5% coverage for CMYK each, you use. If...

Users Manual - English
Page 207
... surface with a piece of the belt unit with both hands and lift the belt unit up, then pull it in the machine using the green handle. Troubleshooting and routine maintenance e Remove the waste toner box from domestic waste. f Unpack the new waste toner box and put the new one in case you accidentally spill or...
... surface with a piece of the belt unit with both hands and lift the belt unit up, then pull it in the machine using the green handle. Troubleshooting and routine maintenance e Remove the waste toner box from domestic waste. f Unpack the new waste toner box and put the new one in case you accidentally spill or...

Users Manual - English
Page 208
h Put the drum unit back in the machine as follows. 1 Make sure that the gray lock lever (1) is in the up position and put the drum unit in the machine. Push down the gray lock lever (1). 1 1 192 g Put the belt unit back in the machine. Push down on the machine. Match the h mark on the belt unit to the g mark on the green area of the belt unit to lock it in place.
h Put the drum unit back in the machine as follows. 1 Make sure that the gray lock lever (1) is in the up position and put the drum unit in the machine. Push down the gray lock lever (1). 1 1 192 g Put the belt unit back in the machine. Push down on the machine. Match the h mark on the belt unit to the g mark on the green area of the belt unit to lock it in place.


