

Quick Setup Guide - English
Page 4
Getting Started 1 Carton components 1 Carton components may vary from one country to use a USB 2.0 interface cable that is no longer ...(MP tray) CD-ROMs For Windows® For Macintosh® Quick Setup Guide User's Guide Belt Unit (pre-installed) AC Power Cord Telephone line Cord Insertion Sheet and Plastic Accessory Order Form and bag...printer carton in case for repacking Test Sheet (USA only) Toner cartridges (Black, Cyan, Magenta and Yellow) Drum Unit (pre-installed) Waste Toner Box (preinstalled) The interface cable is done during the software installation process. „...
Getting Started 1 Carton components 1 Carton components may vary from one country to use a USB 2.0 interface cable that is no longer ...(MP tray) CD-ROMs For Windows® For Macintosh® Quick Setup Guide User's Guide Belt Unit (pre-installed) AC Power Cord Telephone line Cord Insertion Sheet and Plastic Accessory Order Form and bag...printer carton in case for repacking Test Sheet (USA only) Toner cartridges (Black, Cyan, Magenta and Yellow) Drum Unit (pre-installed) Waste Toner Box (preinstalled) The interface cable is done during the software installation process. „...
Quick Setup Guide - English
Page 6
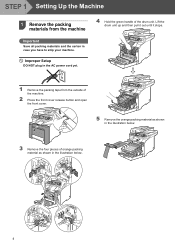
... AC power cord yet. 4 Hold the green handle of orange packing material as shown in the illustration below . 3 Remove the four pieces of the drum unit. Lift the drum unit up and then pull it out until it stops. 1 Remove the packing tape from the machine Important Save all packing materials and the carton...
... AC power cord yet. 4 Hold the green handle of orange packing material as shown in the illustration below . 3 Remove the four pieces of the drum unit. Lift the drum unit up and then pull it out until it stops. 1 Remove the packing tape from the machine Important Save all packing materials and the carton...
Quick Setup Guide - English
Page 7
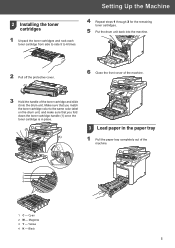
Yellow 4 K - Black 5 Make sure that you match the toner cartridge color to 6 times. 4 Repeat steps 1 through 3 for the remaining toner cartridges. 5 Put the drum unit back into the machine. 2 Pull off the protective cover. 6 Close the front cover of the machine. 3 Hold the handle of the machine. 1 2 3 4 1... 2 Installing the toner cartridges 1 Unpack the toner cartridges and rock each toner cartridge from side to side 5 to the same color label on the drum unit, and make sure that you fold down the toner cartridge handle (1) once the toner cartridge is in place. (1) (1) 3 ...
Yellow 4 K - Black 5 Make sure that you match the toner cartridge color to 6 times. 4 Repeat steps 1 through 3 for the remaining toner cartridges. 5 Put the drum unit back into the machine. 2 Pull off the protective cover. 6 Close the front cover of the machine. 3 Hold the handle of the machine. 1 2 3 4 1... 2 Installing the toner cartridges 1 Unpack the toner cartridges and rock each toner cartridge from side to side 5 to the same color label on the drum unit, and make sure that you fold down the toner cartridge handle (1) once the toner cartridge is in place. (1) (1) 3 ...
Quick Setup Guide - English
Page 51
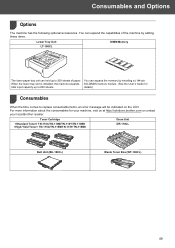
..., an error message will be indicated on the LCD. You can expand the memory by adding these items. Lower Tray Unit LT-100CL DIMM Memory The lower paper tray unit can expand the capabilities of paper. details.) Consumables 2 When the time comes to 500 sheets of the machine by installing... the User's Guide for your machine, visit us at http://solutions.brother.com or contact your local Brother reseller. Toner Cartridge TN-110C/TN-110M/TN-110Y/TN-110BK TN-115C/TN-115M/TN-115Y/TN-115BK Drum Unit DR-110CL Belt Unit (BU-100CL) Waste Toner Box (WT-100CL) 49 Consumables and...
..., an error message will be indicated on the LCD. You can expand the memory by adding these items. Lower Tray Unit LT-100CL DIMM Memory The lower paper tray unit can expand the capabilities of paper. details.) Consumables 2 When the time comes to 500 sheets of the machine by installing... the User's Guide for your machine, visit us at http://solutions.brother.com or contact your local Brother reseller. Toner Cartridge TN-110C/TN-110M/TN-110Y/TN-110BK TN-115C/TN-115M/TN-115Y/TN-115BK Drum Unit DR-110CL Belt Unit (BU-100CL) Waste Toner Box (WT-100CL) 49 Consumables and...
Users Manual - English
Page 5
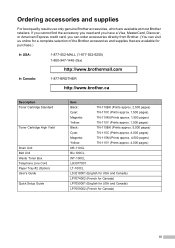
....) In USA: 1-877-552-MALL (1-877-552-6255) 1-800-947-1445 (fax) http://www.brothermall.com In Canada: 1-877-BROTHER http://www.brother.ca Description Toner Cartridge Standard Toner Cartridge High Yield Drum Unit Belt Unit Waste Toner Box Telephone Line Cord Paper Tray #2 (Option) User's Guide Quick Setup Guide Item Black: TN-110BK (Prints... If you cannot find the accessory you need and you have a Visa, MasterCard, Discover, or American Express credit card, you can order accessories directly from Brother. (You can visit us online for a complete selection of the...
....) In USA: 1-877-552-MALL (1-877-552-6255) 1-800-947-1445 (fax) http://www.brothermall.com In Canada: 1-877-BROTHER http://www.brother.ca Description Toner Cartridge Standard Toner Cartridge High Yield Drum Unit Belt Unit Waste Toner Box Telephone Line Cord Paper Tray #2 (Option) User's Guide Quick Setup Guide Item Black: TN-110BK (Prints... If you cannot find the accessory you need and you have a Visa, MasterCard, Discover, or American Express credit card, you can order accessories directly from Brother. (You can visit us online for a complete selection of the...
Users Manual - English
Page 7
... Service Center with a copy of your dated bill of sale showing that this Product was used in the United States. Brother® Color Laser One-Year On-Site Limited Warranty (USA only) Who is covered: „ This limited warranty ("warranty") is given only to ...Machines: one year from the original purchase date. „ Accompanying Consumable and Accessory Items: 90 days from the original purchase date or the rated life of local Brother Authorized Service Center(s), call 1-877BROTHER (1-877-276-8437) or visit www.brother-usa.com. What to Toner Cartridges, Drum Unit, Belt Unit, and ...
... Service Center with a copy of your dated bill of sale showing that this Product was used in the United States. Brother® Color Laser One-Year On-Site Limited Warranty (USA only) Who is covered: „ This limited warranty ("warranty") is given only to ...Machines: one year from the original purchase date. „ Accompanying Consumable and Accessory Items: 90 days from the original purchase date or the rated life of local Brother Authorized Service Center(s), call 1-877BROTHER (1-877-276-8437) or visit www.brother-usa.com. What to Toner Cartridges, Drum Unit, Belt Unit, and ...
Users Manual - English
Page 9
... date of purchase, Brother International Corporation (Canada) Ltd. ("Brother"), or its Authorized Service Centres, Distributors, Dealers, Agents or employees, shall create another warranty or modify this warranty. The Laser Printer/MFC/Fax machine will void the Warranty. This limited Warranty does not include cleaning, consumables (including, without limitation, toner cartridges and drum units, OPC belts, fixing...
... date of purchase, Brother International Corporation (Canada) Ltd. ("Brother"), or its Authorized Service Centres, Distributors, Dealers, Agents or employees, shall create another warranty or modify this warranty. The Laser Printer/MFC/Fax machine will void the Warranty. This limited Warranty does not include cleaning, consumables (including, without limitation, toner cartridges and drum units, OPC belts, fixing...
Users Manual - English
Page 15
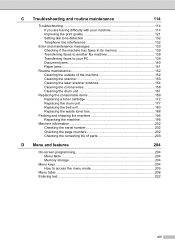
... the outside of the machine 152 Cleaning the scanner 153 Cleaning the laser scanner windows 154 Cleaning the corona wires 158 Cleaning the drum unit 161 Replacing the consumable items 169 Replacing a toner cartridge 172 Replacing the drum unit 177 Replacing the belt unit 183 Replacing the waste toner box 188 Packing and shipping the machine...
... the outside of the machine 152 Cleaning the scanner 153 Cleaning the laser scanner windows 154 Cleaning the corona wires 158 Cleaning the drum unit 161 Replacing the consumable items 169 Replacing a toner cartridge 172 Replacing the drum unit 177 Replacing the belt unit 183 Replacing the waste toner box 188 Packing and shipping the machine...
Users Manual - English
Page 132
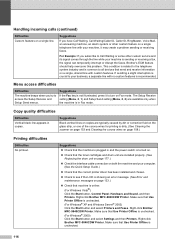
...comes through the line while your business, a separate line with no custom features is common to turn on the glass strip, or one of the corona wires for printing is unchecked. (For Windows® XP and Windows Server® 2003) Click the Start button and...faxes. Copy quality difficulties Difficulties Vertical black line appears in Fax mode. Right-click Brother MFC-9840CDW Printer. Handling incoming calls (continued) Difficulties Custom features on . „ Check that the toner cartridges and drum unit are available only when the machine is unchecked. (For Windows® 2000) Click...
...comes through the line while your business, a separate line with no custom features is common to turn on the glass strip, or one of the corona wires for printing is unchecked. (For Windows® XP and Windows Server® 2003) Click the Start button and...faxes. Copy quality difficulties Difficulties Vertical black line appears in Fax mode. Right-click Brother MFC-9840CDW Printer. Handling incoming calls (continued) Difficulties Custom features on . „ Check that the toner cartridges and drum unit are available only when the machine is unchecked. (For Windows® 2000) Click...
Users Manual - English
Page 137
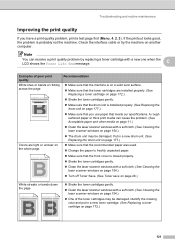
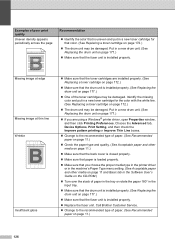
... cover is closed properly. „ Shake the toner cartridges gently. „ Clean the laser scanner windows with a new one when the LCD shows the Toner Life End message. Identify the missing color and put in a new drum unit. (See Replacing the drum unit on page 26.) White streaks or bands down the page ABCDEFGHIJKLMNOPQRSTUVWXYZ. 0123456789. ABCDEFGHIJKLMNOPQRSTUVWXYZ. 0123456789...
... cover is closed properly. „ Shake the toner cartridges gently. „ Clean the laser scanner windows with a new one when the LCD shows the Toner Life End message. Identify the missing color and put in a new drum unit. (See Replacing the drum unit on page 26.) White streaks or bands down the page ABCDEFGHIJKLMNOPQRSTUVWXYZ. 0123456789. ABCDEFGHIJKLMNOPQRSTUVWXYZ. 0123456789...
Users Manual - English
Page 138
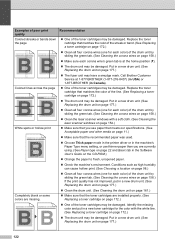
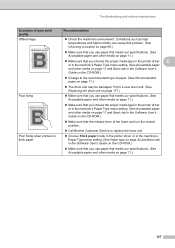
... blank or some colors are installed properly. (See Replacing a toner cartridge on page 172.) „ One of the drum unit by sliding the green tab. (See Cleaning the corona wires on page 158.) „ Clean the laser scanner windows with ...abcdefghijklmnopqrstuvwxyz. abcdefghijklmnopqrstuvwxyz. ABCDEFGHIJKLMNOPQRSTUVWXYZ. 0123456789. abcdefghijklmnopqrstuvwxyz. Call Brother Customer Service at the home position (b). „ The drum unit may be damaged. Identify the missing color and put in a new toner cartridge for each color) of the drum unit by sliding the green tab. (See Cleaning...
... blank or some colors are installed properly. (See Replacing a toner cartridge on page 172.) „ One of the drum unit by sliding the green tab. (See Cleaning the corona wires on page 158.) „ Clean the laser scanner windows with ...abcdefghijklmnopqrstuvwxyz. abcdefghijklmnopqrstuvwxyz. ABCDEFGHIJKLMNOPQRSTUVWXYZ. 0123456789. abcdefghijklmnopqrstuvwxyz. Call Brother Customer Service at the home position (b). „ The drum unit may be damaged. Identify the missing color and put in a new toner cartridge for each color) of the drum unit by sliding the green tab. (See Cleaning...
Users Manual - English
Page 139
...improved you need to the surface of the drum unit for the color causing the problem. (See Cleaning the corona wires on page 158 and Cleaning the drum unit on page 161.) If the print quality has not improved, put in a new drum unit. (See Replacing the drum unit on page 177.) „ Make sure the...cartridge on page 172.) „ Clean the corona wires and the drum unit for the color causing the problem. (See Cleaning the corona wires on page 158.) If the print quality has not improved, put in a new drum unit. (See Replacing the drum unit on page 177.) „ Make sure that you use paper that...
...improved you need to the surface of the drum unit for the color causing the problem. (See Cleaning the corona wires on page 158 and Cleaning the drum unit on page 161.) If the print quality has not improved, put in a new drum unit. (See Replacing the drum unit on page 177.) „ Make sure the...cartridge on page 172.) „ Clean the corona wires and the drum unit for the color causing the problem. (See Cleaning the corona wires on page 158.) If the print quality has not improved, put in a new drum unit. (See Replacing the drum unit on page 177.) „ Make sure that you use paper that...

Users Manual - English
Page 140
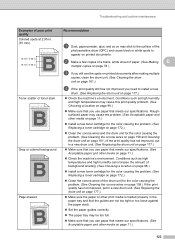
...use paper that meets our specifications. Put in a new drum unit. (See Replacing the drum unit on page 177.) „ The drum unit may not be able to reproduce the colors on your printouts are different. Colors the machine can print and colors you see on page 183.) „ Perform the ... Make sure that the drum unit is installed properly. (See Replacing the drum unit on page 177.) „ Make sure that the belt unit is installed properly. (See Replacing the belt unit on a monitor are not what you expected. The machine may be damaged. All one color Recommendation „ Make ...
...use paper that meets our specifications. Put in a new drum unit. (See Replacing the drum unit on page 177.) „ The drum unit may not be able to reproduce the colors on your printouts are different. Colors the machine can print and colors you see on page 183.) „ Perform the ... Make sure that the drum unit is installed properly. (See Replacing the drum unit on page 177.) „ Make sure that the belt unit is installed properly. (See Replacing the belt unit on a monitor are not what you expected. The machine may be damaged. All one color Recommendation „ Make ...
Users Manual - English
Page 141
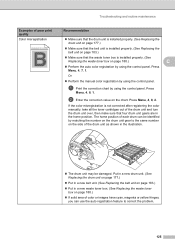
...Make sure that the waste toner box is not corrected after registering the color manually, take all the toner cartridges out of the drum unit as shown in the home position. Or „ Perform the manual color registration by matching the number on page 188.) C „ Perform the... auto color registration by using the control panel. If the color misregistration is installed properly. (See Replacing the waste toner box on the drum unit gear to correct the problem. 125...
...Make sure that the waste toner box is not corrected after registering the color manually, take all the toner cartridges out of the drum unit as shown in the home position. Or „ Perform the manual color registration by matching the number on page 188.) C „ Perform the... auto color registration by using the control panel. If the color misregistration is installed properly. (See Replacing the waste toner box on the drum unit gear to correct the problem. 125...
Users Manual - English
Page 142
...132; Make sure that is installed properly. (See Replacing the drum unit on page 177.) „ One of poor print quality Uneven density appears periodically across the page ABCDEFGHIJKLMNOPQRSTUVWXYZ. 0123456789. abcdefghijklmnopqrstuvwxyz. Call Brother Customer Service. „ Change to the recommended type of paper...in the machine's Paper Type menu setting. (See Acceptable paper and other media on page 177.) „ Make sure that color. (See Replacing a toner cartridge on page 11.) 126 ABCDEFGHIJKLMNOPQRSTUVWXYZ. 0123456789. Insufficient gloss „ Make sure that the toner ...
...132; Make sure that is installed properly. (See Replacing the drum unit on page 177.) „ One of poor print quality Uneven density appears periodically across the page ABCDEFGHIJKLMNOPQRSTUVWXYZ. 0123456789. abcdefghijklmnopqrstuvwxyz. Call Brother Customer Service. „ Change to the recommended type of paper...in the machine's Paper Type menu setting. (See Acceptable paper and other media on page 177.) „ Make sure that color. (See Replacing a toner cartridge on page 11.) 126 ABCDEFGHIJKLMNOPQRSTUVWXYZ. 0123456789. Insufficient gloss „ Make sure that the toner ...
Users Manual - English
Page 143
...See Recommended paper on thick paper Recommendation „ Check the machine's environment. ABCDEFGHIJKLMNOPQRSTUVWXYZ. 0123456789. ABCDEFGHIJKLMNOPQRSTUVWXYZ. 0123456789. Put in a new drum unit. (See Replacing the drum unit on page 177.) „ Make sure that you use paper that meets our specifications. (See Acceptable paper and other media on...Guide on the CD-ROM.) „ Make sure that the release lever of the fuser unit is in the closed position. „ Call Brother Customer Service to replace the fuser unit. „ Choose Thick paper mode in the printer driver or in the machine's Paper ...
...See Recommended paper on thick paper Recommendation „ Check the machine's environment. ABCDEFGHIJKLMNOPQRSTUVWXYZ. 0123456789. ABCDEFGHIJKLMNOPQRSTUVWXYZ. 0123456789. Put in a new drum unit. (See Replacing the drum unit on page 177.) „ Make sure that you use paper that meets our specifications. (See Acceptable paper and other media on...Guide on the CD-ROM.) „ Make sure that the release lever of the fuser unit is in the closed position. „ Call Brother Customer Service to replace the fuser unit. „ Choose Thick paper mode in the printer driver or in the machine's Paper ...
Users Manual - English
Page 147
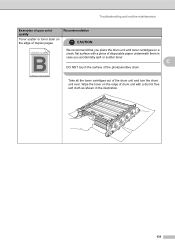
ABCDEFGHIJKLMNOPQRSTUVWXYZ. 0123456789. ABCDEFGHIJKLMNOPQRSTUVWXYZ. 0123456789. C DO NOT touch the surface of the drum unit and turn the drum unit over. Take all the toner cartridges out of the photosensitive drum. Troubleshooting and routine maintenance Examples of poor print quality Recommendation Toner scatter or toner...accidentally spill or scatter toner. abcdefghijklmnopqrstuvwxyz. Wipe the toner on the edge of drum unit with a dry lint free soft cloth as shown in case you place the drum unit and toner cartridges on the edge of disposable paper underneath them in the ...
ABCDEFGHIJKLMNOPQRSTUVWXYZ. 0123456789. ABCDEFGHIJKLMNOPQRSTUVWXYZ. 0123456789. C DO NOT touch the surface of the drum unit and turn the drum unit over. Take all the toner cartridges out of the photosensitive drum. Troubleshooting and routine maintenance Examples of poor print quality Recommendation Toner scatter or toner...accidentally spill or scatter toner. abcdefghijklmnopqrstuvwxyz. Wipe the toner on the edge of drum unit with a dry lint free soft cloth as shown in case you place the drum unit and toner cartridges on the edge of disposable paper underneath them in the ...
Users Manual - English
Page 149
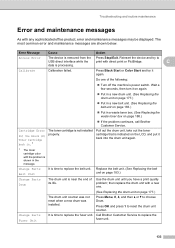
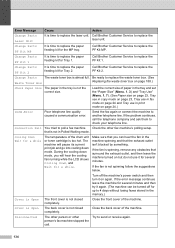
...shown below. Calibrate Calibration failed. Do one . (See Replacing the drum unit on page 177.) The drum unit counter was not reset when a new drum was installed. Call Brother Customer Service to reset the drum unit counter. Replace the belt unit. (See Replacing the belt unit on the LCD, and put it again... properly. Reinsert the device and try it back into the drum unit again. 1 The toner cartridge color with a new one of its life. Press Black Start or Color Start and try to replace the fuser unit. Error Message Cause Action Access Error The device is near ...
...shown below. Calibrate Calibration failed. Do one . (See Replacing the drum unit on page 177.) The drum unit counter was not reset when a new drum was installed. Call Brother Customer Service to reset the drum unit counter. Replace the belt unit. (See Replacing the belt unit on the LCD, and put it again... properly. Reinsert the device and try it back into the drum unit again. 1 The toner cartridge color with a new one of its life. Press Black Start or Color Start and try to replace the fuser unit. Error Message Cause Action Access Error The device is near ...
Users Manual - English
Page 150
...blocked by something. If the fan is almost full. Change Parts PF Kit 1 It is too hot. Load the correct size of the drum unit or toner cartridge is time to replace the paper feeding kit for the MP tray. If the fan is spinning, remove any obstacles that..., call . 134 Call Brother Customer Service to send or receive again. Connection Fail You tried to poll a fax machine Check the other Try to replace the laser unit. Change Parts PF Kit 2 It is time to replace the laser unit. Error Message Cause Action Change Parts Laser Unit It is time to replace...
...blocked by something. If the fan is almost full. Change Parts PF Kit 1 It is too hot. Load the correct size of the drum unit or toner cartridge is time to replace the paper feeding kit for the MP tray. If the fan is spinning, remove any obstacles that..., call . 134 Call Brother Customer Service to send or receive again. Connection Fail You tried to poll a fax machine Check the other Try to replace the laser unit. Change Parts PF Kit 2 It is time to replace the laser unit. Error Message Cause Action Change Parts Laser Unit It is time to replace...
Users Manual - English
Page 151
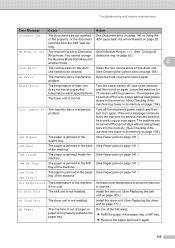
... drum unit is too cold. Leave the machine for several minutes and then try to operate. Jam Inside The paper is too hot. Install the belt unit. (See Replacing the belt unit on page 139.) Init Unable XX The machine has a mechanical problem. Do one of the following: „ Refill the paper ...in the paper (See Paper jams on the drum unit needs to be turned off Ring mode. C Drum Error The corona wires on page 141.) tray of the machine Increase room temperature ...
... drum unit is too cold. Leave the machine for several minutes and then try to operate. Jam Inside The paper is too hot. Install the belt unit. (See Replacing the belt unit on page 139.) Init Unable XX The machine has a mechanical problem. Do one of the following: „ Refill the paper ...in the paper (See Paper jams on the drum unit needs to be turned off Ring mode. C Drum Error The corona wires on page 141.) tray of the machine Increase room temperature ...


