
Users Manual - English
Page 149
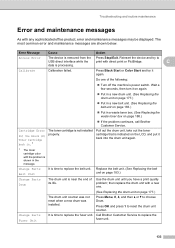
...Put the Black (K) Toner Cartridge back in. 1 The toner cartridge is time to reset the drum unit counter. The most common error and maintenance messages are shown below. Do one . (See Replacing the drum unit on the LCD, and put it again. Troubleshooting and routine maintenance Error and ...the message. Calibrate Calibration failed. Press Black Start or Color Start and try to choose Drum. then replace the drum unit with a new one of its life. Call Brother Customer Service to replace the fuser unit. Pull out the drum unit, take out the toner cartridge that is time ...
...Put the Black (K) Toner Cartridge back in. 1 The toner cartridge is time to reset the drum unit counter. The most common error and maintenance messages are shown below. Do one . (See Replacing the drum unit on the LCD, and put it again. Troubleshooting and routine maintenance Error and ...the message. Calibrate Calibration failed. Press Black Start or Color Start and try to choose Drum. then replace the drum unit with a new one of its life. Call Brother Customer Service to replace the fuser unit. Pull out the drum unit, take out the toner cartridge that is time ...
Users Manual - English
Page 198
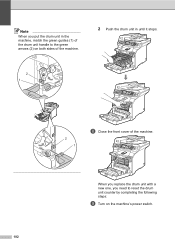
When you replace the drum unit with a new one, you put the drum unit in until it stops. 2 1 2 1 h Close the front cover of the drum unit handle to reset the drum unit counter by completing the following steps: i Turn on both sides of the machine. 2 Push the drum unit in the machine, match the green guides (1) of the machine. Note When you need to the green arrows (2) on the machine's power switch. 182
When you replace the drum unit with a new one, you put the drum unit in until it stops. 2 1 2 1 h Close the front cover of the drum unit handle to reset the drum unit counter by completing the following steps: i Turn on both sides of the machine. 2 Push the drum unit in the machine, match the green guides (1) of the machine. Note When you need to the green arrows (2) on the machine's power switch. 182

Users Manual - English
Page 199
... by improper handling of the belt unit. The LCD shows the parts name which needs to be reset the counter. 84.Reset Menu Drum Select ab or OK k Press a or b to reset the drum unit counter. l Press 1 to choose Drum. j Press Menu, 8, 4. Press the front cover release button and then open the front cover. m Press Stop...
... by improper handling of the belt unit. The LCD shows the parts name which needs to be reset the counter. 84.Reset Menu Drum Select ab or OK k Press a or b to reset the drum unit counter. l Press 1 to choose Drum. j Press Menu, 8, 4. Press the front cover release button and then open the front cover. m Press Stop...

Users Manual - English
Page 203
Note When you need to the green arrows (2) on the machine's power switch. 187 When you replace the belt unit with a new one, you put the drum unit in the machine, match the green guides (1) of the drum unit handle to reset the belt unit counter by completing the following steps: i Turn on both sides of the machine. C 2 1 h Close the front cover of the machine. 2 1 Troubleshooting and routine maintenance 2 Push the drum unit in until it stops.
Note When you need to the green arrows (2) on the machine's power switch. 187 When you replace the belt unit with a new one, you put the drum unit in the machine, match the green guides (1) of the drum unit handle to reset the belt unit counter by completing the following steps: i Turn on both sides of the machine. C 2 1 h Close the front cover of the machine. 2 1 Troubleshooting and routine maintenance 2 Push the drum unit in until it stops.
Users Manual - English
Page 219
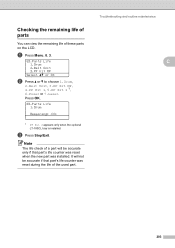
...life counter was installed. Troubleshooting and routine maintenance C 203 Press OK. 83.Parts Life 1.Drum Remaining: XX% 1 PF Kit 2 appears only when the optional LT-100CL tray is installed. c Press Stop/Exit. a Press Menu, 8, 3. 83.Parts Life 1.Drum 2.Belt Unit 3.PF Kit MP Select ab or OK b Press a or b to... choose 1.Drum, 2.Belt Unit, 3.PF Kit MP, 4.PF Kit 1, 5.PF Kit 2 1, 6.Fuser or 7.Laser. It will be accurate if that part's life counter was reset when the new part was reset during the life of these parts on the LCD. Checking the remaining...
...life counter was installed. Troubleshooting and routine maintenance C 203 Press OK. 83.Parts Life 1.Drum Remaining: XX% 1 PF Kit 2 appears only when the optional LT-100CL tray is installed. c Press Stop/Exit. a Press Menu, 8, 3. 83.Parts Life 1.Drum 2.Belt Unit 3.PF Kit MP Select ab or OK b Press a or b to... choose 1.Drum, 2.Belt Unit, 3.PF Kit MP, 4.PF Kit 1, 5.PF Kit 2 1, 6.Fuser or 7.Laser. It will be accurate if that part's life counter was reset when the new part was reset during the life of these parts on the LCD. Checking the remaining...
Users Manual - English
Page 237
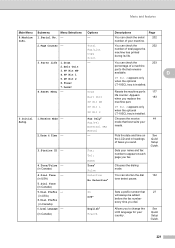
... replace the 183 machine part. D PF Kit 2 appears only when the optional LT-100CL tray is installed. 0.Initial 1.Receive Mode - Drum Belt Unit PF Kit MP Resets the machine part's 177 life counter. Puts the date and time on each page you fax. 4.Tone/Pulse - (in Canada) Tone*... available. You can check the 203 percentage of total pages the machine has printed during its life. 3.Parts Life 1.Drum - 2.Belt Unit 3.PF Kit MP 4.PF Kit 1 5.PF Kit 2 6.Fuser 7.Laser You can check the serial 202 Info. Appears when you send. PF Kit 1 PF Kit 2 PF Kit 2...
... replace the 183 machine part. D PF Kit 2 appears only when the optional LT-100CL tray is installed. 0.Initial 1.Receive Mode - Drum Belt Unit PF Kit MP Resets the machine part's 177 life counter. Puts the date and time on each page you fax. 4.Tone/Pulse - (in Canada) Tone*... available. You can check the 203 percentage of total pages the machine has printed during its life. 3.Parts Life 1.Drum - 2.Belt Unit 3.PF Kit MP 4.PF Kit 1 5.PF Kit 2 6.Fuser 7.Laser You can check the serial 202 Info. Appears when you send. PF Kit 1 PF Kit 2 PF Kit 2...


