Users Manual - English
Page 1
Brother Laser Printer HL-5130 HL-5140 HL-5150D HL-5170DN User's Guide For visually-impaired users You can read this manual with Screen Reader 'text-to-speech' software. Keep the CD-ROM in the box. You can use the printer. Please visit our web site at http://solutions.brother.com where you need to set up the printer.... Please use the Quick Setup Guide to . Version 3 Please read this User's Guide thoroughly before you use the printer. You must set...
Brother Laser Printer HL-5130 HL-5140 HL-5150D HL-5170DN User's Guide For visually-impaired users You can read this manual with Screen Reader 'text-to-speech' software. Keep the CD-ROM in the box. You can use the printer. Please visit our web site at http://solutions.brother.com where you need to set up the printer.... Please use the Quick Setup Guide to . Version 3 Please read this User's Guide thoroughly before you use the printer. You must set...
Users Manual - English
Page 2
You must follow these instructions to prevent possible personal injury. Laser printer HL-5100 series User's Guide Definitions of warnings, cautions, and notes We use the following terms throughout this User's Guide: You must follow these warnings to make sure you use the printer. I Remember these useful tips when you use the printer properly and do not damage it.
You must follow these instructions to prevent possible personal injury. Laser printer HL-5100 series User's Guide Definitions of warnings, cautions, and notes We use the following terms throughout this User's Guide: You must follow these warnings to make sure you use the printer. I Remember these useful tips when you use the printer properly and do not damage it.
Users Manual - English
Page 3
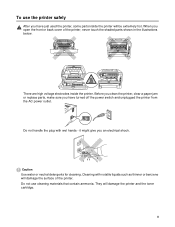
When you an electrical shock. Before you clean the printer, clear a paper jam or replace parts, make sure you have just used the printer, some parts inside the printer. They will damage the surface of the printer, never touch the shaded parts shown in the illustrations below. it might give you... open the front or back cover of the printer. Cleaning with wet hands - II Do not use the printer safely After you have turned off the power switch and unplugged the printer from the AC power outlet. There are high voltage electrodes inside the...
When you an electrical shock. Before you clean the printer, clear a paper jam or replace parts, make sure you have just used the printer, some parts inside the printer. They will damage the surface of the printer, never touch the shaded parts shown in the illustrations below. it might give you... open the front or back cover of the printer. Cleaning with wet hands - II Do not use the printer safely After you have turned off the power switch and unplugged the printer from the AC power outlet. There are high voltage electrodes inside the...
Users Manual - English
Page 4
... We recommend that you must ship your Printer, carefully package the Printer to avoid any damage during transit. Hewlett Packard is a trademark of Hewlett-Packard Company. IBM, IBM PC, and Proprinter are registered trademarks of International Business Machines Corporation. Microsoft®, MS-..., 6L, 5P, 5L, 4, 4L 4P, III, IIIP, II, and IIP are trademarks of Brother Industries Ltd., this product are trademarks of Brother Industries, Ltd. The Printer should also be responsible for any damages (including consequential) caused by reliance on the materials presented, including...
... We recommend that you must ship your Printer, carefully package the Printer to avoid any damage during transit. Hewlett Packard is a trademark of Hewlett-Packard Company. IBM, IBM PC, and Proprinter are registered trademarks of International Business Machines Corporation. Microsoft®, MS-..., 6L, 5P, 5L, 4, 4L 4P, III, IIIP, II, and IIP are trademarks of Brother Industries Ltd., this product are trademarks of Brother Industries, Ltd. The Printer should also be responsible for any damages (including consequential) caused by reliance on the materials presented, including...

Users Manual - English
Page 5
...transparencies from the paper tray 1-33 Printing on transparencies from the manual feed tray (For HL-5130 and HL-5140) ........ 1-36 Printing on transparencies from the MP tray (For HL-5150D and HL-5170DN 1-39 Duplex Printing ...1-43 Guidelines for printing on both sides of the paper ... 1-44 Manual duplex printing from the multi-purpose tray (For HL-5150D and HL-5170DN) .... 1-45 Printing on both sides of the paper (automatic duplex printing 1-47 Guidelines for automatic duplex printing 1-47 2 Driver and software ...2-1 Printer driver ...2-1 For Windows® 95/98/Me, Windows NT® 4.0...
...transparencies from the paper tray 1-33 Printing on transparencies from the manual feed tray (For HL-5130 and HL-5140) ........ 1-36 Printing on transparencies from the MP tray (For HL-5150D and HL-5170DN 1-39 Duplex Printing ...1-43 Guidelines for printing on both sides of the paper ... 1-44 Manual duplex printing from the multi-purpose tray (For HL-5150D and HL-5170DN) .... 1-45 Printing on both sides of the paper (automatic duplex printing 1-47 Guidelines for automatic duplex printing 1-47 2 Driver and software ...2-1 Printer driver ...2-1 For Windows® 95/98/Me, Windows NT® 4.0...
Users Manual - English
Page 6
...printer driver ...3-8 Printer Settings ...3-9 Using the control panel button 3-9 Using the printer driver ...3-9 Print fonts (Not available for HL-5130 3-10 Using the control panel button 3-10 Using the printer driver (Not available for HL-5130 3-10 Network factory default setting (For HL...17 7 Appendix ...A-1 Printer specifications ...A-1 Important information for choosing your paper A-6 8 Appendix (For Europe and Other Countries B-1 Brother Numbers ...B-1 Important information: Regulations B-2 Radio interference (220 to 240 volt model only B-2 International ENERGY STAR® Compliance...
...printer driver ...3-8 Printer Settings ...3-9 Using the control panel button 3-9 Using the printer driver ...3-9 Print fonts (Not available for HL-5130 3-10 Using the control panel button 3-10 Using the printer driver (Not available for HL-5130 3-10 Network factory default setting (For HL...17 7 Appendix ...A-1 Printer specifications ...A-1 Important information for choosing your paper A-6 8 Appendix (For Europe and Other Countries B-1 Brother Numbers ...B-1 Important information: Regulations B-2 Radio interference (220 to 240 volt model only B-2 International ENERGY STAR® Compliance...
Users Manual - English
Page 8
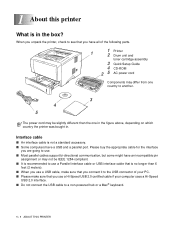
... than 6 feet (2 meters). ■ When you use a USB cable, make sure that you connect it to the USB connector of the following parts. 1 1 Printer 2 Drum unit and toner cartridge assembly 3 Quick Setup Guide 4 CD-ROM 2 5 AC power cord Components may be IEEE 1284-compliant. ■ It is no ...longer than the one in the figure above, depending on which country the printer was bought in the box? 1\ About this printer What is not a standard accessory. ■ Some computers have a USB and a parallel port. When you unpack the...
... than 6 feet (2 meters). ■ When you use a USB cable, make sure that you connect it to the USB connector of the following parts. 1 1 Printer 2 Drum unit and toner cartridge assembly 3 Quick Setup Guide 4 CD-ROM 2 5 AC power cord Components may be IEEE 1284-compliant. ■ It is no ...longer than the one in the figure above, depending on which country the printer was bought in the box? 1\ About this printer What is not a standard accessory. ■ Some computers have a USB and a parallel port. When you unpack the...
Users Manual - English
Page 9
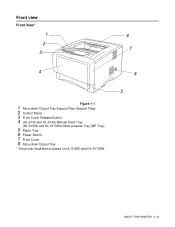
Front view Front View* 1 8 2 7 3 4 Figure 1-1 1 Face-down Output Tray Support Flap (Support Flap) 2 Control Panel 3 Front Cover Release Button 4 (HL-5130 and HL-5140) Manual Feed Tray (HL-5150D and HL-5170DN) Multi-purpose Tray (MP Tray) 5 Paper Tray 6 Power Switch 7 Front Cover 8 Face-down Output Tray * The printer illustration is based on HL-5150D and HL-5170DN. 6 5 ABOUT THIS PRINTER 1 - 2
Front view Front View* 1 8 2 7 3 4 Figure 1-1 1 Face-down Output Tray Support Flap (Support Flap) 2 Control Panel 3 Front Cover Release Button 4 (HL-5130 and HL-5140) Manual Feed Tray (HL-5150D and HL-5170DN) Multi-purpose Tray (MP Tray) 5 Paper Tray 6 Power Switch 7 Front Cover 8 Face-down Output Tray * The printer illustration is based on HL-5150D and HL-5170DN. 6 5 ABOUT THIS PRINTER 1 - 2

Users Manual - English
Page 10
Back view Back view* 1 2 3 4 Figure 1-2 1 Face-up Output Tray 2 Duplex Tray (For HL-5150D and HL-5170DN) 3 AC Power Connector 4 Parallel Interface Connector 5 USB Interface Connector 6 Side Cover 7 (HL-5170DN) 10/100BASE-TX Port 8 (HL-5170DN) LED (Light-emitting Diode) * The printer illustration is based on HL-5170DN. 8 7 6 5 1 - 3 ABOUT THIS PRINTER
Back view Back view* 1 2 3 4 Figure 1-2 1 Face-up Output Tray 2 Duplex Tray (For HL-5150D and HL-5170DN) 3 AC Power Connector 4 Parallel Interface Connector 5 USB Interface Connector 6 Side Cover 7 (HL-5170DN) 10/100BASE-TX Port 8 (HL-5170DN) LED (Light-emitting Diode) * The printer illustration is based on HL-5170DN. 8 7 6 5 1 - 3 ABOUT THIS PRINTER
Users Manual - English
Page 11
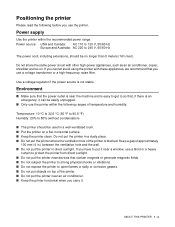
... an emergency, it near the machine and is easy to get to so that, if there is blocked. If you use the printer. ABOUT THIS PRINTER 1 - 4 Power source: USA and Canada: AC 110 to 120 V, 50/60 Hz Europe and Australia: AC 220 to open flames or salty or corrosive gasses. &#.... Keep a gap of temperature and humidity: Temperature: 10 °C to 32.5 °C (50 °F to 90.5 °F) Humidity: 20% to 80% (without condensation) ■ The printer should be easily unplugged. ■ Only use a blind or a heavy curtain to put it can be no longer than 5 meters (16½ feet). If you...
... an emergency, it near the machine and is easy to get to so that, if there is blocked. If you use the printer. ABOUT THIS PRINTER 1 - 4 Power source: USA and Canada: AC 110 to 120 V, 50/60 Hz Europe and Australia: AC 220 to open flames or salty or corrosive gasses. &#.... Keep a gap of temperature and humidity: Temperature: 10 °C to 32.5 °C (50 °F to 90.5 °F) Humidity: 20% to 80% (without condensation) ■ The printer should be easily unplugged. ■ Only use a blind or a heavy curtain to put it can be no longer than 5 meters (16½ feet). If you...
Users Manual - English
Page 12
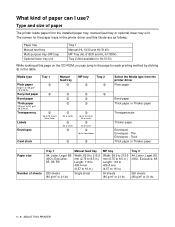
... - The names for the paper trays in the printer driver and this Guide are as follows: Paper tray Manual feed tray Multi-purpose tray (MP tray) Optional lower tray unit Tray 1 Manual (HL-5130 and HL-5140) MP Tray (HL-5150D and HL-5170DN) Tray 2 (Not available for HL-5130) While looking at this page on the...
... - The names for the paper trays in the printer driver and this Guide are as follows: Paper tray Manual feed tray Multi-purpose tray (MP tray) Optional lower tray unit Tray 1 Manual (HL-5130 and HL-5140) MP Tray (HL-5150D and HL-5170DN) Tray 2 (Not available for HL-5130) While looking at this page on the...
Users Manual - English
Page 13
... paper that is 75 to 90 g/m2 (20 to make sure that the paper is suitable. ■ Use paper that is made for choosing your printer. Recommended paper Plain paper Recycled paper Transparency Labels Europe Xerox Premier 80 g/m2 Xerox Business 80 g/m2 Modo DATACOPY 80 g/m2 IGEPA X-Press 80 g/m2... Xerox Recycled Supreme 80 g/m2 3M CG3300 Avery laser label L7163 USA Xerox 4200DP 20 lb Hammermill Laser Paper 24 lb 3M CG 3300 Avery laser label #5160 ■ Before you choose which paper to use with a moisture content of paper, please test...
... paper that is 75 to 90 g/m2 (20 to make sure that the paper is suitable. ■ Use paper that is made for choosing your printer. Recommended paper Plain paper Recycled paper Transparency Labels Europe Xerox Premier 80 g/m2 Xerox Business 80 g/m2 Modo DATACOPY 80 g/m2 IGEPA X-Press 80 g/m2... Xerox Recycled Supreme 80 g/m2 3M CG3300 Avery laser label L7163 USA Xerox 4200DP 20 lb Hammermill Laser Paper 24 lb 3M CG 3300 Avery laser label #5160 ■ Before you choose which paper to use with a moisture content of paper, please test...
Users Manual - English
Page 14
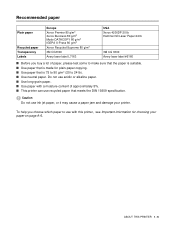
... in.) 5.0 mm (0.19 in.) 4.2 mm (0.17 in.) 5.0 mm (0.19 in.) B6 4.2 mm (0.17 in.) 5.0 mm (0.19 in.) 4.2 mm (0.17 in.) 5.0 mm (0.19 in.) 1 - 7 ABOUT THIS PRINTER Printable area When using PCL emulation, the edges of the paper that cannot be printed on are shown below.
... in.) 5.0 mm (0.19 in.) 4.2 mm (0.17 in.) 5.0 mm (0.19 in.) B6 4.2 mm (0.17 in.) 5.0 mm (0.19 in.) 4.2 mm (0.17 in.) 5.0 mm (0.19 in.) 1 - 7 ABOUT THIS PRINTER Printable area When using PCL emulation, the edges of the paper that cannot be printed on are shown below.
Users Manual - English
Page 15
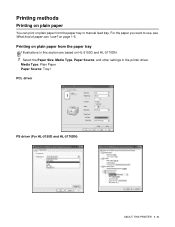
Media Type: Plain Paper Paper Source: Tray1 PCL driver PS driver (For HL-5150D and HL-5170DN) ABOUT THIS PRINTER 1 - 8 Printing methods Printing on plain paper You can I use , see What kind of paper can print on plain paper from the paper tray Illustrations in this section are based on HL-5150D and HL-5170DN. 1 Select the Paper Size, Media Type, Paper Source, and other settings in the printer driver. For the paper you want to use ? Printing on page 1-5. on plain paper from the paper tray or manual feed tray.
Media Type: Plain Paper Paper Source: Tray1 PCL driver PS driver (For HL-5150D and HL-5170DN) ABOUT THIS PRINTER 1 - 8 Printing methods Printing on plain paper You can I use , see What kind of paper can print on plain paper from the paper tray Illustrations in this section are based on HL-5150D and HL-5170DN. 1 Select the Paper Size, Media Type, Paper Source, and other settings in the printer driver. For the paper you want to use ? Printing on page 1-5. on plain paper from the paper tray or manual feed tray.

Users Manual - English
Page 16
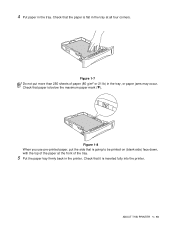
Figure 1-5 3 While pressing the blue paper-guide release lever, slide the paper guides to fit the paper size. Figure 1-6 1 - 9 ABOUT THIS PRINTER Check that the guides are firmly in the slots. 2 Pull the paper tray completely out of the printer.
Figure 1-5 3 While pressing the blue paper-guide release lever, slide the paper guides to fit the paper size. Figure 1-6 1 - 9 ABOUT THIS PRINTER Check that the guides are firmly in the slots. 2 Pull the paper tray completely out of the printer.
Users Manual - English
Page 17
Check that is inserted fully into the printer. 4 Put paper in the tray at the front of paper (80 g/m2 or 21 lb) in the printer. Check that it is going to be printed on (blank side) face down, with the top of the paper at all four corners. Figure 1-8 When you use pre-printed paper, put more than 250 sheets of the tray. 5 Put the paper tray firmly back in the tray, or paper jams may occur. Check that paper is flat in the tray. ABOUT THIS PRINTER 1 - 10 Figure 1-7 Do not put the side that the paper is below the maximum paper mark (▼).
Check that is inserted fully into the printer. 4 Put paper in the tray at the front of paper (80 g/m2 or 21 lb) in the printer. Check that it is going to be printed on (blank side) face down, with the top of the paper at all four corners. Figure 1-8 When you use pre-printed paper, put more than 250 sheets of the tray. 5 Put the paper tray firmly back in the tray, or paper jams may occur. Check that paper is flat in the tray. ABOUT THIS PRINTER 1 - 10 Figure 1-7 Do not put the side that the paper is below the maximum paper mark (▼).

Users Manual - English
Page 18
Pull up the output tray support flap to the printer. 1 - 11 ABOUT THIS PRINTER Figure 1-9 If you choose not to pull out the output tray support flap, we recommend that you remove printed pages immediately after they come out of the printer. 6 Send the print data to prevent paper from sliding off the face-down output tray.
Pull up the output tray support flap to the printer. 1 - 11 ABOUT THIS PRINTER Figure 1-9 If you choose not to pull out the output tray support flap, we recommend that you remove printed pages immediately after they come out of the printer. 6 Send the print data to prevent paper from sliding off the face-down output tray.
Users Manual - English
Page 19
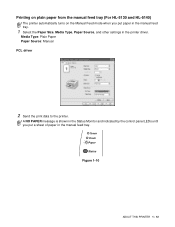
Media Type: Plain Paper Paper Source: Manual PCL driver 2 Send the print data to the printer. Toner Drum Paper Status Figure 1-10 ABOUT THIS PRINTER 1 - 12 A NO PAPER message is shown in the Status Monitor and indicated by the control panel LEDs until you put a sheet of paper in the printer driver. Printing on plain paper from the manual feed tray (For HL-5130 and HL-5140) The printer automatically turns on the Manual Feed mode when you put paper in the manual feed tray. 1 Select the Paper Size, Media Type, Paper Source, and other settings in the manual feed tray.
Media Type: Plain Paper Paper Source: Manual PCL driver 2 Send the print data to the printer. Toner Drum Paper Status Figure 1-10 ABOUT THIS PRINTER 1 - 12 A NO PAPER message is shown in the Status Monitor and indicated by the control panel LEDs until you put a sheet of paper in the printer driver. Printing on plain paper from the manual feed tray (For HL-5130 and HL-5140) The printer automatically turns on the Manual Feed mode when you put paper in the manual feed tray. 1 Select the Paper Size, Media Type, Paper Source, and other settings in the manual feed tray.
Users Manual - English
Page 20
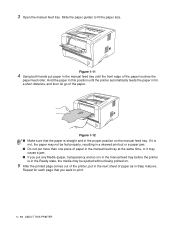
...ejected without being printed on. 5 After the printed page comes out of the printer, put paper in the proper position on ) in the manual feed tray before the printer is straight and in the manual feed tray until the printer automatically feeds the paper in Step 4 above. Repeat for a short distance, ...state, the media may cause a jam. ■ If you want to fit the paper size. Slide the paper guides to print. 1 - 13 ABOUT THIS PRINTER 3 Open the manual feed tray. Figure 1-12 ■ Make sure that you put any Media (paper, transparency and so on the manual feed tray. Figure...
...ejected without being printed on. 5 After the printed page comes out of the printer, put paper in the proper position on ) in the manual feed tray before the printer is straight and in the manual feed tray until the printer automatically feeds the paper in Step 4 above. Repeat for a short distance, ...state, the media may cause a jam. ■ If you want to fit the paper size. Slide the paper guides to print. 1 - 13 ABOUT THIS PRINTER 3 Open the manual feed tray. Figure 1-12 ■ Make sure that you put any Media (paper, transparency and so on the manual feed tray. Figure...

Users Manual - English
Page 21
Printing on plain paper from the multi-purpose tray (MP tray) (For HL-5150D and HL-5170DN) The printer automatically turns on the MP Tray mode when you put paper in the multi-purpose tray. 1 Select the Paper Size, Media Type, Paper Source, and other settings in the printer driver. Media Type: Plain Paper Paper Source: MP Tray PCL driver PS driver ABOUT THIS PRINTER 1 - 14
Printing on plain paper from the multi-purpose tray (MP tray) (For HL-5150D and HL-5170DN) The printer automatically turns on the MP Tray mode when you put paper in the multi-purpose tray. 1 Select the Paper Size, Media Type, Paper Source, and other settings in the printer driver. Media Type: Plain Paper Paper Source: MP Tray PCL driver PS driver ABOUT THIS PRINTER 1 - 14


