
Users Manual - English
Page 8
...Optional Accessories 4-1 Lower Tray Unit (LT-500 4-2 Installing the Lower Tray Unit 4-3 Network Option NC-4100h (For HL-1850 User Only)4-5 Installing the Network Board 4-5 RAM Expansion 4-9 Installing Additional Memory 4-13 IrDA Interface (IR-1000...Replacing the Consumables 5-1 Replacing Maintenance Parts 5-2 Toner Cartridge 5-3 TONER LOW Message 5-4 TONER EMPTY Message 5-5 Replacing the Toner Cartridge 5-5 CHANGE DRUM SOON Message 5-11 Replacing the Drum Unit 5-11 Cleaning 5-14 Cleaning the Printer Exterior 5-14 Cleaning the Printer Interior 5-15 Cleaning the Corona Wire 5-17 ...
...Optional Accessories 4-1 Lower Tray Unit (LT-500 4-2 Installing the Lower Tray Unit 4-3 Network Option NC-4100h (For HL-1850 User Only)4-5 Installing the Network Board 4-5 RAM Expansion 4-9 Installing Additional Memory 4-13 IrDA Interface (IR-1000...Replacing the Consumables 5-1 Replacing Maintenance Parts 5-2 Toner Cartridge 5-3 TONER LOW Message 5-4 TONER EMPTY Message 5-5 Replacing the Toner Cartridge 5-5 CHANGE DRUM SOON Message 5-11 Replacing the Drum Unit 5-11 Cleaning 5-14 Cleaning the Printer Exterior 5-14 Cleaning the Printer Interior 5-15 Cleaning the Corona Wire 5-17 ...

Users Manual - English
Page 11
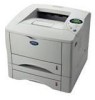
Drum Unit Assembly (with Toner Cartridge) 2. Paper Cassette 1-1 Documentation 3. CD-ROM 4. AC Power Cord 6. Printer 5. CHAPTER 1 ABOUT THIS PRINTER CHAPTER 1 1 ABOUT THIS PRINTER What Is in the Carton Components When you unpack the printer, check to see that you have all of the following parts. 4 1 5 6 2 3 Fig. 1-1 1.
Drum Unit Assembly (with Toner Cartridge) 2. Paper Cassette 1-1 Documentation 3. CD-ROM 4. AC Power Cord 6. Printer 5. CHAPTER 1 ABOUT THIS PRINTER CHAPTER 1 1 ABOUT THIS PRINTER What Is in the Carton Components When you unpack the printer, check to see that you have all of the following parts. 4 1 5 6 2 3 Fig. 1-1 1.
Users Manual - English
Page 50
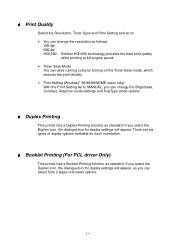
... duplex settings will appear, so you can change the Brightness, Contrast, Graphics mode settings and TrueType mode options. ♦ Duplex Printing This printer has a Duplex Printing function as standard. If you select the Duplex icon, the dialogue box for duplex settings will appear. ♦ Print... Quality Select the Resolution, Toner Save and Print Setting and so on. • You can change the resolution as follows: 300 dpi 600 dpi HQ1200: Brother HQ1200 technology provides the best print quality while printing at full engine speed. ...
... duplex settings will appear, so you can change the Brightness, Contrast, Graphics mode settings and TrueType mode options. ♦ Duplex Printing This printer has a Duplex Printing function as standard. If you select the Duplex icon, the dialogue box for duplex settings will appear. ♦ Print... Quality Select the Resolution, Toner Save and Print Setting and so on. • You can change the resolution as follows: 300 dpi 600 dpi HQ1200: Brother HQ1200 technology provides the best print quality while printing at full engine speed. ...

Users Manual - English
Page 59
Toner Save Mode Sleep Mode Media Type HRC setting Job spooling (You need to set the RAM Disk size first. Device Options CHAPTER 2 DEIVER AND SOFTWARE 1 2 1 You can change settings by clicking on the setting and then choosing a new value in the Change setting for box. ! For more information, see Chapter 3.) 2 Select the installed options from the list. 2-13
Toner Save Mode Sleep Mode Media Type HRC setting Job spooling (You need to set the RAM Disk size first. Device Options CHAPTER 2 DEIVER AND SOFTWARE 1 2 1 You can change settings by clicking on the setting and then choosing a new value in the Change setting for box. ! For more information, see Chapter 3.) 2 Select the installed options from the list. 2-13
Users Manual - English
Page 88
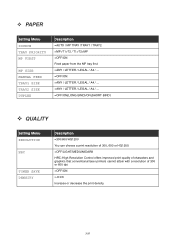
...)/ON(SHORT BIND) ! QUALITY SSeettttiinngg MMeennuu RESOLUTION HRC TONER SAVE DENSITY DDeessccrriippttiioonn =300/600/HQ1200 You can choose a print resolution of 300, 600 or HQ1200. =OFF/LIGHT/MEDIUM/DARK HRC: High Resolution Control offers improved print quality of characters and graphics that conventional laser printers cannot attain with a resolution of 300 or 600...
...)/ON(SHORT BIND) ! QUALITY SSeettttiinngg MMeennuu RESOLUTION HRC TONER SAVE DENSITY DDeessccrriippttiioonn =300/600/HQ1200 You can choose a print resolution of 300, 600 or HQ1200. =OFF/LIGHT/MEDIUM/DARK HRC: High Resolution Control offers improved print quality of characters and graphics that conventional laser printers cannot attain with a resolution of 300 or 600...
Users Manual - English
Page 100
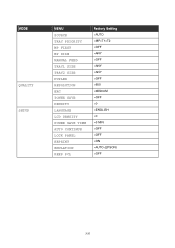
MMOODDEE QUALITY SETUP MMEENNUU SOURCE TRAY PRIORITY MP FIRST MP SIZE MANUAL FEED TRAY1 SIZE TRAY2 SIZE DUPLEX RESOLUTION HRC TONER SAVE DENSITY LANGUAGE LCD DENSITY POWER SAVE TIME AUTO CONTINUE LOCK PANEL REPRINT EMULATION KEEP PCL FFaaccttoorryy SSeettttiinngg =AUTO =MP>T1>T2 =OFF =ANY =OFF =ANY =ANY =OFF =600 =MEDIUM =OFF =0 =ENGLISH =0 =5 MIN. =OFF =OFF =ON =AUTO (EPSON) =OFF 3-32
MMOODDEE QUALITY SETUP MMEENNUU SOURCE TRAY PRIORITY MP FIRST MP SIZE MANUAL FEED TRAY1 SIZE TRAY2 SIZE DUPLEX RESOLUTION HRC TONER SAVE DENSITY LANGUAGE LCD DENSITY POWER SAVE TIME AUTO CONTINUE LOCK PANEL REPRINT EMULATION KEEP PCL FFaaccttoorryy SSeettttiinngg =AUTO =MP>T1>T2 =OFF =ANY =OFF =ANY =ANY =OFF =600 =MEDIUM =OFF =0 =ENGLISH =0 =5 MIN. =OFF =OFF =ON =AUTO (EPSON) =OFF 3-32
Users Manual - English
Page 121
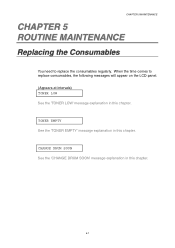
CHAPTER 5 MAINTENANCE CHAPTER 5 5 ROUTINE MAINTENANCE Replacing the Consumables You need to replace consumables, the following messages will appear on the LCD panel. (Appears at intervals) TONER LOW See the 'TONER LOW' message explanation in this chapter. When the time comes to replace the consumables regularly. TONER EMPTY See the 'TONER EMPTY' message explanation in this chapter. 5-1 CHANGE DRUM SOON See the 'CHANGE DRUM SOON' message explanation in this chapter.
CHAPTER 5 MAINTENANCE CHAPTER 5 5 ROUTINE MAINTENANCE Replacing the Consumables You need to replace consumables, the following messages will appear on the LCD panel. (Appears at intervals) TONER LOW See the 'TONER LOW' message explanation in this chapter. When the time comes to replace the consumables regularly. TONER EMPTY See the 'TONER EMPTY' message explanation in this chapter. 5-1 CHANGE DRUM SOON See the 'CHANGE DRUM SOON' message explanation in this chapter.

Users Manual - English
Page 122
Replacing Maintenance Parts You need to replace the maintenance parts regularly to replace the parts, the following messages will appear on the LCD. REPLACE PF KIT See "Maintenance Messages" in this chapter. 5-2 When it is time to maintain print quality. REPLACE LASER See "Maintenance Messages" in this chapter. ♦ Accessories Toner Cartridge Drum Unit See 'Replacing the Toner Cartridge' in this chapter See 'Replacing the Drum Unit' in this chapter. REPLACE FUSER See "Maintenance Messages" in this chapter !
Replacing Maintenance Parts You need to replace the maintenance parts regularly to replace the parts, the following messages will appear on the LCD. REPLACE PF KIT See "Maintenance Messages" in this chapter. 5-2 When it is time to maintain print quality. REPLACE LASER See "Maintenance Messages" in this chapter. ♦ Accessories Toner Cartridge Drum Unit See 'Replacing the Toner Cartridge' in this chapter See 'Replacing the Drum Unit' in this chapter. REPLACE FUSER See "Maintenance Messages" in this chapter !

Users Manual - English
Page 123
... A new toner cartridge contains enough toner to print up to 6,500 A4/Lettersize single-sided pages at 5% coverage (if the print density is set at level 0). ✒ Note • The amount of toner used varies ...according to what is printed on the page and the print density setting. • The more that is printed, the more toner will be used. • If... you change the print density setting for lighter or darker printing, the amount of toner that is used will change (more for ...
... A new toner cartridge contains enough toner to print up to 6,500 A4/Lettersize single-sided pages at 5% coverage (if the print density is set at level 0). ✒ Note • The amount of toner used varies ...according to what is printed on the page and the print density setting. • The more that is printed, the more toner will be used. • If... you change the print density setting for lighter or darker printing, the amount of toner that is used will change (more for ...

Users Manual - English
Page 124
! Purchase a new toner cartridge and have it ready before you get a TONER EMPTY message. TONER LOW Message (appears at intervals) TONER LOW If the LCD shows this chapter. 5-4 To replace the toner cartridge, refer to "Replacing the Toner Cartridge" in this message, the toner cartridge has nearly run out of toner.
! Purchase a new toner cartridge and have it ready before you get a TONER EMPTY message. TONER LOW Message (appears at intervals) TONER LOW If the LCD shows this chapter. 5-4 To replace the toner cartridge, refer to "Replacing the Toner Cartridge" in this message, the toner cartridge has nearly run out of toner.

Users Manual - English
Page 125
Fig. 5-1 5-5 TONER EMPTY ! If you want to buy toner cartridges, contact the dealer who you use quality toner cartridges. If the display shows the following message, the printer has run out of toner or the toner is not evenly distributed inside the cartridge. Replacing the Toner Cartridge ✒ Note To make sure you get the best print quality, make sure you bought the printer from. ☛1 Press the Cover Release Button and then open the Front Cover. TONER EMPTY Message CHAPTER 5 MAINTENANCE Check printed pages, page counter, and display messages routinely. !
Fig. 5-1 5-5 TONER EMPTY ! If you want to buy toner cartridges, contact the dealer who you use quality toner cartridges. If the display shows the following message, the printer has run out of toner or the toner is not evenly distributed inside the cartridge. Replacing the Toner Cartridge ✒ Note To make sure you get the best print quality, make sure you bought the printer from. ☛1 Press the Cover Release Button and then open the Front Cover. TONER EMPTY Message CHAPTER 5 MAINTENANCE Check printed pages, page counter, and display messages routinely. !
Users Manual - English
Page 126
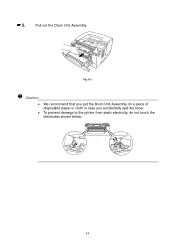
Pull out the Drum Unit Assembly. Fig. 5-2 ! Caution • We recommend that you put the Drum Unit Assembly on a piece of disposable paper or cloth in case you accidentally spill the toner. • To prevent damage to the printer from static electricity, do not touch the electrodes shown below. 5-6 ☛ 2.
Pull out the Drum Unit Assembly. Fig. 5-2 ! Caution • We recommend that you put the Drum Unit Assembly on a piece of disposable paper or cloth in case you accidentally spill the toner. • To prevent damage to the printer from static electricity, do not touch the electrodes shown below. 5-6 ☛ 2.
Users Manual - English
Page 127
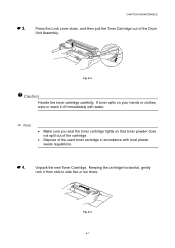
...water. ✒ Note • Make sure you seal the toner cartridge tightly so that toner powder does not spill out of the cartridge. • Dispose of the Drum Unit Assembly. Caution Handle the toner cartridge carefully. If toner spills on your hands or clothes, wipe or wash it ...from side to side five or six times. Unpack the new Toner Cartridge. Fig. 5-4 5-7 CHAPTER 5 MAINTENANCE ☛ 3. Keeping the cartridge ...
...water. ✒ Note • Make sure you seal the toner cartridge tightly so that toner powder does not spill out of the cartridge. • Dispose of the Drum Unit Assembly. Caution Handle the toner cartridge carefully. If toner spills on your hands or clothes, wipe or wash it ...from side to side five or six times. Unpack the new Toner Cartridge. Fig. 5-4 5-7 CHAPTER 5 MAINTENANCE ☛ 3. Keeping the cartridge ...

Users Manual - English
Page 128
...cover. Fig. 5-5 ! The warranty does not cover problems caused by Brother may be damaged. • Use a genuine Brother Toner Cartridge that is specially formulated for high-quality printing. • Printing with a toner or a toner cartridge that is not made by using other toners, toner cartridges or drum units. ☛5 Remove the protective cover. Do ... or room light, the unit may reduce the print quality and the quality and life of a drum unit. Caution Put in the Toner Cartridge immediately after you put in the printer. Caution • Wait to the performance and life of the...
...cover. Fig. 5-5 ! The warranty does not cover problems caused by Brother may be damaged. • Use a genuine Brother Toner Cartridge that is specially formulated for high-quality printing. • Printing with a toner or a toner cartridge that is not made by using other toners, toner cartridges or drum units. ☛5 Remove the protective cover. Do ... or room light, the unit may reduce the print quality and the quality and life of a drum unit. Caution Put in the Toner Cartridge immediately after you put in the printer. Caution • Wait to the performance and life of the...

Users Manual - English
Page 129
... Position Fig. 5-7 ! Caution Make sure that you return the tab to the Home position (L) before you put the Drum Unit back in the printer. When the Toner Cartridge is fitted correctly, the lock lever is lifted automatically. If you do not, printed pages may separate from right to the Home position... (L) before you pick up the Drum Unit Assembly. ☛ 7. CHAPTER 5 MAINTENANCE Put the new Toner Cartridge into place. Return the tab to left several times. Caution Make sure you hear it lock into the Drum Unit until you fit the...
... Position Fig. 5-7 ! Caution Make sure that you return the tab to the Home position (L) before you put the Drum Unit back in the printer. When the Toner Cartridge is fitted correctly, the lock lever is lifted automatically. If you do not, printed pages may separate from right to the Home position... (L) before you pick up the Drum Unit Assembly. ☛ 7. CHAPTER 5 MAINTENANCE Put the new Toner Cartridge into place. Return the tab to left several times. Caution Make sure you hear it lock into the Drum Unit until you fit the...

Users Manual - English
Page 130
☛ 8. Put the Drum Unit back into the printer. Fig. 5-8 ✒ Note We recommend that you clean the printer when you replace the Toner Cartridge. Close the Front Cover. See "Cleaning" in this chapter. 5-10
☛ 8. Put the Drum Unit back into the printer. Fig. 5-8 ✒ Note We recommend that you clean the printer when you replace the Toner Cartridge. Close the Front Cover. See "Cleaning" in this chapter. 5-10

Users Manual - English
Page 131
Under ideal conditions, a drum unit will print. You should only use genuine Brother toner. Replacing the Drum Unit This printer can print upto 20,000 pages *1 with one before there is near the end of printed pages may be significantly less than this estimate. The ... control over the many things that you replace the Drum Unit with suitable ventilation. 5-11 ! CHANGE DRUM SOON Message CHAPTER 5 MAINTENANCE CHANGE DRUM SOON The printer uses a Drum Unit to create the print images on the average type of print job and paper. ✒ Note There are many things that affect...
Under ideal conditions, a drum unit will print. You should only use genuine Brother toner. Replacing the Drum Unit This printer can print upto 20,000 pages *1 with one before there is near the end of printed pages may be significantly less than this estimate. The ... control over the many things that you replace the Drum Unit with suitable ventilation. 5-11 ! CHANGE DRUM SOON Message CHAPTER 5 MAINTENANCE CHANGE DRUM SOON The printer uses a Drum Unit to create the print images on the average type of print job and paper. ✒ Note There are many things that affect...
Users Manual - English
Page 132
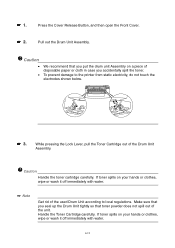
... up the Drum Unit tightly so that you accidentally spill the toner. • To prevent damage to local regulations. While pressing the Lock Lever, pull the Toner Cartridge out of the used Drum Unit according to the printer from static electricity, do not touch the electrodes shown below. ...☛ 3. If toner spills on your hands or clothes, wipe or wash it off immediately...
... up the Drum Unit tightly so that you accidentally spill the toner. • To prevent damage to local regulations. While pressing the Lock Lever, pull the Toner Cartridge out of the used Drum Unit according to the printer from static electricity, do not touch the electrodes shown below. ...☛ 3. If toner spills on your hands or clothes, wipe or wash it off immediately...

Users Manual - English
Page 133
...supplied with a click. Close the Front Cover. ✒ Note We recommend that you clean the printer when you hear it in this chapter. 5-13 Caution Wait to Clean the Printer" in the printer. Put the Toner Cartridge into place with the new drum unit). ✒ Note Do not reset the drum counter ...if you pick up . ! When the Toner Cartridge is fitted correctly, the Lock Lever is put it lock...
...supplied with a click. Close the Front Cover. ✒ Note We recommend that you clean the printer when you hear it in this chapter. 5-13 Caution Wait to Clean the Printer" in the printer. Put the Toner Cartridge into place with the new drum unit). ✒ Note Do not reset the drum counter ...if you pick up . ! When the Toner Cartridge is fitted correctly, the Lock Lever is put it lock...
Users Manual - English
Page 134
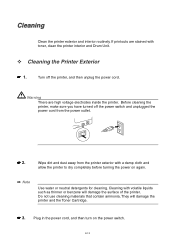
... power switch and unplugged the power cord from the printer exterior with a damp cloth and allow the printer to dry completely before turning the power on the power switch. 5-14 Cleaning with toner, clean the printer interior and Drum Unit. ! Warning There are stained... with volatile liquids such as thinner or benzene will damage the printer and the Toner Cartridge. ☛ 3. Cleaning Clean the printer exterior and interior routinely. Wipe dirt and...
... power switch and unplugged the power cord from the printer exterior with a damp cloth and allow the printer to dry completely before turning the power on the power switch. 5-14 Cleaning with toner, clean the printer interior and Drum Unit. ! Warning There are stained... with volatile liquids such as thinner or benzene will damage the printer and the Toner Cartridge. ☛ 3. Cleaning Clean the printer exterior and interior routinely. Wipe dirt and...


