Users Manual - English
Page 63
... printer driver, port driver, IP address, and so on . For example, Brother network ready printers and Brother network ready Multifunction devices can be used to manage devices from the control panel. Software for example, you can view consumable life, configure network parameters, view serial number information, printer usage, and so on , automatically copied to their PC. 2-17 This means that file to have stored in E-mail to manage many aspects of your Brother network connected devices. Then, each user...
... printer driver, port driver, IP address, and so on . For example, Brother network ready printers and Brother network ready Multifunction devices can be used to manage devices from the control panel. Software for example, you can view consumable life, configure network parameters, view serial number information, printer usage, and so on , automatically copied to their PC. 2-17 This means that file to have stored in E-mail to manage many aspects of your Brother network connected devices. Then, each user...

Users Manual - English
Page 67
... the Automatic Interface Selection mode has been set at the factory to ON, simply connect the interface cable to that interface in the INTERFACE mode on the printer control panel. If you constantly use the parallel interface, you select that interface if only one interface, we recommend that you can turn the high-speed and bidirectional parallel communications on or off by using the Parallel menu in the Interface mode. For more...
... the Automatic Interface Selection mode has been set at the factory to ON, simply connect the interface cable to that interface in the INTERFACE mode on the printer control panel. If you constantly use the parallel interface, you select that interface if only one interface, we recommend that you can turn the high-speed and bidirectional parallel communications on or off by using the Parallel menu in the Interface mode. For more...

Users Manual - English
Page 70
... displayed menu. Buttons You can control the basic print operations and change the printer settings with the seven buttons on the control panel (Go, Job Cancel, Reprint, +, −, Set, Back). BBuuttttoonn 1 Go 2 Job Cancel 3 Reprint 4 + - 5 Set 6 Back FFuunnccttiioonn Exit from the Control panel menu, Reprint settings and Error messages. Stop and cancel the printer operation in the menu structure. 3-2 Go back one level in progress. Move forward and backward through selectable options. Set the selected menus and settings. Pause / Continue printing...
... displayed menu. Buttons You can control the basic print operations and change the printer settings with the seven buttons on the control panel (Go, Job Cancel, Reprint, +, −, Set, Back). BBuuttttoonn 1 Go 2 Job Cancel 3 Reprint 4 + - 5 Set 6 Back FFuunnccttiioonn Exit from the Control panel menu, Reprint settings and Error messages. Stop and cancel the printer operation in the menu structure. 3-2 Go back one level in progress. Move forward and backward through selectable options. Set the selected menus and settings. Pause / Continue printing...
Users Manual - English
Page 140
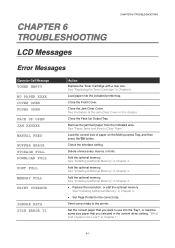
...Jam Clear Cover in the current driver setting. Check the Interface setting. Send correct data to Clear Them". CHAPTER 6 6 TROUBLESHOOTING LCD Messages CHAPTER 6 TROUBLESHOOTING Error Messages OOppeerraattoorrCCaalll MMeessssaaggee TONER EMPTY NO PAPER XXXX COVER OPEN FUSER OPEN FACE UP OPEN JAM XXXXXX MANUAL FEED BUFFER ERROR STORAGE FULL DOWNLOAD FULL FONT FULL MEMORY FULL PRINT OVERRUN IGNORE DATA SIZE ERROR T1 AAccttiioonn Replace the Toner Cartridge with a new one. See "Replacing the Toner Cartridge" in Chapter 4. • Reduce the resolution, or add the optional memory. Load...
...Jam Clear Cover in the current driver setting. Check the Interface setting. Send correct data to Clear Them". CHAPTER 6 6 TROUBLESHOOTING LCD Messages CHAPTER 6 TROUBLESHOOTING Error Messages OOppeerraattoorrCCaalll MMeessssaaggee TONER EMPTY NO PAPER XXXX COVER OPEN FUSER OPEN FACE UP OPEN JAM XXXXXX MANUAL FEED BUFFER ERROR STORAGE FULL DOWNLOAD FULL FONT FULL MEMORY FULL PRINT OVERRUN IGNORE DATA SIZE ERROR T1 AAccttiioonn Replace the Toner Cartridge with a new one. See "Replacing the Toner Cartridge" in Chapter 4. • Reduce the resolution, or add the optional memory. Load...

Users Manual - English
Page 144
...). Problem The printer does not load paper. This is a paper jam. • Clear the jammed paper (see your software. so the Face Down Output Tray • Change the printer driver setting in the paper cassette, and then try again. • Make sure that the MANUAL FEED = ON (STOP) is not selected on the paper you have chosen. • Make sure that you are curled, • Turn the paper in Chapter 1. The printer does not print to remove the paper, turn...
...). Problem The printer does not load paper. This is a paper jam. • Clear the jammed paper (see your software. so the Face Down Output Tray • Change the printer driver setting in the paper cassette, and then try again. • Make sure that the MANUAL FEED = ON (STOP) is not selected on the paper you have chosen. • Make sure that you are curled, • Turn the paper in Chapter 1. The printer does not print to remove the paper, turn...

Users Manual - English
Page 168
Recommendation • Make sure the printer cable is also connected to a storage device or scanner. Remove all other devices and connect the port to the printer only. • Turn off the status monitor in the Device / Options page on your document. • Graphics mode • TrueType mode • Use Printer TrueType Fonts The printer cannot print full pages of a document. Refer to 'Printing Envelopes' in the printer driver. The best combination of your document. • Expand the printer memory by...
Recommendation • Make sure the printer cable is also connected to a storage device or scanner. Remove all other devices and connect the port to the printer only. • Turn off the status monitor in the Device / Options page on your document. • Graphics mode • TrueType mode • Use Printer TrueType Fonts The printer cannot print full pages of a document. Refer to 'Printing Envelopes' in the printer driver. The best combination of your document. • Expand the printer memory by...

Users Manual - English
Page 169
... you have an interface-switching device, make sure that you have print (leaving 62 printable lines). Usually the first two lines and the last two lines of a page cannot have chosen the appropriate printer driver in your printer. Recommendation • Check that the printer cable is selected. Recommendation • Most laser printers have a restricted area that of your PC. Other Problems Problem The printer cannot print. For DOS Users Problem Unable to LPT1...
... you have an interface-switching device, make sure that you have print (leaving 62 printable lines). Usually the first two lines and the last two lines of a page cannot have chosen the appropriate printer driver in your printer. Recommendation • Check that the printer cable is selected. Recommendation • Most laser printers have a restricted area that of your PC. Other Problems Problem The printer cannot print. For DOS Users Problem Unable to LPT1...
Quick Setup Guide - English
Page 1
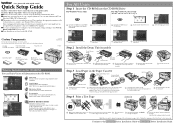
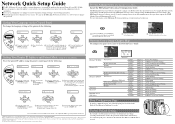
... Data Back Reprint Set Job cancel Go PRINTING Data Back Reprint Set Job cancel Go 1 2 3 4 Make sure the printer power switch is not a standard accessory. message will print a test page. The printer will appear. 5 Press the Go button. If you want . 1 Insert the CD-ROM into the AC outlet. CD-ROM Drum unit assembly (including User's Guide) (with toner cartridge included) AC power cord LJ5948001 Printed in the tray and below the maximum paper mark. 4 Re-install the paper cassette into the printer. Connect...
... Data Back Reprint Set Job cancel Go PRINTING Data Back Reprint Set Job cancel Go 1 2 3 4 Make sure the printer power switch is not a standard accessory. message will print a test page. The printer will appear. 5 Press the Go button. If you want . 1 Insert the CD-ROM into the AC outlet. CD-ROM Drum unit assembly (including User's Guide) (with toner cartridge included) AC power cord LJ5948001 Printed in the tray and below the maximum paper mark. 4 Re-install the paper cassette into the printer. Connect...
Quick Setup Guide - English
Page 2
... put the printer back into its default factory settings (resetting all information such as the password and IP address information), use the BRAdmin Professional software or a web browser to next digit. Network User's Guide Chapter Map To configure the print server refer to accept the appropriate language. Follow the instructions on the LCD. Press the Set button. 4 Enter your Brother network connected devices. SUBNET MASK= Back * 0 . 0 . 0 . 0 Back READY Go Set 5 Press the + button until SETUP is designed...
... put the printer back into its default factory settings (resetting all information such as the password and IP address information), use the BRAdmin Professional software or a web browser to next digit. Network User's Guide Chapter Map To configure the print server refer to accept the appropriate language. Follow the instructions on the LCD. Press the Set button. 4 Enter your Brother network connected devices. SUBNET MASK= Back * 0 . 0 . 0 . 0 Back READY Go Set 5 Press the + button until SETUP is designed...
Driver Setup Guide for Mac - English
Page 1
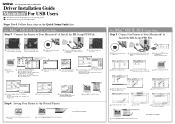
... the Add button. Open the Apple LaserWriter Software folder. Some illustrations are based on the screen. 0 Click the Change... button. 0 Select USB. Laser Printer HL-1850 and HL-1870N Driver Installation Guide Macintosh® For USB Users Follow the instructions in this screen appears, select the USB interface cable. button in PostScriptTM Printer Description (PPD) file. Select Brother HL-1850_1870N series, and then click the Select button. 4 Open your CD-ROM drive. Steps 1 to 9.2 Users: Open the Applications (Mac® OS 9) folder. button in USB Printer...
... the Add button. Open the Apple LaserWriter Software folder. Some illustrations are based on the screen. 0 Click the Change... button. 0 Select USB. Laser Printer HL-1850 and HL-1870N Driver Installation Guide Macintosh® For USB Users Follow the instructions in this screen appears, select the USB interface cable. button in PostScriptTM Printer Description (PPD) file. Select Brother HL-1850_1870N series, and then click the Select button. 4 Open your CD-ROM drive. Steps 1 to 9.2 Users: Open the Applications (Mac® OS 9) folder. button in USB Printer...

Driver Setup Guide for Mac - English
Page 2
... digits of the User's Guide on the HL-1870N. Buttons Go Job Cancel Reprint Menu Set Back Exit from the Print Center menu. Move forward through menus. button, and then press the Set button. Open the Mac OS X folder. 1 Click "Connect the interface cable & Install the driver/utility." 2 Select the Network interface cable. For more information, see "CONTROL PANEL" in Chapter 4 of the Ethernet address. button. Off No remaining data. Language Setting (Default setting is not already installed on your language folder. 6 Double-click the PPD...
... digits of the User's Guide on the HL-1870N. Buttons Go Job Cancel Reprint Menu Set Back Exit from the Print Center menu. Move forward through menus. button, and then press the Set button. Open the Mac OS X folder. 1 Click "Connect the interface cable & Install the driver/utility." 2 Select the Network interface cable. For more information, see "CONTROL PANEL" in Chapter 4 of the Ethernet address. button. Off No remaining data. Language Setting (Default setting is not already installed on your language folder. 6 Double-click the PPD...
Network Users Manual - English
Page 2
... Publication Under the supervision of Brother Industries Ltd., this user's guide are registered trademarks or trademarks of International Business Machines Corporation. HP, HP/UX,JetDirect and JetAdmin are trademarks of respective companies. All other errors relating to avoid damage. Shipment of Adobe Systems Incorporated. WARNING When shipping the print server, put it into the anti-static bag to the publication...
... Publication Under the supervision of Brother Industries Ltd., this user's guide are registered trademarks or trademarks of International Business Machines Corporation. HP, HP/UX,JetDirect and JetAdmin are trademarks of respective companies. All other errors relating to avoid damage. Shipment of Adobe Systems Incorporated. WARNING When shipping the print server, put it into the anti-static bag to the publication...
Network Users Manual - English
Page 32
... print. Now specify if you must now select the correct Network printing port. Click the "Next" button. 7. Now that you have configured the port, you wish to the printer driver already installed section. You can also click the "Windows Update" button to connect directly to Microsoft's support Web site to complete the Wizard. 11. This chapter describes the two most commonly used configurations, Standard TCP/IP Port printing and IPP (Internet Printing...
... print. Now specify if you must now select the correct Network printing port. Click the "Next" button. 7. Now that you have configured the port, you wish to the printer driver already installed section. You can also click the "Windows Update" button to connect directly to Microsoft's support Web site to complete the Wizard. 11. This chapter describes the two most commonly used configurations, Standard TCP/IP Port printing and IPP (Internet Printing...

Network Users Manual - English
Page 35
... displayed, click on Next. 9. CHAPTER 2 TCP/IP PRINTING Windows NT 4.0 Printing (Printer Driver not yet installed) 1. If you like to complete the installation. Click on Next. 10. Click on Service Names. 5. Type in the print server service name in your printer. 7. Select Yes when you are using Domain Name System, enter the name associated with your printer configuration page. Click. You may now print to the print server in the IP address...
... displayed, click on Next. 9. CHAPTER 2 TCP/IP PRINTING Windows NT 4.0 Printing (Printer Driver not yet installed) 1. If you like to complete the installation. Click on Next. 10. Click on Service Names. 5. Type in the print server service name in your printer. 7. Select Yes when you are using Domain Name System, enter the name associated with your printer configuration page. Click. You may now print to the print server in the IP address...

Network Users Manual - English
Page 43
... Start button, select Settings, and open the Printers window. Click on the Details tab and push the Add Port button. The default port name is already being used this , go the Start button, select Setting and then Printers. 2. You have selected a printer driver that you are connected to your Windows system using the standard Windows printer setup procedure. 1. Enter the IP address of the printer driver. 3-3 Select the desired option and press Next. 7. Once you wish to print...
... Start button, select Settings, and open the Printers window. Click on the Details tab and push the Add Port button. The default port name is already being used this , go the Start button, select Setting and then Printers. 2. You have selected a printer driver that you are connected to your Windows system using the standard Windows printer setup procedure. 1. Enter the IP address of the printer driver. 3-3 Select the desired option and press Next. 7. Once you wish to print...
Network Users Manual - English
Page 61
... get the Add Printer Wizard window. (For Windows 95/98/Me user) 14. Select the desired model of either keeping the existing driver (recommended) or replacing it . Note that this , go to load the driver from the CDROM. If you assigned in step 6 and press Next. 15. If necessary, click Have Disk to configure another remote print server, go the Start button, select Settings and then Printers. 12...
... get the Add Printer Wizard window. (For Windows 95/98/Me user) 14. Select the desired model of either keeping the existing driver (recommended) or replacing it . Note that this , go to load the driver from the CDROM. If you assigned in step 6 and press Next. 15. If necessary, click Have Disk to configure another remote print server, go the Start button, select Settings and then Printers. 12...
Network Users Manual - English
Page 79
... same services assigned by connecting to the Brother print server using your web browser by NetWare print server names cannot be used for the Brother printer, where "xxxxxx" is connected, press the ENTER key and type the default password of print servers. Execute the BRCONFIG from the list of "access" in response to do this manual for information on a service other than the default NetWare service, you get the Local> prompt, type: SET SERVICE service TREE tree SET SERVICE service CONTEXT...
... same services assigned by connecting to the Brother print server using your web browser by NetWare print server names cannot be used for the Brother printer, where "xxxxxx" is connected, press the ENTER key and type the default password of print servers. Execute the BRCONFIG from the list of "access" in response to do this manual for information on a service other than the default NetWare service, you get the Local> prompt, type: SET SERVICE service TREE tree SET SERVICE service CONTEXT...
Network Users Manual - English
Page 91
.... Select Add Printer (If you have already installed a Brother printer driver, double click the printer driver that "Automatically detect and install my Plug and Play printer" is not checked. 5. Enter the Location and Comment information and click Next until you can find the node name and MAC address by printing out the printer configuration page. From the Start menu, select Settings and then Printers. 2. Click Next 6. A list of an existing port or DOS device, such...
.... Select Add Printer (If you have already installed a Brother printer driver, double click the printer driver that "Automatically detect and install my Plug and Play printer" is not checked. 5. Enter the Location and Comment information and click Next until you can find the node name and MAC address by printing out the printer configuration page. From the Start menu, select Settings and then Printers. 2. Click Next 6. A list of an existing port or DOS device, such...
Network Users Manual - English
Page 92
.... Select Shared or Not Shared. Refer to the User's Guide for the port (the name must not be printing to print the configuration page on the printer configuration page) You can see the Ethernet address on your print server. 6. Select Add Printer (If you have already installed a Brother printer driver, double click the printer driver that will appear as the default. 11. A list of the desired print server (you selected in the above step will be...
.... Select Shared or Not Shared. Refer to the User's Guide for the port (the name must not be printing to print the configuration page on the printer configuration page) You can see the Ethernet address on your print server. 6. Select Add Printer (If you have already installed a Brother printer driver, double click the printer driver that will appear as the default. 11. A list of the desired print server (you selected in the above step will be...

Network Users Manual - English
Page 107
.... Change both values to accept the output string values. 14. You will then get the Output strings menu. You will get the Enable strings menu. You will be sent before and after each job, and it may cause problems with DOS or Windows application programs, since the program or drivers reset the printer after the print job to accept and print jobs. Otherwise, press ESCAPE multiple times to add...
.... Change both values to accept the output string values. 14. You will then get the Output strings menu. You will get the Enable strings menu. You will be sent before and after each job, and it may cause problems with DOS or Windows application programs, since the program or drivers reset the printer after the print job to accept and print jobs. Otherwise, press ESCAPE multiple times to add...


