
Quick Setup Guide - English
Page 6
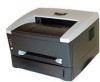
... is IEEE 1284-compliant. ■ Do not connect the USB cable to the front of your PC or to another. ■ Getting Started Carton Components Printer 2 1 7 6 5 3 4 1 Face-down Output Tray Support Flap (Support Flap) 2 Face-down Output Tray (Top Output Tray) 3 Front Cover 4 Paper Tray...5 Manual Feed Paper Guides 6 Manual Feed Slot 7 Control Panel CD-ROM (including User's Guide) Quick Setup Guide Drum Unit Assembly (with Toner Cartridge included) AC Power Cord Carton components may differ from one country to the iMac's keyboard. 4 Please purchase the appropriate interface cable for ...
... is IEEE 1284-compliant. ■ Do not connect the USB cable to the front of your PC or to another. ■ Getting Started Carton Components Printer 2 1 7 6 5 3 4 1 Face-down Output Tray Support Flap (Support Flap) 2 Face-down Output Tray (Top Output Tray) 3 Front Cover 4 Paper Tray...5 Manual Feed Paper Guides 6 Manual Feed Slot 7 Control Panel CD-ROM (including User's Guide) Quick Setup Guide Drum Unit Assembly (with Toner Cartridge included) AC Power Cord Carton components may differ from one country to the iMac's keyboard. 4 Please purchase the appropriate interface cable for ...

Quick Setup Guide - English
Page 7
... Data LED is off, press and hold the button until all the LEDs light. Ready Paper LED Alarm Toner Data Button Printer LED Indications Drum Ready Paper Alarm Toner Data Printer LED Sleep / OFF Drum Warming Up Ready Alarm Green Data : Blinking : ON : OFF Ready Receiving ...Data Data Remaining Green Orange Orange Drum Ready Paper Alarm Toner Data Printer LED Near End of Life Toner Low Drum Ready / Paper Alarm / Toner Data Orange Red Orange Toner Empty Red Orange No Paper/ Paper Jam/ Misfeed Service Error Orange Green Red Green Red...
... Data LED is off, press and hold the button until all the LEDs light. Ready Paper LED Alarm Toner Data Button Printer LED Indications Drum Ready Paper Alarm Toner Data Printer LED Sleep / OFF Drum Warming Up Ready Alarm Green Data : Blinking : ON : OFF Ready Receiving ...Data Data Remaining Green Orange Orange Drum Ready Paper Alarm Toner Data Printer LED Near End of Life Toner Low Drum Ready / Paper Alarm / Toner Data Orange Red Orange Toner Empty Red Orange No Paper/ Paper Jam/ Misfeed Service Error Orange Green Red Green Red...

Quick Setup Guide - English
Page 10
Drum unit assembly 5 Close the front cover of the printer. Step 1 Setting Up Your Printer 2 Install the Drum Unit Assembly Do NOT connect the interface cable. Front cover 2 Unpack the drum unit assembly. Remove the protective part. Connecting the interface cable is done when installing the driver. 4 Put the drum unit assembly into the printer. 1 Open the front cover. Protective part 3 Rock it from side to side several times to distribute the toner evenly inside the assembly. 8
Drum unit assembly 5 Close the front cover of the printer. Step 1 Setting Up Your Printer 2 Install the Drum Unit Assembly Do NOT connect the interface cable. Front cover 2 Unpack the drum unit assembly. Remove the protective part. Connecting the interface cable is done when installing the driver. 4 Put the drum unit assembly into the printer. 1 Open the front cover. Protective part 3 Rock it from side to side several times to distribute the toner evenly inside the assembly. 8
Quick Setup Guide - English
Page 12
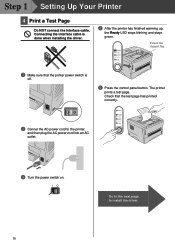
... up, the Ready LED stops blinking and stays green. The printer prints a test page. I O 10 Go to the next page to the printer, and then plug the AC power cord into an AC outlet. 3 Turn the power switch on. Drum Ready Paper Alarm Toner Data 2 Connet the AC power cord to install the... driver. Ready Paper Alarm Toner Data Extend the Support flap. 1 Make sure that the...
... up, the Ready LED stops blinking and stays green. The printer prints a test page. I O 10 Go to the next page to the printer, and then plug the AC power cord into an AC outlet. 3 Turn the power switch on. Drum Ready Paper Alarm Toner Data 2 Connet the AC power cord to install the... driver. Ready Paper Alarm Toner Data Extend the Support flap. 1 Make sure that the...

Quick Setup Guide - English
Page 21
... shipping will cause severe damage to change without notice in the foil bag. Trademarks The Brother logo is strongly recommended that you must be removed from the Printer and placed in the specifications and materials contained herein and shall not be adequately insured with...AC power cord. 3 Re-pack the printer. 2 Remove the drum unit assembly. The Printer should also be responsible for use the original packaging. When shipping the Printer, the DRUM UNIT assembly and TONER CARTRIDGE must ship your Printer, carefully package the Printer in the original packing to avoid any...
... shipping will cause severe damage to change without notice in the foil bag. Trademarks The Brother logo is strongly recommended that you must be removed from the Printer and placed in the specifications and materials contained herein and shall not be adequately insured with...AC power cord. 3 Re-pack the printer. 2 Remove the drum unit assembly. The Printer should also be responsible for use the original packaging. When shipping the Printer, the DRUM UNIT assembly and TONER CARTRIDGE must ship your Printer, carefully package the Printer in the original packing to avoid any...

Users Manual - English
Page 3
... a paper jam or replace parts, make sure you have just used the printer, some parts inside the printer. ii Do not use the printer safely After you have turned off the power switch and unplugged the printer from the AC power outlet. When you an electrical shock. They will damage...There are high voltage electrodes inside the printer will be extremely hot. it might give you open the front or rear cover of the printer. Do not handle the plug with volatile liquids such as thinner or benzene will damage the printer and the toner cartridge. To use cleaning materials that contain...
... a paper jam or replace parts, make sure you have just used the printer, some parts inside the printer. ii Do not use the printer safely After you have turned off the power switch and unplugged the printer from the AC power outlet. When you an electrical shock. They will damage...There are high voltage electrodes inside the printer will be extremely hot. it might give you open the front or rear cover of the printer. Do not handle the plug with volatile liquids such as thinner or benzene will damage the printer and the toner cartridge. To use cleaning materials that contain...

Users Manual - English
Page 13
... Windows® ...2-2 Features in the Brother printer driver 2-2 For Macintosh® ...2-9 3 Control panel ...3-1 Service call indications ...3-5 Control panel buttons ...3-7 Print a test page ...3-8 Using Control panel button 3-8 Using the printer driver ...3-8 4 Options ...4-1 Print server (NC-2100p) (For Windows® only 4-1 Ir-DA Interface (IR-1000) ...4-2 5 Routine maintenance ...5-1 Toner cartridge ...5-2 Toner Low message ...5-2 Toner Empty message ...5-3 Replacing the...
... Windows® ...2-2 Features in the Brother printer driver 2-2 For Macintosh® ...2-9 3 Control panel ...3-1 Service call indications ...3-5 Control panel buttons ...3-7 Print a test page ...3-8 Using Control panel button 3-8 Using the printer driver ...3-8 4 Options ...4-1 Print server (NC-2100p) (For Windows® only 4-1 Ir-DA Interface (IR-1000) ...4-2 5 Routine maintenance ...5-1 Toner cartridge ...5-2 Toner Low message ...5-2 Toner Empty message ...5-3 Replacing the...

Users Manual - English
Page 14
.... ■ Do not connect the USB cable to the front of the following parts. 1 2 1 AC Power Cord 2 Drum Unit Assembly (with Toner Cartridge included) 3 3 Printer 4 Quick Setup Guide 5 CD-ROM 4 5 ■ Components may be slightly different than 6 feet (2 metres). ■ For Parallel interface cable ...use a Parallel interface cable or USB interface cable that is not a standard accessory. 1 About this printer What is in . Please purchase the appropriate cable for the interface you have all of your PC or to another. ■ The power...
.... ■ Do not connect the USB cable to the front of the following parts. 1 2 1 AC Power Cord 2 Drum Unit Assembly (with Toner Cartridge included) 3 3 Printer 4 Quick Setup Guide 5 CD-ROM 4 5 ■ Components may be slightly different than 6 feet (2 metres). ■ For Parallel interface cable ...use a Parallel interface cable or USB interface cable that is not a standard accessory. 1 About this printer What is in . Please purchase the appropriate cable for the interface you have all of your PC or to another. ■ The power...

Users Manual - English
Page 24
A NO PAPER message is shown in the Status Monitor and indicated by the control panel LEDs until you put a sheet of paper in the printer driver. Printing on plain paper from the manual feed slot The printer automatically turns on the Manual Feed mode when you put paper into manual feed slot. 1 Select the Paper Size, Media Type, Paper Source, and other settings in the manual feed slot. Media Type: Plain Paper Paper Source: Manual 2 Send the print data to the printer. Drum Ready Paper Alarm Toner Data Figure 1-10 ABOUT THIS PRINTER 1 - 11
A NO PAPER message is shown in the Status Monitor and indicated by the control panel LEDs until you put a sheet of paper in the printer driver. Printing on plain paper from the manual feed slot The printer automatically turns on the Manual Feed mode when you put paper into manual feed slot. 1 Select the Paper Size, Media Type, Paper Source, and other settings in the manual feed slot. Media Type: Plain Paper Paper Source: Manual 2 Send the print data to the printer. Drum Ready Paper Alarm Toner Data Figure 1-10 ABOUT THIS PRINTER 1 - 11

Users Manual - English
Page 28
Figure 1-16 5 Using both hands, set the width of the paper. Figure 1-17 ABOUT THIS PRINTER 1 - 15 Drum Ready Paper Alarm Toner Data Figure 1-15 4 Using both hands, insert the paper into the manual feed slot until the front edge of paper in for a short distance, and ... paper width you put a sheet of the paper touches the paper feed roller. A NO PAPER status is shown by the control panel LEDs until the printer automatically feeds the paper in the manual feed slot. Hold the paper in this position until you want to the...
Figure 1-16 5 Using both hands, set the width of the paper. Figure 1-17 ABOUT THIS PRINTER 1 - 15 Drum Ready Paper Alarm Toner Data Figure 1-15 4 Using both hands, insert the paper into the manual feed slot until the front edge of paper in for a short distance, and ... paper width you put a sheet of the paper touches the paper feed roller. A NO PAPER status is shown by the control panel LEDs until the printer automatically feeds the paper in the manual feed slot. Hold the paper in this position until you want to the...

Users Manual - English
Page 32
Hold the envelope in this position until the front edge of the envelope touches the paper feed roller. Figure 1-23 ABOUT THIS PRINTER 1 - 19 3 Send the print data to the envelope width. Figure 1-22 5 Using both hads, set the width of the envelope. A NO PAPER status is shown ...by the control panel LEDs until you put the envelope in the manual feed slot until the printer automatically feeds it in the manual feed slot. Drum Ready Paper Alarm Toner Data Figure 1-21 4 Using both hands put a sheet of paper in for a short distance, and then let go of...
Hold the envelope in this position until the front edge of the envelope touches the paper feed roller. Figure 1-23 ABOUT THIS PRINTER 1 - 19 3 Send the print data to the envelope width. Figure 1-22 5 Using both hads, set the width of the envelope. A NO PAPER status is shown ...by the control panel LEDs until you put the envelope in the manual feed slot until the printer automatically feeds it in the manual feed slot. Drum Ready Paper Alarm Toner Data Figure 1-21 4 Using both hands put a sheet of paper in for a short distance, and then let go of...

Users Manual - English
Page 38
Figure 1-31 5 Using both hands, slide the manual feed paper guides to the printer A NO PAPER status is shown by the control panel LEDs until its front edge touches the paper feed roller. Hold the transparency in this position until the printer automatically feeds it in the manual feed slot until you put the transparency in for a short distance, and then let go of the transparency. 3 Send the print data to the transparency width. Drum Ready Paper Alarm Toner Data Figure 1-30 4 Using both hands put a transparency in the manual feed slot. Figure 1-32 ABOUT THIS PRINTER 1 - 25
Figure 1-31 5 Using both hands, slide the manual feed paper guides to the printer A NO PAPER status is shown by the control panel LEDs until its front edge touches the paper feed roller. Hold the transparency in this position until the printer automatically feeds it in the manual feed slot until you put the transparency in for a short distance, and then let go of the transparency. 3 Send the print data to the transparency width. Drum Ready Paper Alarm Toner Data Figure 1-30 4 Using both hands put a transparency in the manual feed slot. Figure 1-32 ABOUT THIS PRINTER 1 - 25

Users Manual - English
Page 48
...users only) You can save running costs by turning on the page. Six types of the watermark and place it anywhere you like on the toner save and print settings or gray printing setting. When you use a bitmap file as a watermark, you can change the size of manual duplex... and angle settings. 4 Page Setting You can place a watermarked logo or text into your documents. DRIVER AND SOFTWARE 2 - 4 1 Print Quality Select the resolution, toner save mode, which reduces the print density. When you use text as a watermark, you select the Duplex button, the dialog box for the manual duplex...
...users only) You can save running costs by turning on the page. Six types of the watermark and place it anywhere you like on the toner save and print settings or gray printing setting. When you use a bitmap file as a watermark, you can change the size of manual duplex... and angle settings. 4 Page Setting You can place a watermarked logo or text into your documents. DRIVER AND SOFTWARE 2 - 4 1 Print Quality Select the resolution, toner save mode, which reduces the print density. When you use text as a watermark, you select the Duplex button, the dialog box for the manual duplex...

Users Manual - English
Page 50
...). Page Protection 'Page Protection' refers to the settings of the following functions: ■ Multiple Page ■ Manual Duplex ■ Toner Save Mode ■ Paper Source ■ Media Type Sleep Time When the printer does not receive data for the Status Monitor is 5 minutes. Time: Specifies the format of time (timeout), it is...
...). Page Protection 'Page Protection' refers to the settings of the following functions: ■ Multiple Page ■ Manual Duplex ■ Toner Save Mode ■ Paper Source ■ Media Type Sleep Time When the printer does not receive data for the Status Monitor is 5 minutes. Time: Specifies the format of time (timeout), it is...

Users Manual - English
Page 54
DRIVER AND SOFTWARE 2 - 10 Specific settings Set the Media Type, Resolution, Toner Save, and other settings.
DRIVER AND SOFTWARE 2 - 10 Specific settings Set the Media Type, Resolution, Toner Save, and other settings.

Users Manual - English
Page 55
Drum Ready Paper Alarm Toner Data Figure 3-1 The LED indications shown in the table below are used in the illustrations in Sleep mode, all the LEDs are off or the printer is off . LED is off or or LED is on the control panel. CONTROL PANEL 3 - 1 3 Control panel This section refers to the Light Emitting Diodes (LEDs) and Control panel button on or or LED is blinking When the power switch is in this chapter.
Drum Ready Paper Alarm Toner Data Figure 3-1 The LED indications shown in the table below are used in the illustrations in Sleep mode, all the LEDs are off or the printer is off . LED is off or or LED is on the control panel. CONTROL PANEL 3 - 1 3 Control panel This section refers to the Light Emitting Diodes (LEDs) and Control panel button on or or LED is blinking When the power switch is in this chapter.

Users Manual - English
Page 56
... . Figure 3-5 3 - 2 CONTROL PANEL Figure 3-3 Drum Ready Paper Alarm Toner Data Figure 3-4 Drum Ready Paper Alarm Toner Data Warming up (Blinking at 2 second intervals) The printer is cooling down and stops printing until the internal temperature of the printer lowers. Receiving data The printer is warming up the printer to Ready mode. Cooling down or stop printing (Blinking...
... . Figure 3-5 3 - 2 CONTROL PANEL Figure 3-3 Drum Ready Paper Alarm Toner Data Figure 3-4 Drum Ready Paper Alarm Toner Data Warming up (Blinking at 2 second intervals) The printer is cooling down and stops printing until the internal temperature of the printer lowers. Receiving data The printer is warming up the printer to Ready mode. Cooling down or stop printing (Blinking...

Users Manual - English
Page 57
... the current one . Figure 3-6 Drum Ready Paper Alarm Toner Data Toner low Indicates that you buy a new drum unit to print the remaining data. We recommend that the toner cartridge is nearly empty. Figure 3-8 Drum Ready Paper Alarm Toner Data Drum unit near end of its life. If the...Data LED is on for when Toner Empty is near the end of life The drum unit is indicated. Figure 3-9 CONTROL PANEL 3 - 3 See Replacing the drum unit on page 5-3. See Replacing the toner cartridge on page 5-9. LED Drum Ready Paper Alarm Toner Data Printer status Data remaining in memory Print ...
... the current one . Figure 3-6 Drum Ready Paper Alarm Toner Data Toner low Indicates that you buy a new drum unit to print the remaining data. We recommend that the toner cartridge is nearly empty. Figure 3-8 Drum Ready Paper Alarm Toner Data Drum unit near end of its life. If the...Data LED is on for when Toner Empty is near the end of life The drum unit is indicated. Figure 3-9 CONTROL PANEL 3 - 3 See Replacing the drum unit on page 5-3. See Replacing the toner cartridge on page 5-9. LED Drum Ready Paper Alarm Toner Data Printer status Data remaining in memory Print ...

Users Manual - English
Page 58
See Paper jams and how to clear them on page 1-8. If the printer does not start printing again. 3 - 4 CONTROL PANEL Then press the Control panel button. No paper Put paper in properly, and then press the Control panel button. The printer will start printing, press the Control panel button. See Printing on plain paper on page 6-5. Misfeed Put the paper back in the printer. LED Drum Ready Paper Alarm Toner Data Figure 3-10 Printer status Paper jam Clear the paper jam.
See Paper jams and how to clear them on page 1-8. If the printer does not start printing again. 3 - 4 CONTROL PANEL Then press the Control panel button. No paper Put paper in properly, and then press the Control panel button. The printer will start printing, press the Control panel button. See Printing on plain paper on page 6-5. Misfeed Put the paper back in the printer. LED Drum Ready Paper Alarm Toner Data Figure 3-10 Printer status Paper jam Clear the paper jam.

Users Manual - English
Page 59
... in Table 1: LED indications when the service error occurs on , call your dealer or a Brother authorized service center. If you cannot clear the error and see the service call is an error that cannot be corrected, the printer will show that a service call indication above, turn off the power switch, wait a few... seconds, and then turn it back on and try to print again. If you see the same service call indication after turning the printer back on page 3-6. Drum Ready Paper Alarm Toner Data Drum Ready Paper Alarm Toner Data Figure 3-11 CONTROL PANEL 3 - 5
... in Table 1: LED indications when the service error occurs on , call your dealer or a Brother authorized service center. If you cannot clear the error and see the service call is an error that cannot be corrected, the printer will show that a service call indication above, turn off the power switch, wait a few... seconds, and then turn it back on and try to print again. If you see the same service call indication after turning the printer back on page 3-6. Drum Ready Paper Alarm Toner Data Drum Ready Paper Alarm Toner Data Figure 3-11 CONTROL PANEL 3 - 5


