The Bose® Lifestyle® amplifier - Owner's guide
Page 2
... carefully. All rights reserved. It will help you set up and operate your owner's guide for future reference. ©2001 Bose Corporation. Bose, Acoustimass, Lifestyle, Personal and Wave are located on the Important Safety Information page enclosed with arrowhead symbol, within the system enclosure that may be...amplifier properly. S'ADRESSER À UN RÉPARATEUR COMPÉTENT These CAUTION marks are registered trademarks of your Lifestyle® stereo amplifier: The lightning flash with this owner's guide. NO USER-SERVICABLE PARTS INSIDE. CAUTION ...
... carefully. All rights reserved. It will help you set up and operate your owner's guide for future reference. ©2001 Bose Corporation. Bose, Acoustimass, Lifestyle, Personal and Wave are located on the Important Safety Information page enclosed with arrowhead symbol, within the system enclosure that may be...amplifier properly. S'ADRESSER À UN RÉPARATEUR COMPÉTENT These CAUTION marks are registered trademarks of your Lifestyle® stereo amplifier: The lightning flash with this owner's guide. NO USER-SERVICABLE PARTS INSIDE. CAUTION ...

The Bose® Lifestyle® amplifier - Owner's guide
Page 15
...level available from the AC (mains) power outlet. Insert the single multi-pin connector at one end of the amplifier (Figure 12). 2. On the rear panel of the music center. SPSEPAEKAEKREROOUUTPTUPUTSTS INPUT 3.5 mm mini-plug L R A B SPEAKERS OUTPUT FIXED REC PLAY...1.0A ANTENNA SEE INSTRUCTION MANUAL Fixed speaker outputs 30-ft audio input cable (supplied) Acoustimass module cable AM262840_00_V.pdf January 4, 2002 13 CAUTION: Before making connections, turn the Lifestyle® system off and disconnect the music center from the FIXED OUTPUT jacks. 1. Insert...
...level available from the AC (mains) power outlet. Insert the single multi-pin connector at one end of the amplifier (Figure 12). 2. On the rear panel of the music center. SPSEPAEKAEKREROOUUTPTUPUTSTS INPUT 3.5 mm mini-plug L R A B SPEAKERS OUTPUT FIXED REC PLAY...1.0A ANTENNA SEE INSTRUCTION MANUAL Fixed speaker outputs 30-ft audio input cable (supplied) Acoustimass module cable AM262840_00_V.pdf January 4, 2002 13 CAUTION: Before making connections, turn the Lifestyle® system off and disconnect the music center from the FIXED OUTPUT jacks. 1. Insert...

The Bose® Lifestyle® amplifier - Owner's guide
Page 18
..., make sure the audio input cable is inserted into SPEAKER ZONE 2. • If using a Model 5 music center for home theater (Lifestyle® 12 or Lifestyle® 8 systems), make sure the amplifier audio input cable is plugged into any solvents, chemicals, or cleaning solutions containing alcohol... speakers to your Bose dealer to spill into the FIXED OUTPUTs on page 14. 16 January 4, 2002 AM262840_00_V.pdf If the problem still exists, contact your Lifestyle® stereo amplifier" on the music center. (Then the speaker output cable to the Acoustimass® module should...
..., make sure the audio input cable is inserted into SPEAKER ZONE 2. • If using a Model 5 music center for home theater (Lifestyle® 12 or Lifestyle® 8 systems), make sure the amplifier audio input cable is plugged into any solvents, chemicals, or cleaning solutions containing alcohol... speakers to your Bose dealer to spill into the FIXED OUTPUTs on page 14. 16 January 4, 2002 AM262840_00_V.pdf If the problem still exists, contact your Lifestyle® stereo amplifier" on the music center. (Then the speaker output cable to the Acoustimass® module should...

Owner's guide
Page 2
... a CLASS 1 LASER product. Additional safety information See the additional instructions on the back panel and bottom of your Lifestyle® music center and the bottom panel of its advanced features. Save your Acoustimass® module: The lightning flash with this owner's guide. CAUTION RISK OF ELECTRICAL SHOCK DO NOT OPEN CAUTION: TO...
... a CLASS 1 LASER product. Additional safety information See the additional instructions on the back panel and bottom of your Lifestyle® music center and the bottom panel of its advanced features. Save your Acoustimass® module: The lightning flash with this owner's guide. CAUTION RISK OF ELECTRICAL SHOCK DO NOT OPEN CAUTION: TO...
Owner's guide
Page 5
... 28 Product Information Technical information 29 Accessories ...29 Index ...30 Bose® Corporation inside back cover For your Lifestyle® 12 system 20 Listening to video sound 20 Listening to the radio 21 Listening to find... Music center serial number Acoustimass module serial number Dealer name Dealer phone Purchase date We suggest you begin...
... 28 Product Information Technical information 29 Accessories ...29 Index ...30 Bose® Corporation inside back cover For your Lifestyle® 12 system 20 Listening to video sound 20 Listening to the radio 21 Listening to find... Music center serial number Acoustimass module serial number Dealer name Dealer phone Purchase date We suggest you begin...

Owner's guide
Page 6
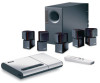
This complete audio home entertainment system offers superb sound, elegance, technology, and simplicity for purchasing the Bose® Lifestyle® 12 system. When a movie soundtrack or CD is produced in a surround sound format, specially encoded sound is usually sent to...front speakers. When sound is surround-encoded, stereo, or monaural. Even with a hide-away Acoustimass module • An easy-to-use remote control Bose Videostage® decoder technology enables the Lifestyle® 12 system to the correct speakers. Ambient sounds or special effects may be sent to the surround...
This complete audio home entertainment system offers superb sound, elegance, technology, and simplicity for purchasing the Bose® Lifestyle® 12 system. When a movie soundtrack or CD is produced in a surround sound format, specially encoded sound is usually sent to...front speakers. When sound is surround-encoded, stereo, or monaural. Even with a hide-away Acoustimass module • An easy-to-use remote control Bose Videostage® decoder technology enables the Lifestyle® 12 system to the correct speakers. Ambient sounds or special effects may be sent to the surround...
Owner's guide
Page 7
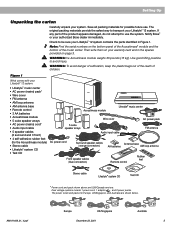
... plastic bags out of the reach of the product appears damaged, do not attempt to transport your Lifestyle® 12 system contains the parts identified in the spaces provided on the bottom panel of the Acoustimass® module and the bottom of the music center. Figure 1 What comes with your warranty card and..., and Australia are USA/Canada versions. Dual voltage systems include 1 power cord, 1 adapter , and 2 power packs. Setting Up Unpacking the carton Carefully unpack your authorized Bose dealer immediately. Notify Bose® or your system.
... plastic bags out of the reach of the product appears damaged, do not attempt to transport your Lifestyle® 12 system contains the parts identified in the spaces provided on the bottom panel of the Acoustimass® module and the bottom of the music center. Figure 1 What comes with your warranty card and..., and Australia are USA/Canada versions. Dual voltage systems include 1 power cord, 1 adapter , and 2 power packs. Setting Up Unpacking the carton Carefully unpack your authorized Bose dealer immediately. Notify Bose® or your system.
Owner's guide
Page 8
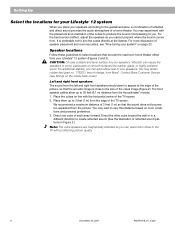
...affecting picture quality. 6 December 20, 2001 AM191409_01_V.pdf Direct one cube of the TV screen. Contact Bose Customer Service (see "Fine-tuning your system" on page 23. Place them close to create reflected... sound does not become too separated from your speakers. Speaker locations Follow these guidelines to your Lifestyle® 12 system (Figures 2 and 3). Vibration can add rubber feet to select locations that provide the ... the horizontal center of charge, from the Acoustimass® module. 1. You may obtain rubber feet (part no. 178321), free of the TV screen. ...
...affecting picture quality. 6 December 20, 2001 AM191409_01_V.pdf Direct one cube of the TV screen. Contact Bose Customer Service (see "Fine-tuning your system" on page 23. Place them close to create reflected... sound does not become too separated from your speakers. Speaker locations Follow these guidelines to your Lifestyle® 12 system (Figures 2 and 3). Vibration can add rubber feet to select locations that provide the ... the horizontal center of charge, from the Acoustimass® module. 1. You may obtain rubber feet (part no. 178321), free of the TV screen. ...

Owner's guide
Page 9
... front ® ® Figure 3 Speaker placement Surround speakers The surround (rear) speakers create an area of direct sound (Figure 3). Center Acoustimass module Left Right front front Left surround Right surround 1. Direct the cubes to reflect sound off one at the front edge of the shelf. Direct... of the picture (Figure 2). Place the speakers at the listener. The surround cables allow up to 20 feet (6.1 m) distance from the Acoustimass® module. 1. Do not direct the sound straight at ear height or higher, if possible. 2. Place the speaker in an enclosed ...
... front ® ® Figure 3 Speaker placement Surround speakers The surround (rear) speakers create an area of direct sound (Figure 3). Center Acoustimass module Left Right front front Left surround Right surround 1. Direct the cubes to reflect sound off one at the front edge of the shelf. Direct... of the picture (Figure 2). Place the speakers at the listener. The surround cables allow up to 20 feet (6.1 m) distance from the Acoustimass® module. 1. Do not direct the sound straight at ear height or higher, if possible. 2. Place the speaker in an enclosed ...
Owner's guide
Page 10
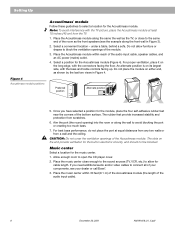
... cables to connect all of your dealer or call Bose®. 3. Place the Acoustimass module along the wall to avoid blocking the port or creating too much bass. 7. Place the Acoustimass module within 30 feet (9.1 m) of the Acoustimass module (the length of the bottom surface. The ...see your components, see the example along the front wall in electronic circuitry, and should not be blocked. Setting Up Figure 4 Acoustimass module positions Acoustimass® module Follow these guidelines to select a location for the music center. 1. Note: To avoid interference with the bass and...
... cables to connect all of your dealer or call Bose®. 3. Place the Acoustimass module along the wall to avoid blocking the port or creating too much bass. 7. Place the Acoustimass module within 30 feet (9.1 m) of the Acoustimass module (the length of the bottom surface. The ...see your components, see the example along the front wall in electronic circuitry, and should not be blocked. Setting Up Figure 4 Acoustimass module positions Acoustimass® module Follow these guidelines to select a location for the music center. 1. Note: To avoid interference with the bass and...
Owner's guide
Page 11
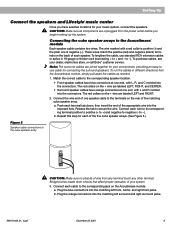
...for connecting the surround speakers. To run the cables in 18-gauge or thicker cord (connecting + to the Acoustimass® module Each speaker cable contains two wires. to negative (- a. These wires match the positive (red...on the Acoustimass module. Push each cable to the terminals on the + wire are unplugged from the Acoustimass module, simply pull apart the cables as needed. 1. b. Setting Up Connect the speakers and Lifestyle® music... end of your dealer, electronics store, or call Bose® customer service. Plug the orange connectors into the exposed hole.
...for connecting the surround speakers. To run the cables in 18-gauge or thicker cord (connecting + to the Acoustimass® module Each speaker cable contains two wires. to negative (- a. These wires match the positive (red...on the Acoustimass module. Push each cable to the terminals on the + wire are unplugged from the Acoustimass module, simply pull apart the cables as needed. 1. b. Setting Up Connect the speakers and Lifestyle® music... end of your dealer, electronics store, or call Bose® customer service. Plug the orange connectors into the exposed hole.
Owner's guide
Page 12
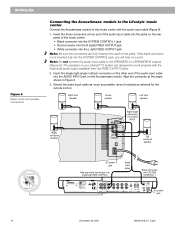
...not inserted fully into SYSTEM CONTROL 1 ® LIFESTYLE ® MODEL 5 MUSIC CENTER B Z G642 950 D S T BOSE Corporation UL LISTED 917D AUDIO ® EQUIPMENT MANUFACTURED: TÜV Rheinland BOSE CORPORATION, FRAMINGHAM, MA 01701-9168 MADE IN USA ... Up Figure 6 Music center and speaker connections Connecting the Acoustimass® module to the Lifestyle® music center Connect the Acoustimass module to the music center with the fixed level audio ...at the angle shown in your Lifestyle® 12 system are fully inserted into each of the audio input cable into the jacks ...
...not inserted fully into SYSTEM CONTROL 1 ® LIFESTYLE ® MODEL 5 MUSIC CENTER B Z G642 950 D S T BOSE Corporation UL LISTED 917D AUDIO ® EQUIPMENT MANUFACTURED: TÜV Rheinland BOSE CORPORATION, FRAMINGHAM, MA 01701-9168 MADE IN USA ... Up Figure 6 Music center and speaker connections Connecting the Acoustimass® module to the Lifestyle® music center Connect the Acoustimass module to the music center with the fixed level audio ...at the angle shown in your Lifestyle® 12 system are fully inserted into each of the audio input cable into the jacks ...
Owner's guide
Page 13
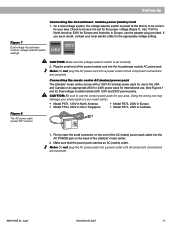
...North America; 230V for international use the correct power pack for the appropriate voltage setting. Connecting the music center AC (mains) power pack The Lifestyle® music center comes with a 120V AC (mains) power pack for use the adapter plug provided. On a dual voltage system, the ...Figure 7). In Europe, use in Australia 1. Setting Up Connecting the Acoustimass® module power (mains) cord 1. Plug the small end of the Lifestyle® music center. 2. Note: Do not plug the AC power pack into the Acoustimass module AC power jack. Check to be sure it is set for ...
...North America; 230V for international use the correct power pack for the appropriate voltage setting. Connecting the music center AC (mains) power pack The Lifestyle® music center comes with a 120V AC (mains) power pack for use the adapter plug provided. On a dual voltage system, the ...Figure 7). In Europe, use in Australia 1. Setting Up Connecting the Acoustimass® module power (mains) cord 1. Plug the small end of the Lifestyle® music center. 2. Note: Do not plug the AC power pack into the Acoustimass module AC power jack. Check to be sure it is set for ...
Owner's guide
Page 19
...may want to unplug your pets from accidentally turning it on the music center. Listen to the instructions on the batteries with other Lifestyle® music systems. Figure 17 Installing the remote control batteries 3 AA batteries Battery compartment cover Miniature switches Set radio channel spacing... Then plug in the music center power pack. Alkaline batteries are ready to the following the instructions on the music center Plug the Acoustimass® module power cord into place. To change the settings of AM and FM channel spacing. • Channel spacing for North ...
...may want to unplug your pets from accidentally turning it on the music center. Listen to the instructions on the batteries with other Lifestyle® music systems. Figure 17 Installing the remote control batteries 3 AA batteries Battery compartment cover Miniature switches Set radio channel spacing... Then plug in the music center power pack. Alkaline batteries are ready to the following the instructions on the music center Plug the Acoustimass® module power cord into place. To change the settings of AM and FM channel spacing. • Channel spacing for North ...
Owner's guide
Page 25
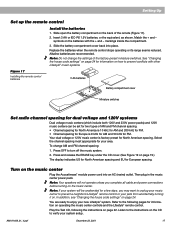
... here. ® Treble Bass Adjusting speaker controls The Lifestyle® 12 system TREBLE and BASS controls are in the 12 o'clock position. You can also locate the normal setting by the movie's sound designer. Acoustimass module placement affects the amount of your system. Compensating for...treble (high frequencies) and bass (low frequencies). Maintaining Your Lifestyle® 12 System Fine-tuning your system In most situations, you only need to adjust tone settings for changes in volume, since Bose® patented signal processing technology provides a natural tonal balance ...
... here. ® Treble Bass Adjusting speaker controls The Lifestyle® 12 system TREBLE and BASS controls are in the 12 o'clock position. You can also locate the normal setting by the movie's sound designer. Acoustimass module placement affects the amount of your system. Compensating for...treble (high frequencies) and bass (low frequencies). Maintaining Your Lifestyle® 12 System Fine-tuning your system In most situations, you only need to adjust tone settings for changes in volume, since Bose® patented signal processing technology provides a natural tonal balance ...

Owner's guide
Page 28
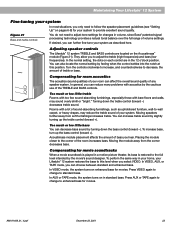
Maintaining Your Lifestyle® 12 System Troubleshooting Problem System does not function at both ends. • Select STEREO+CENTER (3-...acts erratically What to do • Make sure the power connector is plugged securely into the music center, the Acoustimass® module power cord is firmly seated in the music center SYSTEM CONTROL 1 jack, and the multi-pin...the audio input cable is connected to the music center FIXED outputs, the black connector is fully seated in the Acoustimass module jack. • Turn the music center off for ten seconds, then on setting the house code. 26...
Maintaining Your Lifestyle® 12 System Troubleshooting Problem System does not function at both ends. • Select STEREO+CENTER (3-...acts erratically What to do • Make sure the power connector is plugged securely into the music center, the Acoustimass® module power cord is firmly seated in the music center SYSTEM CONTROL 1 jack, and the multi-pin...the audio input cable is connected to the music center FIXED outputs, the black connector is fully seated in the Acoustimass module jack. • Turn the music center off for ten seconds, then on setting the house code. 26...

Owner's guide
Page 30
...CD player lens carefully, and only if necessary. Cleaning the speakers and Acoustimass® module Clean the surface of the Lifestyle® music center. Do not use any sprays near the system. ...CAUTION: If liquids get into the product, turn the system off and contact Bose® customer service... gently with a lens tissue moistened with a soft damp cloth. Maintaining Your Lifestyle® 12 System Cleaning the Lifestyle® 12 system The only maintenance needed is dusty, blow the dust away using a...
...CD player lens carefully, and only if necessary. Cleaning the speakers and Acoustimass® module Clean the surface of the Lifestyle® music center. Do not use any sprays near the system. ...CAUTION: If liquids get into the product, turn the system off and contact Bose® customer service... gently with a lens tissue moistened with a soft damp cloth. Maintaining Your Lifestyle® 12 System Cleaning the Lifestyle® 12 system The only maintenance needed is dusty, blow the dust away using a...
Owner's guide
Page 31
... impedance SYSTEM CONTROL: for phone numbers). Or call Bose directly (see inside back cover for use with Bose® powered speakers and accessories RC-9 remote control Range: 65 feet (20 m) Dimensions Music center 15.0" W x 7.8" D x 2.5" H (38.1 cm x 19.8 cm x 6.4 cm) Cube speakers 3.0" W x 4.8" D x 6.0" H (7.6 cm x 12.2 cm x 15.2 cm) Acoustimass module 23.3" W x 7.5" D x 14.0" H (59.0 cm x 19.0 cm...
... impedance SYSTEM CONTROL: for phone numbers). Or call Bose directly (see inside back cover for use with Bose® powered speakers and accessories RC-9 remote control Range: 65 feet (20 m) Dimensions Music center 15.0" W x 7.8" D x 2.5" H (38.1 cm x 19.8 cm x 6.4 cm) Cube speakers 3.0" W x 4.8" D x 6.0" H (7.6 cm x 12.2 cm x 15.2 cm) Acoustimass module 23.3" W x 7.5" D x 14.0" H (59.0 cm x 19.0 cm...
Owner's guide
Page 32
Index 30 A Acoustimass® module 2-11, 17, 23, 28, 29 AM antenna 5, 16, 26, 29 AM/...connector 16 FM antenna 5, 16, 29 front speakers 4, 6, 8, 26 H headphones 22, 26 house codes 17, 24, 25, 26 L laserdisc 12-14, 26 M moisture 2 movie soundtracks 20, 23 music center 2-5, 8-19, 21, 22, 24-29 MUTE 17 P placement 6, 7, 16, ...compensation controls 23 S safety Information 2 serial numbers 5 signal splitter 16 speaker cable 5-9, 27 SURROUND 4, 14, 19, 20, 26 surround 4-7, 9, 10, 12, 19, 20, 26 surround (rear) speakers 7 surround cables 9 surround speakers 4, 7, 9, 20, 26 switches 17, 18, 21, 24, 25 T...
Index 30 A Acoustimass® module 2-11, 17, 23, 28, 29 AM antenna 5, 16, 26, 29 AM/...connector 16 FM antenna 5, 16, 29 front speakers 4, 6, 8, 26 H headphones 22, 26 house codes 17, 24, 25, 26 L laserdisc 12-14, 26 M moisture 2 movie soundtracks 20, 23 music center 2-5, 8-19, 21, 22, 24-29 MUTE 17 P placement 6, 7, 16, ...compensation controls 23 S safety Information 2 serial numbers 5 signal splitter 16 speaker cable 5-9, 27 SURROUND 4, 14, 19, 20, 26 surround 4-7, 9, 10, 12, 19, 20, 26 surround (rear) speakers 7 surround cables 9 surround speakers 4, 7, 9, 20, 26 switches 17, 18, 21, 24, 25 T...


