User Manual
Page 2
... flame sources, such as applicable by law. This product conforms to all EU Directive requirements as lighted candles, on or near the apparatus. Do not recharge, disassemble, heat above 100ºC (212ºF), or incinerate. It is best to avoid extreme volume when using headphones, especially for future reference. Dispose of important operating and maintenance instructions in this guide...
... flame sources, such as applicable by law. This product conforms to all EU Directive requirements as lighted candles, on or near the apparatus. Do not recharge, disassemble, heat above 100ºC (212ºF), or incinerate. It is best to avoid extreme volume when using headphones, especially for future reference. Dispose of important operating and maintenance instructions in this guide...
User Manual
Page 3
... been tested and found to comply with the limits for a Class B digital device, pursuant to which can radiate radio frequency energy and, if not installed and used without prior written permission. Operation is no guarantee that may cause undesired operation. System model name and number (on the connection panel of your Product Registration card together with the instructions, may be determined by turning the...
... been tested and found to comply with the limits for a Class B digital device, pursuant to which can radiate radio frequency energy and, if not installed and used without prior written permission. Operation is no guarantee that may cause undesired operation. System model name and number (on the connection panel of your Product Registration card together with the instructions, may be determined by turning the...
User Manual
Page 5
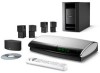
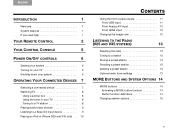
English TAB 2 TAB 3 TAB 4 INTRODUCTION 1 Welcome 1 System features 1 If you need help 1 YOUR REMOTE CONTROL 2 YOUR CONTROL CONSOLE 5 POWER ON/OFF CONTROLS 6 Starting your system 6 Turning on your TV 6 Shutting down your system 6 OPERATING YOUR CONNECTED DEVICES 7 Selecting a connected device 7 Watching TV 8 Using a set top box 8 Using the tuner in your TV 8 Tuning to a TV station 8 Playing audio/video devices 9 Listening to a Bose link input device 9 Playing an iPod or iPhone (V25 and V35 only) . . 10 TAB 5 TAB...
English TAB 2 TAB 3 TAB 4 INTRODUCTION 1 Welcome 1 System features 1 If you need help 1 YOUR REMOTE CONTROL 2 YOUR CONTROL CONSOLE 5 POWER ON/OFF CONTROLS 6 Starting your system 6 Turning on your TV 6 Shutting down your system 6 OPERATING YOUR CONNECTED DEVICES 7 Selecting a connected device 7 Watching TV 8 Using a set top box 8 Using the tuner in your TV 8 Tuning to a TV station 8 Playing audio/video devices 9 Listening to a Bose link input device 9 Playing an iPod or iPhone (V25 and V35 only) . . 10 TAB 5 TAB...
User Manual
Page 7
... your system and its connected devices. Please register your product performing optimally. Failure to http://owners.Bose.com on the Internet for your home. This guide describes your new remote control and shows you how to check the troubleshooting table on your system using the ADAPTiQ® audio calibration system. If you experience any operating difficulties, be sure to operate your limited warranty rights...
... your system and its connected devices. Please register your product performing optimally. Failure to http://owners.Bose.com on the Internet for your home. This guide describes your new remote control and shows you how to check the troubleshooting table on your system using the ADAPTiQ® audio calibration system. If you experience any operating difficulties, be sure to operate your limited warranty rights...

User Manual
Page 8
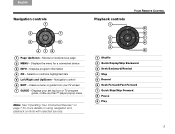
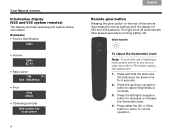
... volume 4 Mute - Allows manual entry of channels and settings 7 TV Input - Mutes/unmutes system speakers (Press and hold to turn off 14 Information Display (V25 and V35 system remotes) *For V25 and V35 systems delivering sound to another room through Bose® link OUT (not applicable to mute/unmute all rooms*) 3 Volume Up/Down - Displays and selects connected devices from the source list on your TV. 2 Power - Changes inputs...
... volume 4 Mute - Allows manual entry of channels and settings 7 TV Input - Mutes/unmutes system speakers (Press and hold to turn off 14 Information Display (V25 and V35 system remotes) *For V25 and V35 systems delivering sound to another room through Bose® link OUT (not applicable to mute/unmute all rooms*) 3 Volume Up/Down - Displays and selects connected devices from the source list on your TV. 2 Power - Changes inputs...
User Manual
Page 9
.../Fast Forward 7 Quick Skip/Skip Forward 8 Pause 9 Play 3 Displays the menu for more details on using navigation and playback controls with selected sources. Navigation control 6 EXIT - Displays your TV screen 7 GUIDE - Displays program information 4 OK - Selects or confirms highlighted item 5 Left/Right and Up/Down - Moves to next/previous page 2 MENU - Clears a menu or guide from your set top box or TV program guide, or Blu-ray Disc™ player popup menu Note: See "Operating Your Connected Devices" on...
.../Fast Forward 7 Quick Skip/Skip Forward 8 Pause 9 Play 3 Displays the menu for more details on using navigation and playback controls with selected sources. Navigation control 6 EXIT - Displays your TV screen 7 GUIDE - Displays program information 4 OK - Selects or confirms highlighted item 5 Left/Right and Up/Down - Moves to next/previous page 2 MENU - Clears a menu or guide from your set top box or TV program guide, or Blu-ray Disc™ player popup menu Note: See "Operating Your Connected Devices" on...
User Manual
Page 10
... illumination level. 4. WBUR90.9 • iPod iPod Album • Operating prompts Hold number key to select Brightness or Contrast. 3. Press the up/down navigation button to set preset TAB 4 TAB 3 TAB 2 English Remote glow button Pressing the glow button on the rear of deleting a radio preset, switch to prolong battery life. The light turns off automatically after several seconds to any source other than AM or FM before making this adjustment. 1. Press...
... illumination level. 4. WBUR90.9 • iPod iPod Album • Operating prompts Hold number key to select Brightness or Contrast. 3. Press the up/down navigation button to set preset TAB 4 TAB 3 TAB 2 English Remote glow button Pressing the glow button on the rear of deleting a radio preset, switch to prolong battery life. The light turns off automatically after several seconds to any source other than AM or FM before making this adjustment. 1. Press...
User Manual
Page 11
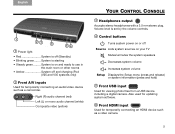
... the volume controls. 4 Control buttons Turns system power on or off Source Lists system sources on and ready to use in the main room or other rooms • Amber System off (Standby) • Blinking green........ English TAB 2 TAB 3 TAB 4 1 23 4 56 1 Power light • Red System is starting • Steady green ......... Volume level is on your TV Mutes/unmutes the system speakers Decreases system volume Increases system volume Setup Displays the Setup menu...
... the volume controls. 4 Control buttons Turns system power on or off Source Lists system sources on and ready to use in the main room or other rooms • Amber System off (Standby) • Blinking green........ English TAB 2 TAB 3 TAB 4 1 23 4 56 1 Power light • Red System is starting • Steady green ......... Volume level is on your TV Mutes/unmutes the system speakers Decreases system volume Increases system volume Setup Displays the Setup menu...

User Manual
Page 12
... 6 TAB 5 POWER ON/OFF CONTROLS Starting your system Press the power button on the remote or on the control console. When it changes from blinking to solid green, your system is on and ready to turn on the remote control to use the remote that came with your TV If you decide to a minimum, the system operates in a very low power state when in standby (off) mode. TAB...
... 6 TAB 5 POWER ON/OFF CONTROLS Starting your system Press the power button on the remote or on the control console. When it changes from blinking to solid green, your system is on and ready to turn on the remote control to use the remote that came with your TV If you decide to a minimum, the system operates in a very low power state when in standby (off) mode. TAB...
User Manual
Page 14
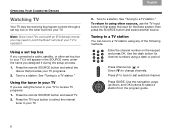
... receive TV programs: 1. Tune to a TV station." Using the tuner in your TV. Press the remote SOURCE button and select TV. 2. Note: Since most TVs come with an IR (infrared) remote, you are using other set top box to first select the input for channel numbers using any of the following methods. Using a set top box If you connected a cable, satellite, or other sources, use the TV Input button to your TV programs. 2. See "Tuning to a station. Press the TV Input button to change channels...
... receive TV programs: 1. Tune to a TV station." Using the tuner in your TV. Press the remote SOURCE button and select TV. 2. Note: Since most TVs come with an IR (infrared) remote, you are using other set top box to first select the input for channel numbers using any of the following methods. Using a set top box If you connected a cable, satellite, or other sources, use the TV Input button to your TV programs. 2. See "Tuning to a station. Press the TV Input button to change channels...

User Manual
Page 15
... use the following controls to content from a Bose link-compatible system, such as a CD, DVD, DVR, or Blu-ray Disc™ player. Connect that system to select it is connected. 9 Be sure to connect your LIFESTYLE® system to listen to operate the selected device. If you programmed the Bose® remote for the device, you may have connected an audio/visual device such as another LIFESTYLE® system. MENU Display device menu...
... use the following controls to content from a Bose link-compatible system, such as a CD, DVD, DVR, or Blu-ray Disc™ player. Connect that system to select it is connected. 9 Be sure to connect your LIFESTYLE® system to listen to operate the selected device. If you programmed the Bose® remote for the device, you may have connected an audio/visual device such as another LIFESTYLE® system. MENU Display device menu...
User Manual
Page 21
... OPTIONS menu for a video device. Accesses the system menu for some digital television services (EU only). Using the left /right ( select the setting. ) navigation buttons, 6. Press the remote OK button to change. 5. Accesses interactive features for your set top box. Press the remote MORE button. 2. Highlighted option Selected setting 4. Press the remote EXIT button when done. 15 English TAB 2 TAB 3 TAB 4 Moves to the "Home" state of items appearing in a multi-tuner device. Using...
... OPTIONS menu for a video device. Accesses the system menu for some digital television services (EU only). Using the left /right ( select the setting. ) navigation buttons, 6. Press the remote OK button to change. 5. Accesses interactive features for your set top box. Press the remote MORE button. 2. Highlighted option Selected setting 4. Press the remote EXIT button when done. 15 English TAB 2 TAB 3 TAB 4 Moves to the "Home" state of items appearing in a multi-tuner device. Using...
User Manual
Page 23
... HDMI audio to your TV (audio from the TV is set to Stereo (2) or Front (3) Center Speaker Adjusts the volume level of the front center speaker relative to other speakers (-8 to Normal* to +8) (unavailable if the Speakers option is not affected by plugging headphones into the control console or by your TV (only settings supported by pressing Mute or Volume on the remote) Off Sends HDMI audio to the LIFESTYLE® system speakers Video Output * Factory setting Changes...
... HDMI audio to your TV (audio from the TV is set to Stereo (2) or Front (3) Center Speaker Adjusts the volume level of the front center speaker relative to other speakers (-8 to Normal* to +8) (unavailable if the Speakers option is not affected by plugging headphones into the control console or by your TV (only settings supported by pressing Mute or Volume on the remote) Off Sends HDMI audio to the LIFESTYLE® system speakers Video Output * Factory setting Changes...
User Manual
Page 25
... provides 64 house codes and 4 room codes. On the screen, you will see the house code, select Homewide in the Setup menu and then select house code. Your system has two house code modes. Note: Switching between the device and the left (L) and right (R) analog connections for input 4 or 5. • Radio operation - Likewise, you must also make analog audio connections if a digital audio connection is set to the same room code. English TAB 2 TAB...
... provides 64 house codes and 4 room codes. On the screen, you will see the house code, select Homewide in the Setup menu and then select house code. Your system has two house code modes. Note: Switching between the device and the left (L) and right (R) analog connections for input 4 or 5. • Radio operation - Likewise, you must also make analog audio connections if a digital audio connection is set to the same room code. English TAB 2 TAB...
User Manual
Page 26
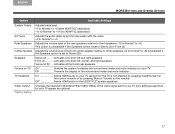
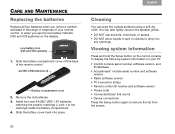
...® module serial number and software version • Radio software version • TV connection status • Remote control ID number and software version • House code • Connected Bose® link rooms • Device connections Press the Setup button again to remove the list from the screen. 20 TAB 8 TAB 7 TAB 6 TAB 5 CARE AND MAINTENANCE Replacing the batteries Replace all four batteries when you see the low battery indicator (V25...
...® module serial number and software version • Radio software version • TV connection status • Remote control ID number and software version • House code • Connected Bose® link rooms • Device connections Press the Setup button again to remove the list from the screen. 20 TAB 8 TAB 7 TAB 6 TAB 5 CARE AND MAINTENANCE Replacing the batteries Replace all four batteries when you see the low battery indicator (V25...
User Manual
Page 27
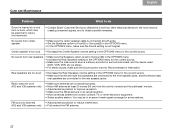
... initial operation of my Bose® remote • Make sure the control console is turned on the control console. See "Resetting the system" on -screen instructions. No sound • Make sure the Acoustimass module is plugged into a live AC (mains) outlet. • Select a connected device from the SOURCE menu. • Reset the system. Make sure that you have selected the right source. • Make sure that the audio input cable is firmly plugged into the Acoustimass connector...
... initial operation of my Bose® remote • Make sure the control console is turned on the control console. See "Resetting the system" on -screen instructions. No sound • Make sure the Acoustimass module is plugged into a live AC (mains) outlet. • Select a connected device from the SOURCE menu. • Reset the system. Make sure that you have selected the right source. • Make sure that the audio input cable is firmly plugged into the Acoustimass connector...
User Manual
Page 28
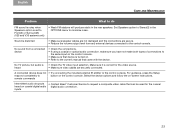
... video sound source is stereo-encoded or surround-encoded, and the device used (DVD, VCR, DVR, etc.) is stereo. • For stereo inputs, make sure the Sound option is not Original. FM sound is too loud • Decrease the Center Speaker volume setting in the OPTIONS menu for the current source. Radio does not work (V25 and V35 systems only) • Make sure antennas are connected to the rear speaker jacks. No sound from center speaker • Make sure the center speaker cable is connected...
... video sound source is stereo-encoded or surround-encoded, and the device used (DVD, VCR, DVR, etc.) is stereo. • For stereo inputs, make sure the Sound option is not Original. FM sound is too loud • Decrease the Center Speaker volume setting in the OPTIONS menu for the current source. Radio does not work (V25 and V35 systems only) • Make sure antennas are connected to the rear speaker jacks. No sound from center speaker • Make sure the center speaker cable is connected...
User Manual
Page 29
...; Make sure speaker cables are not damaged and the connections are securely connected. remote commands Intermittent audio dropouts • Contact Bose® Customer Service to request a composite video cable that can be used for the video source. • Make sure video cables are secure. • Reduce the volume output level from a connected device • Check the connections. • If using a coaxial or optical audio connection, make sure you have not made both types of connections to the same input...
...; Make sure speaker cables are not damaged and the connections are securely connected. remote commands Intermittent audio dropouts • Contact Bose® Customer Service to request a composite video cable that can be used for the video source. • Make sure video cables are secure. • Reduce the volume output level from a connected device • Check the connections. • If using a coaxial or optical audio connection, make sure you have not made both types of connections to the same input...
User Manual
Page 30
... problems, contact Bose® Customer Service. If you still cannot operate the system using the remote, try the next procedure to red when the system shuts down. 2. Using the remote navigation buttons, select Update. 3. Contacting customer service For additional help in the carton. 24 The power light blinks when pairing is on the control console changes to the USB drive included with the control console. TAB 4 TAB 3 TAB 2 English Performing a system software update System software updates...
... problems, contact Bose® Customer Service. If you still cannot operate the system using the remote, try the next procedure to red when the system shuts down. 2. Using the remote navigation buttons, select Update. 3. Contacting customer service For additional help in the carton. 24 The power light blinks when pairing is on the control console changes to the USB drive included with the control console. TAB 4 TAB 3 TAB 2 English Performing a system software update System software updates...
User Manual
Page 31
... with a software program that can view .pdf files. To read the file "licenses.pdf," plug the USB drive into a computer with a USB port, navigate to the USB root directory, and open source software programs included in your system package) into the USB input on a disc for the open "licenses.pdf" with such source code. You may then remove the USB drive. 4. To read this product by a limited warranty. Please refer to the specific terms...
... with a software program that can view .pdf files. To read the file "licenses.pdf," plug the USB drive into a computer with a USB port, navigate to the USB root directory, and open source software programs included in your system package) into the USB input on a disc for the open "licenses.pdf" with such source code. You may then remove the USB drive. 4. To read this product by a limited warranty. Please refer to the specific terms...

