
User Manual
Page 3
... Using the other sources 20 Playing a DVD 20 Using DVD parental controls 22 Playing a CD 22 Using the radio 23 Setting, removing, or reassigning radio station presets 23 Using the headphone jack 24 Using the sleep timer 24 CONTROLLING EXTERNAL SOURCES 26 Using your LIFESTYLE® remote with other components 26 Setting the remote to control each component 26 For TV control 26 For cable/satellite control 28 For VCR (or other video recorder) control 29 For AUX control 30 Assigning channel control to the TV input...
... Using the other sources 20 Playing a DVD 20 Using DVD parental controls 22 Playing a CD 22 Using the radio 23 Setting, removing, or reassigning radio station presets 23 Using the headphone jack 24 Using the sleep timer 24 CONTROLLING EXTERNAL SOURCES 26 Using your LIFESTYLE® remote with other components 26 Setting the remote to control each component 26 For TV control 26 For cable/satellite control 28 For VCR (or other video recorder) control 29 For AUX control 30 Assigning channel control to the TV input...
User Manual
Page 4
... the System menu 32 How to make changes 33 Stored CD options 33 Audio options 36 Video options 37 Media center options 38 Remote control options 39 DVD Lock options 41 CHANGING SOURCE SETTINGS 43 Quick adjustments as you watch or listen 43 Where to find the list of options 43 How to change the settings 44 Stored CDs settings options 45 CD settings options 45 DVD settings options 46 Tuner settings options...
... the System menu 32 How to make changes 33 Stored CD options 33 Audio options 36 Video options 37 Media center options 38 Remote control options 39 DVD Lock options 41 CHANGING SOURCE SETTINGS 43 Quick adjustments as you watch or listen 43 Where to find the list of options 43 How to change the settings 44 Stored CDs settings options 45 CD settings options 45 DVD settings options 46 Tuner settings options...
User Manual
Page 5
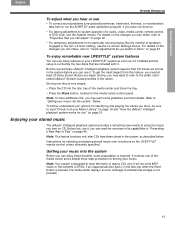
... S-Video) up to higher-quality video output formats (component and HDMI). • Makes your own CDs adds listening pleasure with your system allows you can better explore and exploit all this Bose product - Types of discs you to connect multiple video sources to the rates at the same time. Each file named with : - With the VS-2 correctly installed, a single button press selects the source video and audio at...
... S-Video) up to higher-quality video output formats (component and HDMI). • Makes your own CDs adds listening pleasure with your system allows you can better explore and exploit all this Bose product - Types of discs you to connect multiple video sources to the rates at the same time. Each file named with : - With the VS-2 correctly installed, a single button press selects the source video and audio at...

User Manual
Page 6
... video, Dolby Digital audio, and other video components and requires a simple video cable connection to a DVD-RW or +RW more than once. D Dolby Digital - Dolby Digital is split into three parts: luminance and two color signals for Digital Theater Systems, a type of multi-channel surround sound format used interchangeably with a player, their respective region numbers must match. DVD video - You can be added. An abbreviation most common means of video signal, which are sold. The simplest of three types of encoding multi-channel audio...
... video, Dolby Digital audio, and other video components and requires a simple video cable connection to a DVD-RW or +RW more than once. D Dolby Digital - Dolby Digital is split into three parts: luminance and two color signals for Digital Theater Systems, a type of multi-channel surround sound format used interchangeably with a player, their respective region numbers must match. DVD video - You can be added. An abbreviation most common means of video signal, which are sold. The simplest of three types of encoding multi-channel audio...

User Manual
Page 8
... satellite receiver that is connected to your LIFESTYLE ® system. Selects the AUX source connected to your LIFESTYLE system. Selects the TV source that is set to "Using your cable or satellite box on and off . SYSTEM CONTROLS Français Español English SYSTEM CONTROLS Remote control buttons The advanced radio frequency (RF) remote control provided with this system works from almost anywhere inside your home, with other stored CD modes of play...
... satellite receiver that is connected to your LIFESTYLE ® system. Selects the AUX source connected to your LIFESTYLE system. Selects the TV source that is set to "Using your cable or satellite box on and off . SYSTEM CONTROLS Français Español English SYSTEM CONTROLS Remote control buttons The advanced radio frequency (RF) remote control provided with this system works from almost anywhere inside your home, with other stored CD modes of play...

User Manual
Page 9
... or exits the System menu. Displays an electronic program guide (if your TV, cable, satellite box or VCR/DVR provides this function and your TV. Confirms the selection of your TV picture between 4:3 and 16:9 (widescreen). Enters or exits the menu of the DVD disc that is set up or down , left, or right in a menu or screen. * See Remote Version in "Remote control options" on page 39...
... or exits the System menu. Displays an electronic program guide (if your TV, cable, satellite box or VCR/DVR provides this function and your TV. Confirms the selection of your TV picture between 4:3 and 16:9 (widescreen). Enters or exits the menu of the DVD disc that is set up or down , left, or right in a menu or screen. * See Remote Version in "Remote control options" on page 39...

User Manual
Page 12
... and selects system settings on the media center display. lifts up Disc tray Controls Display window Headphone jack IR emitter Controls Four of the media center control panel buttons provide similar control to control other components using the LIFESTYLE® remote. The other components or reflective surfaces in sequence. Selects the source last used when it is selected from an audio CD to malfunction. SYSTEM CONTROLS SYSTEM CONTROLS Media center Figure 1 Front view of the media center On/Off Source Volume...
... and selects system settings on the media center display. lifts up Disc tray Controls Display window Headphone jack IR emitter Controls Four of the media center control panel buttons provide similar control to control other components using the LIFESTYLE® remote. The other components or reflective surfaces in sequence. Selects the source last used when it is selected from an audio CD to malfunction. SYSTEM CONTROLS SYSTEM CONTROLS Media center Figure 1 Front view of the media center On/Off Source Volume...
User Manual
Page 15
... the Store button is verified by the two discs that CD tracks are included with it . Note: This feature functions only after CDs have not done so. • For lasting adjustment to system operation (for audio, video, media center, remote control, or DVD lock), use it is installed and the setup is pressed, the media center displays an error message to indicate that you can make , refer to Play" on...
... the Store button is verified by the two discs that CD tracks are included with it . Note: This feature functions only after CDs have not done so. • For lasting adjustment to system operation (for audio, video, media center, remote control, or DVD lock), use it is installed and the setup is pressed, the media center displays an error message to indicate that you can make , refer to Play" on...
User Manual
Page 17
... media center display As a convenient reminder of music you used another preset recently, the system may select that they have their own presets. Instructions on how to enter the menu to make to Stored CD settings, refer to repeat is playing. This helps the system differentiate preferences and prevents it applies to the type of how to use the small, color-coded uMusic® System Guide...
... media center display As a convenient reminder of music you used another preset recently, the system may select that they have their own presets. Instructions on how to enter the menu to make to Stored CD settings, refer to repeat is playing. This helps the system differentiate preferences and prevents it applies to the type of how to use the small, color-coded uMusic® System Guide...
User Manual
Page 21
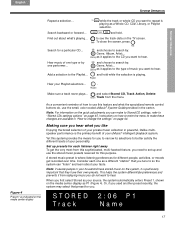
... same features. Resume play . to view the menu shown at the beginning of the DVD. down arrows to reach the menu item you have defined the segment. to restart at a point in "Where to the right of the DVD several on-screen selections offered. Press Enter to A, confirming your system" on the quick adjustments you can make those changes are available in...
... same features. Resume play . to view the menu shown at the beginning of the DVD. down arrows to reach the menu item you have defined the segment. to restart at a point in "Where to the right of the DVD several on-screen selections offered. Press Enter to A, confirming your system" on the quick adjustments you can make those changes are available in...
User Manual
Page 23
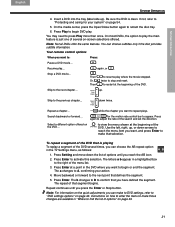
.... a third time. Select a preset station... Instructions on how to enter the menu to make to the radio tuner settings, refer to "Tuner settings options (FM or AM radio)" on the system if it until the display indicates PRESET: # SET. • For numbers 10 through 20, press the first number, then press and hold the second number until the display indicates PRESET: # SET. 23 To assign a station to a specific number use the LIFESTYLE® remote control and follow...
.... a third time. Select a preset station... Instructions on how to enter the menu to make to the radio tuner settings, refer to "Tuner settings options (FM or AM radio)" on the system if it until the display indicates PRESET: # SET. • For numbers 10 through 20, press the first number, then press and hold the second number until the display indicates PRESET: # SET. 23 To assign a station to a specific number use the LIFESTYLE® remote control and follow...

User Manual
Page 29
... instructions below : Turn on your LIFESTYLE® remote. Turn on the left , select CBL•SAT Code. • Move right to select it . For VCR (or other video recorder) control The list of VCR brands and codes include selections for DVRs (or PVRs) and DVD recorders, as AUX. If you can use CBL•SAT On/Off to turn on your cable or satellite source, and use AUX to connect...
... instructions below : Turn on your LIFESTYLE® remote. Turn on the left , select CBL•SAT Code. • Move right to select it . For VCR (or other video recorder) control The list of VCR brands and codes include selections for DVRs (or PVRs) and DVD recorders, as AUX. If you can use CBL•SAT On/Off to turn on your cable or satellite source, and use AUX to connect...

User Manual
Page 30
... a component connected to the AUX inputs on your LIFESTYLE system, you can set up button on your component. On some DVRs, pressing Shuffle and Repeat buttons will allow you to select the brand. 3. Then using the LIFESTYLE® System menu, refer to control your LIFESTYLE remote to make this control, you must press the AUX source button first. To make sure important functions on the component also work. To exercise this change, press...
... a component connected to the AUX inputs on your LIFESTYLE system, you can set up button on your component. On some DVRs, pressing Shuffle and Repeat buttons will allow you to select the brand. 3. Then using the LIFESTYLE® System menu, refer to control your LIFESTYLE remote to make this control, you must press the AUX source button first. To make sure important functions on the component also work. To exercise this change, press...

User Manual
Page 32
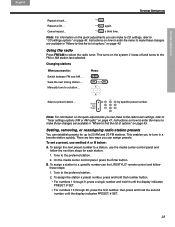
... menu: • Make sure your AUX device Setting a TV channel control device Selecting a remote control version Setting IR control Preview screen - However, if you move across to use 32 Properties - Submenus under each property Select Remote Control to adjust these system options: Controlling your TV set Controlling your CBL/SAT receiver Controlling your VCR or video recorder Controlling your TV is no need to the VS-2. • Press System on . • Make sure to select the TV Video Input...
... menu: • Make sure your AUX device Setting a TV channel control device Selecting a remote control version Setting IR control Preview screen - However, if you move across to use 32 Properties - Submenus under each property Select Remote Control to adjust these system options: Controlling your TV set Controlling your CBL/SAT receiver Controlling your VCR or video recorder Controlling your TV is no need to the VS-2. • Press System on . • Make sure to select the TV Video Input...
User Manual
Page 37
... only with Bose link-compatible products in other areas or rooms of video options. Bose 5.1 [default] TV Stereo Allows you to move into the active list of your house. Sends 2-channel HDMI audio from your cable box, satellite receiver, or VCR to your Installation Guide. Figure 18 Preview of video features, and press the Enter button to hear cable/satellite or VCR audio in Bose 5.1 surround sound. Refer to "Using the TV...
... only with Bose link-compatible products in other areas or rooms of video options. Bose 5.1 [default] TV Stereo Allows you to move into the active list of your house. Sends 2-channel HDMI audio from your cable box, satellite receiver, or VCR to your Installation Guide. Figure 18 Preview of video features, and press the Enter button to hear cable/satellite or VCR audio in Bose 5.1 surround sound. Refer to "Using the TV...

User Manual
Page 38
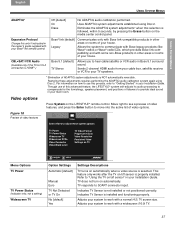
... brightness. Figure 19 Preview of media center features Media Center Select Media Center to adjust these system options: Display Brightness Display Language Optical Source Digital Audio Output Tuner Spacing uMusic Preset Restore Settings Menu Options Display Brightness Display Language navigate select Option Settings 4 [default] 1 to 7 English [default] Dansk, Deutsch, Español, Français, Italiano, Nederlands, Svenska Settings Descriptions Media center display lights with the VS-2 video enhancer. Reduces screen black level, appropriate for PAL (European standard) monitors...
... brightness. Figure 19 Preview of media center features Media Center Select Media Center to adjust these system options: Display Brightness Display Language Optical Source Digital Audio Output Tuner Spacing uMusic Preset Restore Settings Menu Options Display Brightness Display Language navigate select Option Settings 4 [default] 1 to 7 English [default] Dansk, Deutsch, Español, Français, Italiano, Nederlands, Svenska Settings Descriptions Media center display lights with the VS-2 video enhancer. Reduces screen black level, appropriate for PAL (European standard) monitors...

User Manual
Page 39
... system operation. Identifies the IR code that works with the preset selected in the option above . Original [default] PCM No processing applied for naming or renaming preset selected in the option above . USING SYSTEM MENUS English Español Français USING SYSTEM MENUS Optical Source Digital Audio Output Tuner Spacing uMusic® Preset Preset Action Restore Settings None [default] No digital signal received via optical cable for the LIFESTYLE® remote to control. -- Yes Overwrites user settings and adjustments...
... system operation. Identifies the IR code that works with the preset selected in the option above . Original [default] PCM No processing applied for naming or renaming preset selected in the option above . USING SYSTEM MENUS English Español Français USING SYSTEM MENUS Optical Source Digital Audio Output Tuner Spacing uMusic® Preset Preset Action Restore Settings None [default] No digital signal received via optical cable for the LIFESTYLE® remote to control. -- Yes Overwrites user settings and adjustments...

User Manual
Page 45
... adjustable in the system. Sets system to +5 Audio Track DTS [default] Dolby Digital Sleep Timer Off [default] 10-90 Establishes relative surround sound volume. Establishes relative center speaker volume. Establishes relative center speaker volume. Icon Menu Option Option Settings Settings descriptions 2-3-5 Speakers 2, 3, 5 [default] Determines the number of a different preset or names number, using the remote control. Select Stored as play mode or preset selections change. CHANGING SOURCE SETTINGS English Español Français CHANGING SOURCE SETTINGS...
... adjustable in the system. Sets system to +5 Audio Track DTS [default] Dolby Digital Sleep Timer Off [default] 10-90 Establishes relative surround sound volume. Establishes relative center speaker volume. Establishes relative center speaker volume. Icon Menu Option Option Settings Settings descriptions 2-3-5 Speakers 2, 3, 5 [default] Determines the number of a different preset or names number, using the remote control. Select Stored as play mode or preset selections change. CHANGING SOURCE SETTINGS English Español Français CHANGING SOURCE SETTINGS...
User Manual
Page 57
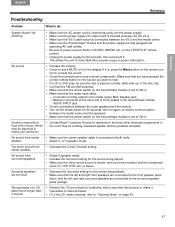
... surround-encoded, and the component used (TV, VCR, DVR, etc.) is lit on the display. or 5-speaker mode. No sound • Increase the volume. • Check to see if MUTE is stereo. Make sure that the left and right front speakers are connected to the front speaker jacks (blue), and the left and right surround speakers are fully plugged into operating AC wall outlets. • Be sure to press a source button (CD/DVD...
... surround-encoded, and the component used (TV, VCR, DVR, etc.) is lit on the display. or 5-speaker mode. No sound • Increase the volume. • Check to see if MUTE is stereo. Make sure that the left and right front speakers are connected to the front speaker jacks (blue), and the left and right surround speakers are fully plugged into operating AC wall outlets. • Be sure to press a source button (CD/DVD...
User Manual
Page 58
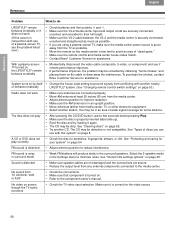
... be defective or not compatible. The disc does not play A CD or DVD does not play correctly • After pressing the CD/DVD button, wait a few feet to avoid an area of weak signal coverage for assistance. See "Cleaning discs" on screen, though the TV audio functions • Check the TV video input selection. FM sound is distorted • Adjust antenna position to the component owner's manual. Make sure it is correct...
... be defective or not compatible. The disc does not play A CD or DVD does not play correctly • After pressing the CD/DVD button, wait a few feet to avoid an area of weak signal coverage for assistance. See "Cleaning discs" on screen, though the TV audio functions • Check the TV video input selection. FM sound is distorted • Adjust antenna position to the component owner's manual. Make sure it is correct...

