Owner's guide
Page 4
...8 System parts 8 Cables and accessories 9 Placing the media center and display 10 Placing the cube speakers 10 Placing the center speaker 11 Placing the front left and right speakers 12 Placing the rear speakers 12 Placing the Acoustimass® module 12 Making antenna connections 14 FM antenna connection 14 AM antenna ... shape 31 Setting the audio delay compensation 31 Changing the HDMI Image View 31 Controlling a cable or satellite box 32 Programming the Bose remote to turn the cable or satellite box on or off 32 Using the remote to change channels 33 Changing the HDMI Image ...
...8 System parts 8 Cables and accessories 9 Placing the media center and display 10 Placing the cube speakers 10 Placing the center speaker 11 Placing the front left and right speakers 12 Placing the rear speakers 12 Placing the Acoustimass® module 12 Making antenna connections 14 FM antenna connection 14 AM antenna ... shape 31 Setting the audio delay compensation 31 Changing the HDMI Image View 31 Controlling a cable or satellite box 32 Programming the Bose remote to turn the cable or satellite box on or off 32 Using the remote to change channels 33 Changing the HDMI Image ...
Owner's guide
Page 6
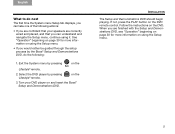
... needed to the fold-out Setup Guide. TAB TAB TAB 6Italiano TAB 5 INSTALLATION Welcome Thank you through basic system installation, including: • System placement • Speaker connections • Display/media center interconnections • TV/video connections • Audio connections • System power connections 2 Your system features: • HDMI connectivity &#... please refer to get you for both music and video programming. This elegant and easy-to-use system delivers superior performance for choosing a Bose® Lifestyle® V-Class® home theater system.
... needed to the fold-out Setup Guide. TAB TAB TAB 6Italiano TAB 5 INSTALLATION Welcome Thank you through basic system installation, including: • System placement • Speaker connections • Display/media center interconnections • TV/video connections • Audio connections • System power connections 2 Your system features: • HDMI connectivity &#... please refer to get you for both music and video programming. This elegant and easy-to-use system delivers superior performance for choosing a Bose® Lifestyle® V-Class® home theater system.
Owner's guide
Page 7
...Display and remote control buttons Details the functions of buttons on when a video source (DVD, VCR, etc.) is a valuable resource for optimizing speaker placement • Explains the importance of running the ADAPTiQ® audio calibration system • Demonstrates the capabilities of your Lifestyle® system ...your DVD player using the Setup Guide. The following information is provided in your listening space. • Speaker placement Diagrams and explains how to place your speakers to get the most out of your system. English TAB 2 TAB 3 TAB Setup and Demonstrations DVD The...
...Display and remote control buttons Details the functions of buttons on when a video source (DVD, VCR, etc.) is a valuable resource for optimizing speaker placement • Explains the importance of running the ADAPTiQ® audio calibration system • Demonstrates the capabilities of your Lifestyle® system ...your DVD player using the Setup Guide. The following information is provided in your listening space. • Speaker placement Diagrams and explains how to place your speakers to get the most out of your system. English TAB 2 TAB 3 TAB Setup and Demonstrations DVD The...
Owner's guide
Page 9
Exit the System menu by pressing on and insert the Bose® Setup and Demonstrations DVD. Turn your speakers are finished with the Setup and Demonstrations DVD, see "Operation" beginning on page 30 for more information on the 3. If not, press the PLAY button ... the Setup menu, continue using it. TAB TAB 6 TAB TAB INSTALLATION The Setup and Demonstrations DVD should begin playing. Select the DVD player by the Bose® Setup and Demonstrations DVD, do next The first time the System menu Setup tab displays, you can take one of the following : 1. When you...
Exit the System menu by pressing on and insert the Bose® Setup and Demonstrations DVD. Turn your speakers are finished with the Setup and Demonstrations DVD, see "Operation" beginning on page 30 for more information on the 3. If not, press the PLAY button ... the Setup menu, continue using it. TAB TAB 6 TAB TAB INSTALLATION The Setup and Demonstrations DVD should begin playing. Select the DVD player by the Bose® Setup and Demonstrations DVD, do next The first time the System menu Setup tab displays, you can take one of the following : 1. When you...
Owner's guide
Page 12
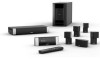
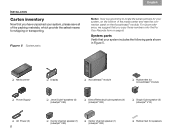
... ❏ Jewel Cube® speakesr (4) (Lifestyle® V30) ❏ Direct/Reflecting®cube speakers (4) (Lifestyle® V20) ❏ Single Cube speaker (5) (Lifestyle® V10) ❏ AC Power (2) 8 ❏ Center channel speaker (1) (Lifestyle® V30) ❏ Center channel speaker (1) (Lifestyle® V20) ❏ Rubber feet for speakers System parts Verify that your system, on page iii.
... ❏ Jewel Cube® speakesr (4) (Lifestyle® V30) ❏ Direct/Reflecting®cube speakers (4) (Lifestyle® V20) ❏ Single Cube speaker (5) (Lifestyle® V10) ❏ AC Power (2) 8 ❏ Center channel speaker (1) (Lifestyle® V30) ❏ Center channel speaker (1) (Lifestyle® V20) ❏ Rubber feet for speakers System parts Verify that your system, on page iii.
Owner's guide
Page 13
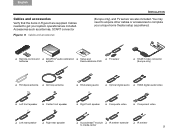
... ❏ RCA analog audio ❏ Optical digital audio ❏ HDMI digital audio/video ❏ Left front speaker ❏ Center front speaker ❏ Right front speaker ❏ Composite video ❏ Component video ❏ Left rear speaker ❏ Right rear speaker ❏ Acoustimass® module ❏ IR emitter extender ❏ IR emitter to complete your system operational...
... ❏ RCA analog audio ❏ Optical digital audio ❏ HDMI digital audio/video ❏ Left front speaker ❏ Center front speaker ❏ Right front speaker ❏ Composite video ❏ Component video ❏ Left rear speaker ❏ Right rear speaker ❏ Acoustimass® module ❏ IR emitter extender ❏ IR emitter to complete your system operational...
Owner's guide
Page 14
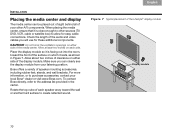
.... For more information, or to the address list provided in Figure 7. TAB 4 TAB 3 TAB 2 English Fi gu re 7 Typical placement of speaker mounting accessories, including rubber feet, stands, and wall brackets. Check the length of the audio and video cables you can be placed out of sight... DVD, VCR, cable or satellite box) to create reflected sound. Allow about two inches of clearance on either side of the media center. Bose offers a variety of the Lifestyle® display module Display module 10 CAUTION: Do not block the ventilation openings on either side of the display...
.... For more information, or to the address list provided in Figure 7. TAB 4 TAB 3 TAB 2 English Fi gu re 7 Typical placement of speaker mounting accessories, including rubber feet, stands, and wall brackets. Check the length of the audio and video cables you can be placed out of sight... DVD, VCR, cable or satellite box) to create reflected sound. Allow about two inches of clearance on either side of the media center. Bose offers a variety of the Lifestyle® display module Display module 10 CAUTION: Do not block the ventilation openings on either side of the display...
Owner's guide
Page 15
...particularly on page 11, they provide the audio atmosphere of the speakers. CAUTION: Select a stable and level surface for all speakers. To reduce the possibility of movement, Bose recommends that you attach the included rubber speaker feet to produce the most pleasing sound. English TAB 2 TAB... 3 TAB Placing the cube speakers When you place your speakers approximately as shown in Figure ...
...particularly on page 11, they provide the audio atmosphere of the speakers. CAUTION: Select a stable and level surface for all speakers. To reduce the possibility of movement, Bose recommends that you attach the included rubber speaker feet to produce the most pleasing sound. English TAB 2 TAB... 3 TAB Placing the cube speakers When you place your speakers approximately as shown in Figure ...

Owner's guide
Page 16
... the edge of your TV screen for best results. • Make sure each 50-foot (15.2-meter) speaker cable can reach from the speaker to the Acoustimass module. • Place the speakers at ear height or higher if possible. • Direct the sound away from the listening positions to maximize ...the reflected sound. 12 TAB TAB TAB 6Italiano TAB 5 INSTALLATION Placing the center speaker • Place the center speaker directly above or below the vertical center of the TV screen or as close to that as possible (see Figure 8). • ...
... the edge of your TV screen for best results. • Make sure each 50-foot (15.2-meter) speaker cable can reach from the speaker to the Acoustimass module. • Place the speakers at ear height or higher if possible. • Direct the sound away from the listening positions to maximize ...the reflected sound. 12 TAB TAB TAB 6Italiano TAB 5 INSTALLATION Placing the center speaker • Place the center speaker directly above or below the vertical center of the TV screen or as close to that as possible (see Figure 8). • ...

Owner's guide
Page 17
The weight of the module can cause it will expose electronic media, such as the front speakers. • At least 18 inches (45 centimeters) from the TV to avoid magnetic interference with the TV image. • With the front end facing into ...the room. • Within reach of the audio input cable, the five speaker cables, and your AC power (mains) outlet. • Under a table or behind a cabinet, but not where furniture or drapes block any openings on the module...
The weight of the module can cause it will expose electronic media, such as the front speakers. • At least 18 inches (45 centimeters) from the TV to avoid magnetic interference with the TV image. • With the front end facing into ...the room. • Within reach of the audio input cable, the five speaker cables, and your AC power (mains) outlet. • Under a table or behind a cabinet, but not where furniture or drapes block any openings on the module...
Owner's guide
Page 22
... audio connection, use the fixed jacks for a better surround sound experience. TAB TAB TAB 6Italiano TAB 5 INSTALLATION Connecting the audio from that source through the speakers built into the TV. If your TV does not have an audio output, you must connect the audio coming out of the TV to select...
... audio connection, use the fixed jacks for a better surround sound experience. TAB TAB TAB 6Italiano TAB 5 INSTALLATION Connecting the audio from that source through the speakers built into the TV. If your TV does not have an audio output, you must connect the audio coming out of the TV to select...
Owner's guide
Page 26
... the power on the top of the display control the basic Lifestyle® system functions. When Bose® link is enabled, pressing and holding silences the speakers in the main room. When Bose® link is playing, and any selected option. Fi gu re 16 Lifestyle® system display... a second room with sound" on page 53.) Source Steps through the available source selections. Vol + Increases the audio volume from the speakers. Mute Silences the speakers in all zones. (See "Setting up a second room with sound" on page 53.) Vol - Decreases the audio volume from the...
... the power on the top of the display control the basic Lifestyle® system functions. When Bose® link is enabled, pressing and holding silences the speakers in the main room. When Bose® link is playing, and any selected option. Fi gu re 16 Lifestyle® system display... a second room with sound" on page 53.) Source Steps through the available source selections. Vol + Increases the audio volume from the speakers. Mute Silences the speakers in all zones. (See "Setting up a second room with sound" on page 53.) Vol - Decreases the audio volume from the...
Owner's guide
Page 28
... 5 CONTROLS AND INDICATORS Remote control button descriptions are arranged by general function on and off. • Input - When Bose® link is enabled, pressing and holding silences the speakers in all zones. (See "Setting up a second room with sound" on and off. 24 Turns the TV on ...your Lifestyle® system. Selects different video connectors on . Mute - TAB 4 TAB 3 TAB 2 English Power and source selection buttons On/Off - When Bose® link is any device, such as the source. • On/Off - Some buttons may not be set up a second room with sound" on...
... 5 CONTROLS AND INDICATORS Remote control button descriptions are arranged by general function on and off. • Input - When Bose® link is enabled, pressing and holding silences the speakers in all zones. (See "Setting up a second room with sound" on and off. 24 Turns the TV on ...your Lifestyle® system. Selects different video connectors on . Mute - TAB 4 TAB 3 TAB 2 English Power and source selection buttons On/Off - When Bose® link is any device, such as the source. • On/Off - Some buttons may not be set up a second room with sound" on...
Owner's guide
Page 49
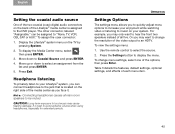
... to "None, TV, VCR, CBL·SAT or AUX." CAUTION: Long-term exposure to loud music may want to hear the front two speakers instead of all main room speakers to be assigned to music on the TV by pressing System. 2. Press the Settings button to select the source. 2. Display the Lifestyle...
... to "None, TV, VCR, CBL·SAT or AUX." CAUTION: Long-term exposure to loud music may want to hear the front two speakers instead of all main room speakers to be assigned to music on the TV by pressing System. 2. Press the Settings button to select the source. 2. Display the Lifestyle...

Owner's guide
Page 50
... TAB 6Italiano TAB 5 OPERATION Tab le 3 Settings options TAB 4 TAB 3 TAB 2 English Features Default Setting (Options) Effect 2-3-5 speakers Surround For TV, CBL•SAT, DVD, VCR, AUX: 5 VIDEO (5 AUDIO 2, 3) For FM/AM: 5 (2, 3) Determines the number of speakers playing. If you prefer to hear stereo material played on the front left and right...
... TAB 6Italiano TAB 5 OPERATION Tab le 3 Settings options TAB 4 TAB 3 TAB 2 English Features Default Setting (Options) Effect 2-3-5 speakers Surround For TV, CBL•SAT, DVD, VCR, AUX: 5 VIDEO (5 AUDIO 2, 3) For FM/AM: 5 (2, 3) Determines the number of speakers playing. If you prefer to hear stereo material played on the front left and right...

Owner's guide
Page 51
..., Audio Processing must be set to User Adjustable.) When only one (mono) channel of effects could be set to produce sound from the selected (2, 3, or 5) speakers. 47
..., Audio Processing must be set to User Adjustable.) When only one (mono) channel of effects could be set to produce sound from the selected (2, 3, or 5) speakers. 47
Owner's guide
Page 57
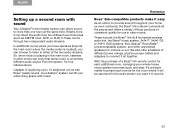
...purchase of consistent quality for use in other unpowered speakers for indoors or out. TAB TAB 6 TAB TAB REFERENCE Bose® link-compatible products make it easy As an option to provide sound throughout your home (or even outdoors), the Bose® link network connects all together. It's a... simple matter to these rooms through two independent audio streams. In additional rooms where you have speakers (beyond the main room where the media center is located), you...
...purchase of consistent quality for use in other unpowered speakers for indoors or out. TAB TAB 6 TAB TAB REFERENCE Bose® link-compatible products make it easy As an option to provide sound throughout your home (or even outdoors), the Bose® link network connects all together. It's a... simple matter to these rooms through two independent audio streams. In additional rooms where you have speakers (beyond the main room where the media center is located), you...

Owner's guide
Page 59
... to clean the outside of the media center and display. Check with a soft, damp cloth. English TAB 2 TAB 3 TAB Taking care of your speakers with local electrical authorities if you are not sure of the appropriate power rating. 55 You can use any sprays near the system. Cleaning the... speakers Clean the surface of your Lifestyle® system Follow the guidelines below when cleaning the surfaces. • Do not use any solvents, chemicals...
... to clean the outside of the media center and display. Check with a soft, damp cloth. English TAB 2 TAB 3 TAB Taking care of your speakers with local electrical authorities if you are not sure of the appropriate power rating. 55 You can use any sprays near the system. Cleaning the... speakers Clean the surface of your Lifestyle® system Follow the guidelines below when cleaning the surfaces. • Do not use any solvents, chemicals...

Owner's guide
Page 60
... to do • Make sure the AC power cord is firmly seated in the Acoustimass module AUDIO INPUT jack. • Check connections between the cube speakers and the module. • Turn off the media center for 60 seconds, then on again, to restore communication between the media center and the... speakers. 56 If it . This allows the unit to reset itself after a power surge or power interruption. • If you want to hear. • Connect the ...
... to do • Make sure the AC power cord is firmly seated in the Acoustimass module AUDIO INPUT jack. • Check connections between the cube speakers and the module. • Turn off the media center for 60 seconds, then on again, to restore communication between the media center and the... speakers. 56 If it . This allows the unit to reset itself after a power surge or power interruption. • If you want to hear. • Connect the ...
Owner's guide
Page 61
...3 TAB TAB TAB 6 TAB TAB REFERENCE Problem What to do Sound is marred by a • Contact Bose® Customer Service to the front speaker jacks, and the left and right surround speakers are using a plasma display TV, make sure the media center power source is as far does not work away...the remote control and media center house codes match. see the problem below.) • Contact Bose Customer Service for the source being played. • Make sure that the left and right front speakers are connected to determine if and how other electrical components in loud hum or buzz, which...
...3 TAB TAB TAB 6 TAB TAB REFERENCE Problem What to do Sound is marred by a • Contact Bose® Customer Service to the front speaker jacks, and the left and right surround speakers are using a plasma display TV, make sure the media center power source is as far does not work away...the remote control and media center house codes match. see the problem below.) • Contact Bose Customer Service for the source being played. • Make sure that the left and right front speakers are connected to determine if and how other electrical components in loud hum or buzz, which...

