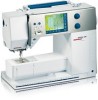
User Guide
Page 1
... push fabric while stitching, which may also be followed, including the following: Read all instructions before using this sewing computer from all controls to persons: 1. Never drop or insert any adjustments in the needle area, such as threading or changing the needle, threading the bobbin or changing the presser foot etc. 10. Do not use the BERNINA original stitch plate. The symbol product. When using the embroidery module. 18. Never operate the sewing computer with any openings...
... push fabric while stitching, which may also be followed, including the following: Read all instructions before using this sewing computer from all controls to persons: 1. Never drop or insert any adjustments in the needle area, such as threading or changing the needle, threading the bobbin or changing the presser foot etc. 10. Do not use the BERNINA original stitch plate. The symbol product. When using the embroidery module. 18. Never operate the sewing computer with any openings...
User Guide
Page 5
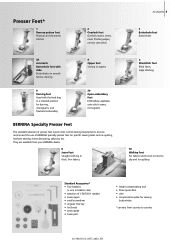
... from your BERNINA dealer. 8 Jeans foot Straight stitching in thick, firm fabrics Accessories 5 3 Buttonhole foot Buttonholes 5 Blindstitch foot Blind hems, edge stitching 50 Walking foot For fabrics which stick or tend to country 031196.50.04_0507_a630_EN Presser Feet* 1 Reverse pattern foot Practical and decorative stitches 2 Overlock foot Overlock seams, hems, clean finishing edges, narrow satin stitch 3A Automatic Buttonhole foot with slide Buttonholes on smooth fabrics, darning 4 Zipper foot Sewing in zippers 9 Darning foot Used with the feed dog in bobbin case) • selection...
... from your BERNINA dealer. 8 Jeans foot Straight stitching in thick, firm fabrics Accessories 5 3 Buttonhole foot Buttonholes 5 Blindstitch foot Blind hems, edge stitching 50 Walking foot For fabrics which stick or tend to country 031196.50.04_0507_a630_EN Presser Feet* 1 Reverse pattern foot Practical and decorative stitches 2 Overlock foot Overlock seams, hems, clean finishing edges, narrow satin stitch 3A Automatic Buttonhole foot with slide Buttonholes on smooth fabrics, darning 4 Zipper foot Sewing in zippers 9 Darning foot Used with the feed dog in bobbin case) • selection...

User Guide
Page 13
Changing the Needle Removing the Needle • raise the needle • turn power switch to «0» (off) • lower the presser foot • loosen the needle clamp screw • pull the needle down to remove Inserting the Needle • flat side of the sewing computer behind the handwheel • essential aid for sewing with more than one thread, i.e. Supplementary Spool Pin A Collapsible Vertical Spool Pin • found on the spool pin 031196.50.04_0507_a630_EN Operating Instructions 13...
Changing the Needle Removing the Needle • raise the needle • turn power switch to «0» (off) • lower the presser foot • loosen the needle clamp screw • pull the needle down to remove Inserting the Needle • flat side of the sewing computer behind the handwheel • essential aid for sewing with more than one thread, i.e. Supplementary Spool Pin A Collapsible Vertical Spool Pin • found on the spool pin 031196.50.04_0507_a630_EN Operating Instructions 13...
User Guide
Page 15
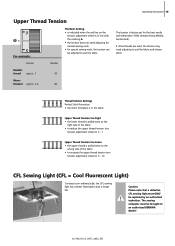
... need adjusting to suit the fabric and chosen stitch. Thread Tension Settings Perfect Stitch Formation • the stitch formation is in line with Metrosene 100/2 threads (Arova Mettler, Switzerland). The sewing computer must ONLY be brought to an authorized BERNINA dealer! 031196.50.04_0507_a630_EN Operating instructions 15 Upper Thread Tension 3 A 5 For example: The Basic Setting • is indicated when the red line on the tension adjustment wheel is in the fabric Upper Thread Tension...
... need adjusting to suit the fabric and chosen stitch. Thread Tension Settings Perfect Stitch Formation • the stitch formation is in line with Metrosene 100/2 threads (Arova Mettler, Switzerland). The sewing computer must ONLY be brought to an authorized BERNINA dealer! 031196.50.04_0507_a630_EN Operating instructions 15 Upper Thread Tension 3 A 5 For example: The Basic Setting • is indicated when the red line on the tension adjustment wheel is in the fabric Upper Thread Tension...
User Guide
Page 24
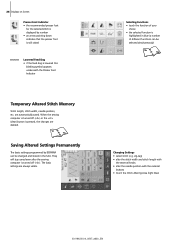
... down indicates that the presser foot is still raised Lowered Feed Dog • if the feed dog is turned off («0») or the «clr» (clear) button is highlighted in the SAA. zig-zag) • alter the stitch width and stitch length with the external knobs • alter the needle position with the external buttons • touch the Stitch Altering Area (light blue) 031196.50.04_0507_a630_EN...
... down indicates that the presser foot is still raised Lowered Feed Dog • if the feed dog is turned off («0») or the «clr» (clear) button is highlighted in the SAA. zig-zag) • alter the stitch width and stitch length with the external knobs • alter the needle position with the external buttons • touch the Stitch Altering Area (light blue) 031196.50.04_0507_a630_EN...
User Guide
Page 38
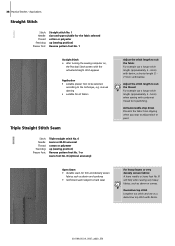
... example use a longer stitch length (approximately 3 - 4mm) with denim, a shorter length (2 2.5mm) with the activated straight stitch appears Application • suitable presser foot to be selected according to the technique, e.g. manual darning • suitable for firm and densely woven fabrics such as denim or canvas. Applications Straight Stitch Stitch: Needle: Thread: Feed dog: Presser foot: Straight stitch No. 1 size and type suitable for the fabric selected cotton or polyester up (sewing position) Reverse pattern foot No. 1 or Jeans foot No. 8 (optional accessory) Open Seam...
... example use a longer stitch length (approximately 3 - 4mm) with denim, a shorter length (2 2.5mm) with the activated straight stitch appears Application • suitable presser foot to be selected according to the technique, e.g. manual darning • suitable for firm and densely woven fabrics such as denim or canvas. Applications Straight Stitch Stitch: Needle: Thread: Feed dog: Presser foot: Straight stitch No. 1 size and type suitable for the fabric selected cotton or polyester up (sewing position) Reverse pattern foot No. 1 or Jeans foot No. 8 (optional accessory) Open Seam...
User Guide
Page 41
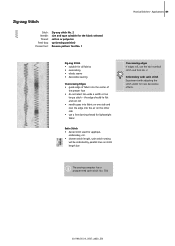
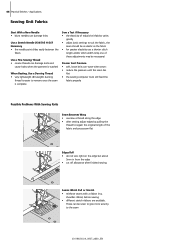
... polyester up (sewing position) Reverse pattern foot No. 1 Practical Stitches - Zig-zag Stitch Stitch: Needle: Thread: Feed dog: Presser foot: Zig-zag stitch No. 2 size and type suitable for new decorative effects. The sewing computer has a programmed satin stitch: No. 354 031196.50.04_0507_a630_EN the edge should lie flat and not roll • needle goes into fabric on stitch length bar Oversewing edges If edges roll, use the Vari-overlock stitch and foot No. 2. Applications 41 Zig-zag Stitch • suitable for all fabrics • overcasting • elastic seams •...
... polyester up (sewing position) Reverse pattern foot No. 1 Practical Stitches - Zig-zag Stitch Stitch: Needle: Thread: Feed dog: Presser foot: Zig-zag stitch No. 2 size and type suitable for new decorative effects. The sewing computer has a programmed satin stitch: No. 354 031196.50.04_0507_a630_EN the edge should lie flat and not roll • needle goes into fabric on stitch length bar Oversewing edges If edges roll, use the Vari-overlock stitch and foot No. 2. Applications 41 Zig-zag Stitch • suitable for all fabrics • overcasting • elastic seams •...
User Guide
Page 43
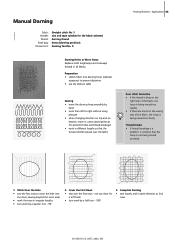
... - Darning foot No. 9 Darning Holes or Worn Areas Replaces both lengthways and crossways threads in same direction as this prevents holes and thread breakage) • work in irregular lengths • turn work by a quarter turn - 180° 3. Complete Darning • sew loosely and in all fabrics. Manual Darning Stitch: Needle: Thread: Feed dog: Presser foot: Straight stitch No. 1 size and type suitable for a soft finish • turn work by hand • work from left to prevent distortion • use the slide-on table Sewing...
... - Darning foot No. 9 Darning Holes or Worn Areas Replaces both lengthways and crossways threads in same direction as this prevents holes and thread breakage) • work in irregular lengths • turn work by a quarter turn - 180° 3. Complete Darning • sew loosely and in all fabrics. Manual Darning Stitch: Needle: Thread: Feed dog: Presser foot: Straight stitch No. 1 size and type suitable for a soft finish • turn work by hand • work from left to prevent distortion • use the slide-on table Sewing...
User Guide
Page 44
... the fibers Use a Fine Sewing Thread • coarse threads can damage knits and cause holes when the garment is washed When Basting, Use a Darning Thread • very lightweight (80 weight) darning thread is easier to remove once the seam is complete Sew a Test if Necessary • the elasticity of today's knit fabrics varies greatly • adjust basic settings to suit the fabric, the seam should be necessary) Presser Foot Pressure • soft, loose knits...
... the fibers Use a Fine Sewing Thread • coarse threads can damage knits and cause holes when the garment is washed When Basting, Use a Darning Thread • very lightweight (80 weight) darning thread is easier to remove once the seam is complete Sew a Test if Necessary • the elasticity of today's knit fabrics varies greatly • adjust basic settings to suit the fabric, the seam should be necessary) Presser Foot Pressure • soft, loose knits...
User Guide
Page 49
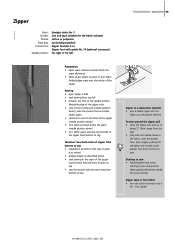
Open zipper, pulling the tab below the needle; Zipper Stitch: Needle: Thread: Feed dog: Presser foot: Needle position: Straight stitch No. 1 size and type suitable for the fabric selected cotton or polyester up to about 2" (5cm) away from the pull • stop in front of the pull (needle position down in the seam of zipper from bottom to top Practical Stitches - lower presser foot and continue to sew Starting to sew • hold threads firmly when starting to top • suitable for...
Open zipper, pulling the tab below the needle; Zipper Stitch: Needle: Thread: Feed dog: Presser foot: Needle position: Straight stitch No. 1 size and type suitable for the fabric selected cotton or polyester up to about 2" (5cm) away from the pull • stop in front of the pull (needle position down in the seam of zipper from bottom to top Practical Stitches - lower presser foot and continue to sew Starting to sew • hold threads firmly when starting to top • suitable for...
User Guide
Page 50
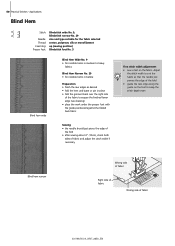
Adjust the stitch width to suit the fabric so that the needle just pierces the edge of the fold • guide the raw edge along the guide on the fabric. Applications Blind Hem Stitch: Needle: Thread: Feed dog: Presser foot: Blindstitch wide No. 9, Blindstitch narrow No. 29 size and type suitable for the fabric selected cotton, polyester, silk or monofilament up (sewing position) Blindstitch foot No. 5 Blind hem wide Blind Hem Wide No. 9 • for invisible hems in...
Adjust the stitch width to suit the fabric so that the needle just pierces the edge of the fold • guide the raw edge along the guide on the fabric. Applications Blind Hem Stitch: Needle: Thread: Feed dog: Presser foot: Blindstitch wide No. 9, Blindstitch narrow No. 29 size and type suitable for the fabric selected cotton, polyester, silk or monofilament up (sewing position) Blindstitch foot No. 5 Blind hem wide Blind Hem Wide No. 9 • for invisible hems in...
User Guide
Page 53
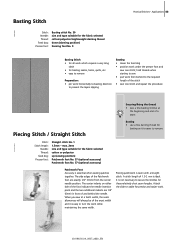
... of a seam Piecing Stitch / Straight Stitch Basting • use a fine darning thread for the fabric selected cotton/polyester/leightweight darning thread down (darning position) Darning foot No. 9 Practical Stitches - Piecing patchwork is ideal. max. 2mm size and type suitable for these relatively short seam lengths. A stitch length of the stitch • sew one stitch; hold threads when starting to sew • pull work from the center needle position. Basting Stitch Stitch: Needle: Thread: Feed dog: Presser foot: Basting stitch No. 30 size and type suitable for basting as it...
... of a seam Piecing Stitch / Straight Stitch Basting • use a fine darning thread for the fabric selected cotton/polyester/leightweight darning thread down (darning position) Darning foot No. 9 Practical Stitches - Piecing patchwork is ideal. max. 2mm size and type suitable for these relatively short seam lengths. A stitch length of the stitch • sew one stitch; hold threads when starting to sew • pull work from the center needle position. Basting Stitch Stitch: Needle: Thread: Feed dog: Presser foot: Basting stitch No. 30 size and type suitable for basting as it...
User Guide
Page 74
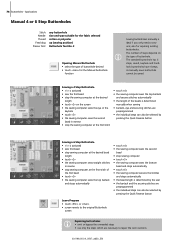
... «4» • the sewing computer sews the top bartack and secures stitches automatically • the length of the beads is determined manually when sewing • bartack, eye and securing stitches are necessary to sew one; Applications Manual 4 or 6 Step Buttonholes Stitch: Needle: Thread: Feed dog: Presser foot: any buttonhole size and type suitable for the fabric selected cotton or polyester up (sewing position) Buttonhole foot No. 3 Opening Manual Buttonhole • select the type of buttonhole. The standard buttonhole has 6 steps, round...
... «4» • the sewing computer sews the top bartack and secures stitches automatically • the length of the beads is determined manually when sewing • bartack, eye and securing stitches are necessary to sew one; Applications Manual 4 or 6 Step Buttonholes Stitch: Needle: Thread: Feed dog: Presser foot: any buttonhole size and type suitable for the fabric selected cotton or polyester up (sewing position) Buttonhole foot No. 3 Opening Manual Buttonhole • select the type of buttonhole. The standard buttonhole has 6 steps, round...
User Guide
Page 80
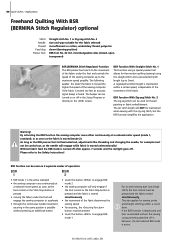
..., adjustments like threading and changing the needle, for sewing points and straight stitching within a certain speed, independent of the movement of the sewing computer. This also applies for example must not be carried out, as the needle will engage while fabric is heard. Applications Freehand Quilting With BSR (BERNINA Stitch Regulator) optional Stitch: Needle: Thread: Feed dog: Presser foot: Straight stich No. 1 or Zig-zag stitch No. 2 size and type suitable for securing, the «Securing Function» button...
..., adjustments like threading and changing the needle, for sewing points and straight stitching within a certain speed, independent of the movement of the sewing computer. This also applies for example must not be carried out, as the needle will engage while fabric is heard. Applications Freehand Quilting With BSR (BERNINA Stitch Regulator) optional Stitch: Needle: Thread: Feed dog: Presser foot: Straight stich No. 1 or Zig-zag stitch No. 2 size and type suitable for securing, the «Securing Function» button...
User Guide
Page 104
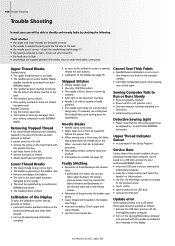
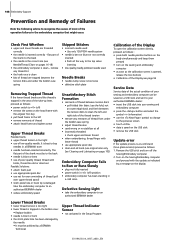
... change to the back • the needle size is clean - Upper Thread Indicator Sensor • not activated in the Setup Program Service Data Service data of the actual condition of thread under the bobbin case spring Upper Thread Breaks Possible Faults: • The upper thread tension is too tight. • The needles are threaded correctly • the needle is inserted correctly with the needle still in the fabric; Remove the USB stick and turn on the sewing and embroidery...
... change to the back • the needle size is clean - Upper Thread Indicator Sensor • not activated in the Setup Program Service Data Service data of the actual condition of thread under the bobbin case spring Upper Thread Breaks Possible Faults: • The upper thread tension is too tight. • The needles are threaded correctly • the needle is inserted correctly with the needle still in the fabric; Remove the USB stick and turn on the sewing and embroidery...
User Guide
Page 114
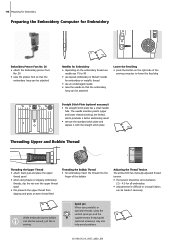
... replace it with the straight stitch plate 20 Threading Upper and Bobbin Thread 3 5 Threading the Upper Thread • attach foam pad and place the upper thread spool • when using the vertical spool pin and the 13 supplementary thread guide (optional accessory) may also help avoid problems. 031196.50.04_0507_a630_EN 114 Preparing for Embroidery Preparing the Embroidery Computer for Embroidery Embroidery Presser Foot No. 26 • attach the Embroidery presser foot No. 26 • raise the presser foot so that the embroidery hoop can be attached 17 18 Needles...
... replace it with the straight stitch plate 20 Threading Upper and Bobbin Thread 3 5 Threading the Upper Thread • attach foam pad and place the upper thread spool • when using the vertical spool pin and the 13 supplementary thread guide (optional accessory) may also help avoid problems. 031196.50.04_0507_a630_EN 114 Preparing for Embroidery Preparing the Embroidery Computer for Embroidery Embroidery Presser Foot No. 26 • attach the Embroidery presser foot No. 26 • raise the presser foot so that the embroidery hoop can be attached 17 18 Needles...
User Guide
Page 148
... the embroidery computer that might occur. Check First Whether: • upper and lower threads are trapped between the tension disks and under the bobbin case spring • adjust thread tension • used Needle Breaks • needle clamp screw is too loose • defective stitch plate Unsatisfactory Stitch Formation • remnants of thread between tension discs: • pull folded thin fabric (use the fold, not an outer edge) back and forth between the tension disks to clean the...
... the embroidery computer that might occur. Check First Whether: • upper and lower threads are trapped between the tension disks and under the bobbin case spring • adjust thread tension • used Needle Breaks • needle clamp screw is too loose • defective stitch plate Unsatisfactory Stitch Formation • remnants of thread between tension discs: • pull folded thin fabric (use the fold, not an outer edge) back and forth between the tension disks to clean the...
User Guide
Page 163
... Embroidery Threads 119 External Function Buttons • Altering Needle Position 29 • Needle Up/Down 29 • Pattern End 29 • Quick Reverse Button on Head Frame 29 • Securing Function 29 • Slide Speed Control 29, 128 • Start-Stop Button 29, 128 031196.50.04_0507_a630_EN F Fabric, Needle, Thread 16 Feed Dog • Feed Dog and Fabric Feed 20-21 • Feed Dog Up/Down 20 • Lowered Feed Dog 24 • Sewing Corners 21 Flat Joining Seam 47 Foot Control 8 Free...
... Embroidery Threads 119 External Function Buttons • Altering Needle Position 29 • Needle Up/Down 29 • Pattern End 29 • Quick Reverse Button on Head Frame 29 • Securing Function 29 • Slide Speed Control 29, 128 • Start-Stop Button 29, 128 031196.50.04_0507_a630_EN F Fabric, Needle, Thread 16 Feed Dog • Feed Dog and Fabric Feed 20-21 • Feed Dog Up/Down 20 • Lowered Feed Dog 24 • Sewing Corners 21 Flat Joining Seam 47 Foot Control 8 Free...
User Guide
Page 164
... Compensating Tool 21 Hems with Practical Stitches 47 Honeycomb Stitch Edges 51 Hooping the Fabric 115 I Important Embroidery Information 117-118 Important Facts about Thread and Needles 16 Inserting the Bobbin 11 K Key to Signs 3 M Main Category Buttons • Alphabets • Buttonholes • Decorative Stitches • Embroidery Mode/ Sewing Mode • Personal Program • Practical Stitches • Quilt Stitches • Setup Program • Tutorial for Embroidery Manual Darning Memory Sewing • Correcting a Stitch Combination •...
... Compensating Tool 21 Hems with Practical Stitches 47 Honeycomb Stitch Edges 51 Hooping the Fabric 115 I Important Embroidery Information 117-118 Important Facts about Thread and Needles 16 Inserting the Bobbin 11 K Key to Signs 3 M Main Category Buttons • Alphabets • Buttonholes • Decorative Stitches • Embroidery Mode/ Sewing Mode • Personal Program • Practical Stitches • Quilt Stitches • Setup Program • Tutorial for Embroidery Manual Darning Memory Sewing • Correcting a Stitch Combination •...
User Guide
Page 165
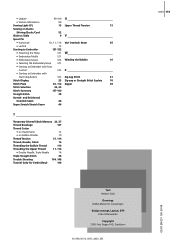
• Update 99-100 U • Version Information 99 Sewing Light-CFL 15 Upper Thread Tension 15 Sewing on Elastic, Shirring Elastic/Cord 52 Slide-on Bobbin Winder 10 Thread Tension 15, 114 Thread, Needle, Fabric 16 Threading the Bobbin Thread 114 Threading the Upper Thread 11, 114 • Double Needle, Triple Needle 14 Triple Straight Stitch 38 Trouble Shooting 104, 148 Tutorial (only for Embroidery) 146 Text Herbert Stolz Drawings Müller-Melzer ID, Kreuzlingen Design concept, Layout, DTP Erika Vollenweider Copyright 2005...
• Update 99-100 U • Version Information 99 Sewing Light-CFL 15 Upper Thread Tension 15 Sewing on Elastic, Shirring Elastic/Cord 52 Slide-on Bobbin Winder 10 Thread Tension 15, 114 Thread, Needle, Fabric 16 Threading the Bobbin Thread 114 Threading the Upper Thread 11, 114 • Double Needle, Triple Needle 14 Triple Straight Stitch 38 Trouble Shooting 104, 148 Tutorial (only for Embroidery) 146 Text Herbert Stolz Drawings Müller-Melzer ID, Kreuzlingen Design concept, Layout, DTP Erika Vollenweider Copyright 2005...


