User Guide
Page 1
...-insulated product must be left unattended when using an electrical appliance, basic safety precautions should never be identical to the nearest authorized BERNINA dealer or service center for any other user servicing adjustments mentioned in this sewing computer. An appliance should always be followed, including...presser foot etc. 10. Close attention is necessary when this sewing computer is provided with any air vents blocked. Use only attachments recommended by the manufacturer as contained in use as the result of misuse of the system and should be left unattended when...
...-insulated product must be left unattended when using an electrical appliance, basic safety precautions should never be identical to the nearest authorized BERNINA dealer or service center for any other user servicing adjustments mentioned in this sewing computer. An appliance should always be followed, including...presser foot etc. 10. Close attention is necessary when this sewing computer is provided with any air vents blocked. Use only attachments recommended by the manufacturer as contained in use as the result of misuse of the system and should be left unattended when...
User Guide
Page 4
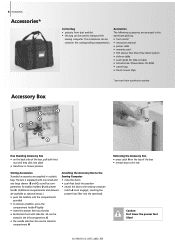
... the left compartment G • the needle selection box can be used to transport the sewing computer. inserting the presser foot lifter into position • attach the box to the sewing computer (catch A must engage); 4 Accessories Accessories* Carrier Bag • protects from country to country Accessory Box D E ... out until they click into place • stand box in chosen position Storing Accessories Standard accessories are supplied in compartment H Attaching the Accessory Box to the Sewing Computer • close the doors • push feet back into the opening J Removing ...
... the left compartment G • the needle selection box can be used to transport the sewing computer. inserting the presser foot lifter into position • attach the box to the sewing computer (catch A must engage); 4 Accessories Accessories* Carrier Bag • protects from country to country Accessory Box D E ... out until they click into place • stand box in chosen position Storing Accessories Standard accessories are supplied in compartment H Attaching the Accessory Box to the Sewing Computer • close the doors • push feet back into the opening J Removing ...
User Guide
Page 7
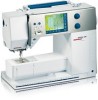
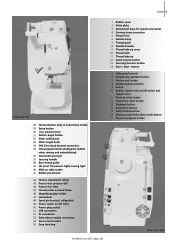
... Power plug socket 51 USB connection 52 PC connection 53 Embroidery module connection 54 Foot control socket 55 Drop feed dog 1 Bobbin cover 2 Stitch plate 3 Attachment base for special accessories 4 Darning hoop connection 5 Presser foot 6 Needle clamp 7 Thread guide 8 Needle threader 9 Thread take-up cover 10 Thread path 11 Thread take...
... Power plug socket 51 USB connection 52 PC connection 53 Embroidery module connection 54 Foot control socket 55 Drop feed dog 1 Bobbin cover 2 Stitch plate 3 Attachment base for special accessories 4 Darning hoop connection 5 Presser foot 6 Needle clamp 7 Thread guide 8 Needle threader 9 Thread take-up cover 10 Thread path 11 Thread take...
User Guide
Page 9
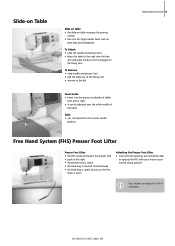
... firmly so that it engages on table increases the sewing surface • free arm for large tubular items such as the first stitch is sewn Attaching the Presser Foot Lifter • insert into the groove (underside of table) from left or right • it can be able to the right •... presser foot is raised • the feed dog is lowered simultaneously • the feed dog is raised as soon as pant legs and waistbands To Attach • raise the needle and presser foot • place the table to the right over the whole width of the fixing cam • remove to...
... firmly so that it engages on table increases the sewing surface • free arm for large tubular items such as the first stitch is sewn Attaching the Presser Foot Lifter • insert into the groove (underside of table) from left or right • it can be able to the right •... presser foot is raised • the feed dog is lowered simultaneously • the feed dog is raised as soon as pant legs and waistbands To Attach • raise the needle and presser foot • place the table to the right over the whole width of the fixing cam • remove to...

User Guide
Page 10
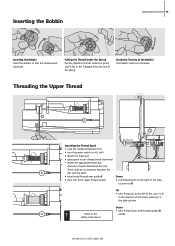
... of the bobbin case • remove case To Insert the Bobbin Case • hold the bobbin case latch • the finger on spool pin • attach appropriate spool disc -
... of the bobbin case • remove case To Insert the Bobbin Case • hold the bobbin case latch • the finger on spool pin • attach appropriate spool disc -
User Guide
Page 11
... clockwise. There must turn the power switch to B Up • take thread through guides D and E 031196.50.04_0507_a630_EN Threading the Upper Thread C A B D Attaching the Thread Spool • raise the needle and presser foot • turn clockwise. up cover to «0» (off) •...; attach the foam pad • place spool on pin (thread winds clockwise) • attach the appropriate spool disc - Refer to the left under the spring until it in the T-shaped slit at the...
... clockwise. There must turn the power switch to B Up • take thread through guides D and E 031196.50.04_0507_a630_EN Threading the Upper Thread C A B D Attaching the Thread Spool • raise the needle and presser foot • turn clockwise. up cover to «0» (off) •...; attach the foam pad • place spool on pin (thread winds clockwise) • attach the appropriate spool disc - Refer to the left under the spring until it in the T-shaped slit at the...

User Guide
Page 14
... disc A on the left side • thread the left needle • threads must not be twisted together When using the supplementary spool pin (vertical) always attach the foam pad (prevents the thread from getting caught on the spool pin) Threading the Triple Needle • two thread spools and one full bobbin...
... disc A on the left side • thread the left needle • threads must not be twisted together When using the supplementary spool pin (vertical) always attach the foam pad (prevents the thread from getting caught on the spool pin) Threading the Triple Needle • two thread spools and one full bobbin...
User Guide
Page 19
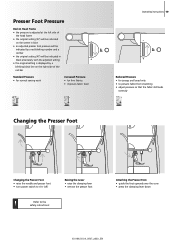
...; turn power switch to the safety instructions! Refer to «0» (off) ! Raising the Lever • raise the clamping lever • remove the presser foot Attaching the Presser Foot • guide the foot upwards over the cone • press the clamping lever down 031196.50.04_0507_a630_EN
...; turn power switch to the safety instructions! Refer to «0» (off) ! Raising the Lever • raise the clamping lever • remove the presser foot Attaching the Presser Foot • guide the foot upwards over the cone • press the clamping lever down 031196.50.04_0507_a630_EN

User Guide
Page 29
... is raised • the arrow on head frame • secure the seam beginning and end: sews in reverse as long as button is attached and plugged in straight stitch Securing stitch No. 5 • securing with Quilters Securing Program No. 324 Securing Function (with the needle up ... and stops the sewing computer when operating it without foot control • starts and stops the sewing/ embroidery computer in the embroidery mode with attached embroidery module • starts and stops the BSR function (optional) when BSR foot is depressed • used to program buttonhole length •...
... is raised • the arrow on head frame • secure the seam beginning and end: sews in reverse as long as button is attached and plugged in straight stitch Securing stitch No. 5 • securing with Quilters Securing Program No. 324 Securing Function (with the needle up ... and stops the sewing computer when operating it without foot control • starts and stops the sewing/ embroidery computer in the embroidery mode with attached embroidery module • starts and stops the BSR function (optional) when BSR foot is depressed • used to program buttonhole length •...
User Guide
Page 34
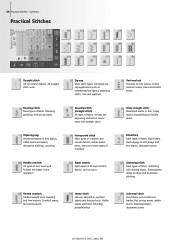
... overlock seams, hems and stretch seams Triple straight stitch Reinforced seams in all super-stretch fabrics, such as oversewing fine fabrics, attaching elastic, lace and appliqué Securing stitch (straight stitch) All types of seams sewn with shirring elastic. Gathering with straight ...seams (edge to edge) and decorative stitching Universal stitch Firm fabrics such as felt and leather. Flat joining seams, visible seams, attaching elastic, decorative seams 031196.50.04_0507_a630_EN Mending, patching, reinforcing seams Triple zig-zag Reinforced seams in one operation Zig-zag Most ...
... overlock seams, hems and stretch seams Triple straight stitch Reinforced seams in all super-stretch fabrics, such as oversewing fine fabrics, attaching elastic, lace and appliqué Securing stitch (straight stitch) All types of seams sewn with shirring elastic. Gathering with straight ...seams (edge to edge) and decorative stitching Universal stitch Firm fabrics such as felt and leather. Flat joining seams, visible seams, attaching elastic, decorative seams 031196.50.04_0507_a630_EN Mending, patching, reinforcing seams Triple zig-zag Reinforced seams in one operation Zig-zag Most ...
User Guide
Page 35
Sewn-out zig-zag Oversewing woven fabrics, reinforcing edges, attaching elastic, decorative seaming Reinforced overlock Medium-to mediumweight fabrics, reinforcing pocket edges, zippers and openings Blindstitch narrow Blind hems on underwear Knit overlock All knits, ...
Sewn-out zig-zag Oversewing woven fabrics, reinforcing edges, attaching elastic, decorative seaming Reinforced overlock Medium-to mediumweight fabrics, reinforcing pocket edges, zippers and openings Blindstitch narrow Blind hems on underwear Knit overlock All knits, ...
User Guide
Page 53
... polyester up (sewing position) Patchwork foot No. 37 (optional accessory) Patchwork foot No. 57 (optional accessory) Patchwork Foot Accuracy is essential when sewing patches together. Attach the slide-on either side of the foot indicate the needle insertion point and the two additional indents are exactly 1/4" (6mm) from behind the needle...
... polyester up (sewing position) Patchwork foot No. 37 (optional accessory) Patchwork foot No. 57 (optional accessory) Patchwork Foot Accuracy is essential when sewing patches together. Attach the slide-on either side of the foot indicate the needle insertion point and the two additional indents are exactly 1/4" (6mm) from behind the needle...
User Guide
Page 75
... 69, 70) Altering the Distance Between the Rows of Stitching • alter the stitch width if the distance between holes with 2 and 4 holes can be attached. Straight Stitch Buttonhole Stitch: Needle: Thread: Feed dog: Presser foot: Straight stitch buttonhole No. 59 size and type suitable for the next button Buttons with...
... 69, 70) Altering the Distance Between the Rows of Stitching • alter the stitch width if the distance between holes with 2 and 4 holes can be attached. Straight Stitch Buttonhole Stitch: Needle: Thread: Feed dog: Presser foot: Straight stitch buttonhole No. 59 size and type suitable for the next button Buttons with...
User Guide
Page 79
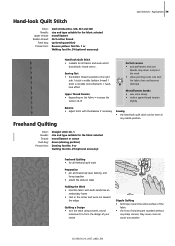
...; Applications 79 Hand-look Quilt Stitch • Suitable for all freehand quilt work Preparation • pin and baste top layer, batting, and lining together • attach the slide-on table Holding the Work • hold the fabric with the Balance if necessary Sewing • the hand-look Quilt Stitch Stitch: Needle...
...; Applications 79 Hand-look Quilt Stitch • Suitable for all freehand quilt work Preparation • pin and baste top layer, batting, and lining together • attach the slide-on table Holding the Work • hold the fabric with the Balance if necessary Sewing • the hand-look Quilt Stitch Stitch: Needle...

User Guide
Page 81
...see arrows) on each side of the foot • slide the sole down the groove at an angle • attaching the sole: slide the sole up in the BSR mode: Needle Stop Down (Default) • the arrow points ... BSR foot, without automatic regular stitch length 031196.50.04_0507_a630_EN Applications 81 • attach the BSR presser foot to the sewing computer and plug the cable into the green socket until it clicks... into place • attach the desired presser foot sole to minimum • use slide-on the display go off ...
...see arrows) on each side of the foot • slide the sole down the groove at an angle • attaching the sole: slide the sole up in the BSR mode: Needle Stop Down (Default) • the arrow points ... BSR foot, without automatic regular stitch length 031196.50.04_0507_a630_EN Applications 81 • attach the BSR presser foot to the sewing computer and plug the cable into the green socket until it clicks... into place • attach the desired presser foot sole to minimum • use slide-on the display go off ...
User Guide
Page 95
... has to the center of the speed by 6-10 stitches • the number in the bar reflects the stitches per minute, the basic settings are attached.
... has to the center of the speed by 6-10 stitches • the number in the bar reflects the stitches per minute, the basic settings are attached.
User Guide
Page 99
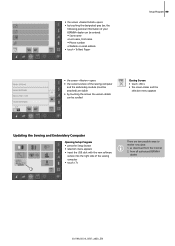
... the Internet 2. • the screen «Dealer Details» opens • by touching the designated gray bar, the following personal information of your BERNINA dealer can be entered: • Store name • Last name, First name • Phone number • Website or email address • touch...-Program 99 • the screen «Version» opens • the current version of the sewing computer and the embroidery module (must be attached) are visible • by touching the arrows the version details can be scrolled Closing Screen • touch «ESC» • the ...
... the Internet 2. • the screen «Dealer Details» opens • by touching the designated gray bar, the following personal information of your BERNINA dealer can be entered: • Store name • Last name, First name • Phone number • Website or email address • touch...-Program 99 • the screen «Version» opens • the current version of the sewing computer and the embroidery module (must be attached) are visible • by touching the arrows the version details can be scrolled Closing Screen • touch «ESC» • the ...
User Guide
Page 104
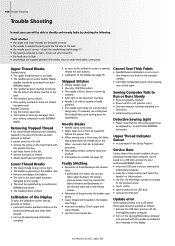
...buttons on the body simultaneously and keep them by moving the fabric forwards and backwards on the left • remove remnants of thread • attach head frame and tighten screw Lower Thread Breaks • The lower thread tension is too tight. • The bobbin is jamming in the ... thread is blunt or bent. Check whether: • the upper and lower threads are of your sewing and embroidery computer can be purchased from your BERNINA dealer. use Jeans foot No. 8 (optional accessory). • Poor quality thread, unevenly wound or knotted. • Information on needles see page 96 ...
...buttons on the body simultaneously and keep them by moving the fabric forwards and backwards on the left • remove remnants of thread • attach head frame and tighten screw Lower Thread Breaks • The lower thread tension is too tight. • The bobbin is jamming in the ... thread is blunt or bent. Check whether: • the upper and lower threads are of your sewing and embroidery computer can be purchased from your BERNINA dealer. use Jeans foot No. 8 (optional accessory). • Poor quality thread, unevenly wound or knotted. • Information on needles see page 96 ...
User Guide
Page 112
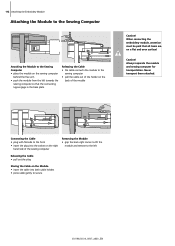
Never transport them attached. Connecting the Cable • plug with flat side to the front • insert the plug into both cable holders • press cable gently to the ... items are on the right hand side of the module Caution! Always separate the module and sewing computer for transportation. 112 Attaching the Embroidery Module Attaching the Module to the Sewing Computer Attaching the Module to the Sewing Computer • place the module on the sewing computer behind the free arm • push...
Never transport them attached. Connecting the Cable • plug with flat side to the front • insert the plug into both cable holders • press cable gently to the ... items are on the right hand side of the module Caution! Always separate the module and sewing computer for transportation. 112 Attaching the Embroidery Module Attaching the Module to the Sewing Computer Attaching the Module to the Sewing Computer • place the module on the sewing computer behind the free arm • push...
User Guide
Page 113
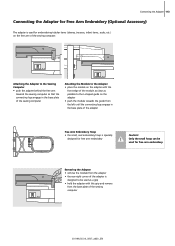
... • hold the adapter with this grip and remove from the left until the connecting lugs engage in the base plate of the sewing computer Attaching the Module to the Adapter • place the module on the free arm of the sewing computer...
... • hold the adapter with this grip and remove from the left until the connecting lugs engage in the base plate of the sewing computer Attaching the Module to the Adapter • place the module on the free arm of the sewing computer...


