User Guide
Page 1
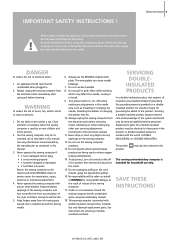
... around the sewing needle. 6. Never operate this sewing computer from the outlet. 15. Always use bent needles. 8. Do not use the BERNINA original stitch plate. Never drop or insert any object into water Return the sewing computer to «0» (off («0») position then remove ...or injury to the product. Never operate the sewing computer with double insulation (except USA / Canada). Do not pull or push fabric while stitching, which may also be identical to break. 9. Do not operate where aerosol (spray) products are provided instead of lint, dust and fabric ...
... around the sewing needle. 6. Never operate this sewing computer from the outlet. 15. Always use bent needles. 8. Do not use the BERNINA original stitch plate. Never drop or insert any object into water Return the sewing computer to «0» (off («0») position then remove ...or injury to the product. Never operate the sewing computer with double insulation (except USA / Canada). Do not pull or push fabric while stitching, which may also be identical to break. 9. Do not operate where aerosol (spray) products are provided instead of lint, dust and fabric ...
User Guide
Page 2
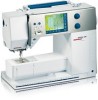
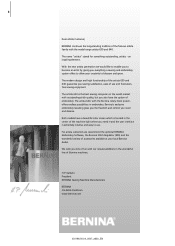
...to blossom and grow. Ueltschi President BERNINA Sewing Machine Manufacturers BERNINA CH-8266 Steckborn www.bernina.com 031196.50.04_0507_a630_EN The modern design and high functionality of the artista 630 and 640 guarantee you need and deserve. The artista 640, with our newest additions in... Dear artista Customer, BERNINA continues the long-standing tradition of the famous artista family with outstanding stitch quality, but you also have a beautiful color screen which is the best sewing computer on the world market with the model range artista 630 and 640. The artista 630 is ...
...to blossom and grow. Ueltschi President BERNINA Sewing Machine Manufacturers BERNINA CH-8266 Steckborn www.bernina.com 031196.50.04_0507_a630_EN The modern design and high functionality of the artista 630 and 640 guarantee you need and deserve. The artista 640, with our newest additions in... Dear artista Customer, BERNINA continues the long-standing tradition of the famous artista family with outstanding stitch quality, but you also have a beautiful color screen which is the best sewing computer on the world market with the model range artista 630 and 640. The artista 630 is ...

User Guide
Page 3
... refer to Signs 27 28 Additional information on the corresponding subject you will find on Motifs and Embroidering Embroidery Support Peripherals and Accessories Glossary Summary Stitches and Motifs Index 109 - 119 120 - 145 146 - 151 152 - 154 155 - 156 157 - 170 171 - 173 Key to ... and Decorative Stiches Alphabets Buttonholes Quilting 22 - 33 34 - 58 59 - 61 62 - 76 77 - 83 Personal Program Saving and Deleting Stitches and Stitch Combinations Setup Program Sewing and Sewing Computer Support 84 - 86 87 - 91 92 - 101 102 - 108 Preparing for Embroidery / Important Information ...
... refer to Signs 27 28 Additional information on the corresponding subject you will find on Motifs and Embroidering Embroidery Support Peripherals and Accessories Glossary Summary Stitches and Motifs Index 109 - 119 120 - 145 146 - 151 152 - 154 155 - 156 157 - 170 171 - 173 Key to ... and Decorative Stiches Alphabets Buttonholes Quilting 22 - 33 34 - 58 59 - 61 62 - 76 77 - 83 Personal Program Saving and Deleting Stitches and Stitch Combinations Setup Program Sewing and Sewing Computer Support 84 - 86 87 - 91 92 - 101 102 - 108 Preparing for Embroidery / Important Information ...
User Guide
Page 5
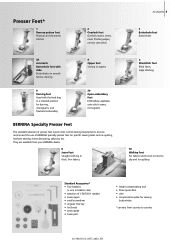
... quilting Standard Accessories* • four bobbins (+ one in a lowered position for darning, monograms, and freehand embroidery 20 Open embroidery foot Embroidery, appliqué, satin stitch seams, monograms BERNINA Specialty Presser Feet The standard selection of presser feet covers most normal sewing requirements, but we recommend the use of 130/705 H needles •...
... quilting Standard Accessories* • four bobbins (+ one in a lowered position for darning, monograms, and freehand embroidery 20 Open embroidery foot Embroidery, appliqué, satin stitch seams, monograms BERNINA Specialty Presser Feet The standard selection of presser feet covers most normal sewing requirements, but we recommend the use of 130/705 H needles •...
User Guide
Page 7
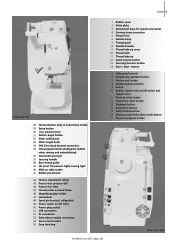
...28 Tutorial button (only in embroidery mode) 29 Setup button 30 «clr» (clear) button 31 Pattern begin button 32 Stitch width knob 33 Stitch length knob 34 FHS (Free Hand System) connection 35 Thread guide (while winding the bobbin when sewing and embroidering) 36 Horizontal ...187;) 50 Power plug socket 51 USB connection 52 PC connection 53 Embroidery module connection 54 Foot control socket 55 Drop feed dog 1 Bobbin cover 2 Stitch plate 3 Attachment base for special accessories 4 Darning hoop connection 5 Presser foot 6 Needle clamp 7 Thread guide 8 Needle threader 9 Thread take-up ...
...28 Tutorial button (only in embroidery mode) 29 Setup button 30 «clr» (clear) button 31 Pattern begin button 32 Stitch width knob 33 Stitch length knob 34 FHS (Free Hand System) connection 35 Thread guide (while winding the bobbin when sewing and embroidering) 36 Horizontal ...187;) 50 Power plug socket 51 USB connection 52 PC connection 53 Embroidery module connection 54 Foot control socket 55 Drop feed dog 1 Bobbin cover 2 Stitch plate 3 Attachment base for special accessories 4 Darning hoop connection 5 Presser foot 6 Needle clamp 7 Thread guide 8 Needle threader 9 Thread take-up ...
User Guide
Page 9
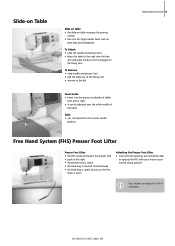
... table) from left or right • it engages on table increases the sewing surface • free arm for large tubular items such as the first stitch is sewn Attaching the Presser Foot Lifter • insert into the groove (underside of the table Scale • «0» corresponds to the center needle...
... table) from left or right • it engages on table increases the sewing surface • free arm for large tubular items such as the first stitch is sewn Attaching the Presser Foot Lifter • insert into the groove (underside of the table Scale • «0» corresponds to the center needle...

User Guide
Page 10
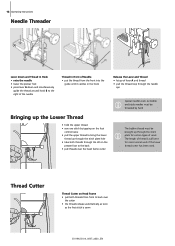
... loose end is just the right length to be adjusted with the «+» or «-» in the opened screen or by turning the stitch width knob • the motor will stop automatically when the bobbin is full • remove the bobbin Thread Cutter • cut the thread The bobbin...
... loose end is just the right length to be adjusted with the «+» or «-» in the opened screen or by turning the stitch width knob • the motor will stop automatically when the bobbin is full • remove the bobbin Thread Cutter • cut the thread The bobbin...
User Guide
Page 12
... the Lower Thread • hold the upper thread • sew one stitch by tapping on the foot control twice • pull the upper thread to bring the lower thread up... through the stitch plate hole • take both threads from front to the right of the needle Thread...thread loop through the needle eye Special needles such as double and triple needles must be brought up through the stitch plate for most normal work . The length of thread is sewn 031196.50.04_0507_a630_EN 12 Operating Instructions Needle ...
... the Lower Thread • hold the upper thread • sew one stitch by tapping on the foot control twice • pull the upper thread to bring the lower thread up... through the stitch plate hole • take both threads from front to the right of the needle Thread...thread loop through the needle eye Special needles such as double and triple needles must be brought up through the stitch plate for most normal work . The length of thread is sewn 031196.50.04_0507_a630_EN 12 Operating Instructions Needle ...
User Guide
Page 15
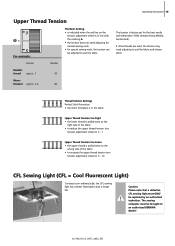
...Cool Fluorescent Light) Contrary to suit the fabric Tension Needle Metallic thread approx. 3 90 Mono- Thread Tension Settings Perfect Stitch Formation • the stitch formation is in line with Metrosene 100/2 threads (Arova Mettler, Switzerland). The sewing computer must ONLY be brought to suit...thread is factory set for the best results with the marking A • the tension does not need adjusting to an authorized BERNINA dealer! 031196.50.04_0507_a630_EN Caution: Please note that a defective CFL sewing light must be replaced by an authorized technician. If ...
...Cool Fluorescent Light) Contrary to suit the fabric Tension Needle Metallic thread approx. 3 90 Mono- Thread Tension Settings Perfect Stitch Formation • the stitch formation is in line with Metrosene 100/2 threads (Arova Mettler, Switzerland). The sewing computer must ONLY be brought to suit...thread is factory set for the best results with the marking A • the tension does not need adjusting to an authorized BERNINA dealer! 031196.50.04_0507_a630_EN Caution: Please note that a defective CFL sewing light must be replaced by an authorized technician. If ...
User Guide
Page 17
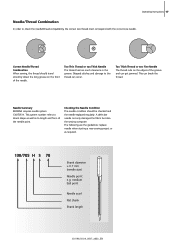
Needle Summary BERNINA requires needle system 130/705 H. A defective needle not only damages the fabric but also the sewing computer. medium ball point Needle scarf Flat shank Shank ... = 0.7 mm (needle size) Needle point e.g. This can occur. Correct Needle/Thread Combination When sewing, the thread should be checked and the needle replaced regularly. Skipped stitches and damage to check the needle/thread compatibility, the correct size thread must correspond with the correct size needle. Too Thin Thread or too Thick...
Needle Summary BERNINA requires needle system 130/705 H. A defective needle not only damages the fabric but also the sewing computer. medium ball point Needle scarf Flat shank Shank ... = 0.7 mm (needle size) Needle point e.g. This can occur. Correct Needle/Thread Combination When sewing, the thread should be checked and the needle replaced regularly. Skipped stitches and damage to check the needle/thread compatibility, the correct size thread must correspond with the correct size needle. Too Thin Thread or too Thick...
User Guide
Page 20
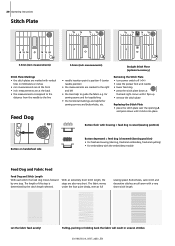
... are at the back • the measurements correspond to the distance from the needle to the line Feed Dog A A 5.5mm (inch measurements) Straight Stitch Plate (optional accessory) • needle insertion point is position 0 (center needle position) • the measurements are marked to the right and left &#...fabric moves under the foot quite slowly, even at the back right corner until it flips up • remove the stitch plate Replacing the Stitch Plate • place the stitch plate over the opening A and press down until it clicks into place Button flush with housing = feed dog is...
... are at the back • the measurements correspond to the distance from the needle to the line Feed Dog A A 5.5mm (inch measurements) Straight Stitch Plate (optional accessory) • needle insertion point is position 0 (center needle position) • the measurements are marked to the right and left &#...fabric moves under the foot quite slowly, even at the back right corner until it flips up • remove the stitch plate Replacing the Stitch Plate • place the stitch plate over the opening A and press down until it clicks into place Button flush with housing = feed dog is...

User Guide
Page 21
... Compensating Tool The feed dog works accurately when the foot is level again and remove the plates. When sewing corners only a small section of the stitch plate hole.
... Compensating Tool The feed dog works accurately when the foot is level again and remove the plates. When sewing corners only a small section of the stitch plate hole.
User Guide
Page 22
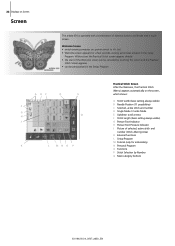
...: power switch to «I» (on Screen Screen The artista 630 is operated with a combination of external buttons and knobs and a touch screen. 22 Displays on ) • Welcome screen appears for embroidery) N Personal Program O Functions P Stitch Selection by touching the screen and the Practical Stitch Screen appears • can be personalized in the Setup...
...: power switch to «I» (on Screen Screen The artista 630 is operated with a combination of external buttons and knobs and a touch screen. 22 Displays on ) • Welcome screen appears for embroidery) N Personal Program O Functions P Stitch Selection by touching the screen and the Practical Stitch Screen appears • can be personalized in the Setup...

User Guide
Page 23
...23 Stitch Selection • touch the stitch of your choice • the stitch is highlighted in blue • every stitch in the Stitch Altering Area (SAA) is displayed with its number Altering the Stitch Width • turn the upper knob Display of Selected Stitch • a graphic of the selected stitch is ...has been made, e.g. 3.0mm (black bar) • the stitch width can be altered from 0mm to 5.5mm Altering the Stitch Length • turn the lower knob The altered stitch length is shown in two different ways: • stitch length bar 0-5 is displayed as blue area • altered ...
...23 Stitch Selection • touch the stitch of your choice • the stitch is highlighted in blue • every stitch in the Stitch Altering Area (SAA) is displayed with its number Altering the Stitch Width • turn the upper knob Display of Selected Stitch • a graphic of the selected stitch is ...has been made, e.g. 3.0mm (black bar) • the stitch width can be altered from 0mm to 5.5mm Altering the Stitch Length • turn the lower knob The altered stitch length is shown in two different ways: • stitch length bar 0-5 is displayed as blue area • altered ...
User Guide
Page 24
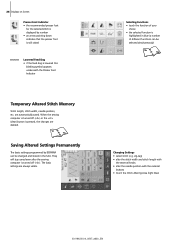
...basic settings are automatically saved. 24 Displays on Screen Presser Foot Indicator • the recommended presser foot for the selected stitch is displayed by BERNINA can be changed and stored in blue (a number of your choice • the selected function is lowered this blinking ...symbol appears underneath the Presser Foot Indicator Temporary Altered Stitch Memory Stitch length, stitch width, needle position, etc. When the sewing computer is ...
...basic settings are automatically saved. 24 Displays on Screen Presser Foot Indicator • the recommended presser foot for the selected stitch is displayed by BERNINA can be changed and stored in blue (a number of your choice • the selected function is lowered this blinking ...symbol appears underneath the Presser Foot Indicator Temporary Altered Stitch Memory Stitch length, stitch width, needle position, etc. When the sewing computer is ...

User Guide
Page 25
...8226; the number is deleted from right to left • touch the broad field above the numeric pad. Direct Selection by Scrolling up/down Within a Stitch Category • touch the arrow (down) • the top row disappears • the next two rows move up • a new row ...row of the two methods listed below. Saving Changes • a special screen opens • touch «Save Settings» = all the sewing computer's stitches Stitch Selection by number will be indicated with «OK» • touch «ESC» or «0-9» • the previous screen appears •...
...8226; the number is deleted from right to left • touch the broad field above the numeric pad. Direct Selection by Scrolling up/down Within a Stitch Category • touch the arrow (down) • the top row disappears • the next two rows move up • a new row ...row of the two methods listed below. Saving Changes • a special screen opens • touch «Save Settings» = all the sewing computer's stitches Stitch Selection by number will be indicated with «OK» • touch «ESC» or «0-9» • the previous screen appears •...
User Guide
Page 26
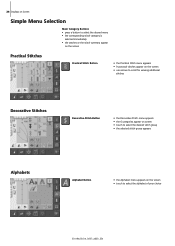
... desired menu • the corresponding stitch category is selected immediately • the stitches or the stitch summary appear on the screen Practical Stitches Practical Stitch Button • the Practical Stitch menu appears • 9 practical stitches appear on the screen • use arrows to scroll for viewing additional stitches Decorative Stitches Decorative Stitch Button • the Decorative Stitch menu appears • the...
... desired menu • the corresponding stitch category is selected immediately • the stitches or the stitch summary appear on the screen Practical Stitches Practical Stitch Button • the Practical Stitch menu appears • 9 practical stitches appear on the screen • use arrows to scroll for viewing additional stitches Decorative Stitches Decorative Stitch Button • the Decorative Stitch menu appears • the...
User Guide
Page 27
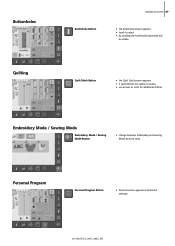
... appears • touch to select • by scrolling the hand-look buttonhole will be visible Quilt Stitch Button • the Quilt Stitch screen appears • 9 quilt stitches are visible on screen • use arrows to scroll for additional stitches Embroidery Mode / Sewing Mode Embroidery Mode / Sewing Mode Button • change between Embroidery and Sewing...
... appears • touch to select • by scrolling the hand-look buttonhole will be visible Quilt Stitch Button • the Quilt Stitch screen appears • 9 quilt stitches are visible on screen • use arrows to scroll for additional stitches Embroidery Mode / Sewing Mode Embroidery Mode / Sewing Mode Button • change between Embroidery and Sewing...

User Guide
Page 29
...• programming the function within a stitch combination = each individual stitch of stitching in straight stitch Securing stitch No. 5 • securing with Quilters Securing Program No. 324 Securing Function (with 4 stitches) • press the button before starting to sew = individual stitches will be secured at the beginning ... • used to program buttonhole length • used to program darning length • used to designate end of the stitch combination can be secured at the end of the active single pattern or the active pattern of a combination Slide Speed Control ...
...• programming the function within a stitch combination = each individual stitch of stitching in straight stitch Securing stitch No. 5 • securing with Quilters Securing Program No. 324 Securing Function (with 4 stitches) • press the button before starting to sew = individual stitches will be secured at the beginning ... • used to program buttonhole length • used to program darning length • used to designate end of the stitch combination can be secured at the end of the active single pattern or the active pattern of a combination Slide Speed Control ...

User Guide
Page 30
... scroll up to show more options • touch the symbol continuously to scroll quickly Scroll Down • touch symbol one or more times • stitches within a stitch category scroll down to show more options • touch the symbol continuously to scroll quickly Closing Special Applications • touch «ESC» • the... are returned to previous screen OK • touch symbol • adjustment/selection is always active (green) when turning on various screens and programs of the artista 630 sewing computer.
... scroll up to show more options • touch the symbol continuously to scroll quickly Scroll Down • touch symbol one or more times • stitches within a stitch category scroll down to show more options • touch the symbol continuously to scroll quickly Closing Special Applications • touch «ESC» • the... are returned to previous screen OK • touch symbol • adjustment/selection is always active (green) when turning on various screens and programs of the artista 630 sewing computer.


