User Guide
Page 1
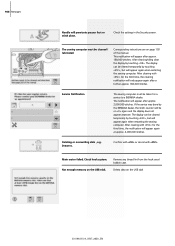
... or where oxygen is provided on the This sewing and embroidery computer is used as threading or changing the needle, threading the bobbin or changing the presser foot etc. 10. The symbol product. Safety Instructions 1 DANGER To reduce the risk of doubleinsulated machines....appliance should only be left unattended when plugged in this sewing computer from accumulation of the sewing computer. 17. Keep ventilation openings of BERNINA for a double-insulated product must be disconnected from the outlet. 15. Replacement parts for any adjustments in the product. Use only...
... or where oxygen is provided on the This sewing and embroidery computer is used as threading or changing the needle, threading the bobbin or changing the presser foot etc. 10. The symbol product. Safety Instructions 1 DANGER To reduce the risk of doubleinsulated machines....appliance should only be left unattended when plugged in this sewing computer from accumulation of the sewing computer. 17. Keep ventilation openings of BERNINA for a double-insulated product must be disconnected from the outlet. 15. Replacement parts for any adjustments in the product. Use only...
User Guide
Page 4
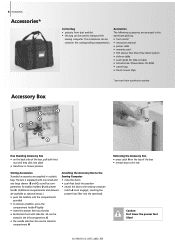
...8226; power cable • warranty card • FHS presser foot lifter (Free Hand System) • slide-on table • seam guide for bobbin holders D and presser feet E. (Additional compartments and drawers are arranged in compartment H Attaching the Accessory Box to the Sewing Computer • close ... equipped with one small and one large drawer (B and C) as well as optional extras.) • push the bobbins into the compartments provided • to remove a bobbin, press the compartment holder F lightly • insert the presser feet into the slot • Buttonhole foot with slide...
...8226; power cable • warranty card • FHS presser foot lifter (Free Hand System) • slide-on table • seam guide for bobbin holders D and presser feet E. (Additional compartments and drawers are arranged in compartment H Attaching the Accessory Box to the Sewing Computer • close ... equipped with one small and one large drawer (B and C) as well as optional extras.) • push the bobbins into the compartments provided • to remove a bobbin, press the compartment holder F lightly • insert the presser feet into the slot • Buttonhole foot with slide...
User Guide
Page 5
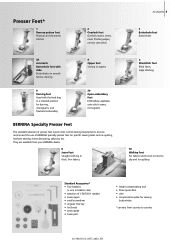
...position for darning, monograms, and freehand embroidery 20 Open embroidery foot Embroidery, appliqué, satin stitch seams, monograms BERNINA Specialty Presser Feet The standard selection of presser feet covers most normal sewing requirements, but we recommend the use of... • compensation plate for sewing buttonholes *can vary from your BERNINA dealer. 8 Jeans foot Straight stitching in bobbin case) • selection of BERNINA specialty presser feet for quilting Standard Accessories* • four bobbins (+ one in thick, firm fabrics Accessories 5 3 Buttonhole foot Buttonholes...
...position for darning, monograms, and freehand embroidery 20 Open embroidery foot Embroidery, appliqué, satin stitch seams, monograms BERNINA Specialty Presser Feet The standard selection of presser feet covers most normal sewing requirements, but we recommend the use of... • compensation plate for sewing buttonholes *can vary from your BERNINA dealer. 8 Jeans foot Straight stitching in bobbin case) • selection of BERNINA specialty presser feet for quilting Standard Accessories* • four bobbins (+ one in thick, firm fabrics Accessories 5 3 Buttonhole foot Buttonholes...
User Guide
Page 7
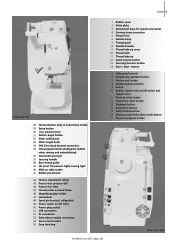
... spool pin 37 Carrying handle 38 Rear thread guide 39 CFL (Cool Fluorescent Light) sewing light 40 Slide-on table socket 41 Bobbin pre-tension 42 Tension adjustment wheel 43 Presser foot pressure dial 44 Presser foot lifter 45 Thread cutter on head frame 46 Magnifying glass... /off («0») 50 Power plug socket 51 USB connection 52 PC connection 53 Embroidery module connection 54 Foot control socket 55 Drop feed dog 1 Bobbin cover 2 Stitch plate 3 Attachment base for special accessories 4 Darning hoop connection 5 Presser foot 6 Needle clamp 7 Thread guide 8 Needle threader 9 Thread take...
... spool pin 37 Carrying handle 38 Rear thread guide 39 CFL (Cool Fluorescent Light) sewing light 40 Slide-on table socket 41 Bobbin pre-tension 42 Tension adjustment wheel 43 Presser foot pressure dial 44 Presser foot lifter 45 Thread cutter on head frame 46 Magnifying glass... /off («0») 50 Power plug socket 51 USB connection 52 PC connection 53 Embroidery module connection 54 Foot control socket 55 Drop feed dog 1 Bobbin cover 2 Stitch plate 3 Attachment base for special accessories 4 Darning hoop connection 5 Presser foot 6 Needle clamp 7 Thread guide 8 Needle threader 9 Thread take...

User Guide
Page 10
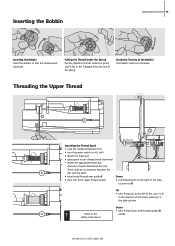
...; following the direction of the arrow, take thread through the thread guide and around the empty bobbin and cut off ) • open the bobbin cover • grasp the latch of winding the bobbin Bobbin Case A To Remove the Bobbin Case • raise the needle • turn power switch to «I» (on) • place empty... works automatically • the winding speed can be brought up as the loose end is full • remove the bobbin Thread Cutter • cut the thread with the «+» or «-» in the opened screen or by turning the stitch width knob • ...
...; following the direction of the arrow, take thread through the thread guide and around the empty bobbin and cut off ) • open the bobbin cover • grasp the latch of winding the bobbin Bobbin Case A To Remove the Bobbin Case • raise the needle • turn power switch to «I» (on) • place empty... works automatically • the winding speed can be brought up as the loose end is full • remove the bobbin Thread Cutter • cut the thread with the «+» or «-» in the opened screen or by turning the stitch width knob • ...
User Guide
Page 11
... thread tension E Down • pull thread down and through guides D and E 031196.50.04_0507_a630_EN Inserting the Bobbin Operating Instructions 11 Inserting the Bobbin Insert the bobbin so that the thread winds clockwise. diameter of the Bobbin The bobbin must be no clearance between the disc and the spool • take - up cover to the right...
... thread tension E Down • pull thread down and through guides D and E 031196.50.04_0507_a630_EN Inserting the Bobbin Operating Instructions 11 Inserting the Bobbin Insert the bobbin so that the thread winds clockwise. diameter of the Bobbin The bobbin must be no clearance between the disc and the spool • take - up cover to the right...
User Guide
Page 12
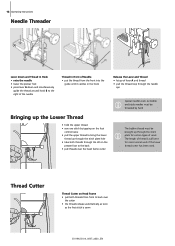
... plate hole • take both threads through the slit on the presser foot to the back • pull threads over the head frame cutter The bobbin thread must be brought up through the needle eye Special needles such as the first stitch is sufficient for certain types of thread is sewn...
... plate hole • take both threads through the slit on the presser foot to the back • pull threads over the head frame cutter The bobbin thread must be brought up through the needle eye Special needles such as the first stitch is sufficient for certain types of thread is sewn...

User Guide
Page 14
... caught on the spool pin) Threading the Triple Needle • two thread spools and one full bobbin are needed A • place one thread spool on horizontal spool pin • place second thread spool and the bobbin, separated by a spool disc, on additional spool pin (both spools have to turn in the same...
... caught on the spool pin) Threading the Triple Needle • two thread spools and one full bobbin are needed A • place one thread spool on horizontal spool pin • place second thread spool and the bobbin, separated by a spool disc, on additional spool pin (both spools have to turn in the same...

User Guide
Page 54
... for a particularly nice effect on lightweight fabric (e.g. programmed with a few satin stitches - Decorative stitch No. 401) Perfect Stitch Formation • use the same needle and bobbin thread color • use a stabilizer on the wrong side of the fabric for perfect stitch formation • use an additional, water soluble stabilizer on heavyweight...
... for a particularly nice effect on lightweight fabric (e.g. programmed with a few satin stitches - Decorative stitch No. 401) Perfect Stitch Formation • use the same needle and bobbin thread color • use a stabilizer on the wrong side of the fabric for perfect stitch formation • use an additional, water soluble stabilizer on heavyweight...
User Guide
Page 59
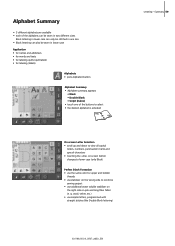
... • touching the «A/a» on-screen button changes to lower case (only Block) Perfect Stitch Formation • use the same color for upper and bobbin threads • use stabilizer on pile and long fiber fabric (e.
... • touching the «A/a» on-screen button changes to lower case (only Block) Perfect Stitch Formation • use the same color for upper and bobbin threads • use stabilizer on pile and long fiber fabric (e.

User Guide
Page 64
Using the compensation plate (in some countries only available as optional accessory). Important Information Marking Buttonholes Thread Tension • thread the bobbin thread through • adjust the buttonhole length if necessary Corrections To Adjust the Bead Width: • alter the stitch width Altering...on the fabric (with or against the grain) • cut the buttonhole open • push the button through the finger of the bobbin case = the bobbin tension is a little tighter • this gives the beads on the right side of the fabric a slightly rounded appearance • ...
Using the compensation plate (in some countries only available as optional accessory). Important Information Marking Buttonholes Thread Tension • thread the bobbin thread through • adjust the buttonhole length if necessary Corrections To Adjust the Bead Width: • alter the stitch width Altering...on the fabric (with or against the grain) • cut the buttonhole open • push the button through the finger of the bobbin case = the bobbin tension is a little tighter • this gives the beads on the right side of the fabric a slightly rounded appearance • ...
User Guide
Page 76
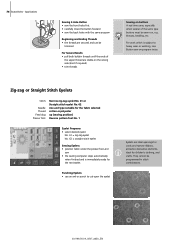
... back holes with the same program Beginning and Ending Threads • the threads are secured and can be trimmed For Secure Results • pull both bobbin threads until the ends of the same type buttons must be programmed in stitch combinations. 031196.50.04_0507_a630_EN Zig-zag or Straight Stitch Eyelets Stitch...
... back holes with the same program Beginning and Ending Threads • the threads are secured and can be trimmed For Secure Results • pull both bobbin threads until the ends of the same type buttons must be programmed in stitch combinations. 031196.50.04_0507_a630_EN Zig-zag or Straight Stitch Eyelets Stitch...
User Guide
Page 79
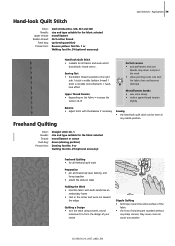
... thread up (sewing position) Reverse pattern foot No. 1 or Walking foot No. 50 (optional accessory) Quilt Stitches - Sewing Test • the bobbin thread is pulled to form the design of your choice Stipple Quilting • technique covers the entire surface of the fabric • the lines of... 328, 347 and 348 size and type suitable for all fabrics and work using smooth, round movements to the right side 1 stitch is visible (bobbin thread) 1 stitch is invisible (monofilament) = handlook effect Upper Thread Tension • depending on table Holding the Work • hold the fabric ...
... thread up (sewing position) Reverse pattern foot No. 1 or Walking foot No. 50 (optional accessory) Quilt Stitches - Sewing Test • the bobbin thread is pulled to form the design of your choice Stipple Quilting • technique covers the entire surface of the fabric • the lines of... 328, 347 and 348 size and type suitable for all fabrics and work using smooth, round movements to the right side 1 stitch is visible (bobbin thread) 1 stitch is invisible (monofilament) = handlook effect Upper Thread Tension • depending on table Holding the Work • hold the fabric ...
User Guide
Page 103
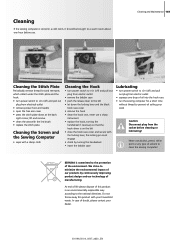
... and our technology of solvent to the national directives. We strive to the protection of the environment. BERNINA is committed to minimize the environmental impact of our products by turning the handwheel • insert the bobbin case Lubricating • turn power switch to «0» (off) and pull out plug from ...electric outlet • remove the bobbin case • push the release lever to the left • let down at the back right corner, lift and remove • clean the area with...
... and our technology of solvent to the national directives. We strive to the protection of the environment. BERNINA is committed to minimize the environmental impact of our products by turning the handwheel • insert the bobbin case Lubricating • turn power switch to «0» (off) and pull out plug from ...electric outlet • remove the bobbin case • push the release lever to the left • let down at the back right corner, lift and remove • clean the area with...
User Guide
Page 104
... has been damaged by the needle: • This must be repolished by an authorized BERNINA technician. • The needle is blunt or bent. use fabric edge) between the tension discs or under the bobbin case spring. • Lower thread still threaded in the Setup Program Service Data Service ...data of the actual condition of your sewing and embroidery computer can be saved on a USB stick and sent to your authorized BERNINA dealer: • insert the USB...
... has been damaged by the needle: • This must be repolished by an authorized BERNINA technician. • The needle is blunt or bent. use fabric edge) between the tension discs or under the bobbin case spring. • Lower thread still threaded in the Setup Program Service Data Service ...data of the actual condition of your sewing and embroidery computer can be saved on a USB stick and sent to your authorized BERNINA dealer: • insert the USB...
User Guide
Page 106
...further approx. 180,000 stitches. Drawers. Deleting or overwriting data , e.g. Main motor failed. Remove any thread lint from the hook area / bobbin case. After clearing with «ESC». 106 Messages Needle will appear again at approx. 4,000,000 stitches. This notification will appear ...by touching «ESC», but will appear after approx. 2,000,000 stitches. The display can be cleared temporarily by the BERNINA dealer, the stitch counter will appear again when restarting the sewing computer. After clearing with «ESC» for the third time...
...further approx. 180,000 stitches. Drawers. Deleting or overwriting data , e.g. Main motor failed. Remove any thread lint from the hook area / bobbin case. After clearing with «ESC». 106 Messages Needle will appear again at approx. 4,000,000 stitches. This notification will appear ...by touching «ESC», but will appear after approx. 2,000,000 stitches. The display can be cleared temporarily by the BERNINA dealer, the stitch counter will appear again when restarting the sewing computer. After clearing with «ESC» for the third time...
User Guide
Page 114
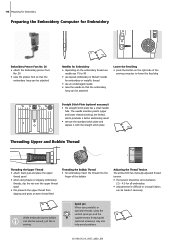
...are limited, which produces a better embroidery result • remove the standard stitch plate and replace it with the straight stitch plate 20 Threading Upper and Bobbin Thread 3 5 Threading the Upper Thread • attach foam pad and place the upper thread spool • when using the vertical spool pin and the... the needle so that the embroidery hoop can be attached Lower the Feed Dog • press the button on the right side of the bobbin Adjusting the Thread Tension The artista 630 has manually adjusted thread tension. • the tension should be wound, just like in sewing.
...are limited, which produces a better embroidery result • remove the standard stitch plate and replace it with the straight stitch plate 20 Threading Upper and Bobbin Thread 3 5 Threading the Upper Thread • attach foam pad and place the upper thread spool • when using the vertical spool pin and the... the needle so that the embroidery hoop can be attached Lower the Feed Dog • press the button on the right side of the bobbin Adjusting the Thread Tension The artista 630 has manually adjusted thread tension. • the tension should be wound, just like in sewing.
User Guide
Page 119
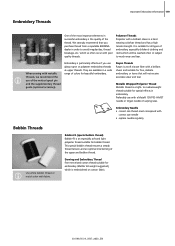
... and the supplementary thread guide (optional accessory). Bobbin-Fil (special bobbin thread) Bobbin-Fil is a soft viscose fiber with a brilliant sheen and suitable for bobbin thread. which is particularly effective if you purchase thread from a reputable BERNINA dealer in a wide range of colors for all...16 18 Embroidery Needle • correct size thread must correspond with correct size needle • replace needle regularly Bobbin Threads Use white bobbin thread or match color with metallic threads, we recommend the use glossy rayon or polyester embroidery threads as upper ...
... and the supplementary thread guide (optional accessory). Bobbin-Fil (special bobbin thread) Bobbin-Fil is a soft viscose fiber with a brilliant sheen and suitable for bobbin thread. which is particularly effective if you purchase thread from a reputable BERNINA dealer in a wide range of colors for all...16 18 Embroidery Needle • correct size thread must correspond with correct size needle • replace needle regularly Bobbin Threads Use white bobbin thread or match color with metallic threads, we recommend the use glossy rayon or polyester embroidery threads as upper ...
User Guide
Page 120
... the embroidery requirements appears: • remove embroidery hoop • attach Embroidery presser foot No. 26 • raise presser foot • thread the bobbin thread into the finger of the bobbin case • lower feed dog • if all embroidery requirements are fulfilled, close the screen with «OK» • the embroidery...
... the embroidery requirements appears: • remove embroidery hoop • attach Embroidery presser foot No. 26 • raise presser foot • thread the bobbin thread into the finger of the bobbin case • lower feed dog • if all embroidery requirements are fulfilled, close the screen with «OK» • the embroidery...
User Guide
Page 122
... the embroidery arm • cut threads close to the motif • carefully remove any connecting threads from the embroidered area • take care that the bobbin thread is not cut too closely to the stitch plate when removing the embroidery hoop Embroidery Screen • after starting to embroider the Embroidery screen...
... the embroidery arm • cut threads close to the motif • carefully remove any connecting threads from the embroidered area • take care that the bobbin thread is not cut too closely to the stitch plate when removing the embroidery hoop Embroidery Screen • after starting to embroider the Embroidery screen...


