User Guide
Page 2
... Bernina dealer. The artista 640, with the model range artista 630 and 640. H.P. Ueltschi President BERNINA Sewing Machine Manufacturers BERNINA CH-8266 Steckborn www.bernina.com 031196.50.04_0507_a630_EN an inspiring element. Bernina's exclusive embroidery rescaling gives you the freedom and control you everything a sewing and embroidery system offers to blossom and grow. The modern design and high functionality of the artista 630...
... Bernina dealer. The artista 640, with the model range artista 630 and 640. H.P. Ueltschi President BERNINA Sewing Machine Manufacturers BERNINA CH-8266 Steckborn www.bernina.com 031196.50.04_0507_a630_EN an inspiring element. Bernina's exclusive embroidery rescaling gives you the freedom and control you everything a sewing and embroidery system offers to blossom and grow. The modern design and high functionality of the artista 630...

User Guide
Page 29
...• starts and stops the sewing computer when operating it without foot control • starts and stops the sewing/ embroidery computer in the embroidery mode with attached embroidery module • starts and stops the BSR function (optional) when BSR foot is depressed • used to program ...buttonhole length • used to program darning length • used to designate end of a combination Slide Speed Control • the ...
...• starts and stops the sewing computer when operating it without foot control • starts and stops the sewing/ embroidery computer in the embroidery mode with attached embroidery module • starts and stops the BSR function (optional) when BSR foot is depressed • used to program ...buttonhole length • used to program darning length • used to designate end of a combination Slide Speed Control • the ...
User Guide
Page 79
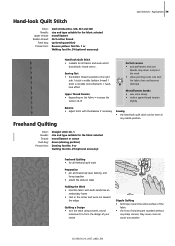
...• attach the slide-on table Holding the Work • hold the fabric with both hands like an embroidery frame • start in the center and work out toward the edges Quilting a Design • turn the work which should look Quilt Stitch Stitch: Needle: Upper thread: Bobbin thread: Feed dog...all fabrics and work using smooth, round movements to the right side 1 stitch is visible (bobbin thread) 1 stitch is pulled to form the design of your choice Stipple Quilting • technique covers the entire surface of the fabric • the lines of stitching are rounded without any sharp ...
...• attach the slide-on table Holding the Work • hold the fabric with both hands like an embroidery frame • start in the center and work out toward the edges Quilting a Design • turn the work which should look Quilt Stitch Stitch: Needle: Upper thread: Bobbin thread: Feed dog...all fabrics and work using smooth, round movements to the right side 1 stitch is visible (bobbin thread) 1 stitch is pulled to form the design of your choice Stipple Quilting • technique covers the entire surface of the fabric • the lines of stitching are rounded without any sharp ...
User Guide
Page 84
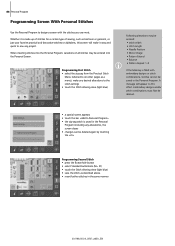
...8226; save the stitch as heirloom or garment, or just your favorite practical and decorative stitches or alphabets, this screen will appear to this effect. Embroidery designs and/or stitch combinations must first be deleted. • a special screen appears • touch the bar «Add to Personal Program» &#... in the Personal Program (including any project. 84 Personal Program Programming Screen With Personal Stitches Use the Personal Program to design a screen with embroidery designs or stitch combinations, stitches cannot be saved in the same manner 031196.50.04_0507_a630_EN
...8226; save the stitch as heirloom or garment, or just your favorite practical and decorative stitches or alphabets, this screen will appear to this effect. Embroidery designs and/or stitch combinations must first be deleted. • a special screen appears • touch the bar «Add to Personal Program» &#... in the Personal Program (including any project. 84 Personal Program Programming Screen With Personal Stitches Use the Personal Program to design a screen with embroidery designs or stitch combinations, stitches cannot be saved in the same manner 031196.50.04_0507_a630_EN
User Guide
Page 99
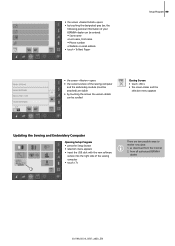
from the Internet 2. • the screen «Dealer Details» opens • by touching the designated gray bar, the following personal information of your BERNINA dealer can be entered: • Store name • Last name, First name • Phone number • Website or email address •... be scrolled Closing Screen • touch «ESC» • the screen closes and the selection menu appears Updating the Sewing and Embroidery Computer Opening Setup Program • press the Setup button • selection menu appears • insert the USB stick with the new software ...
from the Internet 2. • the screen «Dealer Details» opens • by touching the designated gray bar, the following personal information of your BERNINA dealer can be entered: • Store name • Last name, First name • Phone number • Website or email address •... be scrolled Closing Screen • touch «ESC» • the screen closes and the selection menu appears Updating the Sewing and Embroidery Computer Opening Setup Program • press the Setup button • selection menu appears • insert the USB stick with the new software ...
User Guide
Page 101
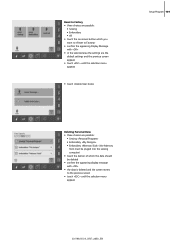
Reset to Factory • three choices are possible: • Sewing • Embroidery • All • touch the on-screen button which you want to «Reset to Factory» • confirm the appearing Display Message with «... «Delete User Data» Setup-Program 101 Deleting Personal Data • three choices are possible: • Sewing «Personal Program» • Embroidery «My Designs» • Embroidery «Memory Stick» (the Memory Stick must be pluged into the sewing computer) • touch the button of which the data should...
Reset to Factory • three choices are possible: • Sewing • Embroidery • All • touch the on-screen button which you want to «Reset to Factory» • confirm the appearing Display Message with «... «Delete User Data» Setup-Program 101 Deleting Personal Data • three choices are possible: • Sewing «Personal Program» • Embroidery «My Designs» • Embroidery «Memory Stick» (the Memory Stick must be pluged into the sewing computer) • touch the button of which the data should...
User Guide
Page 113
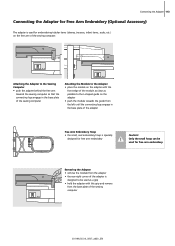
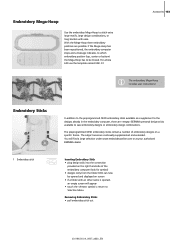
...from the left until the connecting lugs engage in the base plate of the adapter Free Arm Embroidery Hoop • the small, oval embroidery hoop is specially designed for free arm embroidery Caution! Removing the Adapter • remove the module from the adapter • the rear ...right corner of the adapter is designed to be used for free arm embroidery. Connecting the Adapter 113 Connecting the Adapter for Free Arm Embroidery (Optional Accessory) The adapter is used for embroidering tubular items (sleeves, trousers, infant items...
...from the left until the connecting lugs engage in the base plate of the adapter Free Arm Embroidery Hoop • the small, oval embroidery hoop is specially designed for free arm embroidery Caution! Removing the Adapter • remove the module from the adapter • the rear ...right corner of the adapter is designed to be used for free arm embroidery. Connecting the Adapter 113 Connecting the Adapter for Free Arm Embroidery (Optional Accessory) The adapter is used for embroidering tubular items (sleeves, trousers, infant items...
User Guide
Page 120
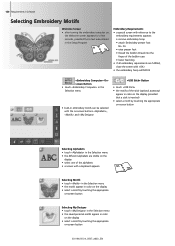
...few seconds, provided that a text was entered in the Setup Program 93 93 Embroidery Requirements • a special screen with reference to the embroidery requirements appears: • remove embroidery hoop • attach Embroidery presser foot No. 26 • raise presser foot • thread the ...; the embroidery hoop will MOVE «Embroidery Computer» Onscreen Button • touch «Embroidery Computer» in the Selection menu • built-in embroidery motifs can be selected with the on-screen buttons «Alphabets», «Motifs» and «My Designs» ...
...few seconds, provided that a text was entered in the Setup Program 93 93 Embroidery Requirements • a special screen with reference to the embroidery requirements appears: • remove embroidery hoop • attach Embroidery presser foot No. 26 • raise presser foot • thread the ...; the embroidery hoop will MOVE «Embroidery Computer» Onscreen Button • touch «Embroidery Computer» in the Selection menu • built-in embroidery motifs can be selected with the on-screen buttons «Alphabets», «Motifs» and «My Designs» ...

User Guide
Page 123
... and Displays of the following functions: «Alphabets», «Motifs» or «My Design» • touch symbol • Selection menu appears Closing Special Applications • this function appears if changing from Sewing to Embroidery Mode, the Selection menu appears. This happens when a motif is selected or combined with an...
... and Displays of the following functions: «Alphabets», «Motifs» or «My Design» • touch symbol • Selection menu appears Closing Special Applications • this function appears if changing from Sewing to Embroidery Mode, the Selection menu appears. This happens when a motif is selected or combined with an...
User Guide
Page 125
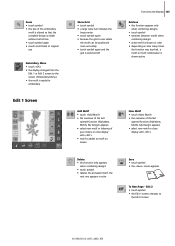
Zoom • touch symbol • the size of the embroidery motif is altered so that the complete design is visible without restrictions • touch symbol again • reverts motif back to original size Embroidery Menu • touch «OK» • the display changes from the Edit 1 or Edit 2 screen to the screen «...
Zoom • touch symbol • the size of the embroidery motif is altered so that the complete design is visible without restrictions • touch symbol again • reverts motif back to original size Embroidery Menu • touch «OK» • the display changes from the Edit 1 or Edit 2 screen to the screen «...
User Guide
Page 127
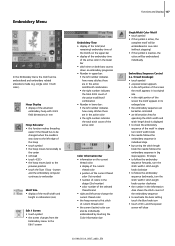
...moves back to reactivate the basic setting touch the blue knob icon • touch «ESC» and the special screen will be embroidered individually Embroidery Sequence Control (i.e. thread breakage) • touch symbol • a special screen appears • in the left arrow change the current thread color &#... • display of the current thread color • position of the current thread color (1st number) • number of colors in the design (2nd number) • color number of the selected thread brand • right and left portion of the screen the motif appears in its ...
...moves back to reactivate the basic setting touch the blue knob icon • touch «ESC» and the special screen will be embroidered individually Embroidery Sequence Control (i.e. thread breakage) • touch symbol • a special screen appears • in the left arrow change the current thread color &#... • display of the current thread color • position of the current thread color (1st number) • number of colors in the design (2nd number) • color number of the selected thread brand • right and left portion of the screen the motif appears in its ...
User Guide
Page 129
... motifs can be either embroidered directly or can be combined with the Zoom function: • touch symbol • the size of the embroidery motif is altered so that the complete design is visible without restrictions • touch symbol again • the motif is also possible to rotate the motifs, to its original...
... motifs can be either embroidered directly or can be combined with the Zoom function: • touch symbol • the size of the embroidery motif is altered so that the complete design is visible without restrictions • touch symbol again • the motif is also possible to rotate the motifs, to its original...

User Guide
Page 132
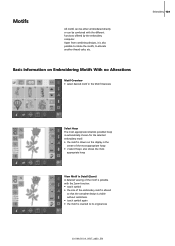
... the motif turn stitch width knob counter clockwise • in the Information Area the alteration is displayed in the embroidery market. Bernina's stitch process engines add correct density in the Edit 1 screen • use the «To Next Page»...of the motif touch the Information Area Bernina's scalable embroidery designs are possible together with the function «Rotate Motif». 132 Embroidery Altering Motifs Mirroring Motifs Each motif can be designed. Combining designs If mirrored and unmirrored designs are combined, particularly attractive effects and ...
... the motif turn stitch width knob counter clockwise • in the Information Area the alteration is displayed in the embroidery market. Bernina's stitch process engines add correct density in the Edit 1 screen • use the «To Next Page»...of the motif touch the Information Area Bernina's scalable embroidery designs are possible together with the function «Rotate Motif». 132 Embroidery Altering Motifs Mirroring Motifs Each motif can be designed. Combining designs If mirrored and unmirrored designs are combined, particularly attractive effects and ...

User Guide
Page 133
...8226; the summary of the last opened on-screen button («Alphabets», «Motifs» and «My Designs») appears • select desired embroidery motif or change to Selection menu» • select desired field, e.g. lettering, in the Selection menu 031196.50.04_0507_a630_EN... • when rescaling, in order to obtain an optimal embroidery result, all motifs in a combination should be chosen for Adjusted Motif Size The most appropriate hoop should be the same size in ...
...8226; the summary of the last opened on-screen button («Alphabets», «Motifs» and «My Designs») appears • select desired embroidery motif or change to Selection menu» • select desired field, e.g. lettering, in the Selection menu 031196.50.04_0507_a630_EN... • when rescaling, in order to obtain an optimal embroidery result, all motifs in a combination should be chosen for Adjusted Motif Size The most appropriate hoop should be the same size in ...
User Guide
Page 134
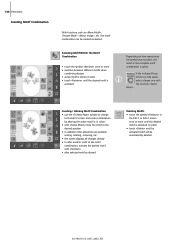
the motif combination can be automatically deleted 031196.50.04_0507_a630_EN 134 Embroidery Creating Motif Combination With functions such as desired. Selecting Motif Within the Motif Combination • touch the symbol «Retrieve» once or more until ... Deleting Motifs • touch the symbol «Retrieve» in the Edit 1 or Edit 2 screen once or more • switches between different motifs when combining designs • active motif is active. If the indicated hoop offers too little space, select a larger one motif or the complete motif combination is shown in...
the motif combination can be automatically deleted 031196.50.04_0507_a630_EN 134 Embroidery Creating Motif Combination With functions such as desired. Selecting Motif Within the Motif Combination • touch the symbol «Retrieve» once or more until ... Deleting Motifs • touch the symbol «Retrieve» in the Edit 1 or Edit 2 screen once or more • switches between different motifs when combining designs • active motif is active. If the indicated hoop offers too little space, select a larger one motif or the complete motif combination is shown in...
User Guide
Page 141
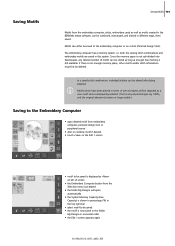
...been altered in terms of screen • the Embroidery Computer button from the Selection menu is activated • the folder My Designs will open desired motif from the embroidery computer, sticks, embroidery cards as well as motifs created in the BERNINA artista software, can be saved • the motif... is now saved in the folder My Designs in numerical order • the Edit ...
...been altered in terms of screen • the Embroidery Computer button from the Selection menu is activated • the folder My Designs will open desired motif from the embroidery computer, sticks, embroidery cards as well as motifs created in the BERNINA artista software, can be saved • the motif... is now saved in the folder My Designs in numerical order • the Edit ...
User Guide
Page 142
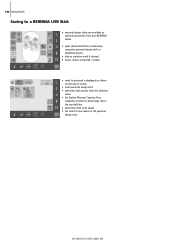
142 Saving Motifs Saving to a BERNINA USB Stick • personal design sticks are available as optional accessories from your BERNINA dealer • open desired motif from embroidery computer, personal design stick or peripheral source • alter or combine motif if desired • touch «Save» in the Edit 1 screen • motif to be saved ...
142 Saving Motifs Saving to a BERNINA USB Stick • personal design sticks are available as optional accessories from your BERNINA dealer • open desired motif from embroidery computer, personal design stick or peripheral source • alter or combine motif if desired • touch «Save» in the Edit 1 screen • motif to be saved ...
User Guide
Page 143
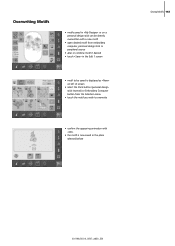
... can be directly overwritten with a new motif • open desired motif from embroidery computer, personal design stick or peripheral source • alter or combine motif if desired • touch «Save» in the Edit 1 screen • motif to be saved ...is displayed as «New» on left of screen • select the Stick button (personal design stick inserted) or Embroidery Computer button from the Selection menu • touch the motif you wish to overwrite • confirm the appearing animation with «OK» •...
... can be directly overwritten with a new motif • open desired motif from embroidery computer, personal design stick or peripheral source • alter or combine motif if desired • touch «Save» in the Edit 1 screen • motif to be saved ...is displayed as «New» on left of screen • select the Stick button (personal design stick inserted) or Embroidery Computer button from the Selection menu • touch the motif you wish to overwrite • confirm the appearing animation with «OK» •...
User Guide
Page 153
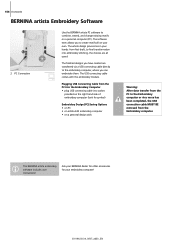
... design sticks available to save embroidery designs or embroidery design combinations. Embroidery Sticks 1 1 Embroidery stick In addition to the preprogrammed OESD embroidery sticks available as a supplement to the designs already in the embroidery computer, there are possible. Inserting Embroidery Stick • plug design stick into the connection provided on the right hand side of embroidery designs on screen • if a folder with ease. For artista 630...
... design sticks available to save embroidery designs or embroidery design combinations. Embroidery Sticks 1 1 Embroidery stick In addition to the preprogrammed OESD embroidery sticks available as a supplement to the designs already in the embroidery computer, there are possible. Inserting Embroidery Stick • plug design stick into the connection provided on the right hand side of embroidery designs on screen • if a folder with ease. For artista 630...
User Guide
Page 154
... BERNINA artista embroidery software includes user instructions! The finished designs you have created are all on your own. Ask your BERNINA dealer for other accessories for your hands: from first draft, to final transformation into socket provided on the right hand side of embroidery computer (look for symbol) Embroidery Design (PC) Saving Options • on PC • on artista 630 embroidery...
... BERNINA artista embroidery software includes user instructions! The finished designs you have created are all on your own. Ask your BERNINA dealer for other accessories for your hands: from first draft, to final transformation into socket provided on the right hand side of embroidery computer (look for symbol) Embroidery Design (PC) Saving Options • on PC • on artista 630 embroidery...


